Page 3956 of 4171
VTL-16
< ON-VEHICLE REPAIR >
HEATER & COOLING UNIT ASSEMBLY
Rear A/C System
NOTE:
Refer to HA-5, "
Precaution for Refrigerant Connection".
Removal and InstallationINFOID:0000000003775269
FRONT HEATER AND COOLING UNIT ASSEMBLY
10. Low-pressure pipe 11. Expansion valve (front)12. Drain hose
13. Dryer & liquid tank 14. Liquid tank bracket 15. Junction pipe
Vehicle front
AWIIA0134GB
1. Rear heater and cooling unit assembly 2. Rear A/C pipes 3. Rear A/C heater core pipes
4. Rear heater core hose 5. Rear blower motor6. Underfloor rear A/C pipes
7. Underfloor rear heater core pipes A. Bolt torque specification B. Leak checking order (l - r)
C. Tightening torque D. Wrench sizeE. O-ring size
⇐ Front
NOTE: The O-ring size 8 is the high-side and the O-ring size 16 is the low-side.
Revision: December 20092009 QX56
Page 4084 of 4171

WT-42
< ON-VEHICLE REPAIR >
WHEEL AND TIRE ASSEMBLY
3. Install balance weight in the position shown.CAUTION:
• Do not install the inner bala nce weight before installing
the outer balance weight.
• Before installing the balance weight, be sure to clean the mating surface of the road wheel.
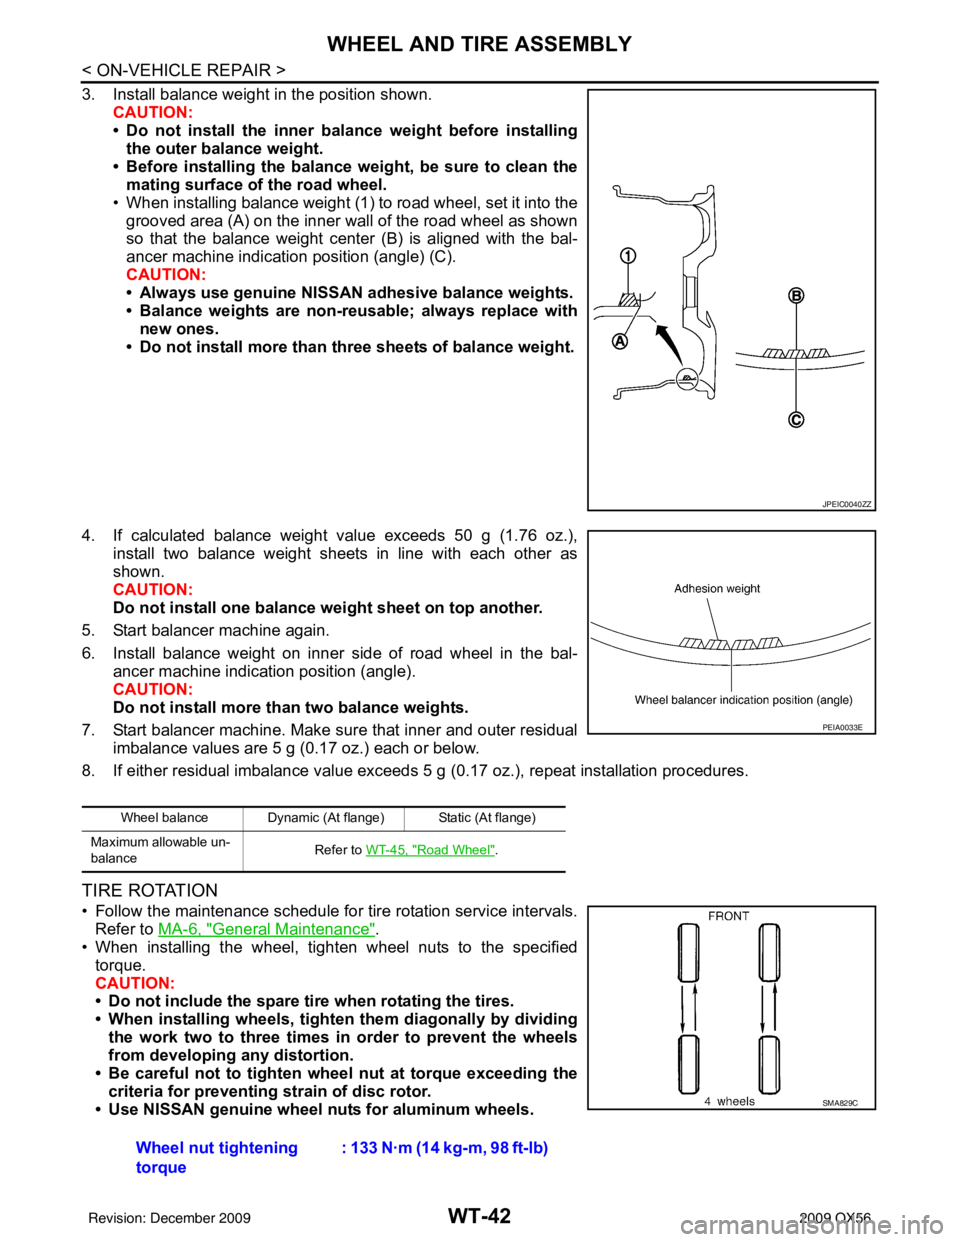
• When installing balance weight (1) to road wheel, set it into the grooved area (A) on the inner wall of the road wheel as shown
so that the balance weight center (B) is aligned with the bal-
ancer machine indication position (angle) (C).
CAUTION:
• Always use genuine NISSAN adhesive balance weights.
• Balance weights are non-reusable; always replace withnew ones.
• Do not install more than three sheets of balance weight.
4. If calculated balance weight value exceeds 50 g (1.76 oz.), install two balance weight sheets in line with each other as
shown.
CAUTION:
Do not install one balance weight sheet on top another.
5. Start balancer machine again.
6. Install balance weight on inner side of road wheel in the bal- ancer machine indication position (angle).
CAUTION:
Do not install more than two balance weights.
7. Start balancer machine. Make sure that inner and outer residual imbalance values are 5 g (0.17 oz.) each or below.
8. If either residual imbalance value exceeds 5 g (0.17 oz.), repeat installation procedures.
TIRE ROTATION
• Follow the maintenance schedule for tire rotation service intervals.
Refer to MA-6, "
General Maintenance".
• When installing the wheel, tighten wheel nuts to the specified
torque.
CAUTION:
• Do not include the spare tire when rotating the tires.
• When installing wheels, tighten them diagonally by dividing
the work two to three times in order to prevent the wheels
from developing any distortion.
• Be careful not to tighten wheel nut at torque exceeding the criteria for preventing strain of disc rotor.
• Use NISSAN genuine wheel nuts for aluminum wheels.
JPEIC0040ZZ
Wheel balance Dynamic (At flange) Static (At flange)
Maximum allowable un-
balance Refer to
WT-45, "
Road Wheel".
PEIA0033E
Wheel nut tightening
torque : 133 N·m (14 kg-m, 98 ft-lb)
SMA829C
Revision: December 20092009 QX56
Page 4161 of 4171

WW-74
< ON-VEHICLE REPAIR >
FRONT WIPER ARM
ON-VEHICLE REPAIR
FRONT WIPER ARM
Front Wiper ArmsINFOID:0000000003776313
REMOVAL AND INSTALLATION
Removal
1. Remove wiper arm covers and wiper arm nuts.
2. Remove front RH wiper arm and front LH wiper arm.
3. Remove front RH blade assembly and front LH blade assembly.
Installation
1. Operate wiper motor one full cycle, then turn "OFF" (Auto Stop).
2. Clean up the pivot area as shown. This will reduce possibility ofwiper arm looseness.
3. Install front RH blade assembly and front LH blade assembly on the wiper arms.
4. Install front RH wiper arm and front LH wiper arm.
5. Tighten wiper arm nuts to specified torque, and install wiper arm covers. Refer to WW-75, "
Wiper Motor
and Linkage".
6. Ensure that wiper blades stop within proper clearanc e. Follow the "Front Wiper Arm Adjustment" proce-
dure.
FRONT WIPER ARM ADJUSTMENT
1. Operate wiper motor one full cycle, then turn "OFF" (Auto Stop).
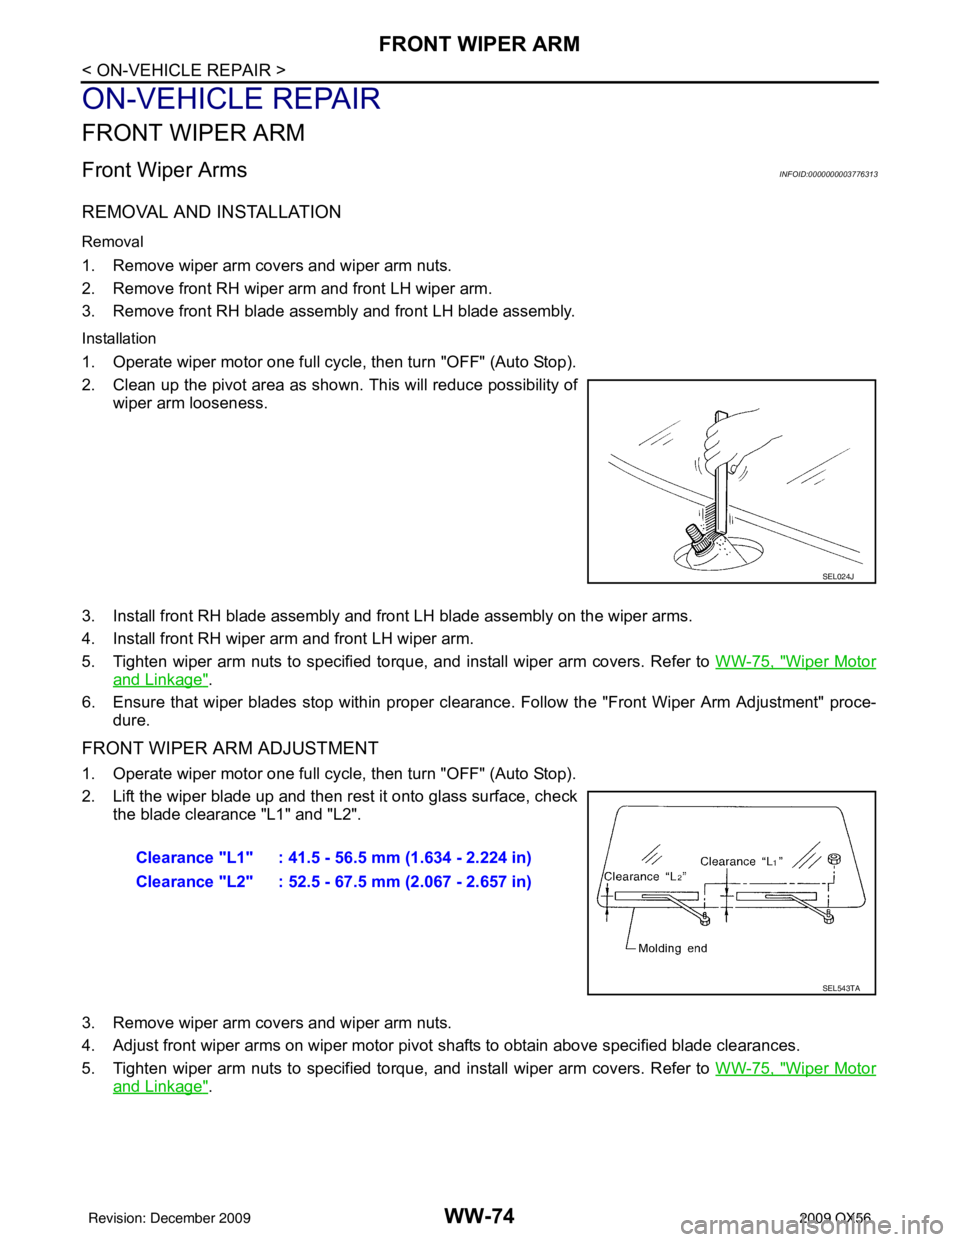
2. Lift the wiper blade up and then rest it onto glass surface, check the blade clearance "L1" and "L2".
3. Remove wiper arm covers and wiper arm nuts.
4. Adjust front wiper arms on wiper motor pivot shafts to obtain above specified blade clearances.
5. Tighten wiper arm nuts to specified torque, and install wiper arm covers. Refer to WW-75, "
Wiper Motor
and Linkage".
SEL024J
Clearance "L1" : 41.5 - 56.5 mm (1.634 - 2.224 in)
Clearance "L2" : 52.5 - 67.5 mm (2.067 - 2.657 in)
SEL543TA
Revision: December 20092009 QX56