Page 3837 of 4171

LINE PRESSURE TESTTM-189
< ON-VEHICLE MAINTENANCE >
CEF
G H
I
J
K L
M A
B
TM
N
O P
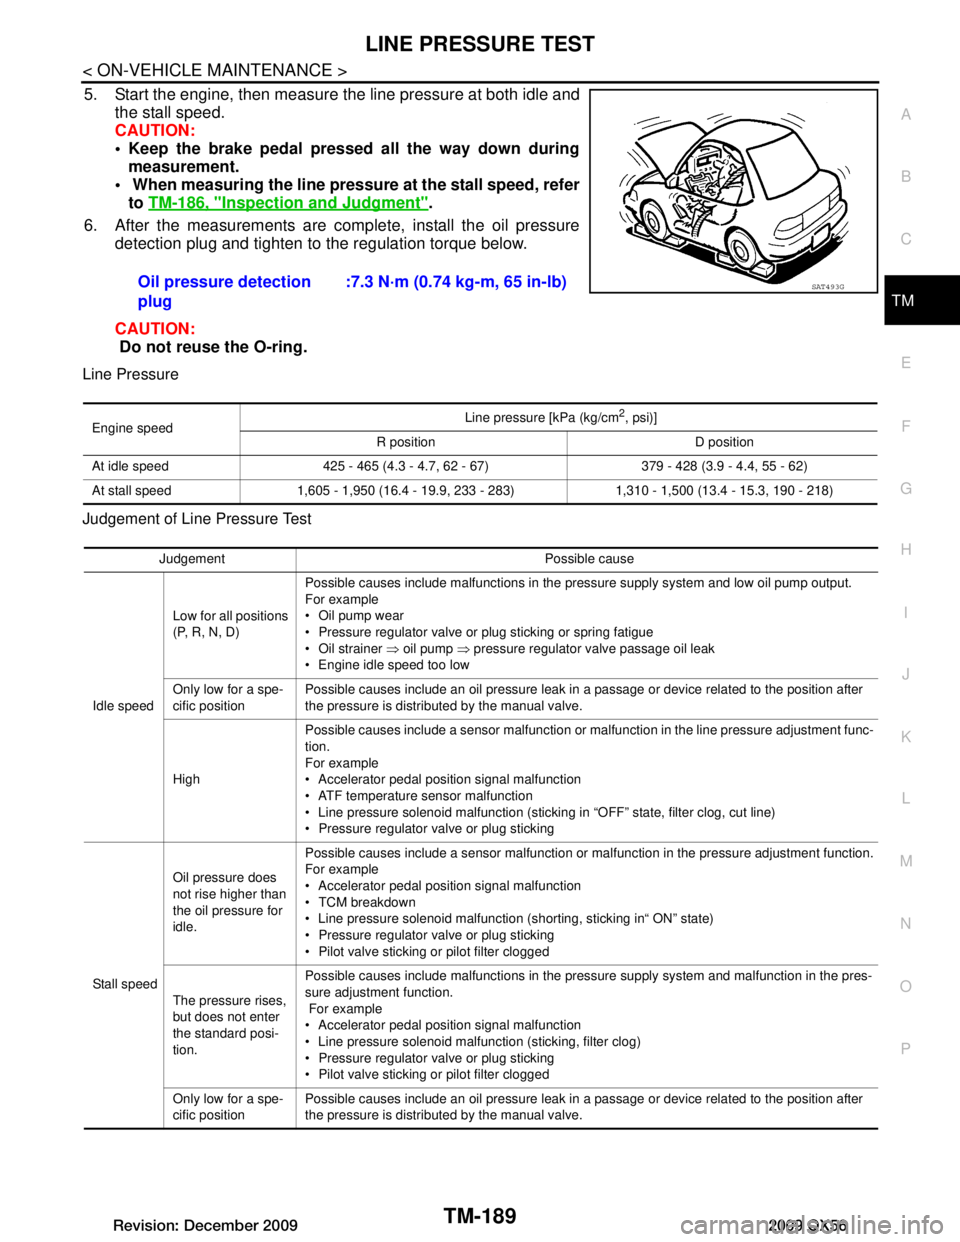
5. Start the engine, then measure the line pressure at both idle and the stall speed.
CAUTION:
Keep the brake pedal pressed all the way down during
measurement.
When measuring the line pressu re at the stall speed, refer
to TM-186, "Inspection and Judgment"
.
6. After the measurements are complete, install the oil pressure detection plug and tighten to the regulation torque below.
CAUTION:
Do not reuse the O-ring.
Line Pressure
Judgement of Line Pressure Test
Oil pressure detection
plug :7.3 N·m (0.74 kg-m, 65 in-lb)SAT493G
Engine speed
Line pressure [kPa (kg/cm
2, psi)]
R position D position
At idle speed 425 - 465 (4.3 - 4.7, 62 - 67) 379 - 428 (3.9 - 4.4, 55 - 62)
At stall speed 1,605 - 1,950 (16.4 - 19.9, 233 - 283) 1,310 - 1,500 (13.4 - 15.3, 190 - 218)
Judgement Possible cause
Idle speed Low for all positions
(P, R, N, D)
Possible causes include malfunctions in the pressure supply system and low oil pump output.
For example
Oil pump wear
Pressure regulator valve or plug sticking or spring fatigue
Oil strainer
⇒ oil pump ⇒ pressure regulator valve passage oil leak
Engine idle speed too low
Only low for a spe-
cific position Possible causes include an oil pressure leak in a passage or device related to the position after
the pressure is distributed by the manual valve.
High Possible causes include a sensor malfunction or malfunction in the line pressure adjustment func-
tion.
For example
Accelerator pedal position signal malfunction
ATF temperature sensor malfunction
Line pressure solenoid malfunction (sticking in “OFF” state, filter clog, cut line)
Pressure regulator valve or plug sticking
Stall speed Oil pressure does
not rise higher than
the oil pressure for
idle.
Possible causes include a sensor malfunction or malfunction in the pressure adjustment function.
For example
Accelerator pedal position signal malfunction
TCM breakdown
Line pressure solenoid malfunction (shorting, sticking in“ ON” state)
Pressure regulator valve or plug sticking
Pilot valve sticking or pilot filter clogged
The pressure rises,
but does not enter
the standard posi-
tion. Possible causes include malfunctions in the pressure supply system and malfunction in the pres-
sure adjustment function.
For example
Accelerator pedal position signal malfunction
Line pressure solenoid malfunction (sticking, filter clog)
Pressure regulator valve or plug sticking
Pilot valve sticking or pilot filter clogged
Only low for a spe-
cific position Possible causes include an oil pressure leak in a passage or device related to the position after
the pressure is distributed by the manual valve.
Revision: December 20092009 QX56
Page 3851 of 4171
CONTROL VALVE WITH TCMTM-203
< ON-VEHICLE REPAIR >
CEF
G H
I
J
K L
M A
B
TM
N
O P
CONTROL VALVE WITH TCM
Control Valve with TCM and A/T Fluid Temperature Sensor 2INFOID:0000000004219688
COMPONENTS
CONTROL VALVE WITH TCM REMOVAL AND INSTALLATION
Removal
1. Disconnect negative battery terminal. Refer to PG-77, "Removal and Installation".
2. Drain A/T fluid. Refer to TM-181, "Changing the A/T Fluid (ATF)"
.
3. Disconnect A/T assembly harness connector.
1. Transmission 2. Snap ring 3. Sub-harness
4. Control valve with TCM 5. Bracket 6. A/T fluid temperature sensor 2
7. Oil pan gasket 8. Brackets 9. Oil pan bolt
10. Oil pan 11. Magnet 12. Drain plug
13. Drain plug gasket 14. A/T assembly harness connector 15. O-ring
AWDIA0024ZZ
Revision: December 20092009 QX56
Page 3852 of 4171
TM-204
< ON-VEHICLE REPAIR >
CONTROL VALVE WITH TCM
4. Remove snap ring from A/T assembly harness connector.
5. Push A/T assembly harness connector.CAUTION:
Do not damage connector.
6. Remove oil pan and oil pan gasket. Refer to TM-201, "Oil Pan"
.
7. Disconnect A/T fluid temperat ure sensor 2 connector (A).
CAUTION:
Do not damage connector.
8. Straighten the four terminal clips to free the terminal cord assembly for A/T fluid temperature sensor 2 harness.
: Terminal clip
9. Straighten terminal clip to fr ee the output speed sensor harness.
10. Disconnect output speed sensor connector (1). CAUTION:
Do not damage connector.
SCIA5021E
SCIA5022E
SCIA8124E
JSDIA1316ZZ
Revision: December 20092009 QX56
Page 3853 of 4171
CONTROL VALVE WITH TCMTM-205
< ON-VEHICLE REPAIR >
CEF
G H
I
J
K L
M A
B
TM
N
O P
11. Remove bolts (A), (B) and (C) from control valve with TCM. : Front
12. Remove control valve with TCM from transmission case. CAUTION:
When removing, be careful with the manual valve notch and
manual plate height. Remove it vertically.
13. Remove A/T fluid temperature sensor 2 with bracket from con- trol valve with TCM.
14. Remove bracket from A/T fluid temperature sensor 2.
15. Remove O-ring from A/T assembly harness connector.
Bolt symbol Length mm (in) Number of bolts A 42 (1.65) 5
B 55 (2.17) 6
C 40 (1.57) 1
SCIA8074E
SCIA5142E
SCIA5253E
SCIA5264E
SCIA5155E
Revision: December 20092009 QX56
Page 3855 of 4171
CONTROL VALVE WITH TCMTM-207
< ON-VEHICLE REPAIR >
CEF
G H
I
J
K L
M A
B
TM
N
O P
2. Install A/T assembly harness connector to control valve with TCM.
3. Connect TCM connector.
4. Install new O-ring in A/T assembly harness connector. CAUTION:
Do not reuse O-ring.
Apply ATF to O-ring.
5. Install A/T fluid temperature sensor 2 to bracket.
6. Install A/T fluid temperature sensor 2 (with bracket) to control valve with TCM. Tighten A/T flui d temperature sensor 2 bolt to
the specified torque. Refer to TM-203, "Control Valve with TCM
and A/T Fluid Temperature Sensor 2".
CAUTION:
Adjust bolt hole of bracket to bolt hole of control valve with
TCM.
SCIA5450E
SCIA5447E
SCIA5155E
SCIA5264E
SCIA5253E
Revision: December 20092009 QX56
Page 3856 of 4171

TM-208
< ON-VEHICLE REPAIR >
CONTROL VALVE WITH TCM
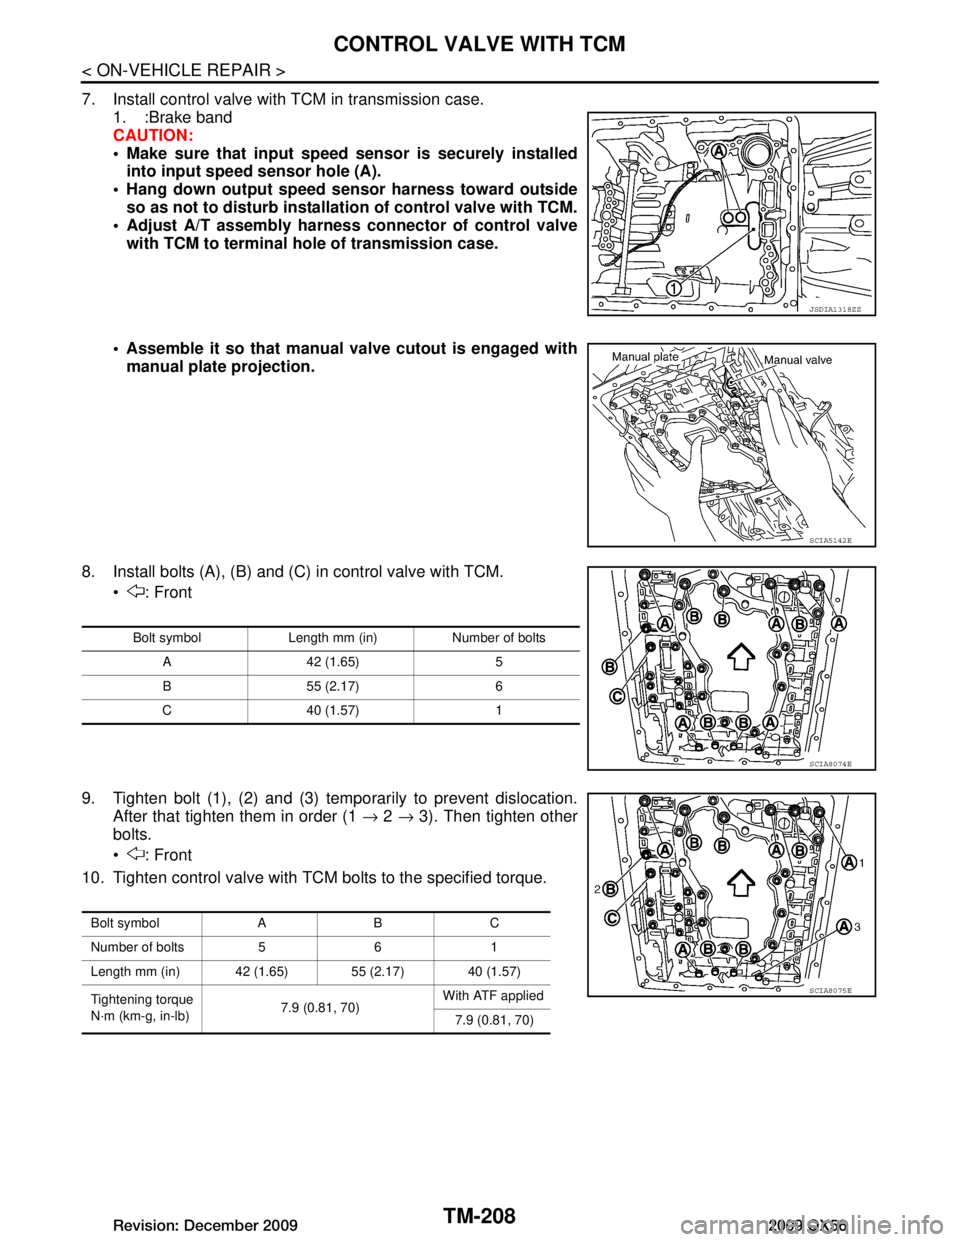
7. Install control valve with TCM in transmission case.1. :Brake band
CAUTION:
Make sure that input speed sensor is securely installed
into input speed sensor hole (A).
Hang down output speed sen sor harness toward outside
so as not to disturb installati on of control valve with TCM.
Adjust A/T assembly harness co nnector of control valve
with TCM to terminal hole of transmission case.
Assemble it so that manual valve cutout is engaged with manual plate projection.
8. Install bolts (A), (B) and (C) in control valve with TCM. : Front
9. Tighten bolt (1), (2) and (3) temporarily to prevent dislocation. After that tighten them in order (1 → 2 → 3). Then tighten other
bolts.
: Front
10. Tighten control valve with TCM bolts to the specified torque.
JSDIA1318ZZ
SCIA5142E
Bolt symbol Length mm (in) Number of bolts
A 42 (1.65) 5
B 55 (2.17) 6
C 40 (1.57) 1
SCIA8074E
Bolt symbol A B C
Number of bolts 5 6 1
Length mm (in) 42 (1.65) 55 (2.17) 40 (1.57)
Tightening torque
N·m (km-g, in-lb) 7.9 (0.81, 70)With ATF applied
7.9 (0.81, 70)
SCIA8075E
Revision: December 20092009 QX56
Page 3857 of 4171

CONTROL VALVE WITH TCMTM-209
< ON-VEHICLE REPAIR >
CEF
G H
I
J
K L
M A
B
TM
N
O P
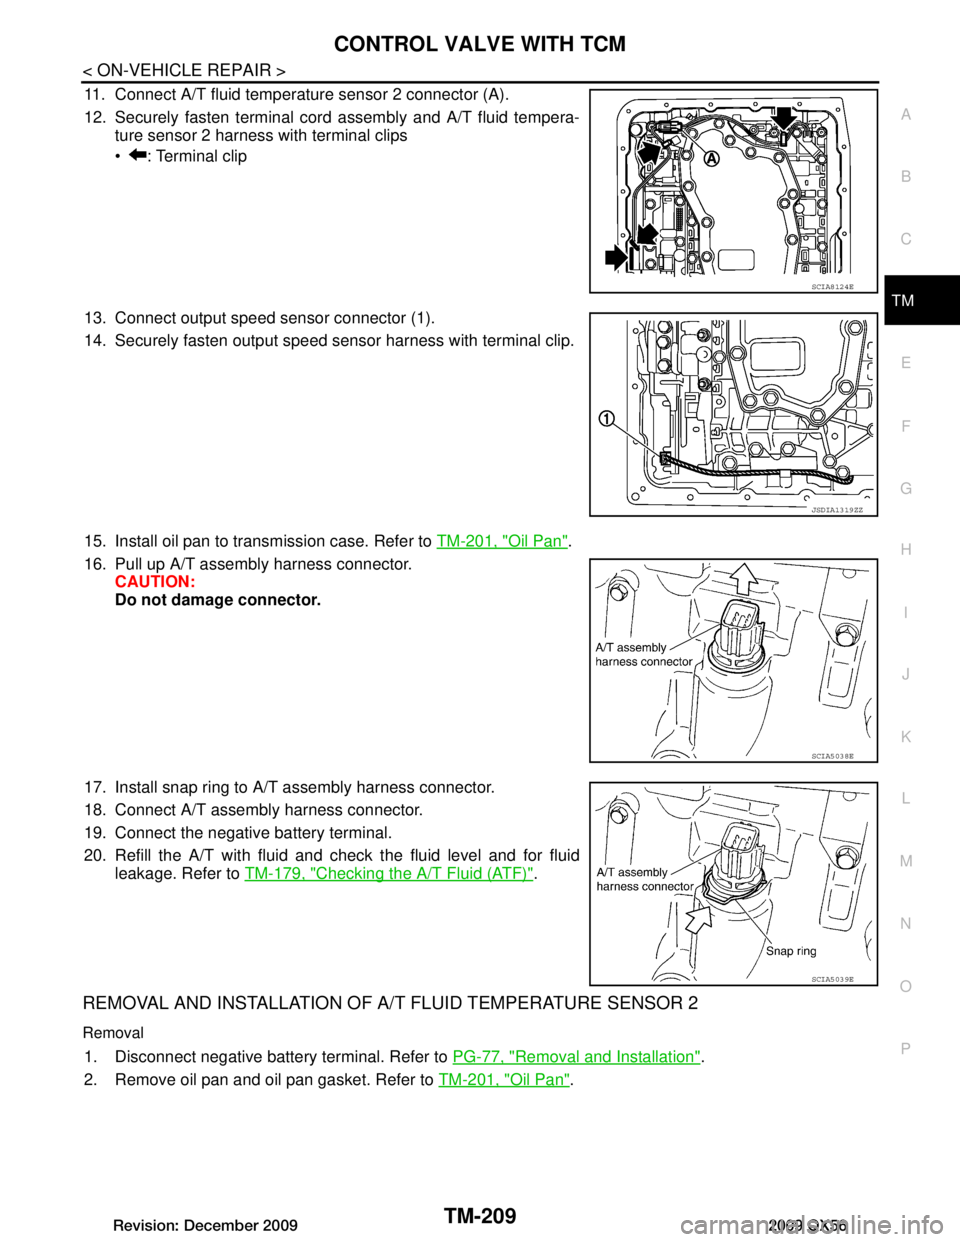
11. Connect A/T fluid temperature sensor 2 connector (A).
12. Securely fasten terminal cord assembly and A/T fluid tempera- ture sensor 2 harness with terminal clips
: Terminal clip
13. Connect output speed sensor connector (1).
14. Securely fasten output speed sensor harness with terminal clip.
15. Install oil pan to transmission case. Refer to TM-201, "Oil Pan"
.
16. Pull up A/T assembly harness connector. CAUTION:
Do not damage connector.
17. Install snap ring to A/T assembly harness connector.
18. Connect A/T assembly harness connector.
19. Connect the negative battery terminal.
20. Refill the A/T with fluid and check the fluid level and for fluid leakage. Refer to TM-179, "Checking the A/T Fluid (ATF)"
.
REMOVAL AND INSTALLATION OF A/ T FLUID TEMPERATURE SENSOR 2
Removal
1. Disconnect negative battery terminal. Refer to PG-77, "Removal and Installation".
2. Remove oil pan and oil pan gasket. Refer to TM-201, "Oil Pan"
.
SCIA8124E
JSDIA1319ZZ
SCIA5038E
SCIA5039E
Revision: December 20092009 QX56
Page 3858 of 4171
TM-210
< ON-VEHICLE REPAIR >
CONTROL VALVE WITH TCM
3. Disconnect A/T fluid temperature sensor 2 connector (A).
CAUTION:
Do not damage connector.
4. Straighten terminal clip to free A/T fluid temperature sensor 2 harness.
5. Remove A/T fluid temperature sensor 2 with bracket from con- trol valve with TCM.
6. Remove bracket from A/T fluid temperature sensor 2.
Installation
CAUTION:
After completing installation, check A/T fluid leakage and fluid level. Refer to TM-179, "Checking the A/
T Fluid (ATF)".
1. Install A/T fluid temperature sensor 2 to bracket.
SCIA8125E
SCIA5253E
SCIA5264E
SCIA5264E
Revision: December 20092009 QX56