2009 INFINITI QX56 mirror
[x] Cancel search: mirrorPage 2288 of 4171

HA-24
< ON-VEHICLE MAINTENANCE >
FLUORESCENT LEAK DETECTOR
FLUORESCENT LEAK DETECTOR
Checking of Refrigerant LeaksINFOID:0000000003775303
PRELIMINARY CHECK
Perform a visual inspection of all refrigeration parts, fittings, hoses and components for signs of A/C oil leak-
age, damage, and corrosion. Any A/C oil leakage may indicate an area of refrigerant leakage. Allow extra
inspection time in these areas when using either an el ectronic refrigerant leak detector (J-41995) or fluores-
cent dye leak detector (J-42220).
If any dye is observed using a fluor escent dye leak detector (J-42220), c onfirm the leak using a electronic
refrigerant leak detector (J-41995). It is possible that the dye is from a prior leak that was repaired and not
properly cleaned.
When searching for leaks, do not stop when one leak is found but continue to check for additional leaks at all
system components and connections.
When searching for refrigerant leaks using an electroni c refrigerant leak detector (J-41995), move the probe
along the suspected leak area at 25 - 50 mm (1 - 2 in) per second and no further than 6 mm (1/4 in) from the
component.
CAUTION:
Moving the electronic refrigerant l eak detector probe slower and clo ser to the suspected leak area will
improve the chances of finding a leak.
Checking System for L eaks Using the Fluorescent Dye Leak DetectorINFOID:0000000003775304
1. Check the A/C system for leaks using the fluorescent dye leak detector and safety goggles (J-42220) in a
low sunlight area (area without windows preferable). Il luminate all components, fittings and lines. The dye
will appear as a bright green/yellow area at the point of leakage. Fluorescent dye observed at the evapo-
rator drain opening indicates an evaporator core asse mbly leak (tubes, core or expansion valve).
2. If the suspected area is difficult to see, use an adjustable mirror or wipe the area with a clean shop rag or
cloth, then inspect the shop rag or cloth with the fl uorescent dye leak detector (J-42220) for dye residue.
3. After the leak is repaired, remove any residual dye using refrigerant dye cleaner (J-43872) to prevent
future misdiagnosis.
4. Perform a system performance check and then verify t he leak repair using a electronic refrigerant leak
detector (J-41995).
NOTE:
Other gases in the work area or substances on the A/C components, for example, anti-freeze, wind-
shield washer fluid, solvents and oils, may falsely tri gger the leak detector. Make sure the surfaces to be
checked are clean.
Clean with a dry cloth or blow off with shop air.
Do not allow the sensor tip of the electronic refri gerant leak detector (J-41995) to contact with any sub-
stance. This can also cause false readings and may damage the detector.
Dye InjectionINFOID:0000000003775305
NOTE:
This procedure is only necessary when recharging t he system or when the compressor has seized and must
be replaced.
1. Check the A/C system static (at rest) pressure . Pressure must be at least 345 kPa (3.52 kg/cm
2 , 50 psi).
2. Pour one bottle 7.4 cc (1/4 ounce) of the HFC-134a (R -134a) fluorescent leak detection dye (J-41447) into
the HFC-134a (R-134a) dye injector (J-41459).
CAUTION:
If repairing the A/C system or replacing a co mponent, pour the HFC-134a (R-134a) fluorescent leak
detection dye (J-41447) directly into the open system connection and proceed with the service
procedures.
3. Connect the refrigerant dye injector (J- 41459) to the low-pressure service valve.
4. Start the engine and switch the A/C system ON.
5. When the A/C system is operating (compressor runni ng), inject one bottle 7.4 cc (1/4 ounce) of HFC-134a
(R-134a) fluorescent leak detection dye (J-41447) th rough the low-pressure service valve using HFC-
134a (R-134a) dye injector (J-41459). Refer to the manufacturer's operating instructions.
Revision: December 20092009 QX56
Page 2327 of 4171
![INFINITI QX56 2009 Factory Service Manual HAC-14
< FUNCTION DIAGNOSIS >[AUTOMATIC AIR CONDITIONER]
AUTOMATIC AIR CONDITIONER SYSTEM
A/C auto amp.
DISPLAY SCREEN
Displays the operational status of the system.
AUTO SWITCH
• The compressor, i INFINITI QX56 2009 Factory Service Manual HAC-14
< FUNCTION DIAGNOSIS >[AUTOMATIC AIR CONDITIONER]
AUTOMATIC AIR CONDITIONER SYSTEM
A/C auto amp.
DISPLAY SCREEN
Displays the operational status of the system.
AUTO SWITCH
• The compressor, i](/manual-img/42/57031/w960_57031-2326.png)
HAC-14
< FUNCTION DIAGNOSIS >[AUTOMATIC AIR CONDITIONER]
AUTOMATIC AIR CONDITIONER SYSTEM
A/C auto amp.
DISPLAY SCREEN
Displays the operational status of the system.
AUTO SWITCH
• The compressor, intake door, air mix doors, outlet
doors and blower speed are automatically controlled so
that the in-vehicle temperature will reach, and be mainta ined at the set temperature selected by the operator.
• When pressing AUTO switch, air inlet, air outlet, bl ower speed, and discharge air temperature are automati-
cally controlled.
TEMPERATURE CONTROL DIAL (DRIVER)
Increases or decreases the set temperature.
TEMPERATURE CONTROL DIAL (PASSENGER)
Increases or decreases the set temperature.
RECIRCULATION ( ) SWITCH
• When REC switch is ON, REC switch indicator turns ON, and air inlet is set to REC.
• When REC switch is turned OFF, or when compressor is turned from ON to OFF, REC switch is automati-
cally turned OFF. REC mode can be re-entered by pressing REC switch again.
• REC switch is not operated when DEF switch is tur ned ON, at the D/F position, or in floor position.
DEFROSTER ( ) SWITCH
Positions the air outlet doors to the defrost position. Al so positions the intake doors to the outside air position,
and turns A/C compressor ON.
REAR WINDOW DEFOGGER SWITCH
When switch is ON, rear window and door mirrors are defogged.
OFF SWITCH
The compressor and blower are OFF, the intake doors are set to the outside air position, and the air outlet
doors are set to the foot (75% foot and 25% defrost) position.
A/C SWITCH
The compressor is ON or OFF.
(Pressing the A/C switch when the AUTO switch is ON will turn off the A/C switch and compressor.)
MODE SWITCH
Controls the air discharge outlets.
FRONT BLOWER CONTROL SWITCHES
Manually control the blower speed.
AWIIA0081ZZ
Revision: December 20092009 QX56
Page 2451 of 4171
INTERIOR ROOM LAMP CONTROL SYSTEMINL-7
< FUNCTION DIAGNOSIS >
C
DE
F
G H
I
J
K
M A
B
INL
N
O P
INTERIOR LAMP BATTERY SAVER CONTROL
If an interior lamp is left ON and does not turn OFF even when the doors are closed, the BCM turns off power
to the interior lamps automatically to save the batte ry 30 minutes after the ignition switch is turned OFF.
The BCM controls power and ground to all interior lamps.
After the battery saver system turns the la mps OFF, the lamps will illuminate again when
• a signal is received from an Intelligent Key or main power window and door lock/unlock switch, or when the
front door LH lock assembly (key cylinder switch) is locked or unlocked
• a door is opened or closed
• the Intelligent Key is removed from or inserted into the ignition switch.
The Interior lamp battery saver control time peri od can be changed with the function setting of CONSULT-III.
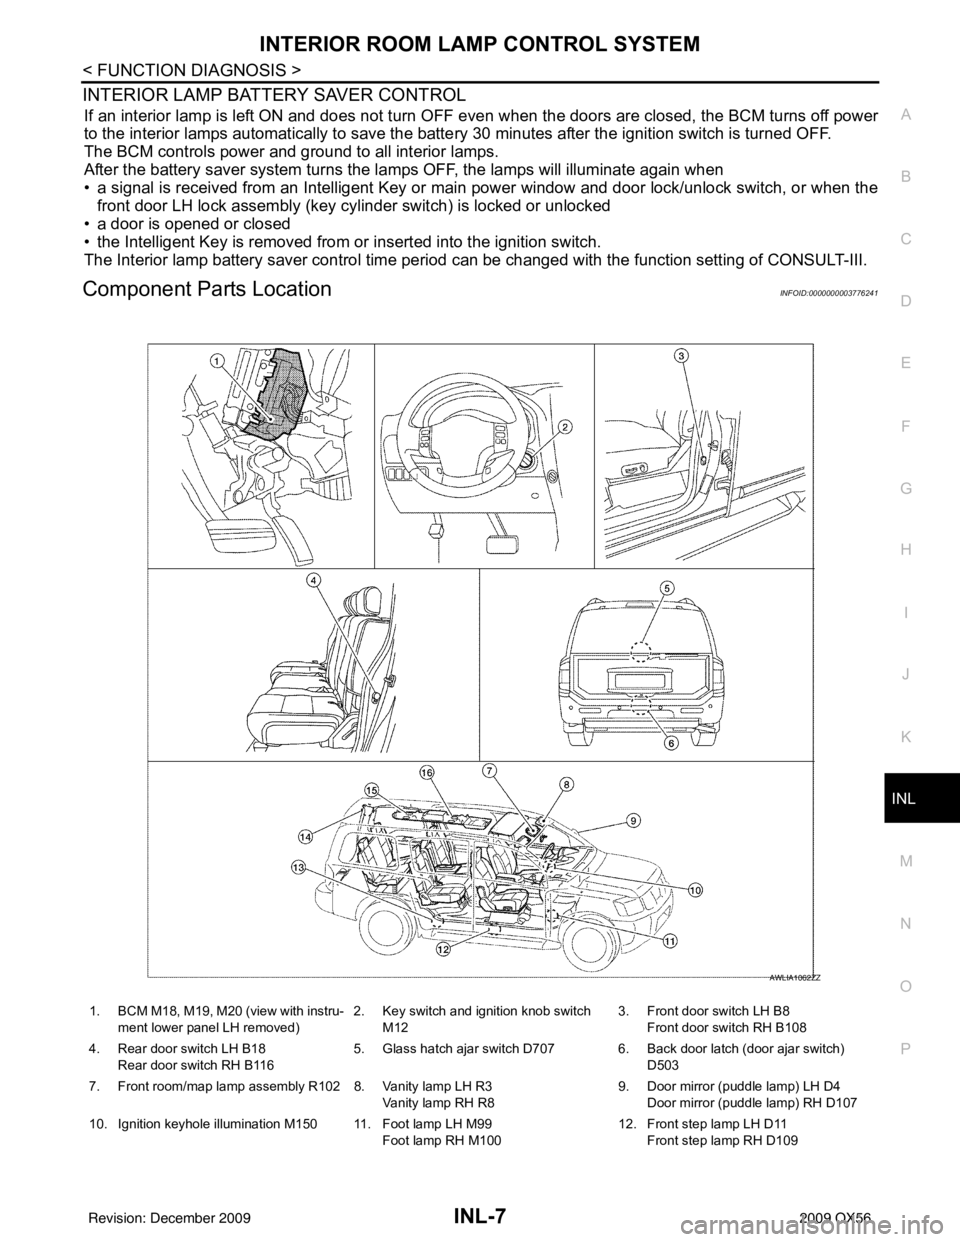
Component Parts LocationINFOID:0000000003776241
1. BCM M18, M19, M20 (view with instru-
ment lower panel LH removed) 2. Key switch and ignition knob switch
M12 3. Front door switch LH B8
Front door switch RH B108
4. Rear door switch LH B18 Rear door switch RH B116 5. Glass hatch ajar switch D707 6. Back door latch (door ajar switch)
D503
7. Front room/map lamp assembly R102 8. Vanity lamp LH R3 Vanity lamp RH R89. Door mirror (puddle lamp) LH D4
Door mirror (puddle lamp) RH D107
10. Ignition keyhole illumination M150 11. Foot lamp LH M99 Foot lamp RH M10012. Front step lamp LH D11
Front step lamp RH D109
AWLIA1062ZZ
Revision: December 20092009 QX56
Page 2460 of 4171
INL-16
< COMPONENT DIAGNOSIS >
BATTERY SAVER OUTPUT/POWER SUPPLY CIRCUIT
- Front step lamp LH
- Front step lamp RH
- Door mirror LH
- Door mirror RH
- Rear step lamp LH
- Rear step lamp RH
- Foot lamp LH
- Foot lamp RH
- Front room/map lamp assembly
- Vanity lamp LH
- Vanity lamp RH
- Cargo lamp
- Personal lamp 2nd row
- Personal lamp 3rd row
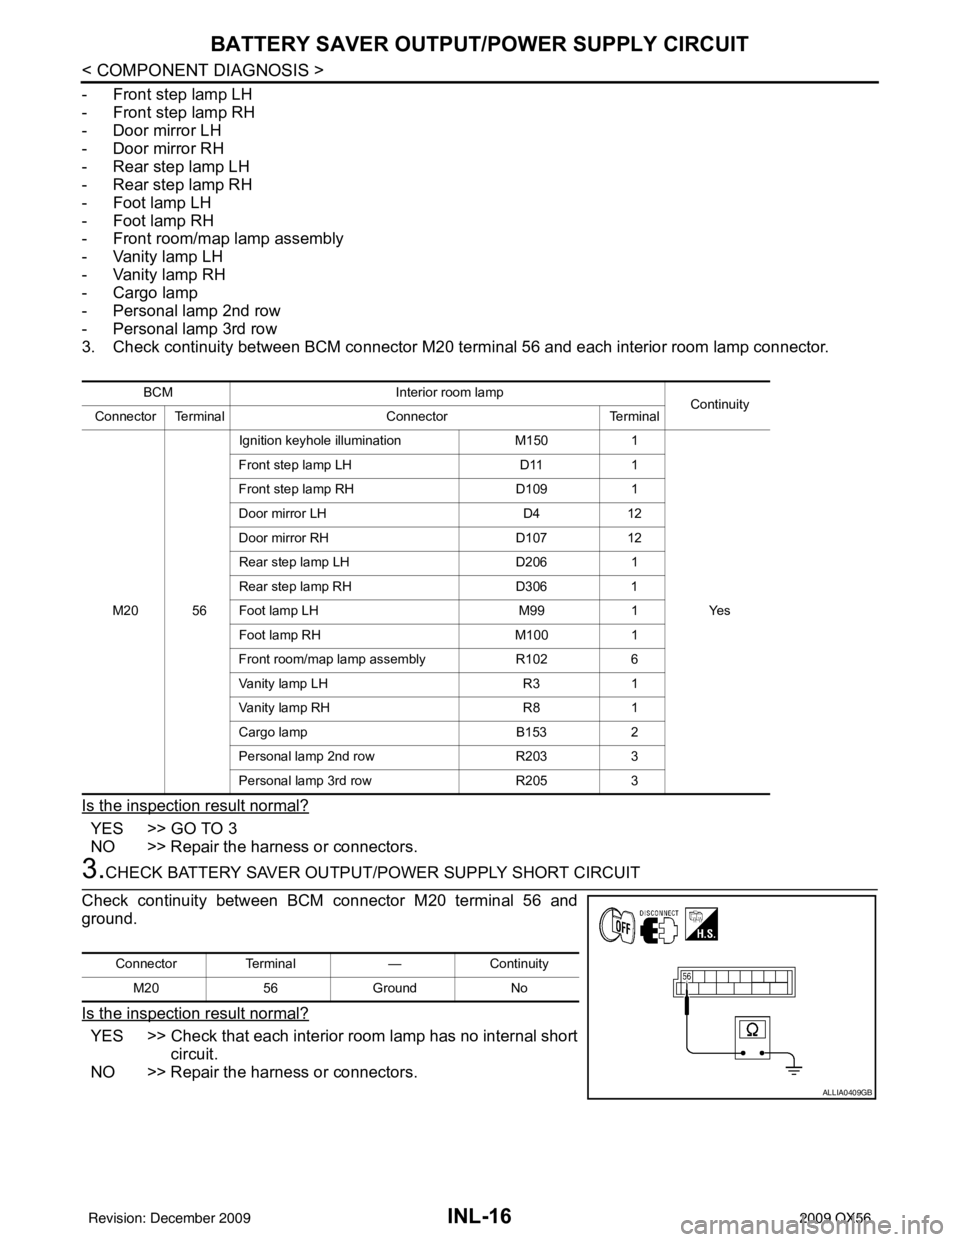
3. Check continuity between BCM connector M20 terminal 56 and each interior room lamp connector.
Is the inspection result normal?
YES >> GO TO 3
NO >> Repair the harness or connectors.
3.CHECK BATTERY SAVER OUTPUT/P OWER SUPPLY SHORT CIRCUIT
Check continuity between BCM connector M20 terminal 56 and
ground.
Is the inspection result normal?
YES >> Check that each interior room lamp has no internal short circuit.
NO >> Repair the harness or connectors.
BCM Interior room lamp
Continuity
Connector Terminal ConnectorTerminal
M20 56 Ignition keyhole illumination
M1501
Ye s
Front step lamp LH
D111
Front step lamp RH D1091
Door mirror LH D412
Door mirror RH D10712
Rear step lamp LH D2061
Rear step lamp RH D3061
Foot lamp LH M991
Foot lamp RH M1001
Front room/map lamp assembly R1026
Vanity lamp LH R31
Vanity lamp RH R81
Cargo lamp B1532
Personal lamp 2nd row R2033
Personal lamp 3rd row R2053
Connector Terminal —Continuity
M20 56Ground No
ALLIA0409GB
Revision: December 20092009 QX56
Page 2462 of 4171
INL-18
< COMPONENT DIAGNOSIS >
INTERIOR ROOM LAMP CONTROL CIRCUIT
1. Turn ignition switch OFF.
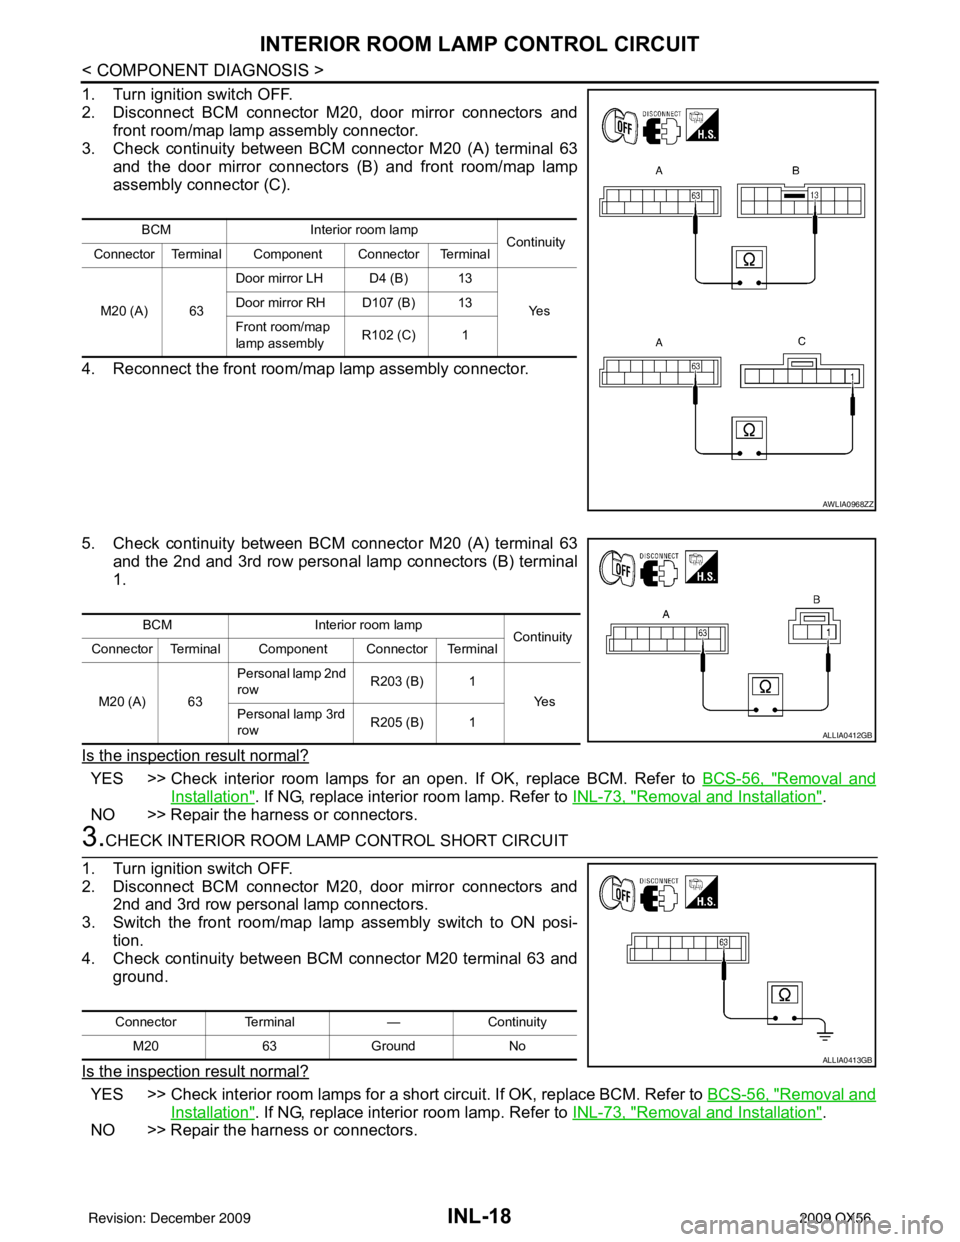
2. Disconnect BCM connector M20, door mirror connectors andfront room/map lamp assembly connector.
3. Check continuity between BCM connector M20 (A) terminal 63 and the door mirror connectors (B) and front room/map lamp
assembly connector (C).
4. Reconnect the front room/map lamp assembly connector.
5. Check continuity between BCM connector M20 (A) terminal 63 and the 2nd and 3rd row personal lamp connectors (B) terminal
1.
Is the inspection result normal?
YES >> Check interior room lamps for an open. If OK, replace BCM. Refer to BCS-56, "Removal and
Installation". If NG, replace interior room lamp. Refer to INL-73, "Removal and Installation".
NO >> Repair the harness or connectors.
3.CHECK INTERIOR ROOM LAMP CONTROL SHORT CIRCUIT
1. Turn ignition switch OFF.
2. Disconnect BCM connector M20, door mirror connectors and 2nd and 3rd row personal lamp connectors.
3. Switch the front room/map lamp assembly switch to ON posi- tion.
4. Check continuity between BCM connector M20 terminal 63 and ground.
Is the inspection result normal?
YES >> Check interior room lamps for a short circuit. If OK, replace BCM. Refer to BCS-56, "Removal and
Installation". If NG, replace interior room lamp. Refer to INL-73, "Removal and Installation".
NO >> Repair the harness or connectors.
BCM Interior room lamp
Continuity
Connector Terminal Component Connector Terminal
M20 (A) 63 Door mirror LH D4 (B) 13
Ye s
Door mirror RH D107 (B) 13
Front room/map
lamp assembly R102 (C) 1
AWLIA0968ZZ
BCM
Interior room lamp
Continuity
Connector Terminal Component Connector Terminal
M20 (A) 63 Personal lamp 2nd
row
R203 (B) 1
Ye s
Personal lamp 3rd
row R205 (B) 1
ALLIA0412GB
Connector
Terminal —Continuity
M20 63Ground No
ALLIA0413GB
Revision: December 20092009 QX56
Page 2514 of 4171

INL-70
< SYMPTOM DIAGNOSIS >
INTERIOR LIGHTING SYSTEM SYMPTOMS
SYMPTOM DIAGNOSIS
INTERIOR LIGHTING SYSTEM SYMPTOMS
Symptom TableINFOID:0000000003776269
CAUTION:
Perform the self-diagnosis with CONSULT-III before the symptom diagnosis. Perform the trouble diag-
nosis if any DTC is detected.
Symptom Possible causeInspection item
All of the following lamps do not turn ON
• Front room/map lamp assembly
• Personal lamp 2nd and 3rd row
• Cargo room lamp
• Front and rear step lamps
• Vanity mirror lamps
• Ignition keyhole illumination
• Puddle lamps
•Foot lamps • Harness between BCM and each
interior room lamp
•BCM Battery saver output/power supply
circuit
Refer to
INL-15
.
Some or all of the following interior room lamps do not
turn ON/OFF
• Puddle lamps
• Front room/map lamp assembly
• Personal lamp 2nd row
• Personal lamp 3rd row • Harness between BCM and each
door switch
• Harness between BCM and each interior room lamp
•BCM Door switch circuit
Refer to
DLK-71
.
Interior room lamp control circuit
Refer to INL-17
.
Some or all of the following lamps do not turn ON/OFF
• Front step lamps
• Rear step lamps
•Foot lamps • Harness between BCM and step
lamps and foot lamps
•BCM Step lamp circuit
Refer to
INL-19
.
Cargo lamp does not turn ON/OFF • Harness between BCM and cargo
lamp
•BCM Cargo lamp co
ntrol circuit
Refer to INL-21
.
Ignition keyhole illumination does not turn ON/OFF • Harness between BCM and ignition
keyhole illumination
•BCM Ignition keyhole illumination control
circuit
Refer to
INL-23
.
Interior room lamp timer does not activate.
(It turns ON/ OFF when the door opens/closes.) —Check the interior room lamp setting.
Refer to
INL-12
.
Interior room lamp battery saver does not activate. —Check the interior room lamp battery
saver setting.
Refer to
INL-13
.
Revision: December 20092009 QX56
Page 2517 of 4171
INTERIOR ROOM LAMPINL-73
< ON-VEHICLE REPAIR >
C
DE
F
G H
I
J
K
M A
B
INL
N
O P
ON-VEHICLE REPAIR
INTERIOR ROOM LAMP
Removal and InstallationINFOID:0000000003776272
MAP LAMP
Removal
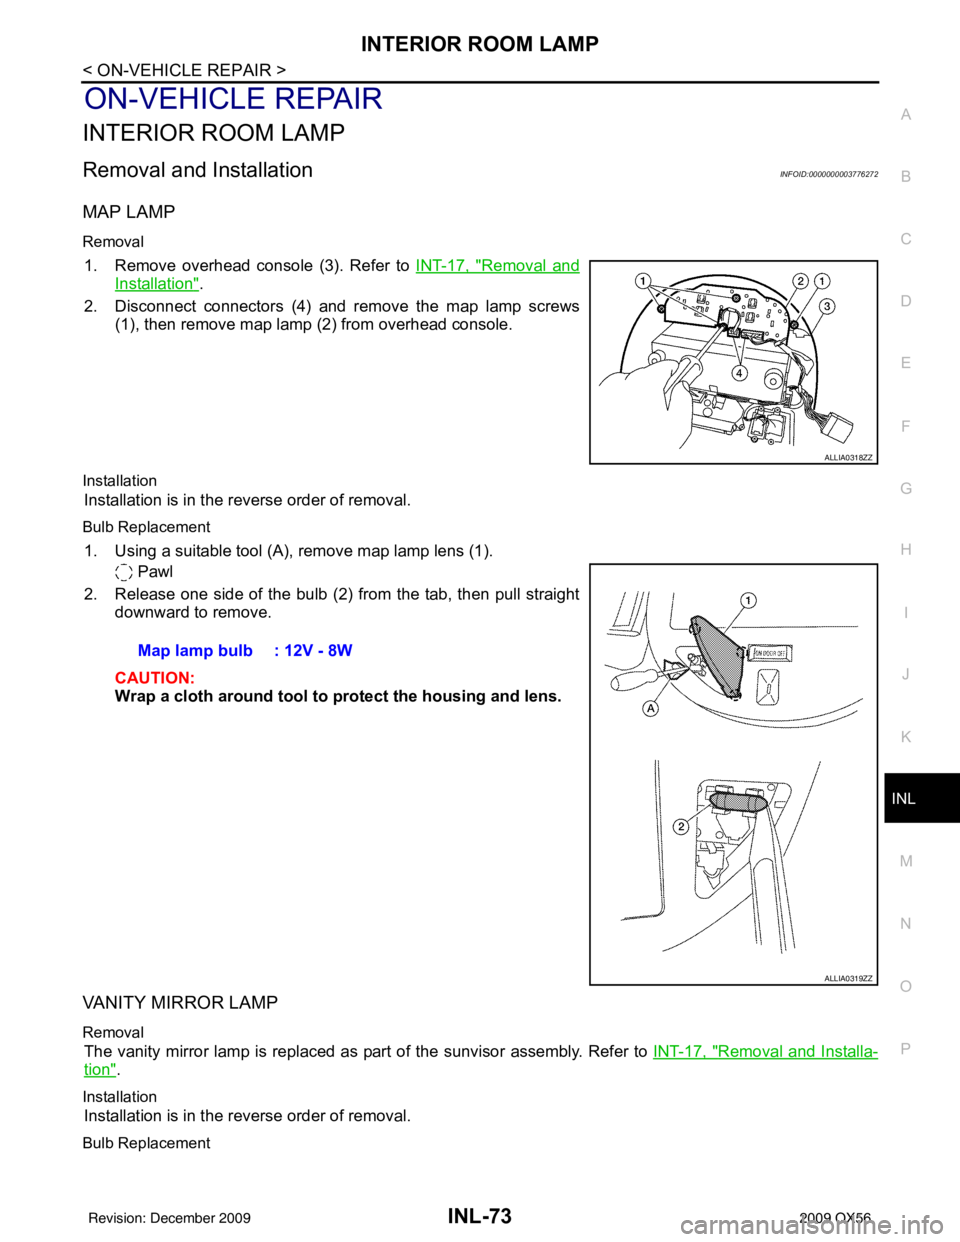
1. Remove overhead console (3). Refer to INT-17, "Removal and
Installation".
2. Disconnect connectors (4) and re move the map lamp screws
(1), then remove map lamp (2) from overhead console.
Installation
Installation is in the reverse order of removal.
Bulb Replacement
1. Using a suitable tool (A), remove map lamp lens (1).
Pawl
2. Release one side of the bulb (2) from the tab, then pull straight downward to remove.
CAUTION:
Wrap a cloth around tool to protect the housing and lens.
VANITY MIRROR LAMP
Removal
The vanity mirror lamp is replaced as part of the sunvisor assembly. Refer to INT-17, "Removal and Installa-
tion".
Installation
Installation is in the reverse order of removal.
Bulb Replacement
ALLIA0318ZZ
Map lamp bulb : 12V - 8W
ALLIA0319ZZ
Revision: December 20092009 QX56
Page 2518 of 4171
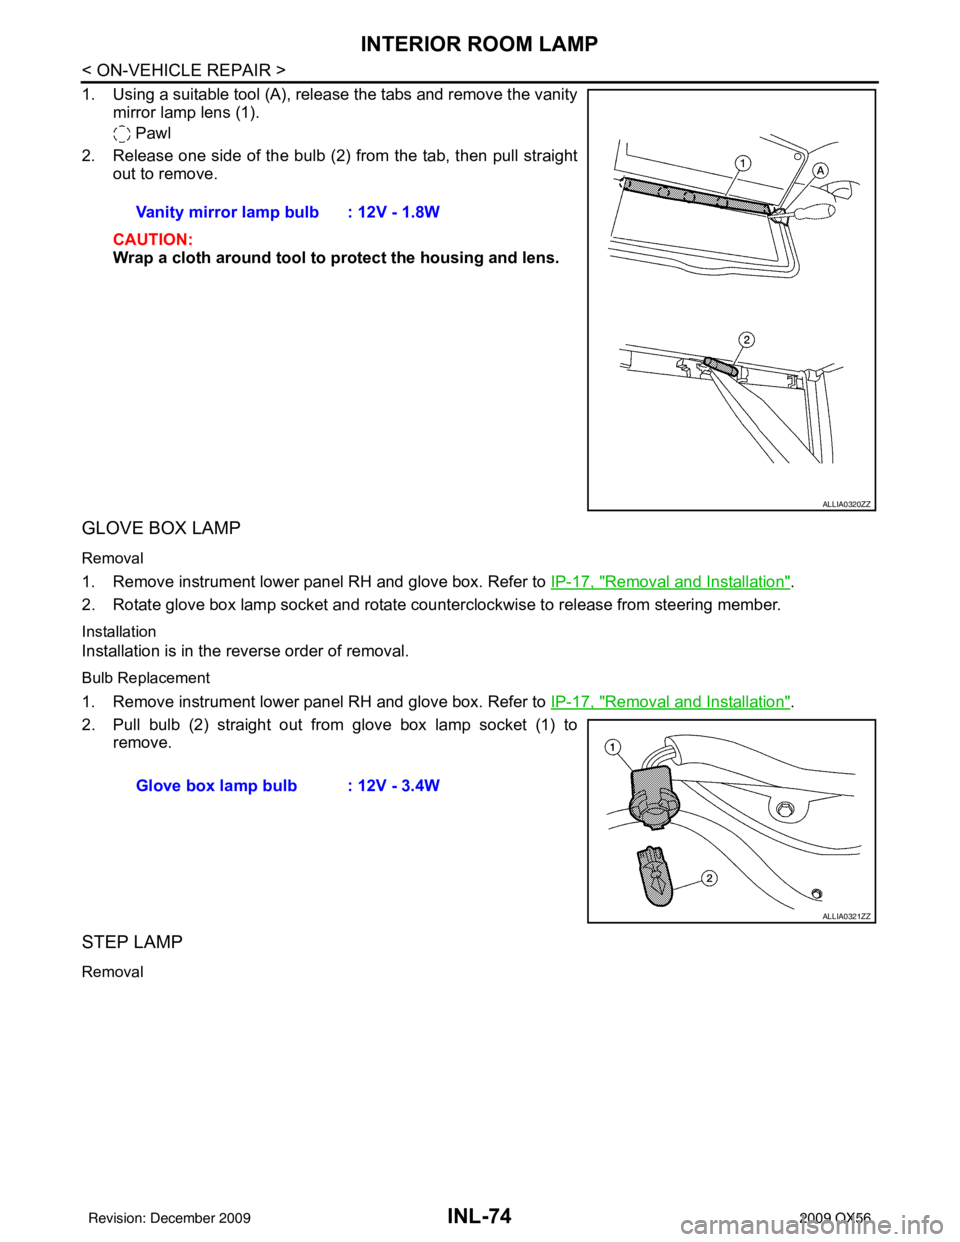
INL-74
< ON-VEHICLE REPAIR >
INTERIOR ROOM LAMP
1. Using a suitable tool (A), release the tabs and remove the vanitymirror lamp lens (1).
Pawl
2. Release one side of the bulb (2) from the tab, then pull straight out to remove.
CAUTION:
Wrap a cloth around tool to protect the housing and lens.
GLOVE BOX LAMP
Removal
1. Remove instrument lower panel RH and glove box. Refer to IP-17, "Removal and Installation".
2. Rotate glove box lamp socket and rotate counterclockwise to release from steering member.
Installation
Installation is in the reverse order of removal.
Bulb Replacement
1. Remove instrument lower panel RH and glove box. Refer to IP-17, "Removal and Installation".
2. Pull bulb (2) straight out from glove box lamp socket (1) to remove.
STEP LAMP
Removal
Vanity mirror lamp bulb : 12V - 1.8W
ALLIA0320ZZ
Glove box lamp bulb : 12V - 3.4W
ALLIA0321ZZ
Revision: December 20092009 QX56