2009 HYUNDAI TUCSON hood open
[x] Cancel search: hood openPage 20 of 273
1
FEATURES OF YOUR HYUNDAI
9
B070B02JM
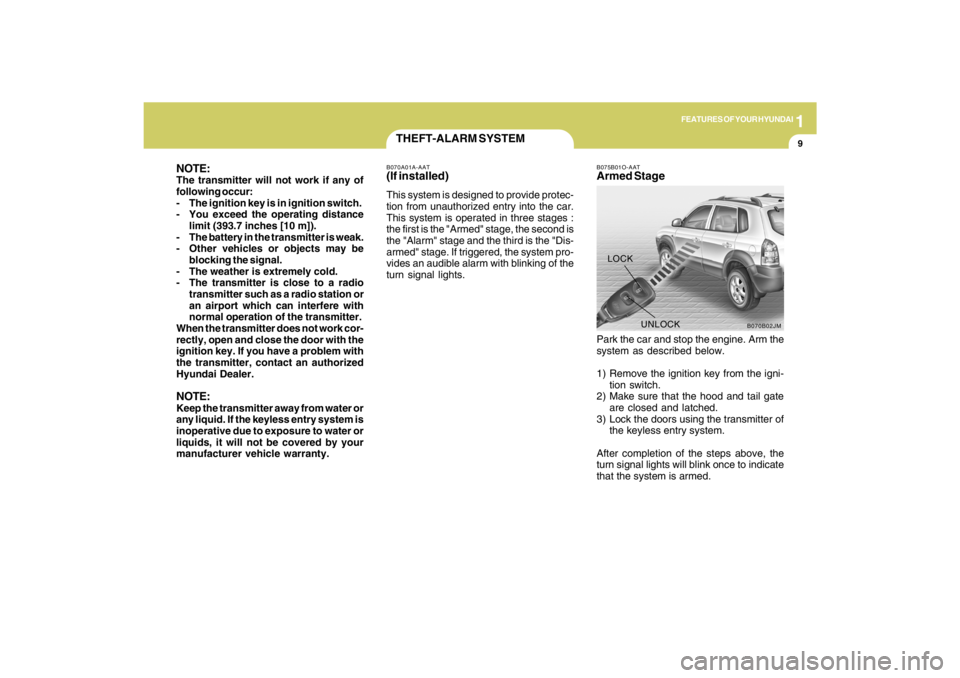
UNLOCK LOCK
THEFT-ALARM SYSTEM
B075B01O-AATArmed StagePark the car and stop the engine. Arm the
system as described below.
1) Remove the ignition key from the igni-
tion switch.
2) Make sure that the hood and tail gate
are closed and latched.
3) Lock the doors using the transmitter of
the keyless entry system.
After completion of the steps above, the
turn signal lights will blink once to indicate
that the system is armed.
B070A01A-AAT(If installed)This system is designed to provide protec-
tion from unauthorized entry into the car.
This system is operated in three stages :
the first is the "Armed" stage, the second is
the "Alarm" stage and the third is the "Dis-
armed" stage. If triggered, the system pro-
vides an audible alarm with blinking of the
turn signal lights.
NOTE:The transmitter will not work if any of
following occur:
- The ignition key is in ignition switch.
- You exceed the operating distance
limit (393.7 inches [10 m]).
- The battery in the transmitter is weak.
- Other vehicles or objects may be
blocking the signal.
- The weather is extremely cold.
- The transmitter is close to a radio
transmitter such as a radio station or
an airport which can interfere with
normal operation of the transmitter.
When the transmitter does not work cor-
rectly, open and close the door with the
ignition key. If you have a problem with
the transmitter, contact an authorized
Hyundai Dealer.NOTE:Keep the transmitter away from water or
any liquid. If the keyless entry system is
inoperative due to exposure to water or
liquids, it will not be covered by your
manufacturer vehicle warranty.
Page 21 of 273
1FEATURES OF YOUR HYUNDAI10
NOTE:o If any door, the tail gate or engine hood
remains open, the system will not be
armed. If this happens, rearm the
system as described above.
o If the "LOCK" button is pressed once
more within 4 seconds after pushing
the "LOCK" button on the transmitter,
the siren will sound once to indicate
that the system is armed.
CAUTION:
Do not arm the system until all passen-
gers have left the car. If the system is
armed while a passenger(s) remains in
the car, the alarm may be activated when
the remaining passenger(s) leaves the
car.
!
B075C01JM-AATAlarm StageThe alarm will be activated if any of the
following occurs while the car is parked
and the system is armed.
1) A front or rear door is opened without
using the transmitter or the ignition key.
2) The tail gate is opened without using
the transmitter or the ignition key.
3) The hood is opened.
The siren will sound and the turn signal
lights will blink continuously for about 30
seconds (This will repeat 3 times). To turn
off the system, unlock the door or tail gate
using the transmitter or the ignition key.
B075D01JM-AATDisarmed StageThe system will be disarmed by using the
transmitter or the ignition key.
The driver's door is unlocked by depress-
ing once the "UNLOCK" button on the
transmitter. If you wish to unlock all doors,
press the "UNLOCK" button on the trans-
mitter again within 4 seconds.
Whenever the step above is completed,
the turn signal lights will blink twice to
indicate that the system is disarmed.NOTE :The system will rearm if a door, tailgate,
or hood is not opened within 30 seconds.
Page 62 of 273
1
FEATURES OF YOUR HYUNDAI
51
!
B260H02A-AAT
Parking Brake/Low Brake
Fluid Level Warning Light
The brake fluid level warning light indi-
cates that the brake fluid level in the brake
master cylinder is low and hydraulic brake
fluid conforming to DOT 3 or DOT 4 speci-
fications should be added. After adding
fluid, if no other trouble is found, the car
should be immediately and carefully driven
to a Hyundai dealer for inspection. If further
trouble is experienced, the vehicle should
not be driven at all but taken to a dealer by
a professional towing service.
Your Hyundai is equipped with dual-di-
agonal braking systems. This means you
still have braking on two wheels even if
one of the dual systems should fail. With
only one of the dual systems working,
more than normal pedal travel and greater
pedal pressure are required to stop the
car. Also, the car will not stop in as short a
distance with only half of the brake system
working. If the brakes fail while you are
driving, shift to a lower gear for additional
engine braking and stop the car as soon as
it is safe to do so.
WARNING:
If you suspect brake trouble, have your
brakes checked by a Hyundai dealer as
soon as possible. Driving your car with
a problem in either the brake electrical
system or brake hydraulic system is
dangerous, and could result in a serious
injury or death.Warning Light OperationThe parking brake/brake fluid level warn-
ing light should come on when the parking
brake is applied and the ignition switch is
turned to "ON" or "START". After the engine
is started, the light should go out when the
parking brake is released.
If the parking brake is not applied, the
warning light should come on when the
ignition switch is turned to "ON" or "START",
then go out when the engine starts. If the
light comes on at any other time, you should
slow the vehicle and bring it to a complete
stop in a safe location off the roadway.
B260J02A-AAT
Charging System Warning
Light
The charging system warning light should
come on when the ignition is turned on,
then go out when the engine is running. If
the light stays on while the engine is run-
ning, there is a malfunction in the electrical
charging system. If the light comes on
while you are driving, stop, turn off the
engine and check under the hood. First,
make certain the generator drive belt is in
place. If it is, check the tension of the belt.
Do this as shown on page 6-23 by pushing
down on the center of the belt. Have the
system checked by your Hyundai dealer
as soon as possible.B260B01JM-AAT
Tail Gate Open Warning Light
This light remains on unless the tail gate
and/or tail gate window is completely
closed and latched.
Page 96 of 273
1
FEATURES OF YOUR HYUNDAI
85
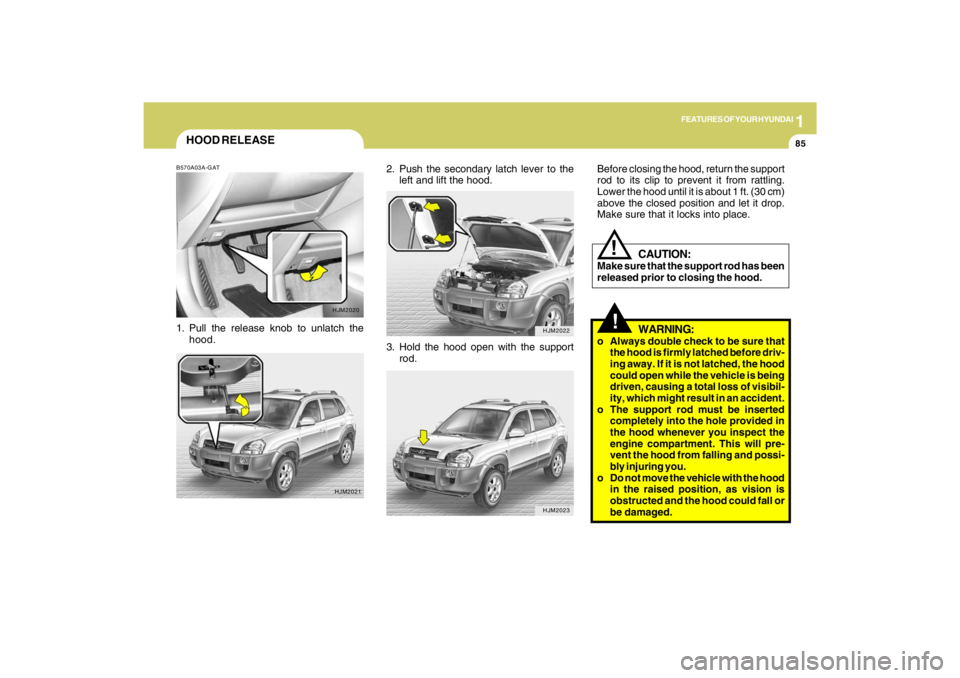
2. Push the secondary latch lever to the
left and lift the hood.
HJM2022HJM2023
HOOD RELEASEB570A03A-GAT1. Pull the release knob to unlatch the
hood.
HJM2020
HJM2021
3. Hold the hood open with the support
rod.
!
Before closing the hood, return the support
rod to its clip to prevent it from rattling.
Lower the hood until it is about 1 ft. (30 cm)
above the closed position and let it drop.
Make sure that it locks into place.
WARNING:
o Always double check to be sure that
the hood is firmly latched before driv-
ing away. If it is not latched, the hood
could open while the vehicle is being
driven, causing a total loss of visibil-
ity, which might result in an accident.
o The support rod must be inserted
completely into the hole provided in
the hood whenever you inspect the
engine compartment. This will pre-
vent the hood from falling and possi-
bly injuring you.
o Do not move the vehicle with the hood
in the raised position, as vision is
obstructed and the hood could fall or
be damaged.
CAUTION:
Make sure that the support rod has been
released prior to closing the hood.
!
Page 173 of 273
34WHAT TO DO IN AN EMERGENCY
IF THE ENGINE OVERHEATS
!!
!
WARNING:
While the engine is running, keep hair,
hands and clothing away from moving
parts such as the fan and drive belts to
prevent injury.
5. If the water pump drive belt is broken or
engine coolant is leaking out, stop the
engine immediately and call the near-
est Hyundai dealer for assistance.
WARNING:
Do not remove the radiator cap when the
engine is hot. This can allow coolant to be
blown out of the opening and cause se-
rious burns.6. If you cannot find the cause of the over-
heat-ing, wait until the engine tempera-
ture has returned to normal. Then, if
coolant has been lost, carefully add
coolant to the reservoir (page 6-9) to
bring the fluid level in the reservoir up to
the halfway mark.
7. Proceed with caution, keeping alert for
further signs of overheating. If over-
heating happens again, call a Hyundai
dealer for assistance.
CAUTION:
Serious loss of coolant indicates there is
a leak in the cooling system and this
should be checked as soon as possible
by a Hyundai dealer.
D030A02A-AATIf your temperature gauge indicates over-
heating, you experience a loss of power, or
hear loud pinging or knocking, the engine
is probably too hot. If this happens, you
should:
1. Pull off the road and stop as soon as it
is safe to do so.
2. Place the gear selector lever in "P"
(auto-matic), or neutral (manual
transaxle) and set the parking brake. If
the air conditioning is on, turn it off.
3. If engine coolant is running out under
the car or steam is coming out from the
hood, stop the engine. Do not open the
hood until the coolant has stopped
running or the steaming has stopped. If
there is no visible loss of engine coolant
and no steam, leave the engine running
and check to be sure the engine cooling
fan is operating. If the fan is not running,
turn the engine off.
4. Check to see if the water pump drive belt
is missing. If it is not missing, check to
see that it is tight. If the drive belt seems
to be satisfactory, check for coolant
leaking from the radiator, hoses or un-
der the car. (If the air conditioning had
been in use, it is normal for cold water
to be draining from it when you stop).
Page 211 of 273
6
DO-IT-YOURSELF MAINTENANCE
7
6. Install a new oil filter in accordance with
the instructions on the carton or on the
filter itself. Do not over-tighten. (Tight-
ening torque : 1.2 ~ 1.6 kgf.m) Be sure
that the mounting surface on the engine
is clean and that the old gasket is re-
moved completely. Lubricate the new
gasket on the filter with clean engine oil
before installation.
7. Remove the engine oil level dipstick.
8. Refill the crankcase with the recom-
mended engine oil. Refer to the speci-
fication in chapter 9 for engine oil ca-
pacity.
!
PROPOSITION 65 WARNING:
This product contains a chemical known
to the State of California to cause can-
cer. Used engine oil may cause irritation
or cancer of the skin if left in contact with
the skin for prolonged periods of time.
Used engine oil contains chemicals that
have caused cancer in laboratory ani-
mals. Always protect your skin by wash-
ing your hands thoroughly with soap and
warm water as soon as possible after
handling used oil.
!
WARNING:
Be very careful when draining the en-
gine oil as it may be hot enough to burn
you! 2. Open the hood and remove the engine
oil filler cap.
3. Slide underneath the car and loosen
the drain plug by turning it counter-
clockwise with a wrench of the proper
size. Be sure that a drain pan is in
position to catch the oil as it drains out,
then remove the drain plug.
4. When the oil has stopped draining, re-
place the drain plug using a new washer
and retighten by turning it clockwise.
Oil pan drain plug tightening torque:
3.5 ~ 4.5 kgf.m (2.7L)
4.0 ~ 4.5 kgf.m (2.0L)
5. Remove the oil filter by turning it coun-
terclockwise with a oil filter wrench of
the proper size. A certain amount of oil
will come out when you remove the
filter. So be sure to have your drain pan
in place underneath it.
CAUTION:
Slowly pour the recommended oil using
by a funnel. Do not overfill! Engine dam-
age may occur if overfilled.
!
9. Start the engine and check to be sure no
oil is leaking from the drain plug or oil
filter.
10. Shut off the engine and recheck the oil
level.
NOTE:Always dispose of used engine oil in an
environmentally acceptable manner. It
is suggested that it be placed in a sealed
container and taken to a service station
for reclamation. Do not pour the oil on the
ground or put it in with the household
trash.
Page 219 of 273

6
DO-IT-YOURSELF MAINTENANCE
15
G120D01A-AATTo Check the Fluid LevelThe fluid level in the brake fluid reservoir
should be checked periodically. The level
should be between the "MIN" and "MAX"
marks on the side of the reservoir. If the
level is at or below the "MIN" mark, care-
fully add fluid to bring it up to "MAX". Do not
overfill.
HJM5007
!
G120E02A-AATAdding Brake Fluid
WARNING:Handle brake fluid carefully. It can dam-
age your vision if it gets into your eyes.
Use only DOT 3 or DOT 4 specification
fluid from a sealed container. Do not
allow the fluid can or reservoir to remain
open any longer than required. This will
prevent entry of dirt and moisture which
can damage the brake system and cause
improper operation.
To add brake fluid, first wipe away any dirt
then unscrew the fluid reservoir cap. Slowly
pour the recommended fluid into the res-
ervoir. Do not overfill. Carefully replace the
cap on the reservoir and tighten.
HJM5007
CHECKING THE CLUTCH FLUIDG130A01A-AATTo Check the Clutch FluidThe clutch fluid level in the master cylinder
should be checked when performing other
under hood services. The system should
be checked for leakage at the same time.
Check to make certain that the clutch fluid
level is always between the "MAX" and
"MIN" level markings on the fluid reservoir.
Fill as required. Fluid loss indicates a leak
in the clutch system which should be in-
spected and repaired immediately. Con-
sult your Hyundai dealer.
Page 229 of 273
6
DO-IT-YOURSELF MAINTENANCE
25
POWER STEERING FLUID
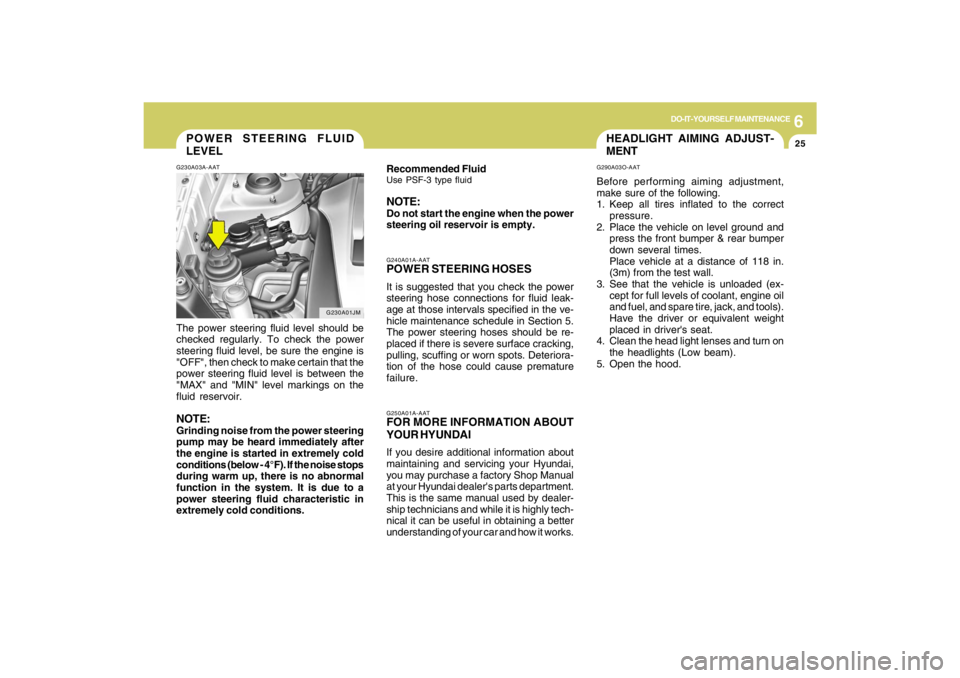
LEVELG230A03A-AATThe power steering fluid level should be
checked regularly. To check the power
steering fluid level, be sure the engine is
"OFF", then check to make certain that the
power steering fluid level is between the
"MAX" and "MIN" level markings on the
fluid reservoir.NOTE:Grinding noise from the power steering
pump may be heard immediately after
the engine is started in extremely cold
conditions (below - 4°F). If the noise stops
during warm up, there is no abnormal
function in the system. It is due to a
power steering fluid characteristic in
extremely cold conditions.
G230A01JM
HEADLIGHT AIMING ADJUST-
MENTG290A03O-AATBefore performing aiming adjustment,
make sure of the following.
1. Keep all tires inflated to the correct
pressure.
2. Place the vehicle on level ground and
press the front bumper & rear bumper
down several times.
Place vehicle at a distance of 118 in.
(3m) from the test wall.
3. See that the vehicle is unloaded (ex-
cept for full levels of coolant, engine oil
and fuel, and spare tire, jack, and tools).
Have the driver or equivalent weight
placed in driver's seat.
4. Clean the head light lenses and turn on
the headlights (Low beam).
5. Open the hood.
G250A01A-AATFOR MORE INFORMATION ABOUT
YOUR HYUNDAIIf you desire additional information about
maintaining and servicing your Hyundai,
you may purchase a factory Shop Manual
at your Hyundai dealer's parts department.
This is the same manual used by dealer-
ship technicians and while it is highly tech-
nical it can be useful in obtaining a better
understanding of your car and how it works.G240A01A-AATPOWER STEERING HOSESIt is suggested that you check the power
steering hose connections for fluid leak-
age at those intervals specified in the ve-
hicle maintenance schedule in Section 5.
The power steering hoses should be re-
placed if there is severe surface cracking,
pulling, scuffing or worn spots. Deteriora-
tion of the hose could cause premature
failure. Recommended FluidUse PSF-3 type fluidNOTE:Do not start the engine when the power
steering oil reservoir is empty.