2009 HYUNDAI TUCSON air condition
[x] Cancel search: air conditionPage 200 of 273

5
VEHICLE MAINTENANCE REQUIREMENTS6
MAINTENANCE UNDER SEVERE USAGE CONDITIONS
SEVERE DRIVING CONDITIONSA - Repeatly driving short distance of less than 5miles(8km) in normal
tempera ture or less than 10miles(16km) in freezing temperature
B - Extensive engine idling or low speed driving for long distances
C- Driving on rough, dusty, muddy, unpaved, graveled or salt-spread
roads
D- Driving in areas using salt or other corrosive materials or in very
cold weatherF040A02JM-AATThe following items must be serviced more frequently on cars normally used under severe driving conditions. Refer to the chart below
for the appropriate maintenance intervals.
R : Replace I : Inspect and, after inspection, clean, adjust, repair or replace if necessary
*1. Transfer case Oil ended Rear Axle Oil should be changed anytime they have been submerged in water.
E - Driving in sandy areas
F - Driving in heavy traffic area over 90°F(32°C)
G- Driving on uphill, downhill, or mountain road
H - Towing a Trailer, or using a camper, or roof rack
I - Driving as a patrol car, taxi, other commercial use or vehicle
towing
J - Driving over 100 MPH(170 Km/h)
K - Frequently driving in stop-and-go conditionsENGINE OIL AND FILTER
TIMING BELT
(WHEN REPLA CE TIMING BELT and INSPECT WATER PUMP : 2.7L)
AIR CLEANER FILTER
SPARK PLUGS
BRAKE PADS, CALIPERS AND ROTORS
REAR BRAKE DRUMS/LININGS/PADS, PARKING BRAKE
STEERING GEAR BOX, LINKAGE & BOOTS/
LOWER ARM BALL JOINT
DRIVESHAFTS AND BOOTS
MANUAL TRANSAXLE OIL
AUTOMATIC TRANSAXLE FLUID
CLIMATE CONTROL AIR FILTER
TRANSFER CASE OIL (4WD) *
1
REAR AXLE OIL (4WD) *
1
PROPELLER SHAFT (4WD)
MAINTENANCE ITEM
R
I/R
R
R
I
I
I
I
R
R
R
R
R
I
EVERY 3,000 MILES (4,800 KM) OR 3 MONTHS
INSPECT EVERY 20,000MILES (32,200 KM)
REPLACE EVERY 40,000MILES (64,400 KM)
MORE FREQUENTLY
MORE FREQUENTLY
MORE FREQUENTLY
MORE FREQUENTLY
MORE FREQUENTLY
EVERY 7,500 MILES (12,000 KM) OR 6 MONTHS
EVERY 60,000 MILES (96,000 KM)
EVERY 30,000 MILES (48,000 KM)
MORE FREQUENTLY
EVERY 25,000 MILES (40,000 KM)
EVERY 50,000 MILES (80,000 KM)
EVERY 7,500 MILES (12,000 KM)
DRIVING
CONDITION MAINTENANCE
INTERVALS MAINTENANCE
OPERATION
A, B, C, F, G, H, I, K
C, D, F, G
C, E
B, H
C, D, G, H
C, D, G, H
C, D, E, F, G
C, E, F
A, C, D, E, F, G, H, I, J
A, C, E, F, G, H, I
C, E,
C, E, G, I
C, E, G, I
C
Page 203 of 273
5
VEHICLE MAINTENANCE REQUIREMENTS
9
F070L01A-AATo Suspension Mounting BoltsCheck the suspension connections for
looseness or damage. Retighten to the
specified torque.
F070G02A-AATo Brake FluidCheck brake fluid level in the brake fluid
reservoir. The level should be between
"MIN" and "MAX" marks on the side of the
reservoir. Use only hydraulic brake fluid
conforming to DOT 3 or DOT 4.F070F01A-AATo Brake Hoses and LinesVisually check for proper installation, chaf-
ing, cracks, deterioration and any leak-
age. Replace any deteriorated or dam-
aged parts immediately.
F070K01A-AATo Exhaust Pipe and MufflerVisually inspect the exhaust pipes, muffler
and
hangers for cracks, deterioration, or dam-
age. Start the engine and listen carefully
for any exhaust gas leakage. Tighten con-
nections or replace parts as necessary.
F070J01A-AATo Brake Pads, Calipers and RotorsCheck the pads for excessive wear, discs
for run out and wear, and calipers for fluid
leakage.F070H01O-AATo Rear Brake Discs and Linings/
Parking BrakeCheck the rear brake discs and linings for
scoring, burning, leaking fluid, broken parts,
and excessive wear. Inspect the parking
brake system including the parking brake
lever and cables. For detailed service pro-
cedures, refer to the Shop Manual.
F070M01A-AATo Steering Gear Box, Linkage &
Boots/Lower Arm Ball JointWith the vehicle stopped and engine off,
check for excessive free-play in the steer-
ing wheel.
Check the linkage for bends or damage.
Check the dust boots and ball joints for
deterioration, cracks, or damage. Replace
any damaged parts.
F070Q01A-AATo Air Conditioning RefrigerantCheck the air conditioning lines and con-
nections for leakage and damage. Check
air conditioning performance according to
the relevant shop manual if necessary.F070P01A-AATo Driveshafts and BootsCheck the drive shafts, boots and clamps
for cracks, deterioration, or damage. Re-
place any damaged parts and, if neces-
sary, repack the grease.F070N01A-AATo Power Steering Pump, Belt and
HosesCheck the power steering pump and hoses
for leakage and damage. Replace any
damaged or leaking parts immediately.
Inspect the power steering belt for evi-
dence of cuts, cracks, excessive wear,
oiliness and proper tension. Replace or
adjust it if necessary.
Page 205 of 273
6
Engine Compartment .................................................... 6-2
General Checks ............................................................ 6-4
Checking the Engine Oil ............................................... 6-5
Changing the Oil and Filter ............................................ 6-6
Checking and Changing the Engine Coolant ................ 6-8
Changing the Air Cleaner Filter ...................................6-10
Checking the Transaxle Oil (Manual) .........................6-11
Checking the Transaxle Fluid (Automatic)..................6-12
Checking the Brakes ..................................................6-14
Checking the Clutch Fluid...........................................6-15
Air Conditioning Care..................................................6-16
Changing the Climate Control Air Filter .......................6-17
Checking the Free-play...............................................6-19
Checking Drive Belts ..................................................6-20
Checking and Replacing Fuses..................................6-21
Checking the Battery..................................................6-23
Power Steering Fluid Level .........................................6-25
Replacement of Light Bulbs ........................................6-27
Bulb Wattage ...............................................................6-34
Fuse Panel Description...............................................6-35
6
DO-IT-YOURSELF MAINTENANCE
Page 208 of 273
6
DO-IT-YOURSELF MAINTENANCE
4
GENERAL CHECKS
G020C01A-AATVehicle InteriorThe following should be checked each
time when the vehicle is driven:
o Lights operation
o Windshield wiper operation
o Horn operation
o Defroster, heating system operation
(and air conditioning, if installed)
o Steering operation and condition
o Mirror condition and operation
o Turn signal operation
o Accelerator pedal operation
o Brake operation, including parking
brake
o Manual transaxle operation, including
clutch operation
o Automatic transaxle operation, includ-
ing "Park" mechanism operation
o Seat control condition and operation
o Seat belt condition and operation
o Sunvisor operation
If you notice anything that does not operate
correctly or appears to be functioning cor-
rectly, inspect it carefully and seek assis-
tance from your Hyundai dealer if service
is needed.
G020B01A-AATVehicle ExteriorThe following should be checked monthly:
o Overall appearance and condition
o Wheel condition and wheel nut torque
o Exhaust system condition
o Light condition and operation
o Windshield glass condition
o Wiper blade condition
o Paint condition and body corrosion
o Fluid leaks
o Door and hood lock condition
o Tire pressure and condition
(including spare tire)
G020A01A-AATEngine CompartmentThe following should be checked regu-
larly:
o Engine oil level and condition
o Transaxle fluid level and condition
o Brake fluid level
o Clutch fluid level
o Engine coolant level
o Windshield washer fluid level
o Accessory drive belt condition
o Engine coolant hose condition
o Fluid leaks (on or below components)
o Power steering fluid level
o Battery condition
o Air filter condition
Page 220 of 273
6
DO-IT-YOURSELF MAINTENANCE
16
!
G130B02A-AATTo Replace the FluidRecommended brake fluid conforming to
DOT 3 or DOT 4 specification should be
used. The reservoir cap must be fully tight-
ened to avoid contamination from foreign
matter or moisture.NOTE:Do not allow any other liquids to contami-
nate the brake fluid. Seal damage will
result.
WARNING:
Use caution when handling brake fluid. It
can damage your vision if you get it in
your eyes. It will also damage your
vehicle's paint if spilled on it and not
removed immediately.
AIR CONDITIONING CARE
!
G140A01A-AATKeeping the Condenser CleanThe air conditioning condenser (and en-
gine radiator) should be checked periodi-
cally for accumulation of dirt, dead insects,
leaves, etc. These can interfere with maxi-
mum cooling efficiency. When removing
such accumulations, brush or hose them
away carefully to avoid bending the cool-
ing fans.
G140B01A-AATChecking the Air Conditioning Op-
eration1. Start the engine and let it run at a fast idle
for several minutes with the air condi-
tioning set at the maximum cold setting.
2. If the air coming out of the in-dash vents
is not cold, have the air conditioning
system inspected by your Hyundai
dealer.
CAUTION:
Running the air conditioning system for
extended periods of time with a low re-
frigerant level may damage the com-
pressor.
Page 221 of 273
6
DO-IT-YOURSELF MAINTENANCE
17
G190A01GK
DOHC CVVT V6
Water Pump Pulley
0.2~0.24 in.
(5~6 mm)
Power steering
COMP
Auto
tensioner
Alternator Pulley
Crankshaft PulleyAlternator
Eng.pulley
G140D02A-AATChecking the Compressor Drive Belt
G140C01A-AATLubricationTo lubricate the compressor and the seals
in the system, the air conditioning should
be run for at least 10 minutes each week.
This is particularly important during cool
weather when the air conditioning system
is not otherwise in use.
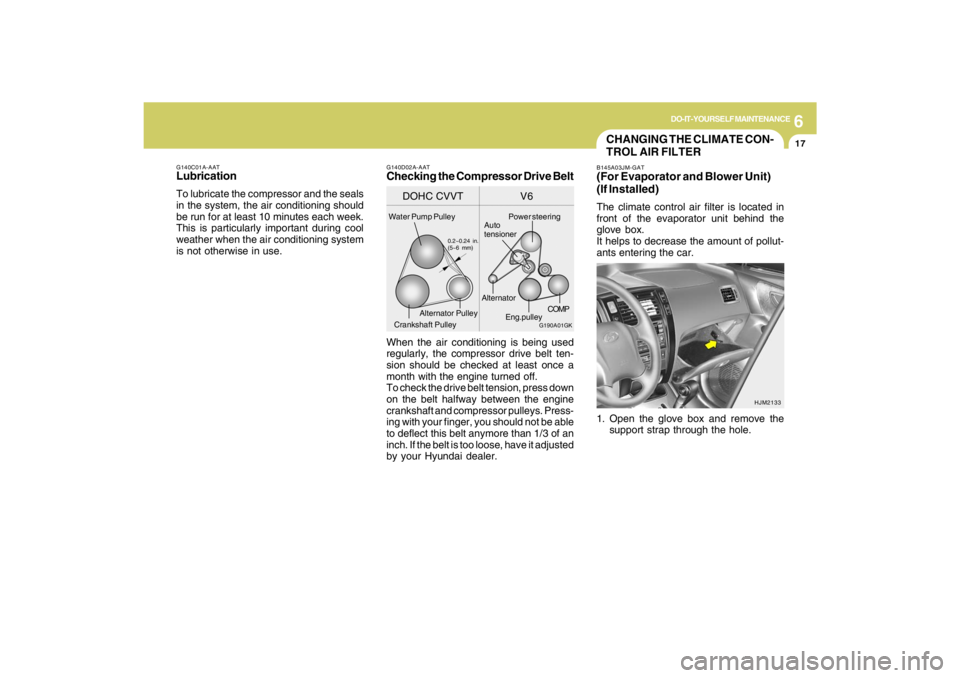
When the air conditioning is being used
regularly, the compressor drive belt ten-
sion should be checked at least once a
month with the engine turned off.
To check the drive belt tension, press down
on the belt halfway between the engine
crankshaft and compressor pulleys. Press-
ing with your finger, you should not be able
to deflect this belt anymore than 1/3 of an
inch. If the belt is too loose, have it adjusted
by your Hyundai dealer.
CHANGING THE CLIMATE CON-
TROL AIR FILTERB145A03JM-GAT(For Evaporator and Blower Unit)
(If Installed)The climate control air filter is located in
front of the evaporator unit behind the
glove box.
It helps to decrease the amount of pollut-
ants entering the car.
1. Open the glove box and remove the
support strap through the hole.
HJM2133
Page 223 of 273
6
DO-IT-YOURSELF MAINTENANCE
19
G150A01JM
!
B145A01JM
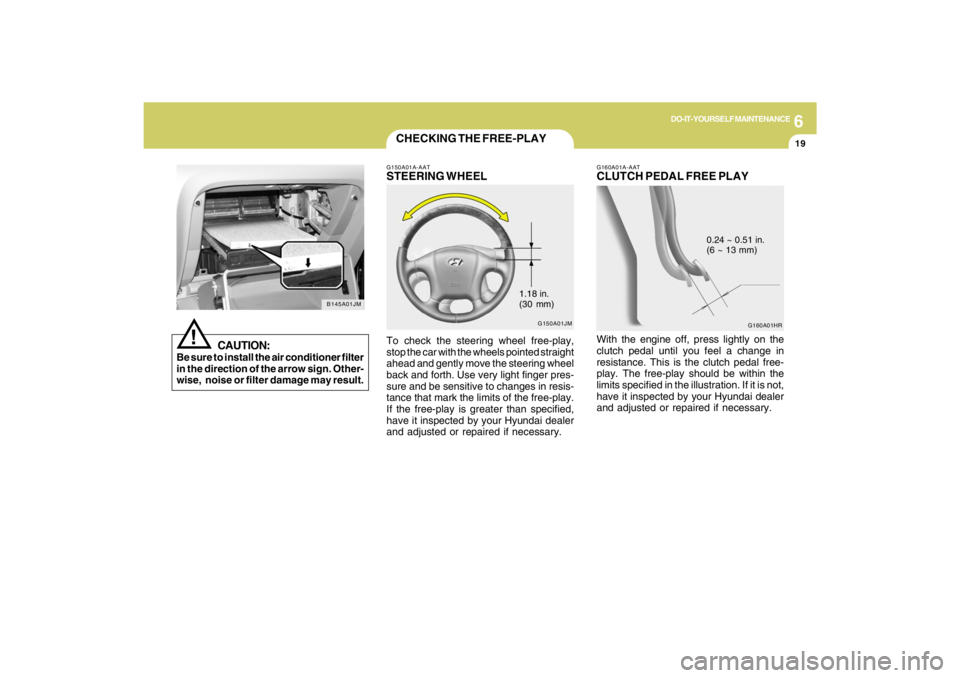
CAUTION:
Be sure to install the air conditioner filter
in the direction of the arrow sign. Other-
wise, noise or filter damage may result.
CHECKING THE FREE-PLAYG150A01A-AATSTEERING WHEELTo check the steering wheel free-play,
stop the car with the wheels pointed straight
ahead and gently move the steering wheel
back and forth. Use very light finger pres-
sure and be sensitive to changes in resis-
tance that mark the limits of the free-play.
If the free-play is greater than specified,
have it inspected by your Hyundai dealer
and adjusted or repaired if necessary.
1.18 in.
(30 mm)
G160A01HR G160A01A-AAT
CLUTCH PEDAL FREE PLAYWith the engine off, press lightly on the
clutch pedal until you feel a change in
resistance. This is the clutch pedal free-
play. The free-play should be within the
limits specified in the illustration. If it is not,
have it inspected by your Hyundai dealer
and adjusted or repaired if necessary.
0.24 ~ 0.51 in.
(6 ~ 13 mm)
Page 228 of 273
6
DO-IT-YOURSELF MAINTENANCE
24
G220C01A-AATChecking Condenser Cooling FanThe condenser cooling fan should come
on automatically whenever the air condi-
tioning is in operation.G220B01A-AATChecking Engine Cooling FanThe engine cooling fan should come on
automatically if the engine coolant tem-
perature is high.CHECKING ELECTRIC COOLING
FANS!
G220A01A-AAT
WARNING:
The cooling fan is controlled by engine
coolant temperature and may some-
times operate even when the engine is
not running. Use extreme caution when
working near the blades of the cooling
fan, so that you are not injured by a
rotating fan blade. As the engine coolant
temperature decreases the fan will au-
tomatically shut off. This is a normal
condition.
If electrolyte gets on your skin,
thoroughly wash the contacted
area.
If you feel a pain or a burning
sensation, get medical atten-
tion immediately.
Wear eye protection when
charging or working near a bat-
tery.
Always provide ventilation
when working in an enclosed
space.
o When lifting a plastic-cased battery,
excessive pressure on the case may
cause battery acid to leak, resulting in
personal injury. Lift with a battery
carrier or with your hands on opposite
corners.
o Never attempt to charge the battery
when the battery cables are con-
nected.
o The electrical ignition system works
with high voltage.
Never touch these components with
the engine running or the ignition
switched on.
!
WARNING:
!
WARNING:Always read the following in-
structions carefully when han-
dling a battery.
Keep lighted cigarettes and all
other flames or sparks away
from the battery.
Hydrogen, which is a highly
combustible gas, is always
present in battery cells and
may explode if ignited.
Keep batteries out of the reach
of children because batteries
contain highly corrosive SUL-
FURIC ACID. Do not allow bat-
tery acid to contact your skin,
eyes, clothing or paint finish.
If any electrolyte gets into your
eyes, flush your eyes with
clean water for at least 15 min-
utes and get immediate medi-
cal attention. If possible, con-
tinue to apply water with a
sponge or cloth until medical
attention is received.