2009 HYUNDAI TUCSON parking brake
[x] Cancel search: parking brakePage 179 of 273
310
WHAT TO DO IN AN EMERGENCY
IF YOU HAVE A FLAT TIRED050A02A-AATIf a tire goes flat while you are driving:
1. Take your foot off the accelerator
pedal and let the car slow down while
driving straight ahead. Do not apply
the brakes immediately or attempt to
pull off the road as this may cause a
loss of control. When the vehicle has
slowed to such a speed that it is safe
to do so, brake carefully and pull off
the road. Drive off the road as far as
possible and park on firm, level
ground. If you are on a divided high-
way, do not park in the median area
between the two traffic lanes.
2. When the car is stopped, turn on your
emergency hazard flashers, set the
parking brake and put the transaxle
in "P" (automatic) or reverse (manual
transaxle).
3. Have all passengers get out of the
vehicle. Be sure they all get out on
the side of the vehicle that is away
from traffic.
4. Change the tire following the instruc-
tions provided on the following pages.
HJM4008
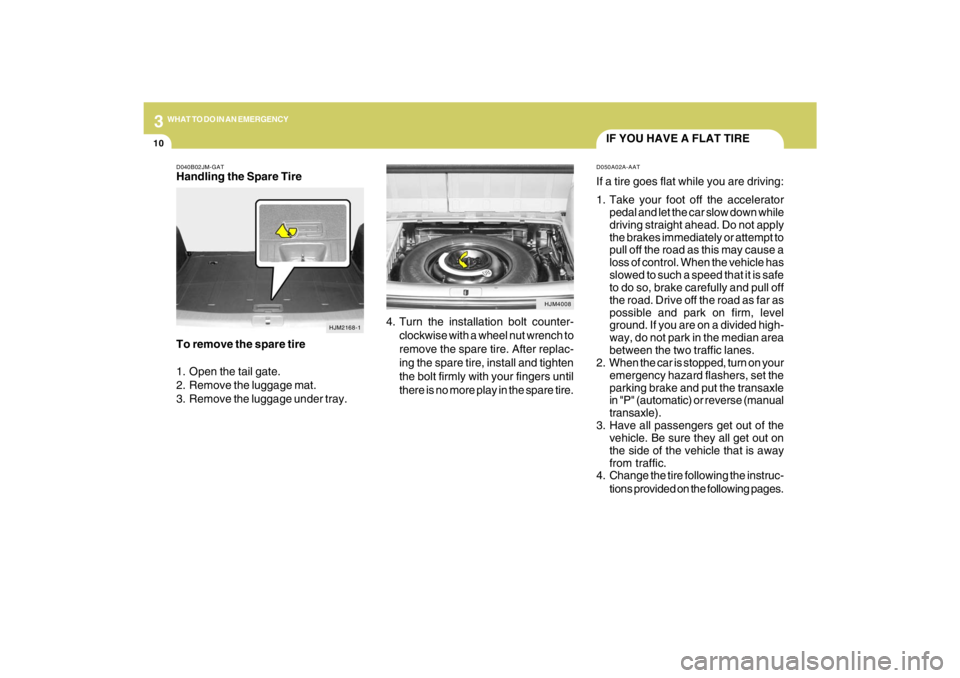
4. Turn the installation bolt counter-
clockwise with a wheel nut wrench to
remove the spare tire. After replac-
ing the spare tire, install and tighten
the bolt firmly with your fingers until
there is no more play in the spare tire.
D040B02JM-GATHandling the Spare Tire
To remove the spare tire
1. Open the tail gate.
2. Remove the luggage mat.
3. Remove the luggage under tray.
HJM2168-1
Page 180 of 273
3
WHAT TO DO IN AN EMERGENCY
11
CHANGING A FLAT TIRED060A02HP-AATThe procedure described on the follow-
ing pages can be used to rotate tires as
well as to change a flat tire. When
preparing to change a flat tire, check to
be sure the gear selector lever is in "P"
(automatic) or reverse gear (manual
transaxle) and that the parking brake is
set, then:
D060A01JM
!
WARNING:
Your vehicle is equipped with tires
designed to provide for safe ride and
handling capability.
Do not use a size and type of tire and
wheel that is different from the one
that is originally installed on your
vehicle. It can affect the safety and
performance of your vehicle, which
could lead to handling failure or
rollover and serious injury.
When replacing the tires, be sure to
equip all four tires with the tire and
wheel of the same size, type, tread,
brand and load-carrying capacity. If
you nevertheless decide to equip
your vehicle with any tire/wheel com-
bination not recommended by
Hyundai for off-road driving, you
should not use these tires for high-
way driving.
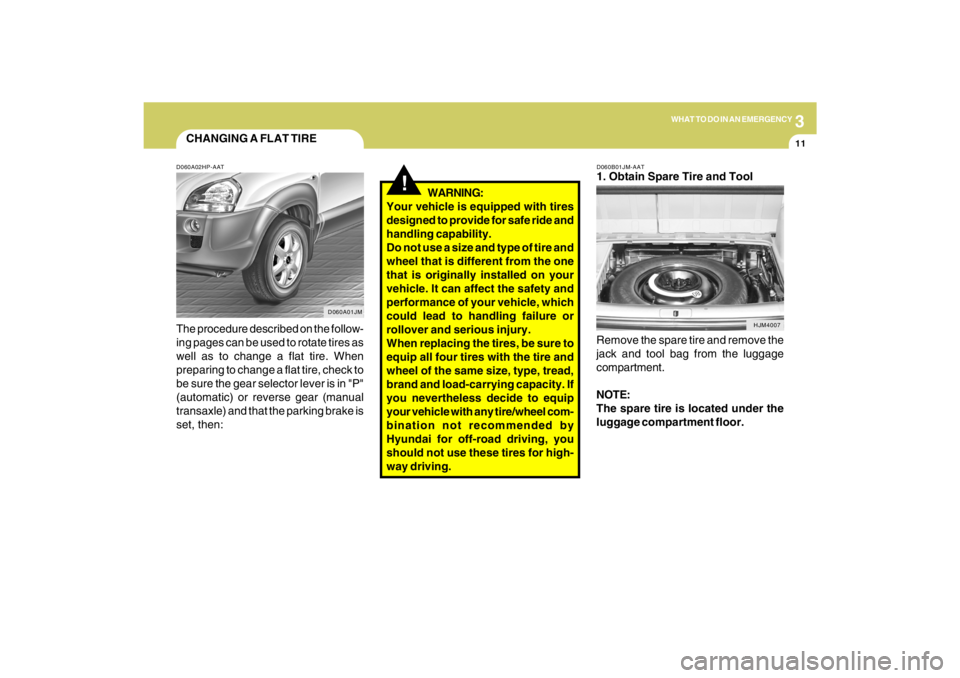
Remove the spare tire and remove the
jack and tool bag from the luggage
compartment.
NOTE:
The spare tire is located under the
luggage compartment floor.D060B01JM-AAT1. Obtain Spare Tire and Tool
HJM4007
Page 199 of 273
5
VEHICLE MAINTENANCE REQUIREMENTS
5
Note : (1) When replace drive belt and inspect water pump.
(2) For every 48 months or 37,200 miles (60,000 km), whichever occurs first : "I"
For every 72 months or 56,000 miles (90,000 km), whichever occurs first : "R"
(3) Inspect every 25,000 miles (40,000 km)and replace every 62,000 miles (100,000 km).
(4) lnspect every 25,000 miles (40,000 km)
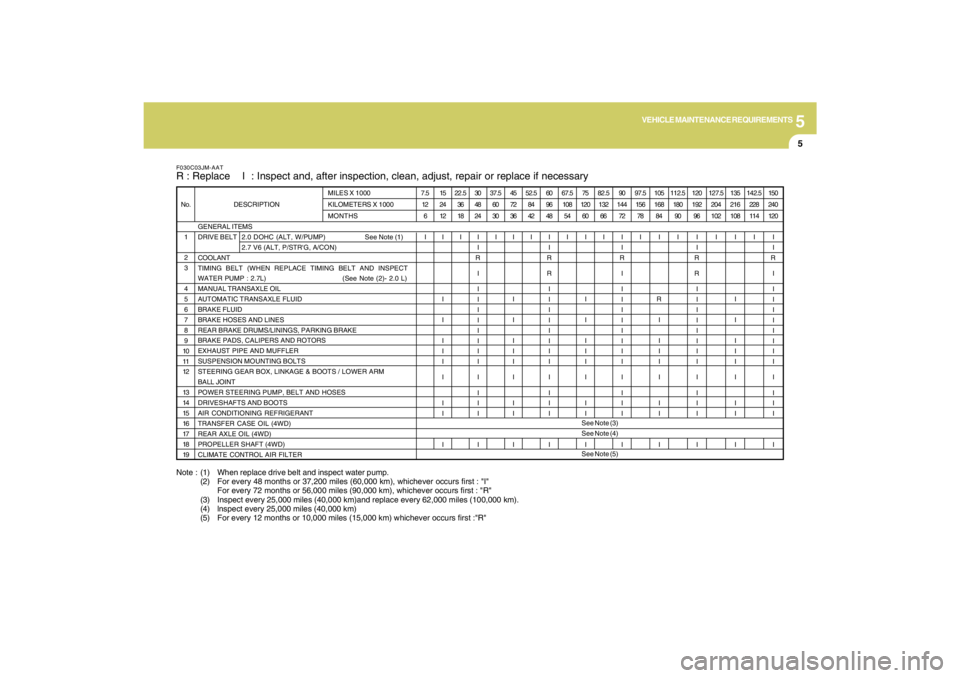
(5) For every 12 months or 10,000 miles (15,000 km) whichever occurs first :"R"F030C03JM-AATR : Replace I : Inspect and, after inspection, clean, adjust, repair or replace if necessary
GENERAL ITEMS
DRIVE BELT
COOLANT
TIMING BELT (WHEN REPLACE TIMING BELT AND INSPECT
WATER PUMP : 2.7L) (See Note (2)- 2.0 L)
MANUAL TRANSAXLE OIL
AUTOMATIC TRANSAXLE FLUID
BRAKE FLUID
BRAKE HOSES AND LINES
REAR BRAKE DRUMS/LININGS, PARKING BRAKE
BRAKE PADS, CALIPERS AND ROTORS
EXHAUST PIPE AND MUFFLER
SUSPENSION MOUNTING BOLTS
STEERING GEAR BOX, LINKAGE & BOOTS / LOWER ARM
BALL JOINT
POWER STEERING PUMP, BELT AND HOSES
DRIVESHAFTS AND BOOTS
AIR CONDITIONING REFRIGERANT
TRANSFER CASE OIL (4WD)
REAR AXLE OIL (4WD)
PROPELLER SHAFT (4WD)
CLIMATE CONTROL AIR FILTER 1
2
3
4
5
6
7
8
9
10
11
12
13
14
15
16
17
18
19 No. DESCRIPTIONMILES X 1000
KILOMETERS X 1000
MONTHS
2.0 DOHC (ALT, W/PUMP) See Note (1)
2.7 V6 (ALT, P/STR'G, A/CON)7.5
12
6
I15
24
12
I
I
I
I
I
I
I
I
I
I22.5
36
18
I30
48
24
I
I
R
I
I
I
I
I
I
I
I
I
I
I
I
I
I37.5
60
30
I45
72
36
I
I
I
I
I
I
I
I
I
I52.5
84
42
I60
96
48
I
I
R
R
I
I
I
I
I
I
I
I
I
I
I
I
I67.5
108
54
I75
120
60
I
I
I
I
I
I
I
I
I
I82.5
132
66
I90
144
72
I
I
R
I
I
I
I
I
I
I
I
I
I
I
I
I
I97.5
156
78
I105
168
84
I
R
I
I
I
I
I
I
I
I112.5
180
90
I120
192
96
I
I
R
R
I
I
I
I
I
I
I
I
I
I
I
I
I127.5
204
102
I135
216
108
I
I
I
I
I
I
I
I
I
I142.5
228
114
I150
240
120
I
I
R
I
I
I
I
I
I
I
I
I
I
I
I
I
I See Note (3)
See Note (4)
See Note (5)
Page 200 of 273

5
VEHICLE MAINTENANCE REQUIREMENTS6
MAINTENANCE UNDER SEVERE USAGE CONDITIONS
SEVERE DRIVING CONDITIONSA - Repeatly driving short distance of less than 5miles(8km) in normal
tempera ture or less than 10miles(16km) in freezing temperature
B - Extensive engine idling or low speed driving for long distances
C- Driving on rough, dusty, muddy, unpaved, graveled or salt-spread
roads
D- Driving in areas using salt or other corrosive materials or in very
cold weatherF040A02JM-AATThe following items must be serviced more frequently on cars normally used under severe driving conditions. Refer to the chart below
for the appropriate maintenance intervals.
R : Replace I : Inspect and, after inspection, clean, adjust, repair or replace if necessary
*1. Transfer case Oil ended Rear Axle Oil should be changed anytime they have been submerged in water.
E - Driving in sandy areas
F - Driving in heavy traffic area over 90°F(32°C)
G- Driving on uphill, downhill, or mountain road
H - Towing a Trailer, or using a camper, or roof rack
I - Driving as a patrol car, taxi, other commercial use or vehicle
towing
J - Driving over 100 MPH(170 Km/h)
K - Frequently driving in stop-and-go conditionsENGINE OIL AND FILTER
TIMING BELT
(WHEN REPLA CE TIMING BELT and INSPECT WATER PUMP : 2.7L)
AIR CLEANER FILTER
SPARK PLUGS
BRAKE PADS, CALIPERS AND ROTORS
REAR BRAKE DRUMS/LININGS/PADS, PARKING BRAKE
STEERING GEAR BOX, LINKAGE & BOOTS/
LOWER ARM BALL JOINT
DRIVESHAFTS AND BOOTS
MANUAL TRANSAXLE OIL
AUTOMATIC TRANSAXLE FLUID
CLIMATE CONTROL AIR FILTER
TRANSFER CASE OIL (4WD) *
1
REAR AXLE OIL (4WD) *
1
PROPELLER SHAFT (4WD)
MAINTENANCE ITEM
R
I/R
R
R
I
I
I
I
R
R
R
R
R
I
EVERY 3,000 MILES (4,800 KM) OR 3 MONTHS
INSPECT EVERY 20,000MILES (32,200 KM)
REPLACE EVERY 40,000MILES (64,400 KM)
MORE FREQUENTLY
MORE FREQUENTLY
MORE FREQUENTLY
MORE FREQUENTLY
MORE FREQUENTLY
EVERY 7,500 MILES (12,000 KM) OR 6 MONTHS
EVERY 60,000 MILES (96,000 KM)
EVERY 30,000 MILES (48,000 KM)
MORE FREQUENTLY
EVERY 25,000 MILES (40,000 KM)
EVERY 50,000 MILES (80,000 KM)
EVERY 7,500 MILES (12,000 KM)
DRIVING
CONDITION MAINTENANCE
INTERVALS MAINTENANCE
OPERATION
A, B, C, F, G, H, I, K
C, D, F, G
C, E
B, H
C, D, G, H
C, D, G, H
C, D, E, F, G
C, E, F
A, C, D, E, F, G, H, I, J
A, C, E, F, G, H, I
C, E,
C, E, G, I
C, E, G, I
C
Page 202 of 273

5
VEHICLE MAINTENANCE REQUIREMENTS8
F070D01A-AATo Manual Transaxle OilInspect the manual transaxle oil according
to the maintenance schedule.NOTE:If the oil level is low, check for possible
leaks before adding oil. Do not overfill.
F070C01A-AATo CoolantThe coolant should be changed at the
intervals specified in the maintenance
schedule.F060E01A-AATo Timing BeltInspect all parts related to the timing belt for
damage and deformation. Replace any
damaged parts immediately.F060J01A-AATo Spark PlugsMake sure to install new spark plugs of the
correct heat range.F060H01A-AATo Air Cleaner FilterA Genuine Hyundai air cleaner filter is
recommended when the filter is replaced.
F060G01A-AATo Vapor Hose and Fuel Filler CapThe vapor hose and fuel filler cap should
be inspected at those intervals specified in
the maintenance schedule. Make sure that
a new vapor hose or fuel filler cap is cor-
rectly replaced.F065F01O-AATo Crankcase Ventilation HoseInspect the surface of hose for evidence of
heat and/or mechanical damage. Hard
and brittle rubber, cracking, tears, cuts,
abrasions, and excessive swelling indi-
cate deterioration. Particular attention
should be paid to examine that hose sur-
face nearest to high heat sources, such as
the exhaust manifold.
Inspect the hose routing to assure that the
hose does not come in contact with any
heat source, sharp edges or moving com-
ponent which might cause heat damage or
mechanical wear. Inspect all hose con-
nections, such as clamps and couplings,
to make sure they are secure, and that no
leaks are present. Hose should be re-
placed immediately if there is any evi-
dence of deterioration or damage.
F070E06A-AATo Automatic Transaxle FluidThe fluid level should be in the “HOT”
range of the dipstick, after the engine and
transaxle are at normal operating tem-
perature. Check the automatic transaxle
fluid level with the engine running and the
transaxle in neutral, with the parking brake
properly applied. Use HYUNDAI GENU-
INE ATF SP III, DIAMOND ATF SP III, SK
ATF SP III or other brands meeting the SP
III specification approved by Hyundai Motor
Co. when adding or changing fluid. Using
the wrong ATF may result in damage to the
ATM.
Page 203 of 273
5
VEHICLE MAINTENANCE REQUIREMENTS
9
F070L01A-AATo Suspension Mounting BoltsCheck the suspension connections for
looseness or damage. Retighten to the
specified torque.
F070G02A-AATo Brake FluidCheck brake fluid level in the brake fluid
reservoir. The level should be between
"MIN" and "MAX" marks on the side of the
reservoir. Use only hydraulic brake fluid
conforming to DOT 3 or DOT 4.F070F01A-AATo Brake Hoses and LinesVisually check for proper installation, chaf-
ing, cracks, deterioration and any leak-
age. Replace any deteriorated or dam-
aged parts immediately.
F070K01A-AATo Exhaust Pipe and MufflerVisually inspect the exhaust pipes, muffler
and
hangers for cracks, deterioration, or dam-
age. Start the engine and listen carefully
for any exhaust gas leakage. Tighten con-
nections or replace parts as necessary.
F070J01A-AATo Brake Pads, Calipers and RotorsCheck the pads for excessive wear, discs
for run out and wear, and calipers for fluid
leakage.F070H01O-AATo Rear Brake Discs and Linings/
Parking BrakeCheck the rear brake discs and linings for
scoring, burning, leaking fluid, broken parts,
and excessive wear. Inspect the parking
brake system including the parking brake
lever and cables. For detailed service pro-
cedures, refer to the Shop Manual.
F070M01A-AATo Steering Gear Box, Linkage &
Boots/Lower Arm Ball JointWith the vehicle stopped and engine off,
check for excessive free-play in the steer-
ing wheel.
Check the linkage for bends or damage.
Check the dust boots and ball joints for
deterioration, cracks, or damage. Replace
any damaged parts.
F070Q01A-AATo Air Conditioning RefrigerantCheck the air conditioning lines and con-
nections for leakage and damage. Check
air conditioning performance according to
the relevant shop manual if necessary.F070P01A-AATo Driveshafts and BootsCheck the drive shafts, boots and clamps
for cracks, deterioration, or damage. Re-
place any damaged parts and, if neces-
sary, repack the grease.F070N01A-AATo Power Steering Pump, Belt and
HosesCheck the power steering pump and hoses
for leakage and damage. Replace any
damaged or leaking parts immediately.
Inspect the power steering belt for evi-
dence of cuts, cracks, excessive wear,
oiliness and proper tension. Replace or
adjust it if necessary.
Page 208 of 273
6
DO-IT-YOURSELF MAINTENANCE
4
GENERAL CHECKS
G020C01A-AATVehicle InteriorThe following should be checked each
time when the vehicle is driven:
o Lights operation
o Windshield wiper operation
o Horn operation
o Defroster, heating system operation
(and air conditioning, if installed)
o Steering operation and condition
o Mirror condition and operation
o Turn signal operation
o Accelerator pedal operation
o Brake operation, including parking
brake
o Manual transaxle operation, including
clutch operation
o Automatic transaxle operation, includ-
ing "Park" mechanism operation
o Seat control condition and operation
o Seat belt condition and operation
o Sunvisor operation
If you notice anything that does not operate
correctly or appears to be functioning cor-
rectly, inspect it carefully and seek assis-
tance from your Hyundai dealer if service
is needed.
G020B01A-AATVehicle ExteriorThe following should be checked monthly:
o Overall appearance and condition
o Wheel condition and wheel nut torque
o Exhaust system condition
o Light condition and operation
o Windshield glass condition
o Wiper blade condition
o Paint condition and body corrosion
o Fluid leaks
o Door and hood lock condition
o Tire pressure and condition
(including spare tire)
G020A01A-AATEngine CompartmentThe following should be checked regu-
larly:
o Engine oil level and condition
o Transaxle fluid level and condition
o Brake fluid level
o Clutch fluid level
o Engine coolant level
o Windshield washer fluid level
o Accessory drive belt condition
o Engine coolant hose condition
o Fluid leaks (on or below components)
o Power steering fluid level
o Battery condition
o Air filter condition
Page 210 of 273
6
DO-IT-YOURSELF MAINTENANCE
6
WARNING:
Be very careful not to touch the radiator
hose when adding the engine oil as it may
be hot enough to burn you.
!
CHANGING THE OIL AND FIL-
TER
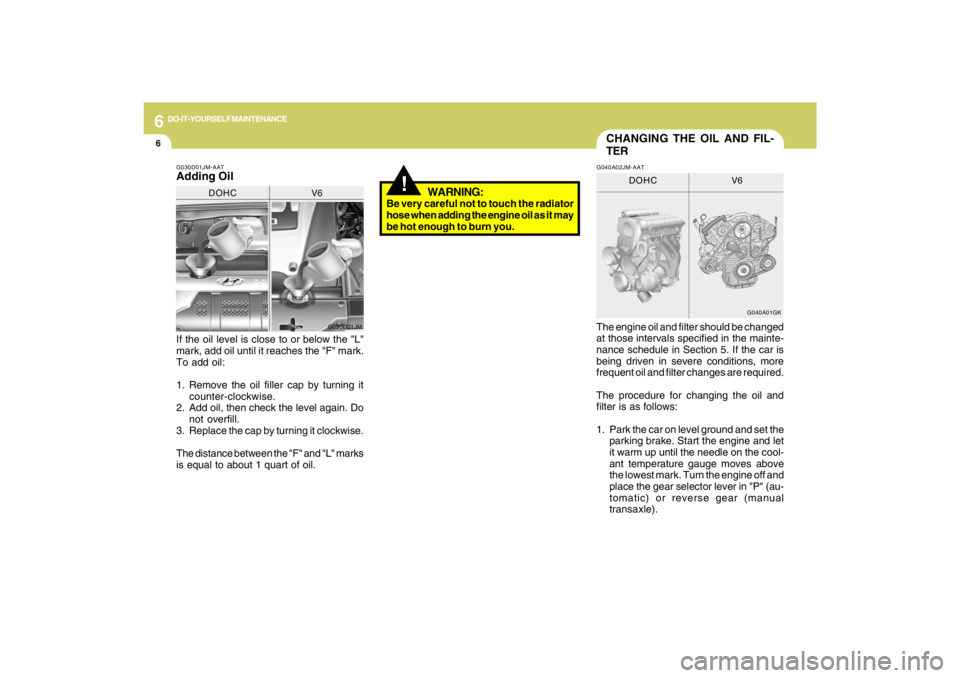
If the oil level is close to or below the "L"
mark, add oil until it reaches the "F" mark.
To add oil:
1. Remove the oil filler cap by turning it
counter-clockwise.
2. Add oil, then check the level again. Do
not overfill.
3. Replace the cap by turning it clockwise.
The distance between the "F" and "L" marks
is equal to about 1 quart of oil.The engine oil and filter should be changed
at those intervals specified in the mainte-
nance schedule in Section 5. If the car is
being driven in severe conditions, more
frequent oil and filter changes are required.
The procedure for changing the oil and
filter is as follows:
1. Park the car on level ground and set the
parking brake. Start the engine and let
it warm up until the needle on the cool-
ant temperature gauge moves above
the lowest mark. Turn the engine off and
place the gear selector lever in "P" (au-
tomatic) or reverse gear (manual
transaxle).G030D01JM-AATAdding Oil
G030D01JM
DOHC V6
G040A01GK
DOHC V6
G040A02JM-AAT