2009 HYUNDAI TUCSON clock
[x] Cancel search: clockPage 134 of 273

1
FEATURES OF YOUR HYUNDAI
123123123123123
1. CD Loading SlotPlease face printed side upward and gen-
tly push in. When the ignition switch is on
ACC or ON and power is off, power is
automatically turned on if the CD is loaded.
This CDP supports both 8cm and 12 cm
CDs. But if VCD, Data CD, MP3 CD are
loaded, "Er-6" message will appear and
CD will be ejected.2. CD Eject ButtonPush
button to eject the CD during CD
playback. This button is enabled when
ignition switch is off.
3. CD LOAD ButtonPush [LOAD] button to load CDs to avail-
able CDC deck (from 1~6). Push [LOAD]
button for more than 2 seconds to load into
all available decks.
The last CD will play. 10 seconds idle
status will disable loading process.4. CD/AUX Selection ButtonIf the auxiliary device is connected, it turns
to AUX MODE to play the sound from the
auxiliary player.
If no auxiliary device is connected, it dis-
plays ""NO MEDIA"" for 5 seconds and
returns to the previous mode."
5. Automatic Track Selection Buttono Push [SEEK
] button for less than 0.8
seconds to play from the beginning of
current song.
o Push [SEEK ] button for less than 0.8
seconds and press again within 1 sec-
onds to play the previous song.
o Push [SEEK ] button for 0.8 or longer
to initiate reverse direction high speed
sound search of current song.
o Push [SEEK ] button for less than 0.8
seconds to play the next song.
o Push [SEEK ] button for 0.8 or longer
to initiate high speed sound search of
current song.
6. INFO ButtonDisplays the information of the current CD
TRACK in the order of DISC TITLE ➟DISC
ARTIST➟TRACK TITLE➟ TRACK
ARTIST➟TOTAL TRACK➟Play Screen
➟DISC TITLE➟···.(not displayed if the in-
formation is not available on the DISC.)7. TUNE/ENTER ButtonTurn this button clockwise to display songs
after current song.
Also, turn this button counterclockwise to
display songs before current song.
To listen to the displayed song, press the
button to skip to the song and play.Pressing the changes the BASS, MIDR-
ANGE, TREBLE, FADER and BALANCE
TUNE mode.
The mode selected is shown on the dis-
play. After selecting each mode, rotate the
Audio control knob clockwise or counter-
clockwise.
o BASS Control
To increase the BASS, rotate the knob
clockwise, while to decrease the BASS,
rotate the knob counterclockwise.
o MID-RANGE Control
To increase the MID-RANGE, rotate the
knob clockwise, while to decrease the
MID-RANGE, rotate the knob counterclock-
wise.
o TREBLE Control
To increase the TREBLE, rotate the knob
clockwise, while to decrease the TREBLE,
rotate the knob counterclockwise.
o FADER Control
Turn the control knob clockwise to emph-
asize rear speaker sound (front speaker
sound will be attenuated). When the con-
trol knob is turned counterclockwise, front
speaker sound will be emphasized (rear
speaker sound will be attenuated).
Page 135 of 273

1FEATURES OF YOUR HYUNDAI
124
o BALANCE Control
Rotate the knob clockwise to emphasize
right speaker sound (left speaker sound
will be attenuated). When the control knob
is turned counter clockwise, left speaker
sound will be emphasized (right speaker
sound will be attenuated).8. RANDOM Play ButtonTurns on/off the randomization of the play
list of files in the currently played DISC.
To cancel the mode, press the key once
again.9. REPEAT ButtonRepeats current song when the button is
pressed for less than 0.8 seconds.
Repeats the entire DISC when the button
is pressed for 0.8 seconds or longer.10. DISC Selection Buttono [DISC
] Change Button
Changes disc to the previous disc.
o [DISC ] Change Button
Changes disc to the next disc.
11. SCAN Play ButtonPlays first 10 seconds of each song in the
DISC.
To cancel the mode, press the key once
again.12. FOLDER ButtonFolder up/down operation.
o Folder is moved up or down from cur-
rently playing and folder name becomes
displayed.
o Press enter key to play the selected
folder.
o If the enter key is not pressed with in 5
seconds, then the previous folder name
will be displayed again.
Page 140 of 273
2
DRIVING YOUR HYUNDAI
5
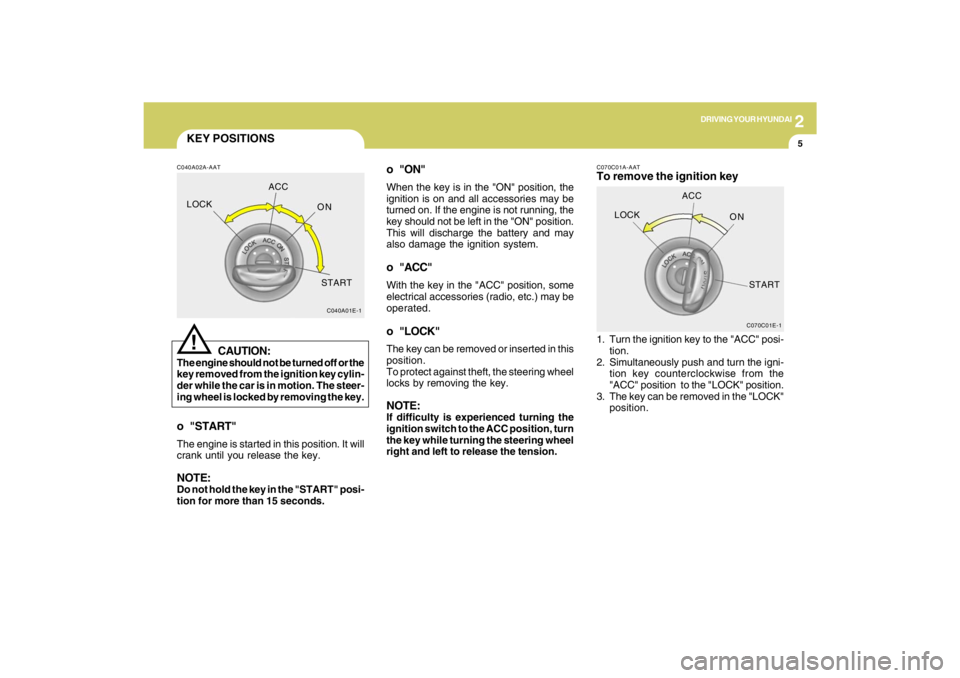
KEY POSITIONSC040A02A-AAT
CAUTION:
The engine should not be turned off or the
key removed from the ignition key cylin-
der while the car is in motion. The steer-
ing wheel is locked by removing the key.
!
o "START"The engine is started in this position. It will
crank until you release the key.NOTE:Do not hold the key in the "START" posi-
tion for more than 15 seconds.
C040A01E-1
LOCKACC
ON
START
o "ON"When the key is in the "ON" position, the
ignition is on and all accessories may be
turned on. If the engine is not running, the
key should not be left in the "ON" position.
This will discharge the battery and may
also damage the ignition system.o "ACC"With the key in the "ACC" position, some
electrical accessories (radio, etc.) may be
operated.o "LOCK"The key can be removed or inserted in this
position.
To protect against theft, the steering wheel
locks by removing the key.NOTE:If difficulty is experienced turning the
ignition switch to the ACC position, turn
the key while turning the steering wheel
right and left to release the tension.
C070C01E-1
LOCKACC
ON
START
C070C01A-AATTo remove the ignition key1. Turn the ignition key to the "ACC" posi-
tion.
2. Simultaneously push and turn the igni-
tion key counterclockwise from the
"ACC" position to the "LOCK" position.
3. The key can be removed in the "LOCK"
position.
Page 179 of 273
310
WHAT TO DO IN AN EMERGENCY
IF YOU HAVE A FLAT TIRED050A02A-AATIf a tire goes flat while you are driving:
1. Take your foot off the accelerator
pedal and let the car slow down while
driving straight ahead. Do not apply
the brakes immediately or attempt to
pull off the road as this may cause a
loss of control. When the vehicle has
slowed to such a speed that it is safe
to do so, brake carefully and pull off
the road. Drive off the road as far as
possible and park on firm, level
ground. If you are on a divided high-
way, do not park in the median area
between the two traffic lanes.
2. When the car is stopped, turn on your
emergency hazard flashers, set the
parking brake and put the transaxle
in "P" (automatic) or reverse (manual
transaxle).
3. Have all passengers get out of the
vehicle. Be sure they all get out on
the side of the vehicle that is away
from traffic.
4. Change the tire following the instruc-
tions provided on the following pages.
HJM4008
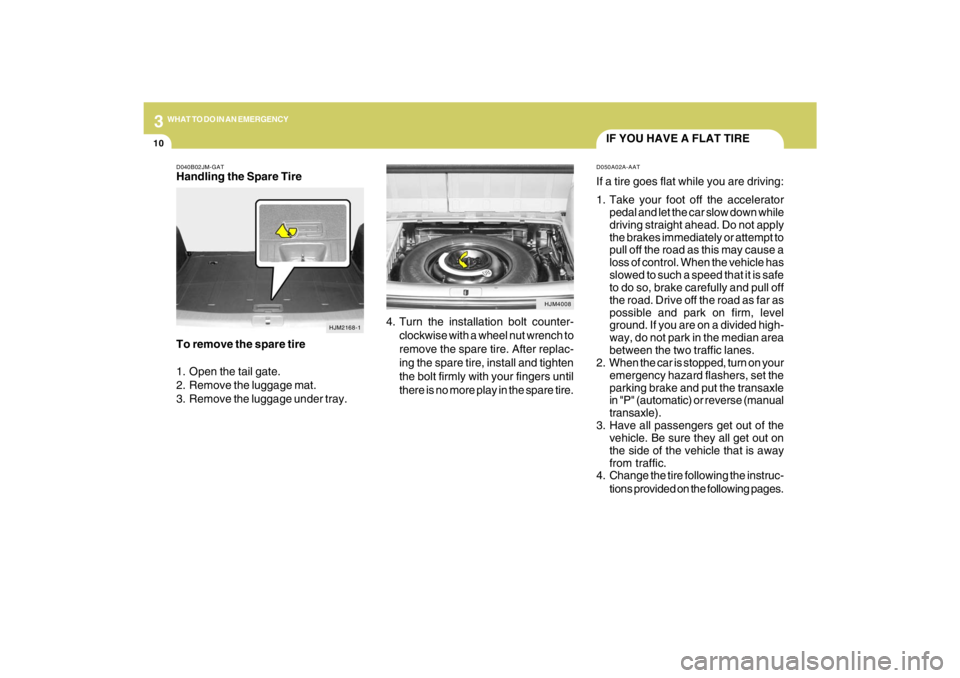
4. Turn the installation bolt counter-
clockwise with a wheel nut wrench to
remove the spare tire. After replac-
ing the spare tire, install and tighten
the bolt firmly with your fingers until
there is no more play in the spare tire.
D040B02JM-GATHandling the Spare Tire
To remove the spare tire
1. Open the tail gate.
2. Remove the luggage mat.
3. Remove the luggage under tray.
HJM2168-1
Page 181 of 273
312
WHAT TO DO IN AN EMERGENCY
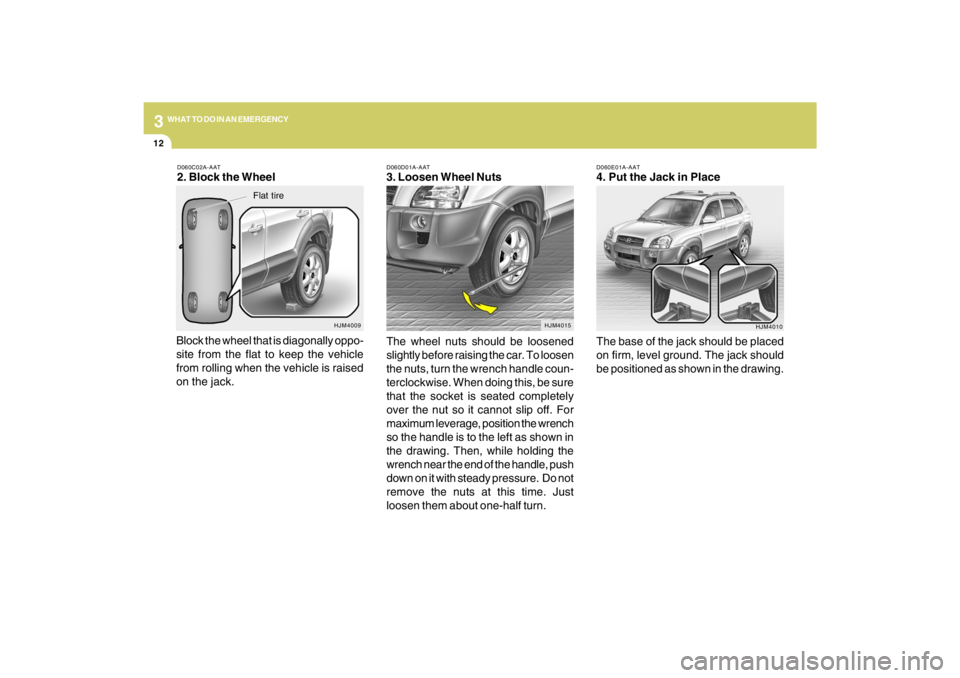
D060E01A-AAT4. Put the Jack in Place
The base of the jack should be placed
on firm, level ground. The jack should
be positioned as shown in the drawing.
HJM4010 D060D01A-AAT
3. Loosen Wheel Nuts
The wheel nuts should be loosened
slightly before raising the car. To loosen
the nuts, turn the wrench handle coun-
terclockwise. When doing this, be sure
that the socket is seated completely
over the nut so it cannot slip off. For
maximum leverage, position the wrench
so the handle is to the left as shown in
the drawing. Then, while holding the
wrench near the end of the handle, push
down on it with steady pressure. Do not
remove the nuts at this time. Just
loosen them about one-half turn.
HJM4015
D060C02A-AAT2. Block the Wheel
Block the wheel that is diagonally oppo-
site from the flat to keep the vehicle
from rolling when the vehicle is raised
on the jack.
HJM4009
Flat tire
Page 182 of 273
3
WHAT TO DO IN AN EMERGENCY
13
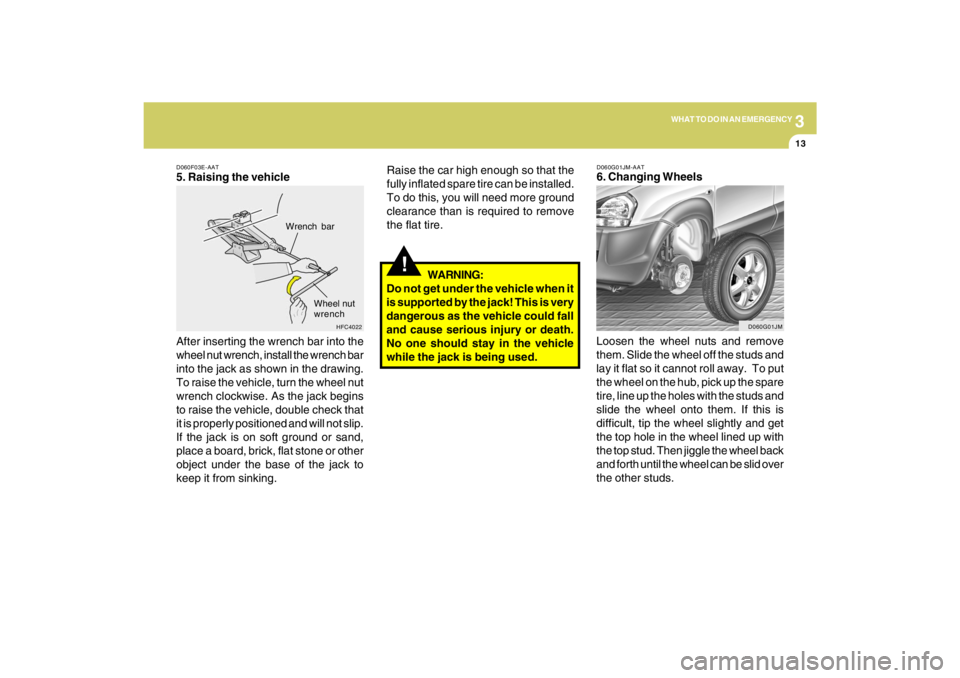
D060F03E-AAT5. Raising the vehicle
After inserting the wrench bar into the
wheel nut wrench, install the wrench bar
into the jack as shown in the drawing.
To raise the vehicle, turn the wheel nut
wrench clockwise. As the jack begins
to raise the vehicle, double check that
it is properly positioned and will not slip.
If the jack is on soft ground or sand,
place a board, brick, flat stone or other
object under the base of the jack to
keep it from sinking.
HFC4022
Wrench bar
Wheel nut
wrench
!
Raise the car high enough so that the
fully inflated spare tire can be installed.
To do this, you will need more ground
clearance than is required to remove
the flat tire.
WARNING:
Do not get under the vehicle when it
is supported by the jack! This is very
dangerous as the vehicle could fall
and cause serious injury or death.
No one should stay in the vehicle
while the jack is being used.
D060G01JM-AAT6. Changing Wheels
Loosen the wheel nuts and remove
them. Slide the wheel off the studs and
lay it flat so it cannot roll away. To put
the wheel on the hub, pick up the spare
tire, line up the holes with the studs and
slide the wheel onto them. If this is
difficult, tip the wheel slightly and get
the top hole in the wheel lined up with
the top stud. Then jiggle the wheel back
and forth until the wheel can be slid over
the other studs.
D060G01JM
Page 184 of 273
3
WHAT TO DO IN AN EMERGENCY
15
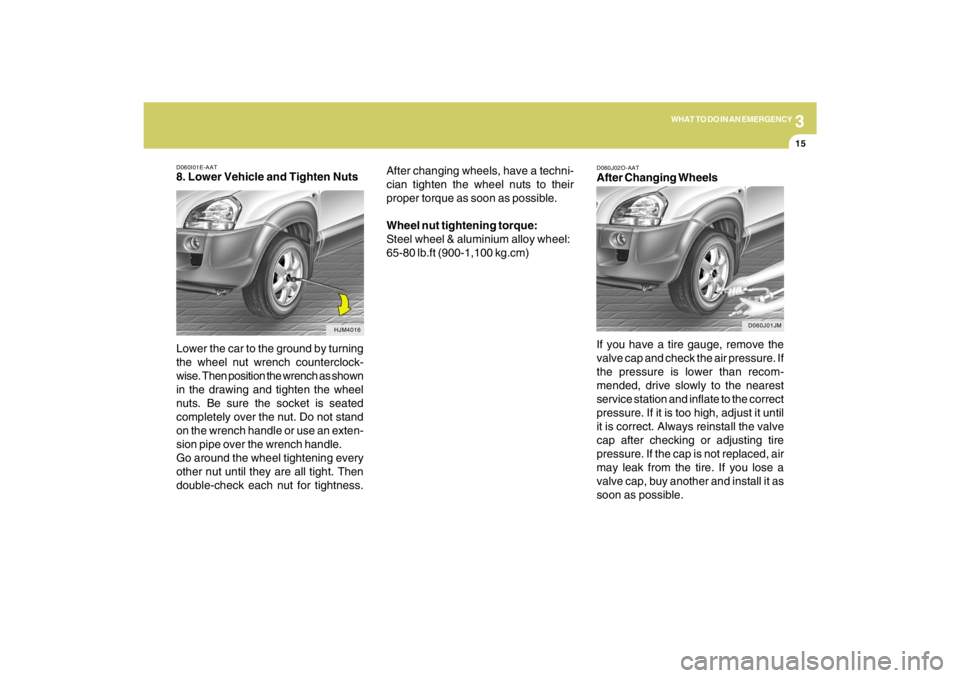
D060I01E-AAT8. Lower Vehicle and Tighten Nuts
Lower the car to the ground by turning
the wheel nut wrench counterclock-
wise. Then position the wrench as shown
in the drawing and tighten the wheel
nuts. Be sure the socket is seated
completely over the nut. Do not stand
on the wrench handle or use an exten-
sion pipe over the wrench handle.
Go around the wheel tightening every
other nut until they are all tight. Then
double-check each nut for tightness.
HJM4016
After changing wheels, have a techni-
cian tighten the wheel nuts to their
proper torque as soon as possible.
Wheel nut tightening torque:
Steel wheel & aluminium alloy wheel:
65-80 lb.ft (900-1,100 kg.cm)
D060J02O-AATAfter Changing Wheels
If you have a tire gauge, remove the
valve cap and check the air pressure. If
the pressure is lower than recom-
mended, drive slowly to the nearest
service station and inflate to the correct
pressure. If it is too high, adjust it until
it is correct. Always reinstall the valve
cap after checking or adjusting tire
pressure. If the cap is not replaced, air
may leak from the tire. If you lose a
valve cap, buy another and install it as
soon as possible.
D060J01JM
Page 210 of 273
6
DO-IT-YOURSELF MAINTENANCE
6
WARNING:
Be very careful not to touch the radiator
hose when adding the engine oil as it may
be hot enough to burn you.
!
CHANGING THE OIL AND FIL-
TER
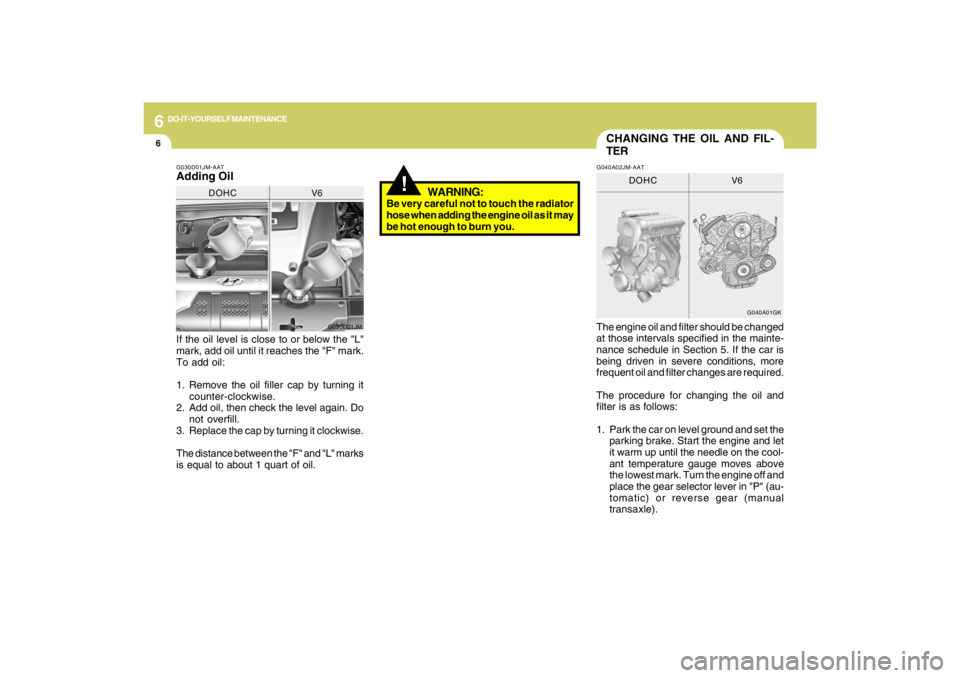
If the oil level is close to or below the "L"
mark, add oil until it reaches the "F" mark.
To add oil:
1. Remove the oil filler cap by turning it
counter-clockwise.
2. Add oil, then check the level again. Do
not overfill.
3. Replace the cap by turning it clockwise.
The distance between the "F" and "L" marks
is equal to about 1 quart of oil.The engine oil and filter should be changed
at those intervals specified in the mainte-
nance schedule in Section 5. If the car is
being driven in severe conditions, more
frequent oil and filter changes are required.
The procedure for changing the oil and
filter is as follows:
1. Park the car on level ground and set the
parking brake. Start the engine and let
it warm up until the needle on the cool-
ant temperature gauge moves above
the lowest mark. Turn the engine off and
place the gear selector lever in "P" (au-
tomatic) or reverse gear (manual
transaxle).G030D01JM-AATAdding Oil
G030D01JM
DOHC V6
G040A01GK
DOHC V6
G040A02JM-AAT