2009 HYUNDAI TUCSON clock
[x] Cancel search: clockPage 211 of 273
6
DO-IT-YOURSELF MAINTENANCE
7
6. Install a new oil filter in accordance with
the instructions on the carton or on the
filter itself. Do not over-tighten. (Tight-
ening torque : 1.2 ~ 1.6 kgf.m) Be sure
that the mounting surface on the engine
is clean and that the old gasket is re-
moved completely. Lubricate the new
gasket on the filter with clean engine oil
before installation.
7. Remove the engine oil level dipstick.
8. Refill the crankcase with the recom-
mended engine oil. Refer to the speci-
fication in chapter 9 for engine oil ca-
pacity.
!
PROPOSITION 65 WARNING:
This product contains a chemical known
to the State of California to cause can-
cer. Used engine oil may cause irritation
or cancer of the skin if left in contact with
the skin for prolonged periods of time.
Used engine oil contains chemicals that
have caused cancer in laboratory ani-
mals. Always protect your skin by wash-
ing your hands thoroughly with soap and
warm water as soon as possible after
handling used oil.
!
WARNING:
Be very careful when draining the en-
gine oil as it may be hot enough to burn
you! 2. Open the hood and remove the engine
oil filler cap.
3. Slide underneath the car and loosen
the drain plug by turning it counter-
clockwise with a wrench of the proper
size. Be sure that a drain pan is in
position to catch the oil as it drains out,
then remove the drain plug.
4. When the oil has stopped draining, re-
place the drain plug using a new washer
and retighten by turning it clockwise.
Oil pan drain plug tightening torque:
3.5 ~ 4.5 kgf.m (2.7L)
4.0 ~ 4.5 kgf.m (2.0L)
5. Remove the oil filter by turning it coun-
terclockwise with a oil filter wrench of
the proper size. A certain amount of oil
will come out when you remove the
filter. So be sure to have your drain pan
in place underneath it.
CAUTION:
Slowly pour the recommended oil using
by a funnel. Do not overfill! Engine dam-
age may occur if overfilled.
!
9. Start the engine and check to be sure no
oil is leaking from the drain plug or oil
filter.
10. Shut off the engine and recheck the oil
level.
NOTE:Always dispose of used engine oil in an
environmentally acceptable manner. It
is suggested that it be placed in a sealed
container and taken to a service station
for reclamation. Do not pour the oil on the
ground or put it in with the household
trash.
Page 213 of 273
6
DO-IT-YOURSELF MAINTENANCE
9
!
!
WARNING:
The cooling fan is controlled by engine
coolant temperature and may some-
times operate even when the engine is
not running. Use extreme caution when
working near the blades of the coolant
fan so that you are not injured by a
rotating fan blade. As the engine coolant
temperature decreases, the fan will au-
tomatically shut off. This is a normal
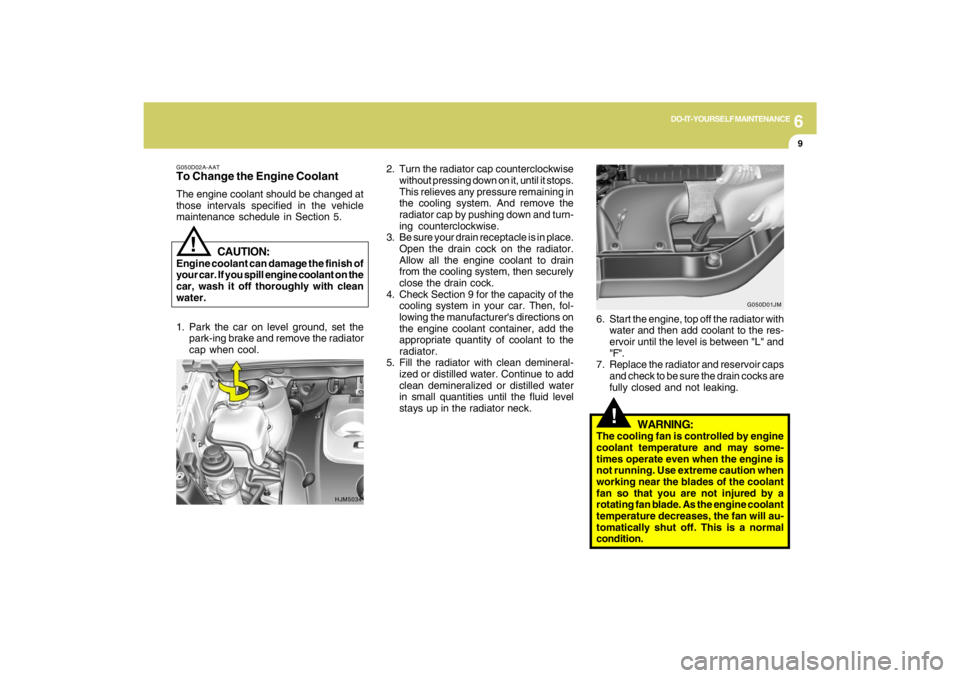
condition. 2. Turn the radiator cap counterclockwise
without pressing down on it, until it stops.
This relieves any pressure remaining in
the cooling system. And remove the
radiator cap by pushing down and turn-
ing counterclockwise.
3. Be sure your drain receptacle is in place.
Open the drain cock on the radiator.
Allow all the engine coolant to drain
from the cooling system, then securely
close the drain cock.
4. Check Section 9 for the capacity of the
cooling system in your car. Then, fol-
lowing the manufacturer's directions on
the engine coolant container, add the
appropriate quantity of coolant to the
radiator.
5. Fill the radiator with clean demineral-
ized or distilled water. Continue to add
clean demineralized or distilled water
in small quantities until the fluid level
stays up in the radiator neck.6. Start the engine, top off the radiator with
water and then add coolant to the res-
ervoir until the level is between "L" and
"F".
7. Replace the radiator and reservoir caps
and check to be sure the drain cocks are
fully closed and not leaking.
G050D02A-AATTo Change the Engine CoolantThe engine coolant should be changed at
those intervals specified in the vehicle
maintenance schedule in Section 5.
HJM5034G050D01JM
CAUTION:
Engine coolant can damage the finish of
your car. If you spill engine coolant on the
car, wash it off thoroughly with clean
water.
1. Park the car on level ground, set the
park-ing brake and remove the radiator
cap when cool.
Page 232 of 273
6
DO-IT-YOURSELF MAINTENANCE
28
HJM5016
HJM5017
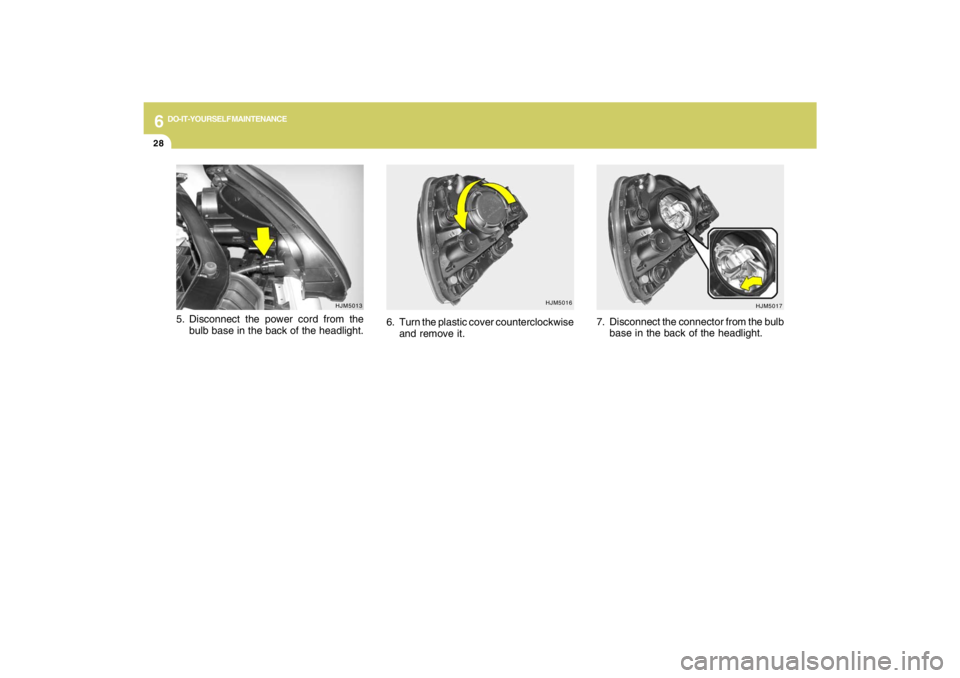
6. Turn the plastic cover counterclockwise
and remove it.7. Disconnect the connector from the bulb
base in the back of the headlight.
HJM5013
5. Disconnect the power cord from the
bulb base in the back of the headlight.
Page 234 of 273
6
DO-IT-YOURSELF MAINTENANCE
30
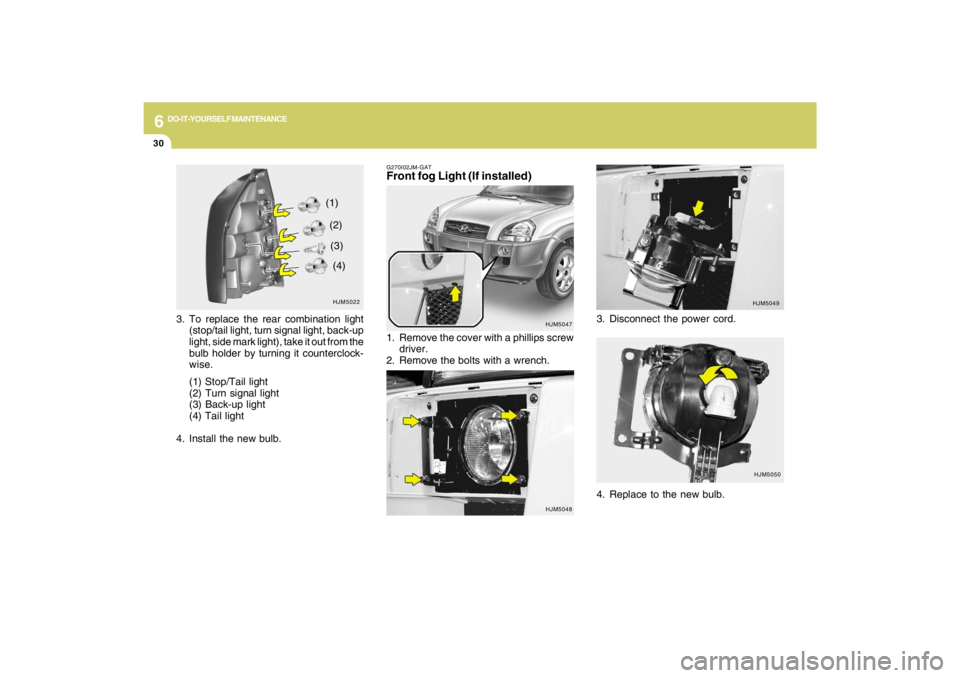
G270I02JM-GATFront fog Light (If installed)
HJM5047
1. Remove the cover with a phillips screw
driver.
2. Remove the bolts with a wrench.3. Disconnect the power cord.
HJM5049
HJM5050
4. Replace to the new bulb.
HJM5048
HJM5022(1)
(2)
(3)
(4)
3. To replace the rear combination light
(stop/tail light, turn signal light, back-up
light, side mark light), take it out from the
bulb holder by turning it counterclock-
wise.
(1) Stop/Tail light
(2) Turn signal light
(3) Back-up light
(4) Tail light
4. Install the new bulb.
Page 241 of 273
6
DO-IT-YOURSELF MAINTENANCE
37
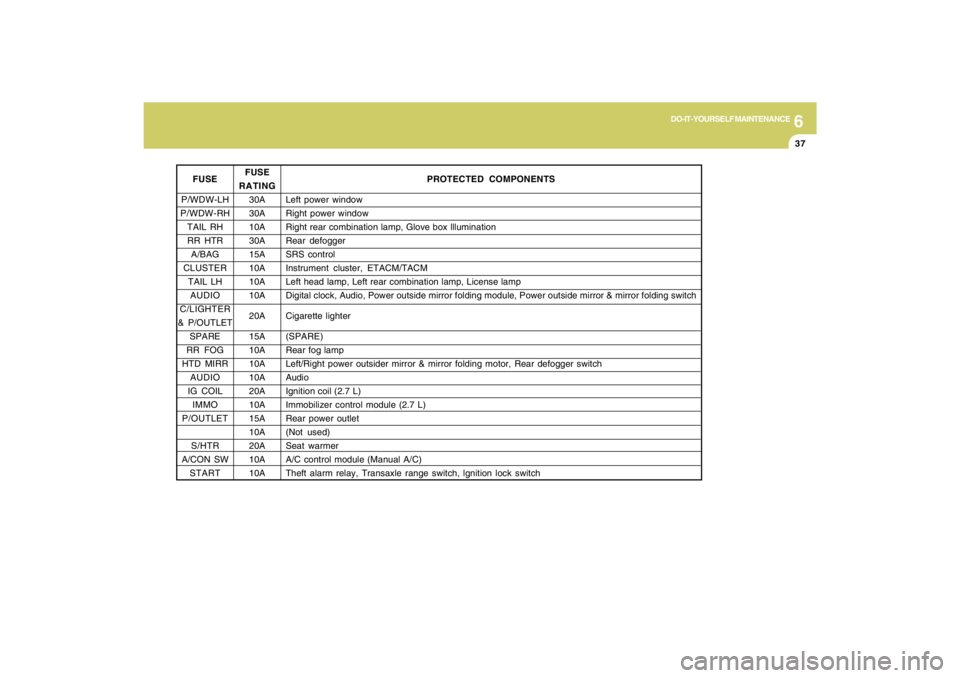
FUSE
P/WDW-LH
P/WDW-RH
TAIL RH
RR HTR
A/BAG
CLUSTER
TAIL LH
AUDIO
C/LIGHTER
& P/OUTLET
SPARE
RR FOG
HTD MIRR
AUDIO
IG COIL
IMMO
P/OUTLET
S/HTR
A/CON SW
STARTPROTECTED COMPONENTS
Left power window
Right power window
Right rear combination lamp, Glove box lllumination
Rear defogger
SRS control
Instrument cluster, ETACM/TACM
Left head lamp, Left rear combination lamp, License lamp
Digital clock, Audio, Power outside mirror folding module, Power outside mirror & mirror folding switch
Cigarette lighter
(SPARE)
Rear fog lamp
Left/Right power outsider mirror & mirror folding motor, Rear defogger switch
Audio
Ignition coil (2.7 L)
Immobilizer control module (2.7 L)
Rear power outlet
(Not used)
Seat warmer
A/C control module (Manual A/C)
Theft alarm relay, Transaxle range switch, lgnition lock switch
FUSE
RATING
30A
30A
10A
30A
15A
10A
10A
10A
20A
15A
10A
10A
10A
20A
10A
15A
10A
20A
10A
10A
Page 242 of 273
6
DO-IT-YOURSELF MAINTENANCE
38
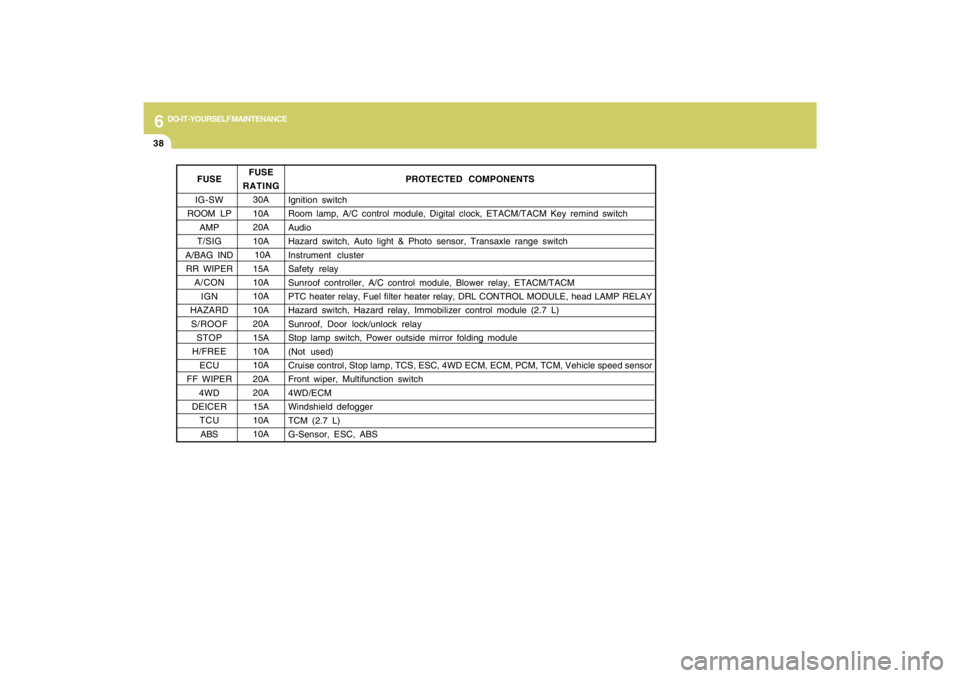
FUSE
IG-SW
ROOM LP
AMP
T/SIG
A/BAG IND
RR WIPER
A/CON
IGN
HAZARD
S/ROOF
STOP
H/FREE
ECU
FF WIPER
4WD
DEICER
TCU
ABS
PROTECTED COMPONENTS
Ignition switch
Room lamp, A/C control module, Digital clock, ETACM/TACM Key remind switch
Audio
Hazard switch, Auto light & Photo sensor, Transaxle range switch
Instrument cluster
Safety relay
Sunroof controller, A/C control module, Blower relay, ETACM/TACM
PTC heater relay, Fuel filter heater relay, DRL CONTROL MODULE, head LAMP RELAY
Hazard switch, Hazard relay, Immobilizer control module (2.7 L)
Sunroof, Door lock/unlock relay
Stop lamp switch, Power outside mirror folding module
(Not used)
Cruise control, Stop lamp, TCS, ESC, 4WD ECM, ECM, PCM, TCM, Vehicle speed sensor
Front wiper, Multifunction switch
4WD/ECM
Windshield defogger
TCM (2.7 L)
G-Sensor, ESC, ABS FUSE
RATING
30A
10A
20A
10A
10A
15A
10A
10A
10A
20A
15A
10A
10A
20A
20A
15A
10A
10A
Page 269 of 273
10
INDEX
2
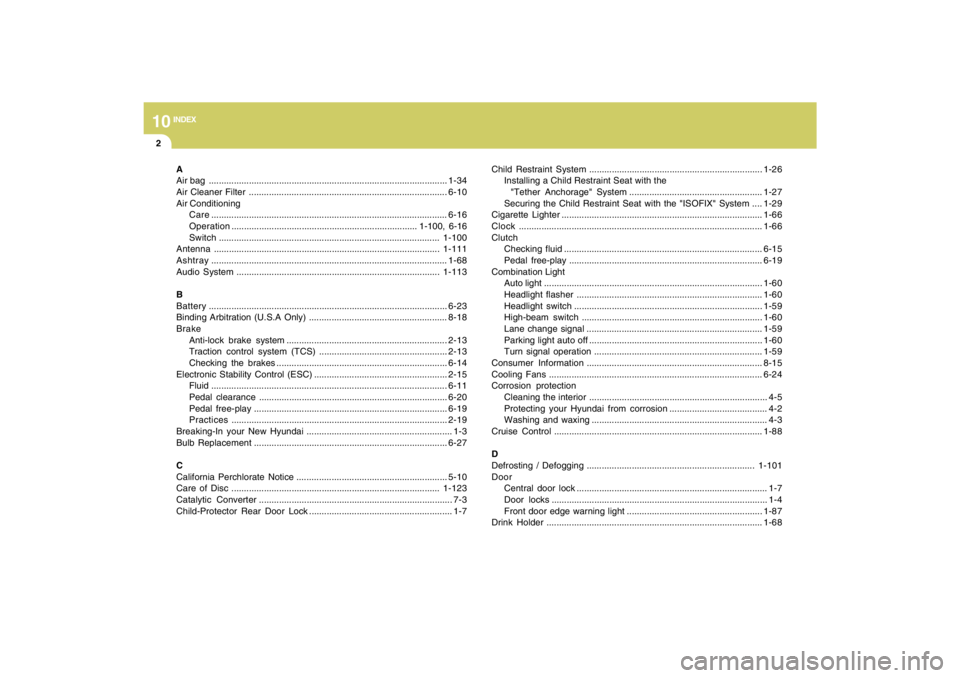
A
Air bag ...............................................................................................1-34
Air Cleaner Filter ...............................................................................6-10
Air Conditioning
Care..............................................................................................6-16
Operation.......................................................................... 1-100, 6-16
Switch........................................................................................1-100
Antenna..........................................................................................1-111
Ashtray..............................................................................................1-68
Audio System.................................................................................1-113
B
Battery...............................................................................................6-23
Binding Arbitration (U.S.A Only) .......................................................8-18
Brake
Anti-lock brake system ................................................................2-13
Traction control system (TCS) ...................................................2-13
Checking the brakes ....................................................................6-14
Electronic Stability Control (ESC) .....................................................2-15
Fluid ..............................................................................................6-11
Pedal clearance...........................................................................6-20
Pedal free-play.............................................................................6-19
Practices......................................................................................2-19
Breaking-In your New Hyundai .......................................................... 1-3
Bulb Replacement.............................................................................6-27
C
California Perchlorate Notice ............................................................5-10
Care of Disc ...................................................................................1-123
Catalytic Converter ............................................................................. 7-3
Child-Protector Rear Door Lock ......................................................... 1-7Child Restraint System.....................................................................1-26
Installing a Child Restraint Seat with the
"Tether Anchorage" System .....................................................1-27
Securing the Child Restraint Seat with the "ISOFIX" System ....1-29
Cigarette Lighter................................................................................1-66
Clock.................................................................................................1-66
Clutch
Checking fluid...............................................................................6-15
Pedal free-play.............................................................................6-19
Combination Light
Auto light.......................................................................................1-60
Headlight flasher..........................................................................1-60
Headlight switch...........................................................................1-59
High-beam switch........................................................................1-60
Lane change signal ......................................................................1-59
Parking light auto off .....................................................................1-60
Turn signal operation...................................................................1-59
Consumer Information......................................................................8-15
Cooling Fans.....................................................................................6-24
Corrosion protection
Cleaning the interior....................................................................... 4-5
Protecting your Hyundai from corrosion....................................... 4-2
Washing and waxing...................................................................... 4-3
Cruise Control...................................................................................1-88
D
Defrosting / Defogging ...................................................................1-101
Door
Central door lock............................................................................ 1-7
Door locks...................................................................................... 1-4
Front door edge warning light ......................................................1-87
Drink Holder ......................................................................................1-68