Page 67 of 273
1FEATURES OF YOUR HYUNDAI56
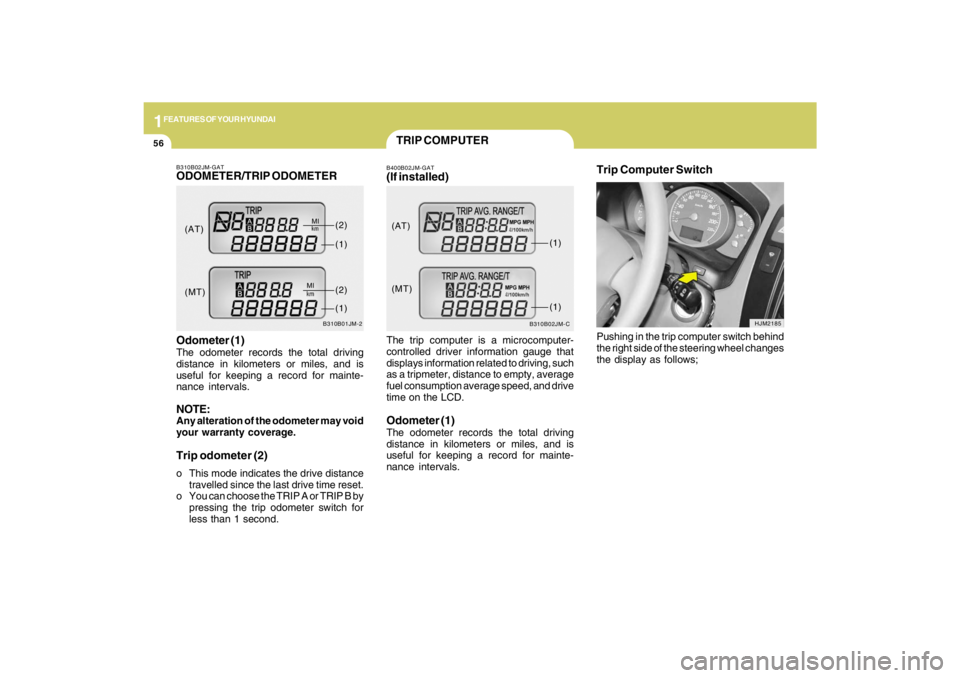
B310B02JM-C
(AT)
(MT)(1)
(1)
TRIP COMPUTERB400B02JM-GAT(If installed)The trip computer is a microcomputer-
controlled driver information gauge that
displays information related to driving, such
as a tripmeter, distance to empty, average
fuel consumption average speed, and drive
time on the LCD.Odometer (1)The odometer records the total driving
distance in kilometers or miles, and is
useful for keeping a record for mainte-
nance intervals.
Trip Computer Switch
HJM2185
Pushing in the trip computer switch behind
the right side of the steering wheel changes
the display as follows;
B310B02JM-GATODOMETER/TRIP ODOMETER
B310B01JM-2
Odometer (1)The odometer records the total driving
distance in kilometers or miles, and is
useful for keeping a record for mainte-
nance intervals.NOTE:Any alteration of the odometer may void
your warranty coverage.Trip odometer (2)o This mode indicates the drive distance
travelled since the last drive time reset.
o You can choose the TRIP A or TRIP B by
pressing the trip odometer switch for
less than 1 second.(AT)
(MT)(1)
(2)(1)(2)
Page 68 of 273
1
FEATURES OF YOUR HYUNDAI
57
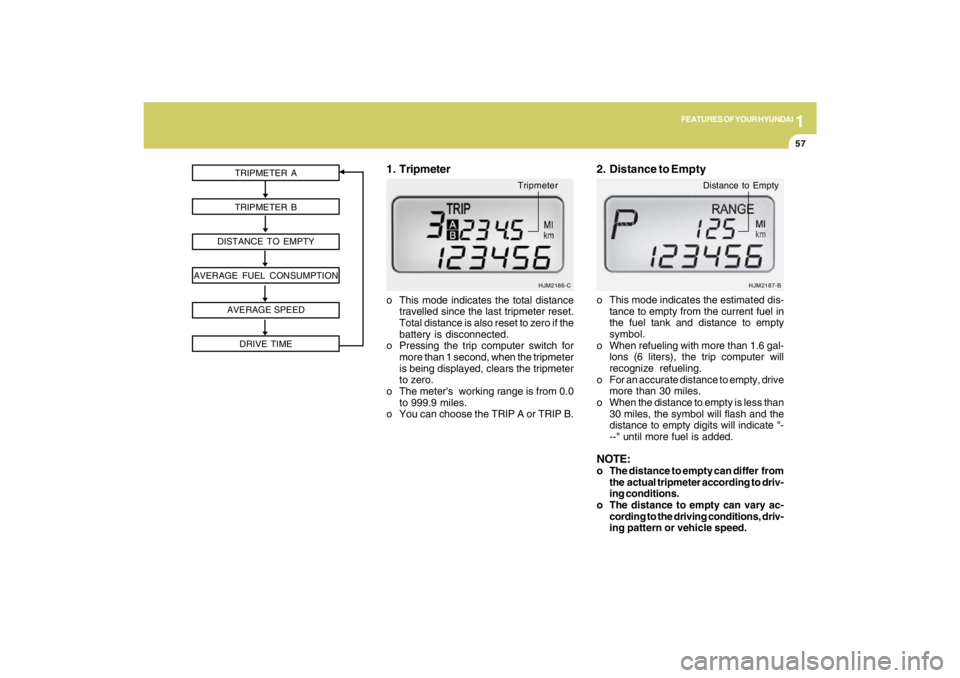
TRIPMETER A
TRIPMETER B
DISTANCE TO EMPTY
AVERAGE FUEL CONSUMPTION
AVERAGE SPEED
DRIVE TIME
HJM2186-C
o This mode indicates the total distance
travelled since the last tripmeter reset.
Total distance is also reset to zero if the
battery is disconnected.
o Pressing the trip computer switch for
more than 1 second, when the tripmeter
is being displayed, clears the tripmeter
to zero.
o The meter's working range is from 0.0
to 999.9 miles.
o You can choose the TRIP A or TRIP B.1. Tripmeter
Tripmeter
o This mode indicates the estimated dis-
tance to empty from the current fuel in
the fuel tank and distance to empty
symbol.
o When refueling with more than 1.6 gal-
lons (6 liters), the trip computer will
recognize refueling.
o For an accurate distance to empty, drive
more than 30 miles.
o When the distance to empty is less than
30 miles, the symbol will flash and the
distance to empty digits will indicate "-
--" until more fuel is added.NOTE:o The distance to empty can differ from
the actual tripmeter according to driv-
ing conditions.
o The distance to empty can vary ac-
cording to the driving conditions, driv-
ing pattern or vehicle speed.2. Distance to Empty
HJM2187-B
Distance to Empty
Page 69 of 273
1FEATURES OF YOUR HYUNDAI58
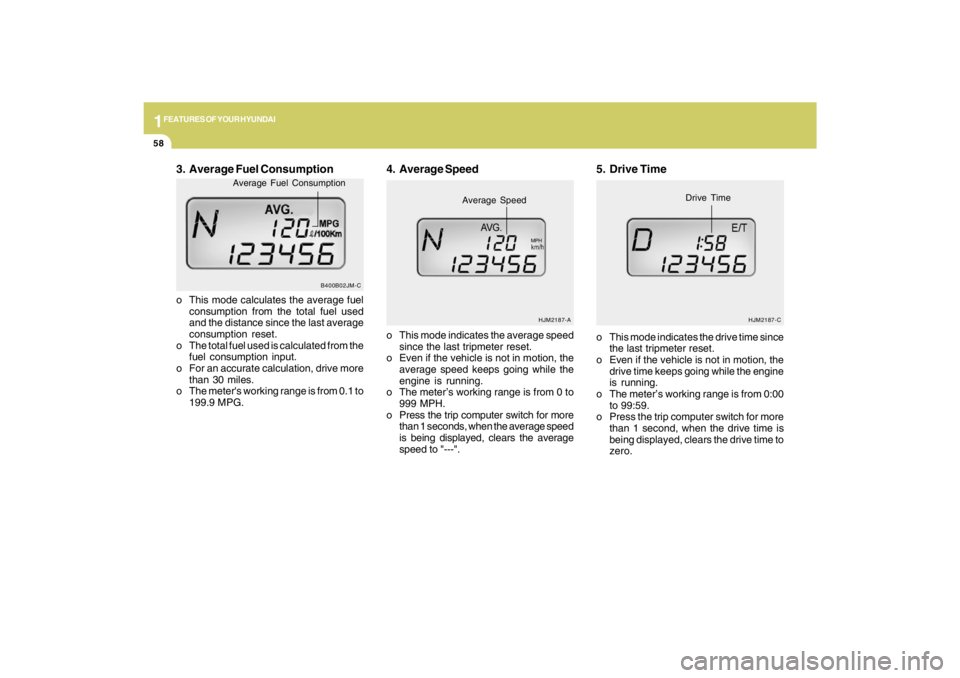
3. Average Fuel Consumptiono This mode calculates the average fuel
consumption from the total fuel used
and the distance since the last average
consumption reset.
o The total fuel used is calculated from the
fuel consumption input.
o For an accurate calculation, drive more
than 30 miles.
o The meter's working range is from 0.1 to
199.9 MPG.o This mode indicates the average speed
since the last tripmeter reset.
o Even if the vehicle is not in motion, the
average speed keeps going while the
engine is running.
o The meter’s working range is from 0 to
999 MPH.
o Press the trip computer switch for more
than 1 seconds, when the average speed
is being displayed, clears the average
speed to "---".
4. Average Speed
HJM2187-A
Average Speed
MPH
5. Drive Timeo This mode indicates the drive time since
the last tripmeter reset.
o Even if the vehicle is not in motion, the
drive time keeps going while the engine
is running.
o The meter’s working range is from 0:00
to 99:59.
o Press the trip computer switch for more
than 1 second, when the drive time is
being displayed, clears the drive time to
zero.
HJM2187-C
Drive Time
B400B02JM-C
Average Fuel Consumption
Page 87 of 273
1FEATURES OF YOUR HYUNDAI76
1. To operate Compass featurePress and release the button, then the
vehicle's directional heading will be dis-
played. Pressing and releasing the button
again will turn off the display.
Heading display
- E : East
- W : West
- S : South
- N : North
ex) NE : North East2. Calibration procedurePress and hold the button for more than 9
but less than 12 seconds. When the com-
pass memory is cleared a "C" will appear
in the display.
- Driving the vehicle in a circle at less
than 5mph 2 times or until the compass
heading appears.
- Driving in a circle in right-handed direc-
tion and opposite direction are pos-
sible, and if the calibration is completed,
the compass heading will appear.
- Keep driving in a circle until a compass
heading appears.
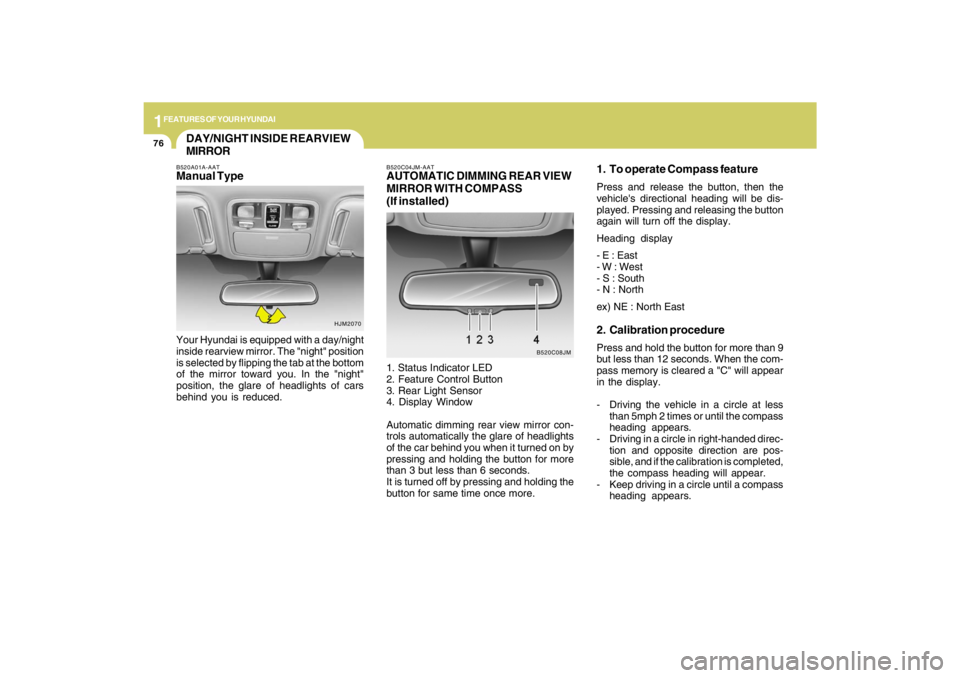
DAY/NIGHT INSIDE REARVIEW
MIRRORB520A01A-AATManual TypeYour Hyundai is equipped with a day/night
inside rearview mirror. The "night" position
is selected by flipping the tab at the bottom
of the mirror toward you. In the "night"
position, the glare of headlights of cars
behind you is reduced.
HJM2070B520C04JM-AAT
AUTOMATIC DIMMING REAR VIEW
MIRROR WITH COMPASS
(If installed)1. Status Indicator LED
2. Feature Control Button
3. Rear Light Sensor
4. Display Window
Automatic dimming rear view mirror con-
trols automatically the glare of headlights
of the car behind you when it turned on by
pressing and holding the button for more
than 3 but less than 6 seconds.
It is turned off by pressing and holding the
button for same time once more.
B520C08JM
Page 88 of 273
1
FEATURES OF YOUR HYUNDAI
77
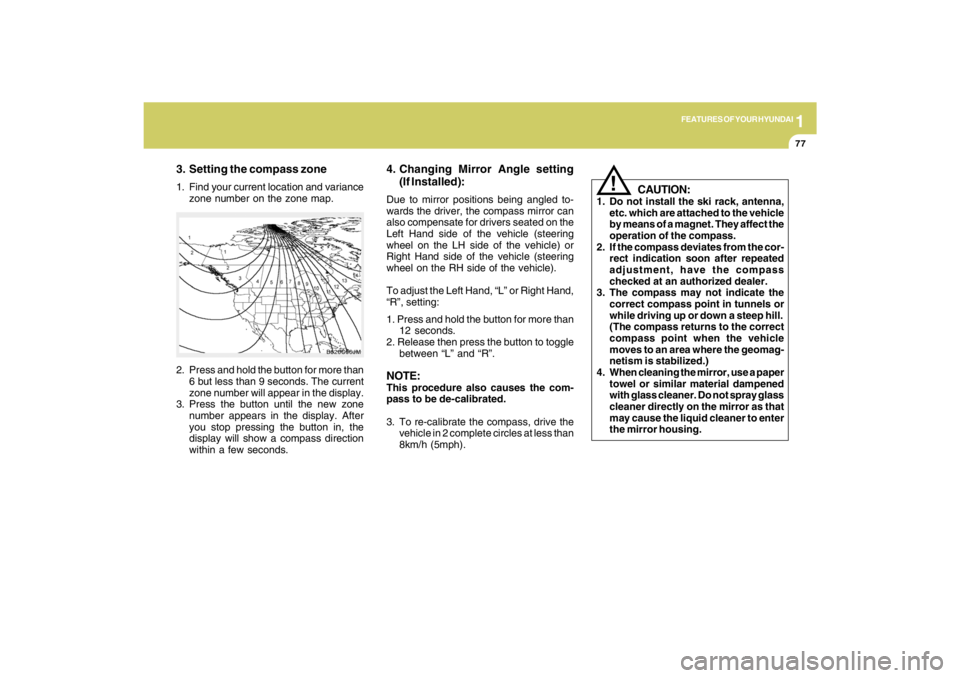
3. Setting the compass zone1. Find your current location and variance
zone number on the zone map.
2. Press and hold the button for more than
6 but less than 9 seconds. The current
zone number will appear in the display.
3. Press the button until the new zone
number appears in the display. After
you stop pressing the button in, the
display will show a compass direction
within a few seconds.
B520C06JM
4. Changing Mirror Angle setting
(If Installed):Due to mirror positions being angled to-
wards the driver, the compass mirror can
also compensate for drivers seated on the
Left Hand side of the vehicle (steering
wheel on the LH side of the vehicle) or
Right Hand side of the vehicle (steering
wheel on the RH side of the vehicle).
To adjust the Left Hand, “L” or Right Hand,
“R”, setting:
1. Press and hold the button for more than
12 seconds.
2. Release then press the button to toggle
between “L” and “R”.NOTE:This procedure also causes the com-
pass to be de-calibrated.
3. To re-calibrate the compass, drive the
vehicle in 2 complete circles at less than
8km/h (5mph).
CAUTION:
1. Do not install the ski rack, antenna,
etc. which are attached to the vehicle
by means of a magnet. They affect the
operation of the compass.
2. If the compass deviates from the cor-
rect indication soon after repeated
adjustment, have the compass
checked at an authorized dealer.
3. The compass may not indicate the
correct compass point in tunnels or
while driving up or down a steep hill.
(The compass returns to the correct
compass point when the vehicle
moves to an area where the geomag-
netism is stabilized.)
4. When cleaning the mirror, use a paper
towel or similar material dampened
with glass cleaner. Do not spray glass
cleaner directly on the mirror as that
may cause the liquid cleaner to enter
the mirror housing.
!
Page 114 of 273
1
FEATURES OF YOUR HYUNDAI
103103103103103
AUTOMATIC HEATING AND COOLING CONTROL SYSTEMB970A01Y-AAT(If installed)Your Hyundai is equipped with an auto-
matic heating and cooling control system
controlled by simply setting the desired
temperature.
B970B01JM B970B02JM-GAT
Heating and Cooling Controls 1. Temperature Control Switch
2. Air Flow Control Switch
3. Display Window
4. Defroster Switch
5. Blower Fan Control Switch 6. AUTO (Automatic Control)Switch
7. OFF Switch
8. Air Conditioning Switch
9. Air lntake Control Switch
Page 115 of 273
1FEATURES OF YOUR HYUNDAI
104
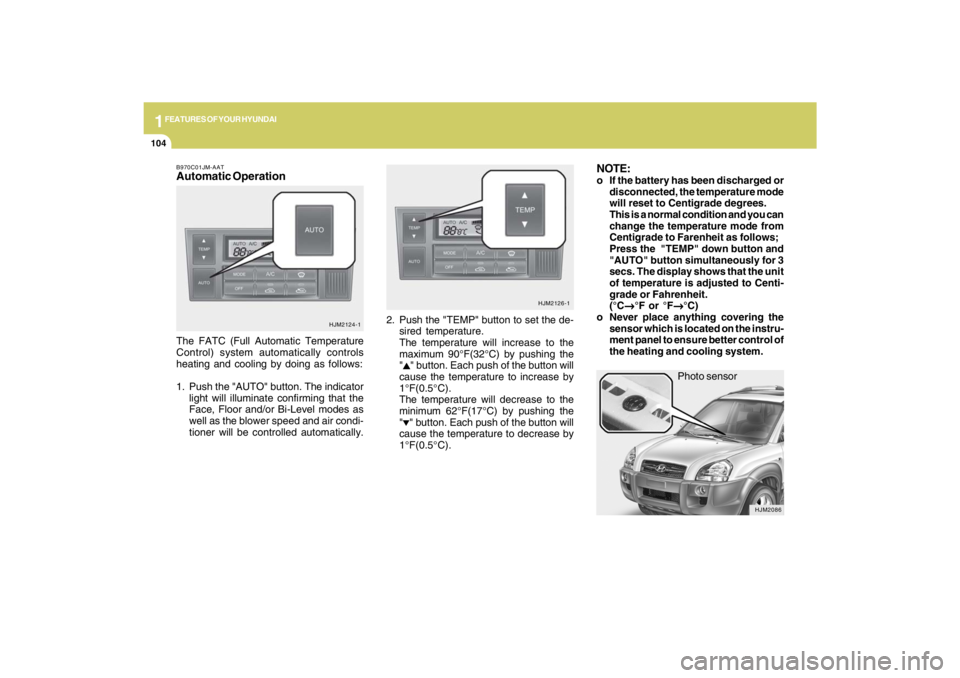
Photo sensor
HJM2086
NOTE:o If the battery has been discharged or
disconnected, the temperature mode
will reset to Centigrade degrees.
This is a normal condition and you can
change the temperature mode from
Centigrade to Farenheit as follows;
Press the "TEMP" down button and
"AUTO" button simultaneously for 3
secs. The display shows that the unit
of temperature is adjusted to Centi-
grade or Fahrenheit.
(°C
→ →→ →
→°F or °F
→ →→ →
→°C)
o Never place anything covering the
sensor which is located on the instru-
ment panel to ensure better control of
the heating and cooling system.
B970C01JM-AATAutomatic OperationThe FATC (Full Automatic Temperature
Control) system automatically controls
heating and cooling by doing as follows:
1. Push the "AUTO" button. The indicator
light will illuminate confirming that the
Face, Floor and/or Bi-Level modes as
well as the blower speed and air condi-
tioner will be controlled automatically.2. Push the "TEMP" button to set the de-
sired temperature.
The temperature will increase to the
maximum 90°F(32°C) by pushing the
"
" button. Each push of the button will
cause the temperature to increase by
1°F(0.5°C).
The temperature will decrease to the
minimum 62°F(17°C) by pushing the
"" button. Each push of the button will
cause the temperature to decrease by
1°F(0.5°C).
HJM2124-1HJM2126-1
Page 124 of 273
1
FEATURES OF YOUR HYUNDAI
113113113113113
AUDIO SYSTEMPA710E01JM-GATRADIO, SET UP, VOLUME CONTROL (PA 710S) (If installed)
A-200JMU
1. FM Selection Button
2. AM Selection Button
3. XM Selection Button
4. CD/AUX Selection Button
5. Automatic Channel Selection Button
6. Power ON/OFF
7. MUTE Button
8. SCAN Button
9. Information Display Button
10. SET UP Button
11. TUNE/ENTER Button
12. CAT(FLDR) Button
13. Preset Button
1 2
7
8
5
6
13 11 12 10 9 4 3