2009 Hyundai H-1 (Grand Starex) change time
[x] Cancel search: change timePage 15 of 303
35
Safety features of your vehicle
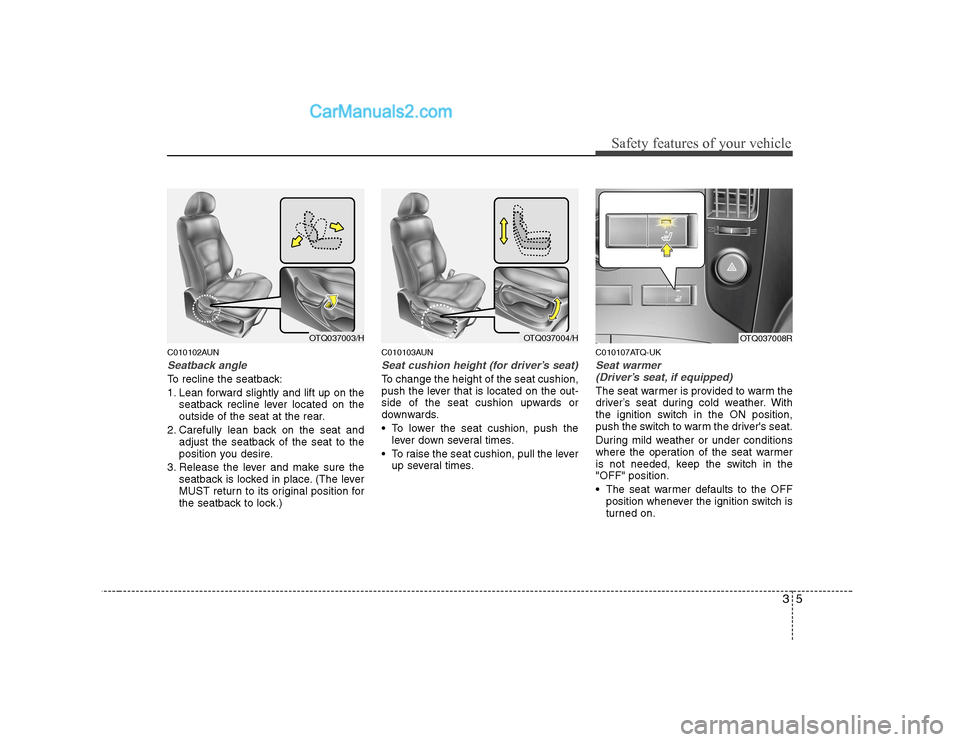
C010102AUN
Seatback angle
To recline the seatback:
1. Lean forward slightly and lift up on theseatback recline lever located on the
outside of the seat at the rear.
2. Carefully lean back on the seat and adjust the seatback of the seat to the
position you desire.
3. Release the lever and make sure the seatback is locked in place. (The lever
MUST return to its original position for
the seatback to lock.) C010103AUN
Seat cushion height (for driver’s seat)
To change the height of the seat cushion,
push the lever that is located on the out-
side of the seat cushion upwards or
downwards.
To lower the seat cushion, push the
lever down several times.
To raise the seat cushion, pull the lever up several times. C010107ATQ-UK
Seat warmer
(Driver’s seat, if equipped)
The seat warmer is provided to warm the
driver’s seat during cold weather. With
the ignition switch in the ON position,
push the switch to warm the driver's seat.
During mild weather or under conditions
where the operation of the seat warmer
is not needed, keep the switch in the"OFF" position.
The seat warmer defaults to the OFF position whenever the ignition switch is
turned on.
OTQ037004/HOTQ037003/HOTQ037008R
Page 118 of 303
457
Features of your vehicle
➃MOOD : Push the switch to turn the
mood lamp on when the
room lamp is off. Once themood lamp is on, each time
you press the button the
colour of the light will change.
The mood lamp will turn off
when the button is pressedagain after the last colour or
when the mood lamp button
is pressed for approximately4 seconds or when the
ROOM, DOOR or DIMMER
button is pressed.
➄ DIMMER : Whenever you push this
button when the room lamp
is turned on, the brightnessof the room lamp will
change within 3 level.
Page 138 of 303
477
Features of your vehicle
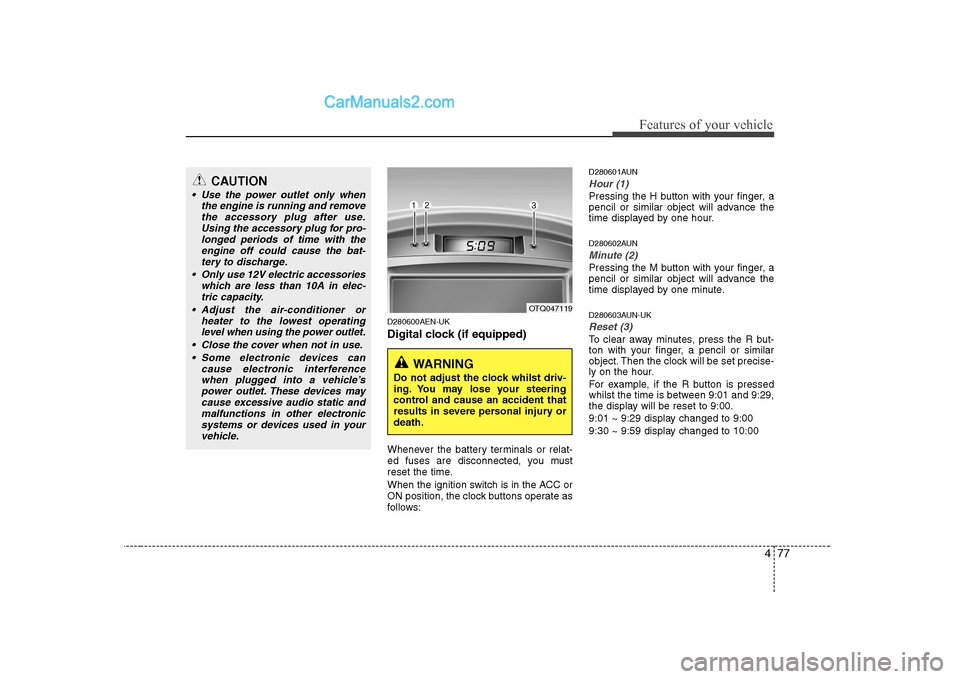
D280600AEN-UK
Digital clock (if equipped)
Whenever the battery terminals or relat-
ed fuses are disconnected, you must
reset the time.
When the ignition switch is in the ACC or
ON position, the clock buttons operate as
follows:D280601AUN
Hour (1)
Pressing the H button with your finger, a
pencil or similar object will advance the
time displayed by one hour.
D280602AUN
Minute (2)
Pressing the M button with your finger, a
pencil or similar object will advance the
time displayed by one minute.
D280603AUN-UK
Reset (3)
To clear away minutes, press the R but-
ton with your finger, a pencil or similar
object. Then the clock will be set precise-
ly on the hour.
For example, if the R button is pressed
whilst the time is between 9:01 and 9:29,
the display will be reset to 9:00.
9:01 ~ 9:29 display changed to 9:00
9:30 ~ 9:59 display changed to 10:00
OTQ047119
WARNING
Do not adjust the clock whilst driv-
ing. You may lose your steering
control and cause an accident that
results in severe personal injury ordeath.
CAUTION
Use the power outlet only when the engine is running and removethe accessory plug after use.Using the accessory plug for pro-
longed periods of time with theengine off could cause the bat- tery to discharge.
Only use 12V electric accessories which are less than 10A in elec-
tric capacity.
Adjust the air-conditioner or heater to the lowest operatinglevel when using the power outlet.
Close the cover when not in use. Some electronic devices can cause electronic interferencewhen plugged into a vehicle’s power outlet. These devices maycause excessive audio static and
malfunctions in other electronicsystems or devices used in your vehicle.
Page 139 of 303
Features of your vehicle
78
4
D280604AEN-UK
Display conversion (if equipped)
To change the 12 hour format to the 24
hour format, press the R button until the
display blinks.
For example, if the R button is pressed
whilst the time is 10:15 p.m., the displaywill be changed to 22:15.
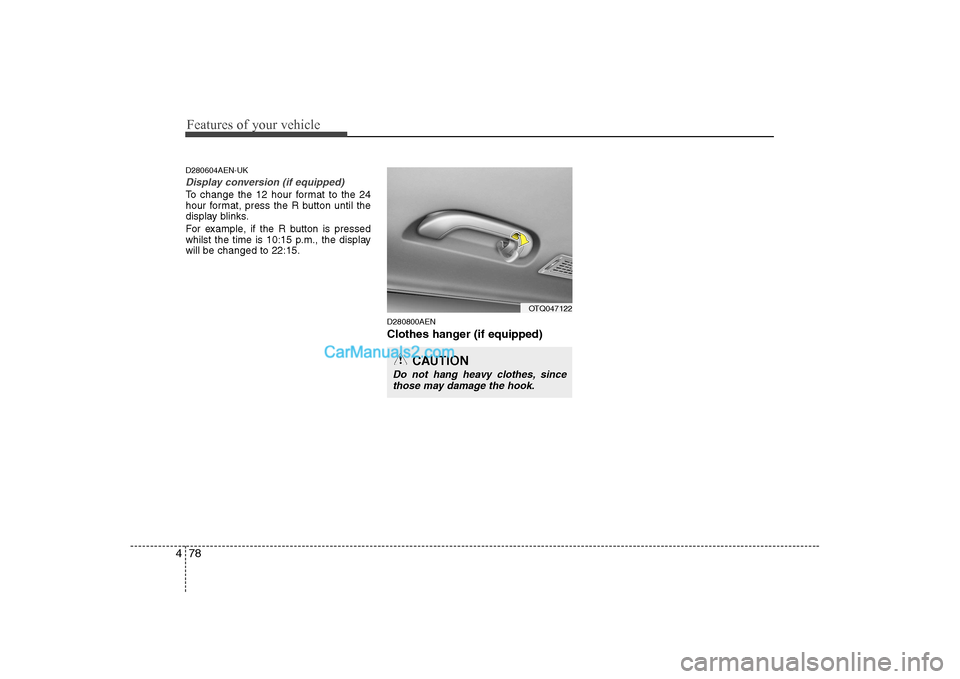
D280800AEN
Clothes hanger (if equipped)
OTQ047122
CAUTION
Do not hang heavy clothes, sincethose may damage the hook.
Page 192 of 303
Driving your vehicle
38
5
E120200AUN-UK
Use high quality ethylene glycol coolant
Your vehicle is delivered with high quality
ethylene glycol coolant in the cooling
system. It is the only type of coolant that
should be used because it helps prevent
corrosion in the cooling system, lubri-
cates the water pump and prevents
freezing. Be sure to replace or replenish
your coolant in accordance with the
maintenance schedule. Before winter,
have your coolant tested to assure that
its freezing point is sufficient for the tem-
peratures anticipated during the winter. E120300AEN-UK
Check battery and cables
Winter puts additional burdens on the
battery system. Visually inspect the bat-
tery and cables as described in section
7. The level of charge in your battery can
be checked by a HYUNDAI authorised
repairer or a service station. E120400AEN-UK
Change to "winter weight" oil if
necessary In some climates it is recommended that
a lower viscosity "winter weight" oil be
used during cold weather. See section 9
for recommendations. If you aren't sure
what weight oil you should use, consult a
HYUNDAI authorised repairer.
E120500AUN-UK
Check spark plugs and ignition system
Inspect your spark plugs and replace
them if necessary. Also check all ignition
wiring and components to be sure they
are not cracked, worn or damaged in any
way.
WARNING
- Tyre chains
The use of chains may adversely affect vehicle handling.
Do not exceed 20 mph (30 km/h) or the chain manufacturer’s rec-
ommended speed limit, whichev-
er is lower.
Drive carefully and avoid bumps, holes, sharp turns, and other
road hazards, which may cause
the vehicle to bounce.
Avoid sharp turns or locked- wheel braking.
CAUTION
Chains that are the wrong size or
improperly installed can damageyour vehicle's brake lines, sus-pension, body and wheels.
Stop driving and retighten the chains any time you hear themhitting the vehicle.
Page 196 of 303
Driving your vehicle
42
5
E140400AUN-UK Driving with a trailer
Towing a trailer requires a certain
amount of experience. Before setting out
for the open road, you must get to know
your trailer. Acquaint yourself with the
feel of handling and braking with the
added weight of the trailer. And always
keep in mind that the vehicle you are
driving is now a good deal longer and not
nearly so responsive as your vehicle is
by itself.
Before you start, check the trailer towbar
and platform, safety cables, electrical
connector(s), lights, tyres and mirror
adjustment. If the trailer has electric
brakes, start your vehicle and trailer mov-
ing and then apply the trailer brake con-
troller by hand to be sure the brakes are
working. This lets you check your electri-
cal connection at the same time.
During your trip, check occasionally to be
sure that the load is secure, and that the
lights and any trailer brakes are still work-ing.
E140401AUN
Following distance
Stay at least twice as far behind the vehi-
cle ahead as you would when driving
your vehicle without a trailer. This can
help you avoid situations that require
heavy braking and sudden turns. E140402AUN
Passing
You’ll need more passing distance up
ahead when you’re towing a trailer. And,
because of the increased vehicle length,
you’ll need to go much farther beyond the
passed vehicle before you can return to
your lane.
E140403AUN-UK
Reversing
Hold the bottom of the steering wheel
with one hand. Then, to move the trailer
to the left, just move your hand to the left.
To move the trailer to the right, move your
hand to the right. Always reverse slowly
and, if possible, have someone guide
you.
E140404AUN-UK
Making turns
When you’re turning with a trailer, make
wider turns than normal. Do this so your
trailer won’t strike soft shoulders, kerbs,
road signs, trees, or other objects. Avoid
jerky or sudden manoeuvres. Signal well
in advance.
E140405AFD-UK
Turn signals when towing a trailer
When you tow a trailer, your vehicle has
to have a different turn signal flasher and
extra wiring. The green arrows on your
instrument panel will flash whenever you
signal a turn or lane change. Properly
connected, the trailer lights will also flash
to alert other drivers you’re about to turn,
change lanes, or stop.
When towing a trailer, the green arrows
on your instrument panel will flash for
turns even if the bulbs on the trailer are
burned out. Thus, you may think drivers
behind you are seeing your signals
when, in fact, they are not. It’s important
to check occasionally to be sure the trail-
er bulbs are still working. You must also
check the lights every time you discon-
nect and then reconnect the wires.
Do not connect a trailer lighting system
directly to your vehicle’s lighting system.
Use only an approved trailer wiring har-
ness.
A HYUNDAI authorised repairer can
assist you in installing the wiring harness.
WARNING
Failure to use an approved trailer wiring harness could result in dam-
age to the vehicle electrical system
and/or personal injury.