Page 8 of 303
Your vehicle at a glance
2
2
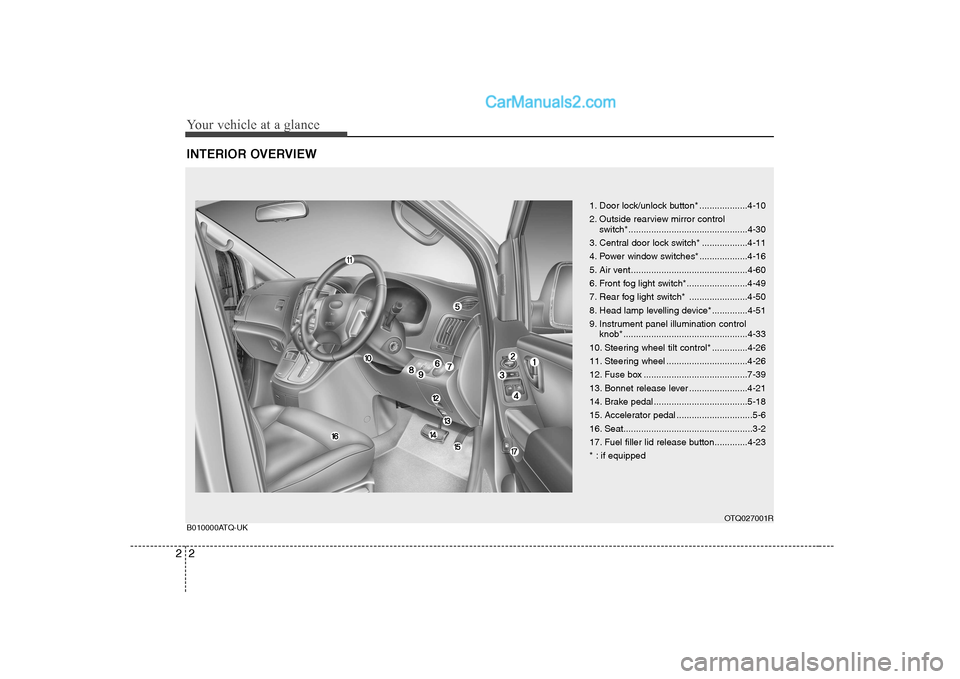
INTERIOR OVERVIEW
1. Door lock/unlock button* ...................4-10
2. Outside rearview mirror control
switch*...............................................4-30
3. Central door lock switch* ..................4-11
4. Power window switches* ...................4-16
5. Air vent ..............................................4-60
6. Front fog light switch*........................4-49
7. Rear fog light switch* .......................4-50
8. Head lamp levelling device* ..............4-51
9. Instrument panel illumination control knob* .................................................4-33
10. Steering wheel tilt control* ..............4-26
11. Steering wheel ................................4-26
12. Fuse box .........................................7-39
13. Bonnet release lever .......................4-21
14. Brake pedal .....................................5-18
15. Accelerator pedal ..............................5-6
16. Seat...................................................3-2
17. Fuel filler lid release button.............4-23
* : if equipped
OTQ027001R
B010000ATQ-UK
Page 62 of 303
4
Keys / 4-2 Remote keyless entry / 4-4Theft-alarm system / 4-6
Door locks / 4-8
Tailgate / 4-13
Windows / 4-16Bonnet / 4-21
Fuel filler lid / 4-23
Steering wheel / 4-26
Mirrors / 4-28
Instrument cluster / 4-32
Rear parking assist system / 4-44
Hazard warning flasher / 4-46Lighting / 4-47
Wipers and washers / 4-52
Interior light / 4-55
Defroster / 4-58
Manual climate control system / 4-59
Windscreen defrosting and defogging / 4-70
Storage compartment / 4-72
Interior features / 4-74Audio system / 4-79
Features of your vehicle
Page 110 of 303
449
Features of your vehicle
D190600AUN
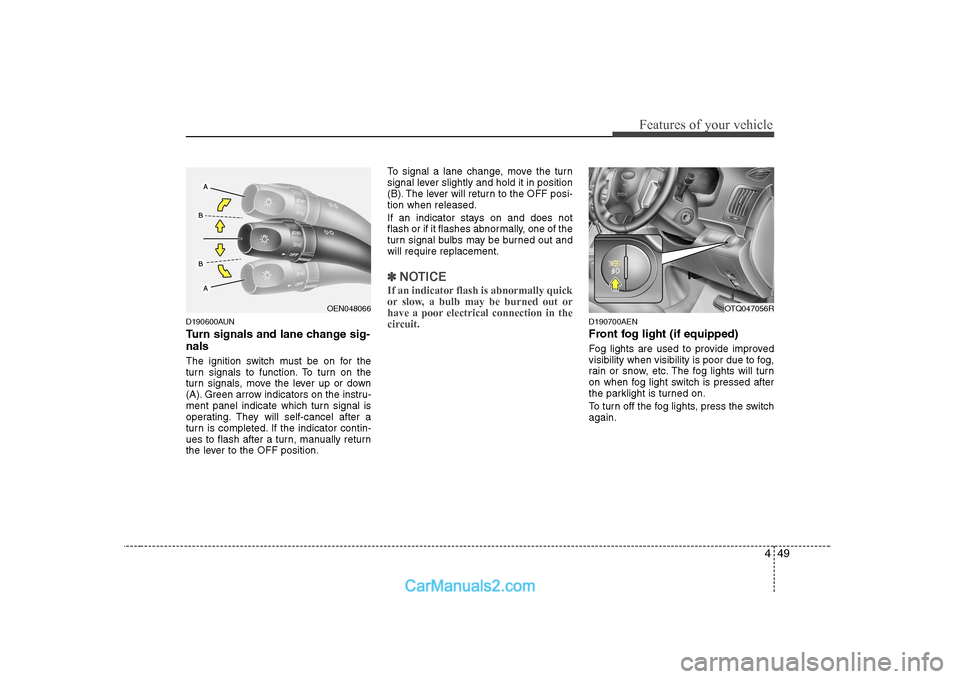
Turn signals and lane change sig- nals
The ignition switch must be on for the
turn signals to function. To turn on the
turn signals, move the lever up or down
(A). Green arrow indicators on the instru-
ment panel indicate which turn signal is
operating. They will self-cancel after a
turn is completed. If the indicator contin-
ues to flash after a turn, manually return
the lever to the OFF position.To signal a lane change, move the turn
signal lever slightly and hold it in position
(B). The lever will return to the OFF posi-tion when released.
If an indicator stays on and does not
flash or if it flashes abnormally, one of the
turn signal bulbs may be burned out andwill require replacement.
✽✽
NOTICE
If an indicator flash is abnormally quick
or slow, a bulb may be burned out or
have a poor electrical connection in the
circuit.
D190700AEN
Front fog light (if equipped)
Fog lights are used to provide improved
visibility when visibility is poor due to fog,
rain or snow, etc. The fog lights will turn
on when fog light switch is pressed after
the parklight is turned on.
To turn off the fog lights, press the switch again.
OEN048066OTQ047056R
Page 111 of 303
Features of your vehicle
50
4
D190800AUN
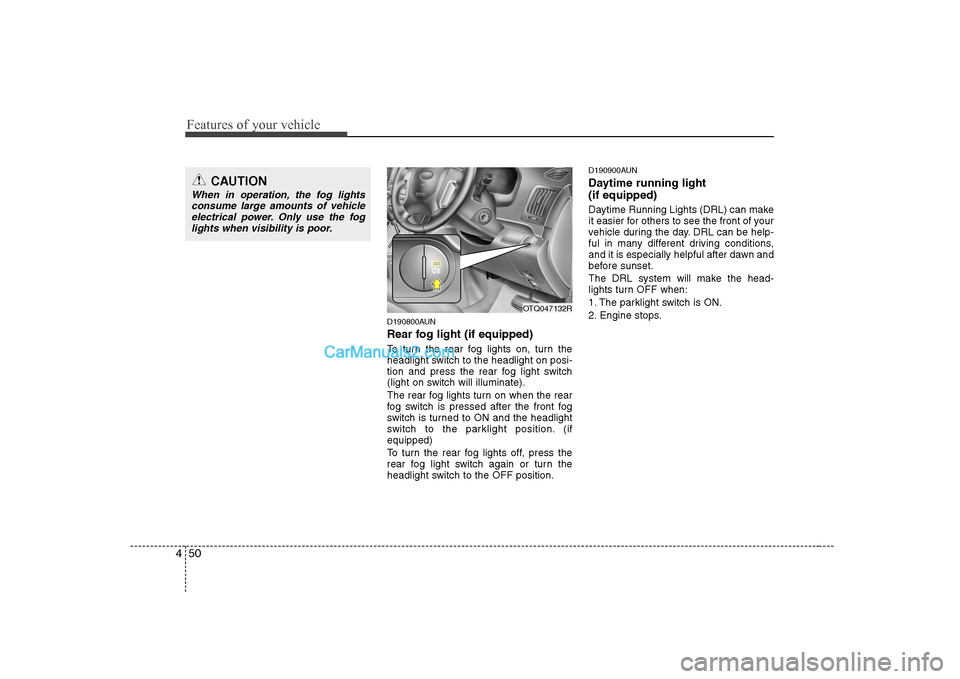
Rear fog light (if equipped)
To turn the rear fog lights on, turn the
headlight switch to the headlight on posi-
tion and press the rear fog light switch
(light on switch will illuminate).
The rear fog lights turn on when the rear
fog switch is pressed after the front fog
switch is turned to ON and the headlight
switch to the parklight position. (ifequipped)
To turn the rear fog lights off, press the
rear fog light switch again or turn the
headlight switch to the OFF position. D190900AUN
Daytime running light (if equipped)
Daytime Running Lights (DRL) can make
it easier for others to see the front of your
vehicle during the day. DRL can be help-
ful in many different driving conditions,
and it is especially helpful after dawn and
before sunset.
The DRL system will make the head-
lights turn OFF when:
1. The parklight switch is ON.
2. Engine stops.
CAUTION
When in operation, the fog lights
consume large amounts of vehicleelectrical power. Only use the fog lights when visibility is poor.
OTQ047132R
Page 124 of 303
463
Features of your vehicle
Recirculated air position The indicator light on the
button illuminates when therecirculated air position isselected.
With the recirculated air position selected, air from
the passenger compart-
ment will be drawn throughthe heating system andheated or cooled accordingto the function selected.
Outside (fresh) air position The indicator light on the
button will not illuminatewhen the outside (fresh) airposition is selected.
With the outside (fresh) airposition selected, air enters
the vehicle from outside andis heated or cooled accord-ing to the function selected.✽✽ NOTICE
Prolonged operation of the heater in the
recirculated air position (without airconditioning selected) may cause fog-
ging of the windscreen and side windows
and the air within the passenger com-partment may become stale.
In addition, prolonged use of the air con-
ditioning with the recirculated air posi-
tion selected will result in excessively dry
air in the passenger compartment.
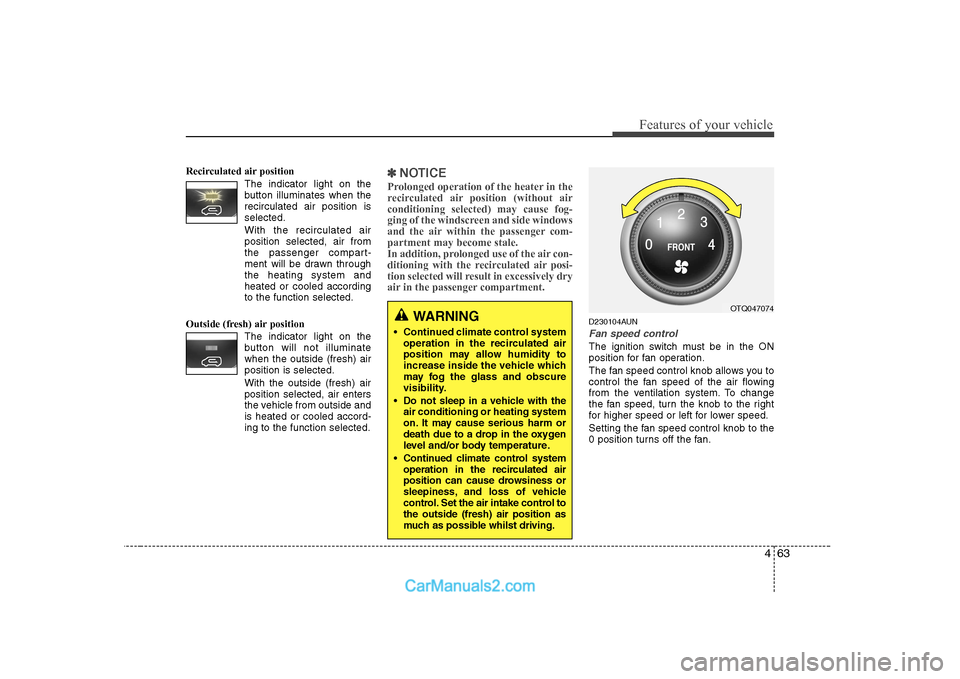
D230104AUN
Fan speed control
The ignition switch must be in the ON
position for fan operation.
The fan speed control knob allows you to
control the fan speed of the air flowing
from the ventilation system. To change
the fan speed, turn the knob to the right
for higher speed or left for lower speed.
Setting the fan speed control knob to the
0 position turns off the fan.
WARNING
• Continued climate control system operation in the recirculated air
position may allow humidity to
increase inside the vehicle which
may fog the glass and obscure
visibility.
Do not sleep in a vehicle with the air conditioning or heating system
on. It may cause serious harm or
death due to a drop in the oxygen
level and/or body temperature.
Continued climate control system operation in the recirculated air
position can cause drowsiness or
sleepiness, and loss of vehicle
control. Set the air intake control tothe outside (fresh) air position as
much as possible whilst driving.OTQ047074
Page 132 of 303
471
Features of your vehicle
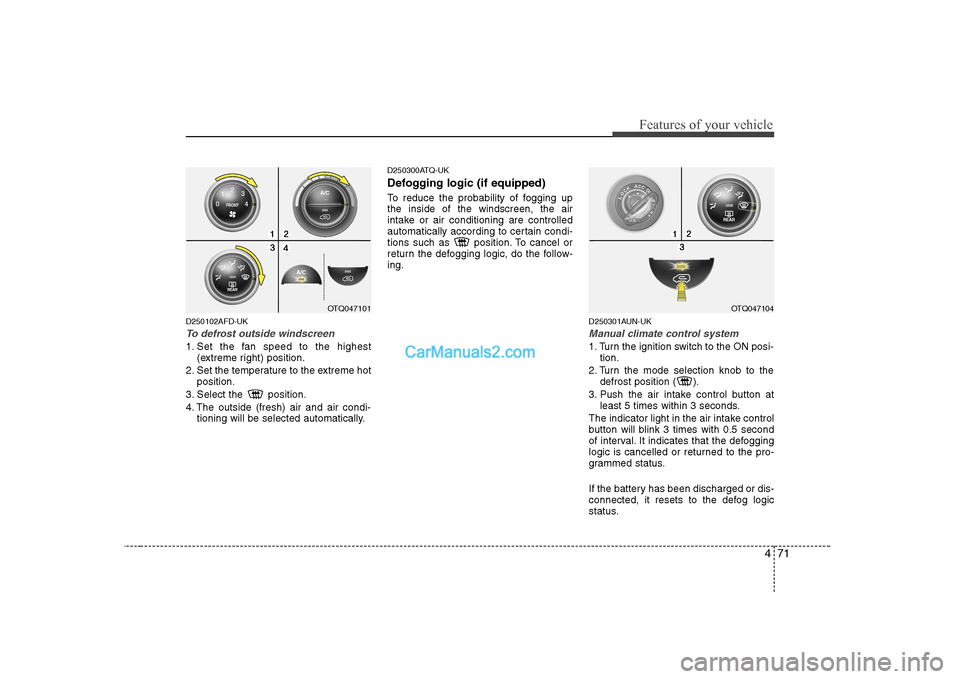
D250102AFD-UK
To defrost outside windscreen
1. Set the fan speed to the highest(extreme right) position.
2. Set the temperature to the extreme hot position.
3. Select the position.
4. The outside (fresh) air and air condi- tioning will be selected automatically. D250300ATQ-UK
Defogging logic (if equipped)
To reduce the probability of fogging up the inside of the windscreen, the air
intake or air conditioning are controlled
automatically according to certain condi-
tions such as position. To cancel or
return the defogging logic, do the follow-ing.
D250301AUN-UK
Manual climate control system
1. Turn the ignition switch to the ON posi-tion.
2. Turn the mode selection knob to the defrost position ( ).
3. Push the air intake control button at least 5 times within 3 seconds.
The indicator light in the air intake control
button will blink 3 times with 0.5 second
of interval. It indicates that the defogging
logic is cancelled or returned to the pro-
grammed status.
If the battery has been discharged or dis-
connected, it resets to the defog logic
status.
OTQ047101OTQ047104
Page 263 of 303
Maintenance
44
7
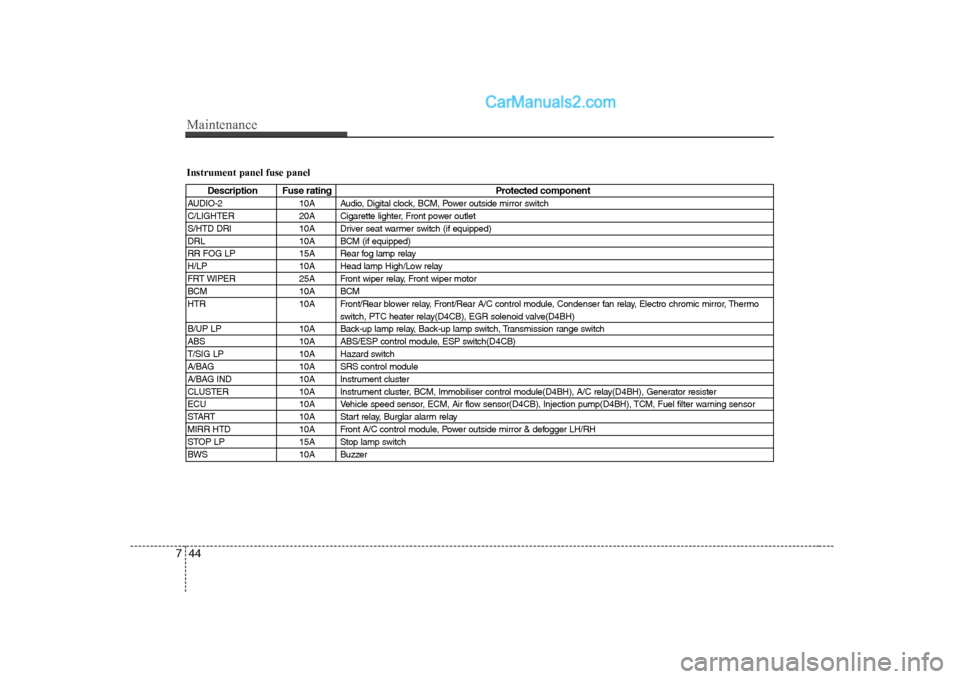
Instrument panel fuse panel
Description Fuse rating Protected component
AUDIO-2 10A Audio, Digital clock, BCM, Power outside mirror switch
C/LIGHTER 20A Cigarette lighter, Front power outlet
S/HTD DRI 10A Driver seat warmer switch (if equipped)
DRL 10A BCM (if equipped)
RR FOG LP 15A Rear fog lamp relay
H/LP 10A Head lamp High/Low relay
FRT WIPER 25A Front wiper relay, Front wiper motor
BCM 10A BCM
HTR 10A Front/Rear blower relay, Front/Rear A/C control module, Condenser fan relay, Electro chromic mirror, Thermo switch, PTC heater relay(D4CB), EGR solenoid valve(D4BH)
B/UP LP 10A Back-up lamp relay, Back-up lamp switch, Transmission range switch
ABS 10A ABS/ESP control module, ESP switch(D4CB)
T/SIG LP 10A Hazard switch
A/BAG 10A SRS control module
A/BAG IND 10A Instrument cluster
CLUSTER 10A Instrument cluster, BCM, Immobiliser control module(D4BH), A/C relay(D4BH), Generator resister
ECU 10A Vehicle speed sensor, ECM, Air flow sensor(D4CB), Injection pump(D4BH), TCM, Fuel filter warning sensor
START 10A Start relay, Burglar alarm relay
MIRR HTD 10A Front A/C control module, Power outside mirror & defogger LH/RH
STOP LP 15A Stop lamp switch
BWS 10A Buzzer
Page 268 of 303
749
Maintenance
LIGHT BULBS
G220000AEN-UK
Use only the bulbs of the specified wattage.
✽✽ NOTICE
After heavy, driving rain or washing, headlight and taillight lenses could
appear frosty. This condition is caused by
the temperature difference between the
lamp inside and outside. This is similar
to the condensation on your windows
inside your vehicle during the rain and
doesn’t indicate a problem with your
vehicle. If the water leaks into the lamp
bulb circuitry, have the vehicle checked
by a HYUNDAI authorised repairer.
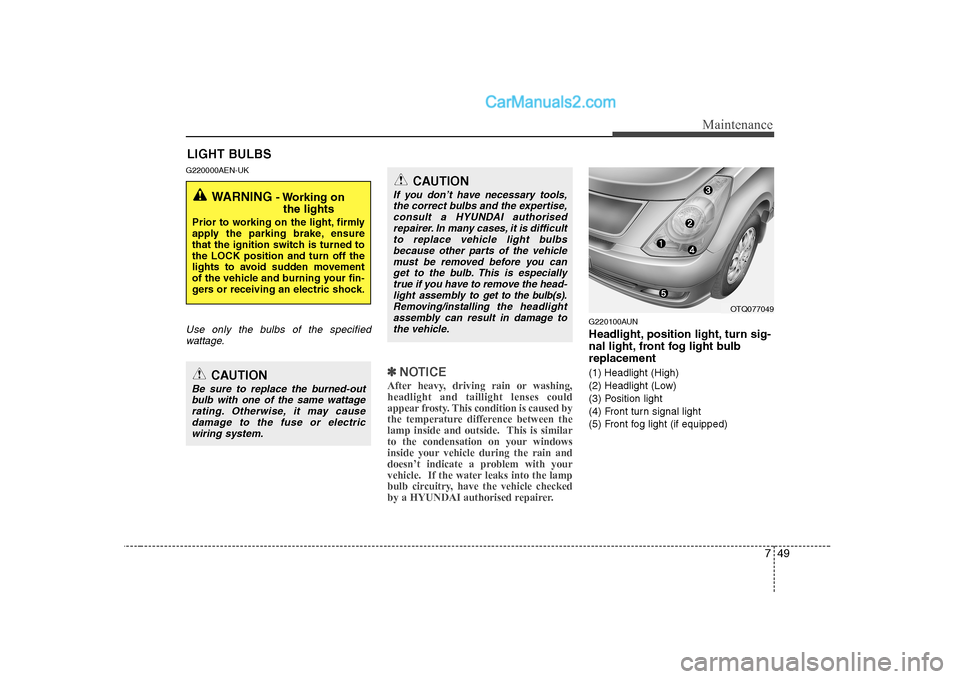
G220100AUN
Headlight, position light, turn sig-
nal light, front fog light bulbreplacement
(1) Headlight (High)
(2) Headlight (Low)
(3) Position light
(4) Front turn signal light
(5) Front fog light (if equipped)
WARNING - Working on
the lights
Prior to working on the light, firmly
apply the parking brake, ensure
that the ignition switch is turned tothe LOCK position and turn off the
lights to avoid sudden movement
of the vehicle and burning your fin-
gers or receiving an electric shock.
CAUTION
Be sure to replace the burned-out bulb with one of the same wattagerating. Otherwise, it may cause damage to the fuse or electricwiring system.
CAUTION
If you don’t have necessary tools,
the correct bulbs and the expertise, consult a HYUNDAI authorisedrepairer. In many cases, it is difficult
to replace vehicle light bulbsbecause other parts of the vehiclemust be removed before you can get to the bulb. This is especially
true if you have to remove the head- light assembly to
get to the bulb(s).
Removing/installingthe headlight
assembly can result in damage to the vehicle.OTQ077049