2009 Hyundai Accent air conditioning
[x] Cancel search: air conditioningPage 156 of 232
3 WHAT TO DO IN AN EMERGENCY
4IF THE ENGINE OVERHEATS
D030A01A-DAT If your temperature gauge indicates overheating, you experience a loss of power, or hear loud pinging or knock- ing, the engine is probably too hot. Ifthis happens, you should:
1. Pull off the road and stop as soon as it is safe to do so.
2. Place the gear selector lever in "P"
(automatic), or neutral (manual transaxle) and set the hand brake. If the air conditioning is on, turn it off.
3. If coolant is running out under the car or steam is coming out from thebonnet, stop the engine. Do not open the bonnet until the coolant hasstopped running or the steaming has stopped. If there is no visible loss of coolant and no steam, leave theengine running and check to be sure the engine cooling fan is operating. If the fan is not running, turn the engineoff.
4. Check to see if the water pump drive
belt is missing. If it is not missing,check to see that it is tight. If the drive belt seems to be satisfactory, check for coolant leaking from theradiator, hoses or under the car.
6. Carefully remove the jumper cables
in the reverse order of attachment.
If you do not know why your batterybecame discharged (because the lightswere left on, etc.), have the charging system checked by your Hyundai dealer.
3. Attach the clamps of the jumper
cable in the exact order shown in theillustration. That is, first, attach one clamp of the jumper cable to the positive (+) post or cable of thedischarged battery. Then attach the other end of the same cable to the positive (+) post or cable of thebooster battery. Next, using the other cable, attach one clamp to the negative (-) post or cable of thebooster battery. Then attach the other end of that cable to a solid metal part of the engine away fromthe battery. Do not connect the cable to any moving part.
4. Start the engine in the car with the booster battery and let it run for afew minutes. This will help to as- sure that the booster battery is fullycharged. During the jumping opera- tion, run the engine in this vehicle at about 2,000 rpm.
5. Start the engine in the car with the discharged battery using the normalstarting procedure. After the enginestarts, leave the jumper cables con- nected and let the engine run at fast idle or about 2,000 rpm for severalminutes.
Page 157 of 232
3
WHAT TO DO IN AN EMERGENCY
5
!
!
SPARE TYRE
(If the air conditioning had been in use, it is normal for cold water to bedraining from it when you stop).
WARNING:
While the engine is running, keep hair, hands and clothing away from moving parts such as the fan anddrive belts to prevent injury. 6. If you cannot find the cause of the
overheating, wait until the enginetemperature has returned to normal. Then, if coolant has been lost, care- fully add engine coolant to the reser-voir (page 6-7) to bring the fluid level in the reservoir up to the halfway mark.
7. Proceed with caution, keeping alert for further signs of overheating. Ifoverheating happens again, call aHyundai dealer for assistance.
5. If the water pump drive belt is broken or coolant is leaking out, stop theengine immediately and call the near-est Hyundai dealer for assistance.
WARNING:
Do not remove the radiator cap when the engine is hot. This can allow coolant to be blown out of the open-ing and cause serious burns.
! CAUTION:
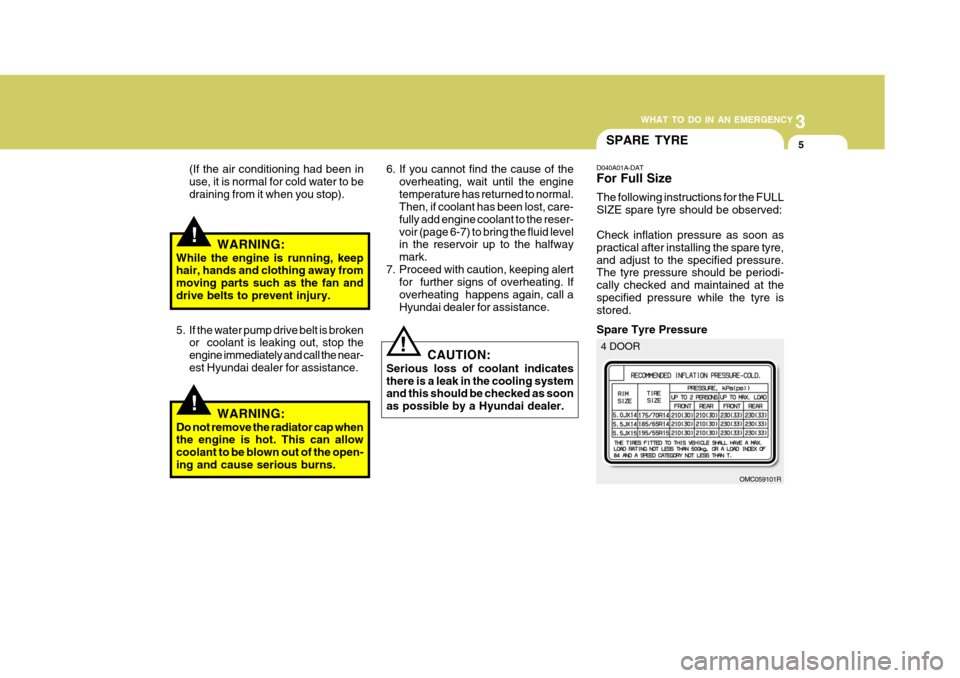
Serious loss of coolant indicates there is a leak in the cooling system and this should be checked as soon as possible by a Hyundai dealer. D040A01A-DAT For Full Size The following instructions for the FULL SIZE spare tyre should be observed: Check inflation pressure as soon as practical after installing the spare tyre,and adjust to the specified pressure. The tyre pressure should be periodi- cally checked and maintained at thespecified pressure while the tyre is stored. Spare Tyre Pressure
OMC059101R
4 DOOR
Page 177 of 232
5
VEHICLE MAINTENANCE REQUIREMENTS
5
1 23456789
101112131415
Note : (1) When adding coolant, use only a qualified coolant additive for your vehicle and never mix hard water in the coolant filled at the factory. An improper coolant mixture can result in serious malfunction or engine damage.
(2) At first, replace at 100,000 km or 60 months : after that, replace every 40,000 km or 24 months. * For your convenience, it can be replaced prior to it's interval when you do maintenance of other items.
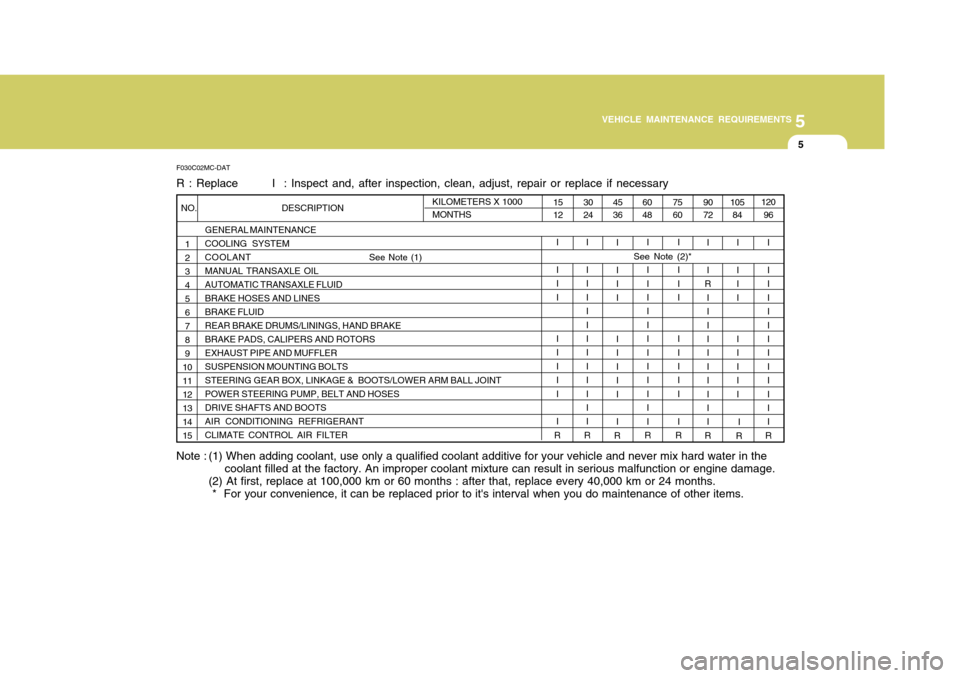
F030C02MC-DAT R : Replace I : Inspect and, after inspection, clean, adjust, repair or replace if necessary
GENERAL MAINTENANCE COOLING SYSTEMCOOLANT
See Note (1)
MANUAL TRANSAXLE OILAUTOMATIC TRANSAXLE FLUIDBRAKE HOSES AND LINESBRAKE FLUIDREAR BRAKE DRUMS/LININGS, HAND BRAKEBRAKE PADS, CALIPERS AND ROTORSEXHAUST PIPE AND MUFFLERSUSPENSION MOUNTING BOLTSSTEERING GEAR BOX, LINKAGE & BOOTS/LOWER ARM BALL JOINTPOWER STEERING PUMP, BELT AND HOSESDRIVE SHAFTS AND BOOTSAIR CONDITIONING REFRIGERANTCLIMATE CONTROL AIR FILTER
120 96
I I IIII I IIIII I
R
105
84
I I II I IIII
90 72
7560
6048
I I
R I II I IIIII I
R
I I I I I I I II I
R
II I I IIII I IIII
R
45 36
3024
I I II I IIII I
R
II IIII I IIIII I
R
15 12
I I II I IIII I
R
KILOMETERS X 1000 MONTHS
NO. DESCRIPTION
See Note (2)*
I
R
Page 181 of 232
5
VEHICLE MAINTENANCE REQUIREMENTS
9
F070L01A-AAT
o Suspension Mounting Bolts
Check the suspension connections for looseness or damage. Retighten to the specified torque. F070M01A-AAT
o Steering Gear Box, Linkage &
Boots / Lower Arm Ball Joint
With the vehicle stopped and engineoff, check for excessive free-play in the steering wheel. Check the linkage for bends or dam- age. Check the dust boots and ball joints for deterioration, cracks, or dam- age. Replace any damaged parts. F070N01A-AAT
o Power Steering Pump, Belt
and Hoses
Check the power steering pump and
hoses for leakage and damage. Re- place any damaged or leaking parts immediately. Inspect the power steer-ing belt for evidence of cuts, cracks, excessive wear, oiliness and proper tension. Replace or adjust it if neces-sary. F070P01A-AAT
o Drive Shafts and Boots
Check the drive shafts, boots andclamps for cracks, deterioration, or damage. Replace any damaged parts and, if necessary, repack the grease. F070Q01A-AAT
o Air Conditioning Refrigerant Check the air conditioning lines and connections for leakage and damage. Check air conditioning performanceaccording to the relevant shop manual if necessary.
F070J01A-AAT
o Brake Pads, Calipers and
Rotors
Check the pads for excessive wear,
discs for run out and wear, and cali-pers for fluid leakage.
F070K01A-AAT
o Exhaust Pipe and Muffler
Visually inspect the exhaust pipes,
muffler and hangers for cracks, dete- rioration, or damage. Start the engineand listen carefully for any exhaust gas leakage. Tighten connections or replace parts as necessary.
Page 182 of 232
Engine Compartment .................................................... 6-2
General Checks ........................................................... 6-3
Maintenance Precautions ............................................. 6-4
Checking the Engine Oil ............................................... 6-4
Checking and Changing the Engine Coolant ................ 6-7
Changing the Air Cleaner Filter ..................................... 6-8
Checking the Transaxle Oil (Manual) ..........................6-11
Checking the Transaxle Fluid (Automatic)..................6-11
Checking the B rakes ................................................... 6-13
Checking the Clutch Fluid ............................................ 6-14
Air Conditioning Care ................................................... 6-15
Changing the Climate Control Air Filter........................ 6-16
Checking and Replacing Fuses .................................. 6-17
Checking the Battery ................................................... 6-19
Power Steering Fluid Level .......................................... 6-21
Headlight Aiming Adjustment ....................................... 6-22
Replacement of Light Bulbs ......................................... 6-24
Bulb Wattage ............................................................... 6-29
Fuse Panel Description ............................................... 6-30
DO-IT-YOURSELF MAINTENANCE
6
6
Page 184 of 232
6
DO-IT-YOURSELF MAINTENANCE
3GENERAL CHECKS
G020A01A-AAT Engine Compartment The following should be checked regu- larly:
o Engine oil level and condition
o Transaxle fluid level and condition
o Brake fluid level
o Clutch fluid level
o Engine coolant level
o Windshield washer fluid level
o Accessory drive belt condition
o Engine coolant hose condition
o Fluid leaks (on or below compo- nents)
o Power steering fluid level
o Battery condition
o Air cleaner filter condition G020C01A-DAT Vehicle Interior The following should be checked each time when the vehicle is driven:
o Lights operation
o Windshield wiper operation
o Horn operation
o Demister, heating system operation
(and air conditioning, if installed)
o Steering operation and condition
o Mirror condition and operation
o Turn signal light operation
o Accelerator pedal operation
o Brake operation, including hand
brake
o Manual transaxle operation, includ- ing clutch operation
o Automatic transaxle operation, in- cluding "Park" mechanism opera-tion
o Seat control condition and opera- tion
o Seat belt condition and operation
o Sunvisor operation If you notice anything that does not operate correctly or appears to befunctioning incorrectly, inspect it care- fully and seek assistance from your Hyundai dealer if service is needed.
G020B01A-DAT Vehicle Exterior The following should be checked monthly:
o Overall appearance and condition
o Wheel condition and wheel nut torque
o Exhaust system condition
o Light condition and operation
o Windshield glass condition
o Wiper blade condition
o Paint condition and body corrosion
o Fluid leaks
o Door and bonnet lock condition
o Tyre pressure and condition (includ-
ing spare tyre)
Page 196 of 232
6
DO-IT-YOURSELF MAINTENANCE
15AIR CONDITIONING CARE
G140C01A-AAT Lubrication To lubricate the compressor and the seals in the system, the air condition-ing should be run for at least 10 min- utes each week. This is particularly important during cool weather whenthe air conditioning system is not oth- erwise in use.
G140A01A-DAT Keeping the Condenser Clean The air conditioning condenser (and engine radiator) should be checked periodically for accumulation of dirt, dead insects, leaves, etc. These caninterfere with maximum cooling effi- ciency. When removing such accumu- lations, brush or hose them away care-fully to avoid bending the cooling fans. Replacement of the filter drier To comply with local Australian State codes and Laws the filter drier must be replaced if the system has been openedto the atmosphere for any reason or if
during servicing no refrigerant is found in the system.
!
G140B01A-AAT Checking the Air Conditioning Operation
1. Start the engine and let it run at fast
idle for several minutes with the air conditioning set at the maximum cold setting.
2. If the air coming out of the in-dash
vents is not cold, have the air condi-tioning system inspected by your Hyundai dealer.
CAUTION:
Running the air conditioning systemfor extended periods of time with a low refrigerant level may damage the compressor.
Page 202 of 232
6
DO-IT-YOURSELF MAINTENANCE
21
!
G220B01A-AAT Checking Engine Cooling Fan The engine coolant fan should come on automatically if the engine coolanttemperature is high. G220C01TB-GAT Checking Condenser Cooling Fan When the air conditioning is in opera- tion, the condenser cooling fan comeson automatically, being controlled by
the engine ECU.
WARNING:
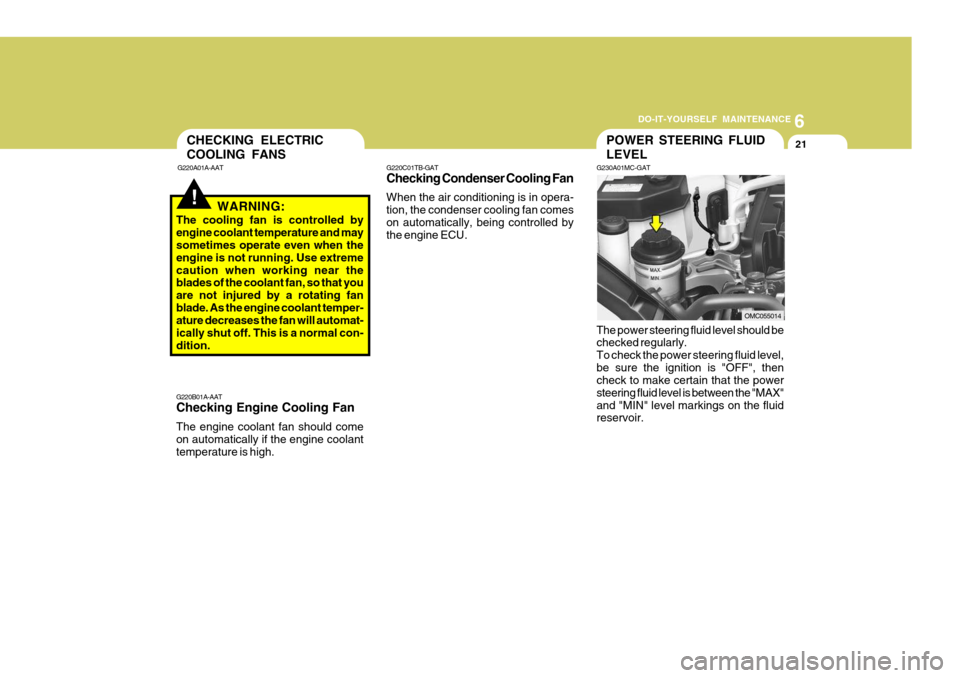
The cooling fan is controlled by engine coolant temperature and may sometimes operate even when the engine is not running. Use extremecaution when working near the blades of the coolant fan, so that you are not injured by a rotating fanblade. As the engine coolant temper- ature decreases the fan will automat- ically shut off. This is a normal con-dition. The power steering fluid level should be checked regularly. To check the power steering fluid level,be sure the ignition is "OFF", then check to make certain that the power steering fluid level is between the "MAX"and "MIN" level markings on the fluid reservoir.
CHECKING ELECTRIC COOLING FANS
G220A01A-AATPOWER STEERING FLUID LEVEL
G230A01MC-GAT
OMC055014