Page 156 of 578

�µ
See pages f or important saf ety
inf ormation and warnings about how toproperly position the seats and seat-backs.
Except LX models
On EX-L and Touring modelsExcept EX-L and Touring models1413
The controls f or the power
adjustable front seats are on the
outside edge of each seat bottom.
You can adjust the seats with the
ignition switch in any position. Make
all seat adjustments bef ore you start
driving.
The passenger seat has the same
adjustments as the driver’s seat but
without any height and lumbar
adjustments.
The f ront passenger’s seat adjusts
manually.
Here are the settings activated with
the remote;
Driving position memory
(see page ). Customized settings
(see page ). When you unlock and open the
driver’s door with the remote
transmitter, the driver’s seat (except
the power lumbar feature) and
outside mirrors start to move to the
positions stored in memory. The
indicator in the related memory
button to the remote comes on.
95
171 Front Seat Power A djustments
Remote Transmitter, Seats
152
�����—�����—�
���y�
�������������y���
�(�/���������y���
�����y
2009 Pilot
Page 172 of 578
.
Keeptheinsideandoutsidemirrors
clean and adjusted f or best visibility.
Be sure to adjust th")
You will also see a ‘‘RELEASE
PARKING BRAKE’’ message on the
multi-inf ormation display (see page).
Keeptheinsideandoutsidemirrors
clean and adjusted f or best visibility.
Be sure to adjust the mirrors bef ore
you start driving.
The inside mirror has day and night
positions. The night position reduces
glare f rom headlights behind you.
Flip the tab on the bottom edge of
the mirror to select the day or night
position. Theinsidemirrorcanautomatically
darken to reduce glare. To turn on
this feature, press the button on the
bottom of the mirror. The AUTO
indicator comes on as a reminder.
When it is on, the mirror darkens
when it senses the headlights of a
vehicle behind you, then returns to
normal visibility when the lights are
gone. Press the button again to turn
of f this f eature.
93
On LX and EX models
On Touring models
On EX-L and Touring models
Mirrors
Parking Brake, Mirrors
168
AUTO BUTTON
INDICATOR SENSOR
Driving the vehicle with the parking
brake applied can damage the rear
brakes and axles. A beeper will sound
if the vehicle is driven with the parking
brake on.
�����—�����—�
���y�
���������
���y���
�(�/���������y���
�����y
2009 Pilot
Page 173 of 578
Turn the ignition switch to the ON
(II) position.
Move the selector switch to L
(driver’s side) or R (passenger’s
side).Push the appropriate edge of the
adjustment switch to move the
mirrorright,left,up,ordown.
When you f inish, move the
selector switch to the center (off)
position. This turns the
adjustment switch of f to keep your
settings.
When you shif t to reverse with the
ignition switch in the ON (II)
position, the rear view is shown on
the lef t side of the inside mirror. For
more information, see page .
1.
2.3.
4.
395
On EX-L models
Mirrors
A djusting the Power Mirrors
Inst rument s and Cont rols
169
SELECTOR SWITCH
ADJUSTMENT SWITCH
There is also a sensor on the back of
the mirror. Items hung on the mirror
may block this sensor and af f ect its
perf ormance.
�����—�����—�
���y�
�������������y���
�(�/���������y���
�����y
2009 Pilot
Page 174 of 578
.The outside mirrors are heated to
remove fog and frost. With the
ignition switch in the ON (II)
position, turn")
Outside mirror positions can be
stored in the driving position
memory system (see page ).The outside mirrors are heated to
remove fog and frost. With the
ignition switch in the ON (II)
position, turn on the heaters by
pressing the button. The indicator in
the button comes on as a reminder.
Press the button again to turn the
heaters off. Pressing this button also
turns the rear window def ogger on
and off.
To turn the feature off, place the
switch in the center position. To tilt the passenger’s mirror,
place the switch in the right
position. To tilt the driver’s mirror, place
the selector switch in the left
position.
Both outside door mirrors have a
reverse tilt f eature. When in reverse,
the selected mirror will tilt down
slightly to improve your view as you
parallel park. Shif ting out of reverse
will return the mirror to its original
position.
171
On Touring models Except U.S. LX model
Mirrors
Reverse Tilt Door MirrorHeated Mirrors
170
HEATED MIRROR BUTTON
�����—�����—�
���y�
�����������
�y���
�(�/���������y���
�����y
2009 Pilot
Page 175 of 578
.
Store a driving position only when
the vehicle is parked.
Turn the ignition switch to the ON
(II) position. You cannot add a
new driving position")
Adjust the seat to a comfortable
position (see page ).
Store a driving position only when
the vehicle is parked.
Turn the ignition switch to the ON
(II) position. You cannot add a
new driving position to the
memory unless the ignition switch
is in the ON (II) position. You can
recall a memorized position with
the ignition switch in any position.
Your vehicle has a memory feature
f or the driver’s seat and outside
mirror positions.
Two seat and outside mirror
positionscanbestoredinseparate
memories. You select a memorized
position by pushing the appropriate
button or using the appropriate
remote transmitter (Driver 1 or
Driver 2).
You can change the ‘‘MEMORY
POSITION LINK’’ setting on the
multi-inf ormation display (see page
). Adjust the outside mirrors f or best
visibility (see page ). Press and release the SET button
on the control panel. You will hear
a beep. Immediately press and
hold one of the memory buttons (1
or 2) until you hear two beeps.
The indicator in the memory
button will come on. The current
positions of the driver’s seat and
outside mirrors are now stored.
1.
2.
3.
4.
152
169
107
CONT INUED
On Touring modelsStoring a Driving Position in
Memory
Driving Position Memory System
Inst rument s and Cont rols
171
MEMORY BUTTONS
SET BUTTON
�����—�����—�
���y�
�����������
�y���
�(�/���������y���
�����y
2009 Pilot
Page 176 of 578

Not press a memory button within
5 seconds.
Doing any of the f ollowing af ter
pressing the SET button will cancel
the storing procedure.
Pressing the SET button again
within 5 seconds.
Readjusting the outside mirror
position. Readjust the seat position. To select a memorized position, do
this:
Make sure the shif t lever is in the
Park (P) position.
Press the desired memory button
(1 or 2) until you hear a beep, then
release the button.
Each memory button stores only one
driving position. Storing a new
position erases the previous setting
stored in that button’s memory. If
you want to add a new position while
retaining the current one, use the
other memory button.
All stored driving positions will be
lost if your vehicle’s battery goes
dead or is disconnected.
The system will move the seat and
outside mirrors to the memorized
positions. The indicator in the
selected memory button will f lash
during movement. When the
adjustments are complete, you will
hear two beeps, and the indicator will
remain on. 1.
2.
Driving Position Memory System
Selecting a Memorized Position
172
�����—�����—�
���y�
�������������y���
�(�/���������y���
�����y
2009 Pilot
Page 177 of 578
To stop the system’s automatic
adjustment, do any of these actions:Push any of the adjustment
switches f or the seat.
Shif t out of Park.
Adjust the outside mirrors. If desired, you can use the
adjustment switches to change the
positions of the seat or outside
mirrors af ter they are in their
memorized positions. If you change
the memorized position, the
indicator in the memory button will
go out. To keep this driving position
f or later use, you must store it in the
driving position memory.
Press any button on the control
panel: SET, 1, or 2.
Driving Position Memory System
Inst rument s and Cont rols
173
�����—�����—�
���y�
�������������y���
�(�/���������y���
�����y
2009 Pilot
Page 181 of 578
�Î�Î
�Î
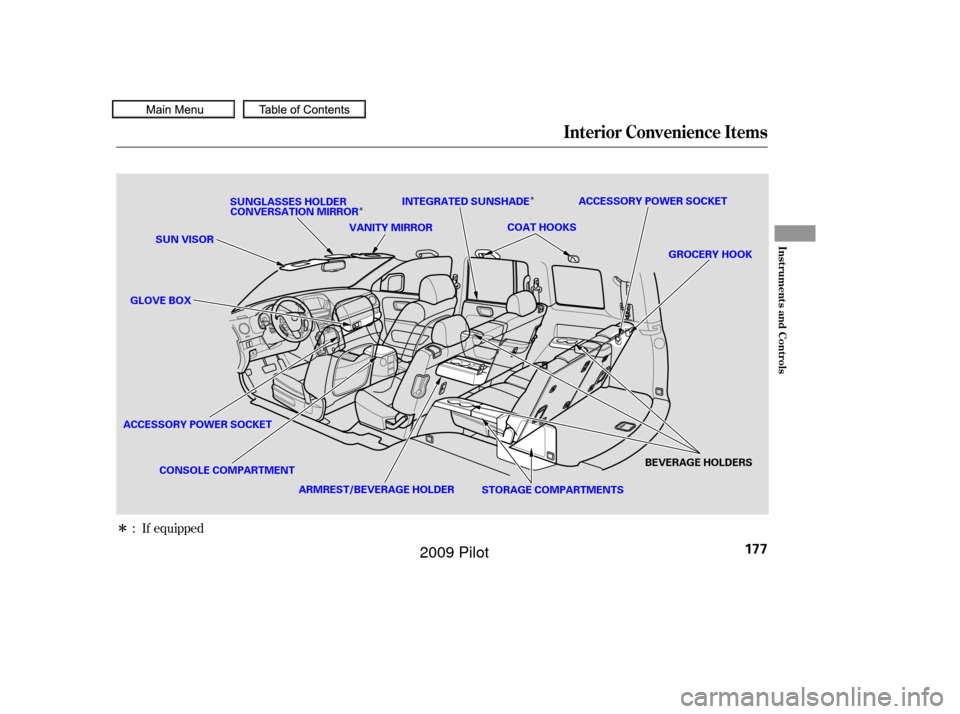
: If equipped
Interior Convenience Items
Inst rument s and Cont rols
177
SUN VISOR VANITY MIRROR
GROCERY HOOK
ARMREST/BEVERAGE HOLDER
CONSOLE COMPARTMENT
ACCESSORY POWER SOCKET SUNGLASSES HOLDER
CONVERSATION MIRROR ACCESSORY POWER SOCKET
INTEGRATED SUNSHADE
BEVERAGE HOLDERS
COAT HOOKS
STORAGE COMPARTMENTS
GLOVE BOX
�����—�����—�
���y�
����
������
�y���
�(�/���������y���
�����y
2009 Pilot
 position.
Move the selector switch to L
(driver’s side) or R (passenger’s
side).Push the appropriate edge of the
adjustment switch to move the
mirrorright,l")