Page 153 of 532

�´
If it takes several pushes on the
button to lock or unlock the doors
and the tailgate, replace the battery
as soon as possible.
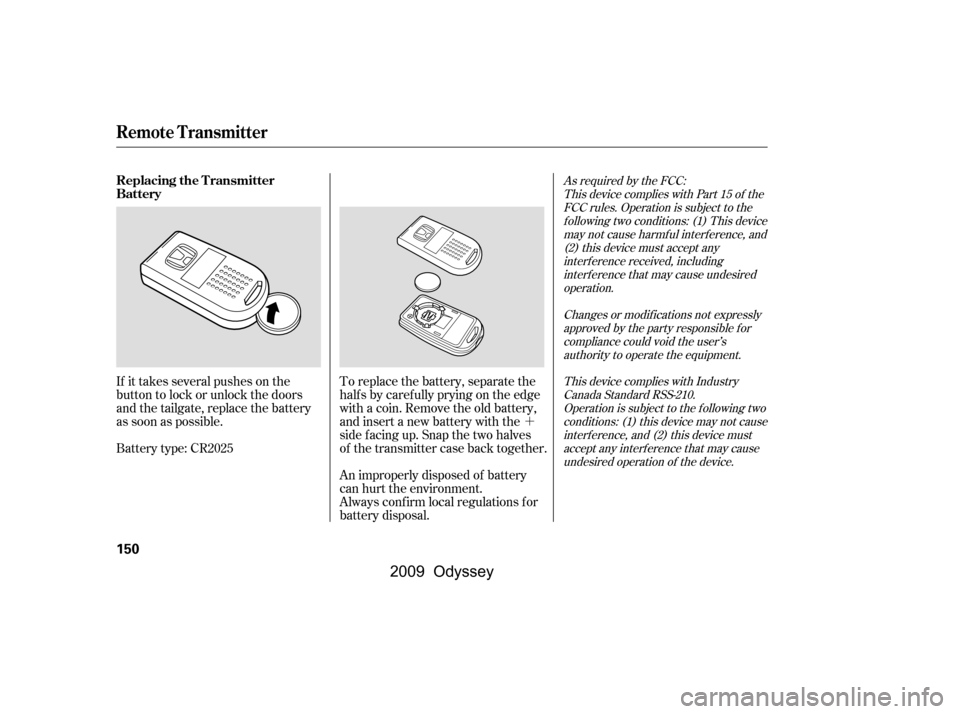
Battery type: CR2025 To replace the battery, separate the
half s by caref ully prying on the edge
with a coin. Remove the old battery,
and insert a new battery with the
side f acing up. Snap the two halves
of the transmitter case back together.
An improperly disposed of battery
can hurt the environment.
Always conf irm local regulations f or
battery disposal.
As required by the FCC:
This device complies with Part 15 of theFCC rules. Operation is subject to thef ollowing two conditions: (1) This devicemay not cause harmf ul interf erence, and(2) this device must accept anyinterf erence received, includinginterf erence that may cause undesiredoperation.
Changes or modif ications not expresslyapproved by the party responsible f orcompliance could void the user’sauthority to operate the equipment.
This device complies with IndustryCanada Standard RSS-210.Operation is subject to the f ollowing twoconditions: (1) this device may not causeinterf erence, and (2) this device mustaccept any interf erence that may causeundesired operation of the device.Replacing the Transmitter
Battery
Remote Transmitter
150
�\f���—�\f���—���
�y�
�
�������\f���y���
�(���������\f�y�\f�
�����y
2009 Odyssey
Page 162 of 532

The power tailgate has an auto-
reverse f eature. If it meets
resistance while opening or closing,
it will beep three times and reverse
direction. However, the tailgate may
not reverse immediately. Always
make sure passengers and objects
are clear of the tailgate before
opening or closing it.
Also check that passengers,
especially children, do not have their
hands on the edge of the tailgate or
on the tailgate sill. The auto reverse
featurestopsworkingwhenthe
tailgate is about to latch so the motor
can pull the tailgate shut.
If your vehicle’s battery is
disconnected, goes dead, or the f use
is removed while the tailgate is f ully
open, the power tailgate needs to be
reset. After connecting the battery
or installing the f use, close the
tailgate f ully by hand.
The power tailgate may not open or
close under the these conditions:
Whenthetailgateortheroof is
covered with snow or ice.
Do not install any accessories on the
tailgate. It may cause the tailgate to
malf unction. If there is snow or ice
on the tailgate, make sure to remove
it bef ore you operate the tailgate.
When the vehicle is swayed in a
strong wind.
The vehicle is parked on a steep
hill.
If you pull the tailgate release handle
while the tailgate is opening or
closing, it will stop moving. You need
to open or close it the rest of the way
manually.
The tailgate has sensors on both
sides. Be caref ul not to damage them.
If the sensors are damaged, the
power tailgate does not f unction
properly.
CONT INUED
A ut o-Reverse
Tailgate
Inst rument s and Cont rols
159
Closing a power tailgate while
anyone is in the path of the
tailgate can cause serious
injury.
Make sure everyone is clear
before closing the power
tailgate.
�����—�����—���
�y�
�
�����������y���
�(�����������y���
�����y
2009 Odyssey
Page 163 of 532

If you try to drive off with the
tailgate not closed completely, a
beeper sounds and a ‘‘DOOR &
TAILGATE OPEN’’ message is
shown on the multi-inf ormation
display.
Keep the tailgate closed at all times
while driving to avoid damaging the
tailgate and to prevent exhaust gas
f rom getting into the interior. Seeon page
.
If there is a problem in the power
tailgate system, you will see a
‘‘CHECK POWER TAILGATE’’
message on the multi-inf ormation
display. Have the system checked by
your dealer.
With this message shown on the
multi-inf ormation display, you can
still open or close the tailgate
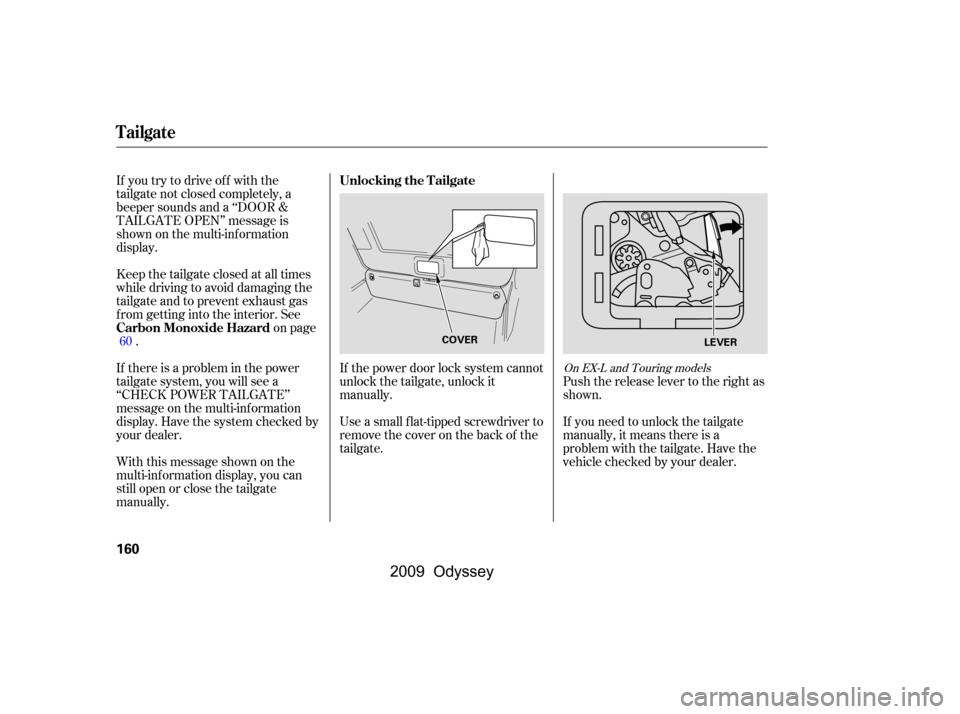
manually. If the power door lock system cannot
unlock the tailgate, unlock it
manually.
Use a small flat-tipped screwdriver to
remove the cover on the back of the
tailgate.
Push the release lever to the right as
shown.
If you need to unlock the tailgate
manually, it means there is a
problem with the tailgate. Have the
vehicle checked by your dealer.
60
On EX-L and Touring models
Unlocking the T ailgate
Carbon Monoxide Hazard
Tailgate
160
LEVER
COVER
�\f���—�\f���—���
�y�
�
�����������y���
�(���������\f�y�\f�
�����y
2009 Odyssey
Page 170 of 532
There are bucket seats with
armrests for two front passengers,
bucket seats with armrests for two
passengers in the second row, and a
bench seat f or three passengers in
the third row.
For greater cargo capacity, the seats
in the second row can be removed,
andthebenchseatinthethirdrow
can be f olded into the f loor.
Your vehicle has a second row plus-
one seat that can be installed
between the second row bucket
seats when needed. The plus-one
seat can also be used as a second
row center console.
Except U.S. LX and Canadian DXmodels
Passenger Seating
Convert ible Second Row BucketSeat s
Seats
Inst rument s and Cont rols
167
�\f���—�\f���—���
�y�
�
�����������y���
�(���������\f�y�\f�
�����y
2009 Odyssey
Page 174 of 532
They are most ef f ective when you
adjust them so the center of the back
of the occupant’s head rests against
the center of the restraint.
An armrest is located on each of the
frontseatsandoneachsideof the
second row seats (depending on
models).Pivotitdowntouseit.
When you remove the bucket seats
in the second row, pivot the armrests
up out of the way.
Theangleof thearmrestoneach
f ront seat is adjustable. Pivot the
armrest down, and pull it up to the desired angle.
Your vehicle is equipped with head
restraints in all seating positions to
help protect you and your
passengers f rom whiplash and other
injuries.
CONT INUED
See pagef or important saf ety
inf ormation and a warning aboutimproperly positioning head restraints.
On EX-L and Touring models 14
Armrests
Head Restraints
Seats
Inst rument s and Cont rols
171
�\f���—�\f���—���
�y�
�
�������
���y���
�(���������\f�y�\f�
�����y
2009 Odyssey
Page 175 of 532
To remove a head restraint f or
cleaning or repair, pull it up as f ar as
it will go. Push the release button,
then pull the restraint out of the seat-
back.
The f ront and rear head restraints
adjust f or height. You need both
hands to adjust the restraint. Do not
attempt to adjust it while driving. To
raise it, pull upward. To lower the
restraint, push the release button
and push the restraint down.
When reinstalling a head restraint,
put the legs back in place. Then
adjust it to the appropriate height
while pressing the release button.
Make sure the removed head
restraints are securely stored.
Removing t he Head Rest raintA djust ing t he Head Rest raint
Seats
172
RELEASE BUTTONLEGSEAT BACK
RELEASEBUTTON
CUSHION
Front and Second row seatThird row seat
Failure to reinstall the head
restraints can result in severe
injury during a crash.
Always replace the head
restraints before driving.
�����—�����—���
�y�
�
�����������y���
�(�����������y���
�����y
2009 Odyssey
Page 177 of 532
To get into or out of the third row
seat, walk between the second row
seats.When the seat on the passenger’s
side is moved to the center, walk
through the passenger’s side to get
into or out of the third row seat.
You need to remove the plus-one
seat (see page ) bef ore you can
make this seat arrangement.To get into or out of the third row
seat, pull up the release lever on the
shoulder of each second row bucket
seat. The seat-back will tilt forward
and the whole seat will slide f orward.
178
T hird Row Seat A ccess
Seats
174
RELEASE LEVER
�\f���—�\f���—���
�y�
�
�����������y���
�(���������\f�y�\f�
�����y
2009 Odyssey
Page 178 of 532
The second row bucket seat on the
passenger’s side can be moved to the
center to provide access to the third
row seat.Remove the passenger’s side
second row bucket seat (see page), then remove the cover.
If you have already set the floor
mat under the passenger’s side
bucket seat, make sure you
remove it bef ore moving the
bucket seat. Hook the f ront of the seat to the
f loor, then slide the seat toward
the center of the vehicle.
Push the back of the seat down
over the f loor hooks. Make sure
the seat is securely locked in place.
1. 2.
3.
177
CONT INUED
Moving the Second Row Bucket
Seat
Seats
Inst rument s and Cont rols
175
COVER HOOK
�����—�����—���
�y�
�
�����������y���
�(�����������y���
�����y
2009 Odyssey