2009 HONDA FIT ECO mode
[x] Cancel search: ECO modePage 176 of 352

If the audio system still does not
recognize the iPod, the iPod may
need to be reset. Follow the
instructions that came with your
iPod, or you can find reset
instructions online at
www.apple.com/
ipod
.
The current file number and total of
the selected playable files are
displayed on the screen. It also
shows the artist, album and track
(file) names on the screen.
To Change or Select FilesUse the SKIP button while an iPod is
playing to select passages and
change files.
SKIP -Each time you press the
SKIP + button (Preset 6), the system
skips forward to the beginning of the
next file. Press the SKIP -button
(Preset 5), to skip backward to the
beginning of the current file. Press it
again to skip to the beginning of the
previous file.
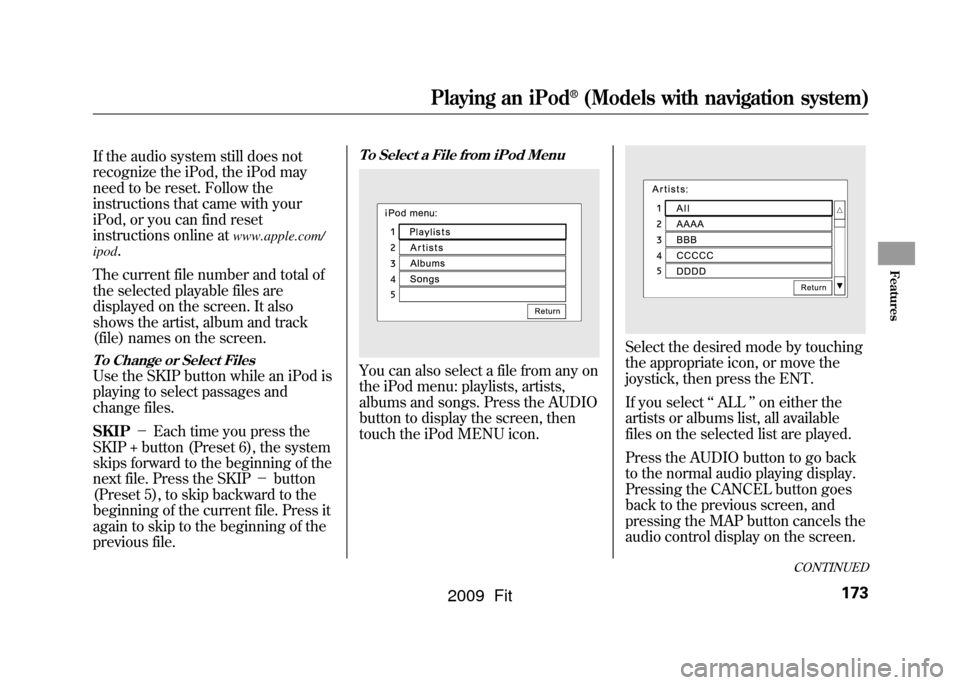
To Select a File from iPod MenuYou can also select a file from any on
the iPod menu: playlists, artists,
albums and songs. Press the AUDIO
button to display the screen, then
touch the iPod MENU icon.
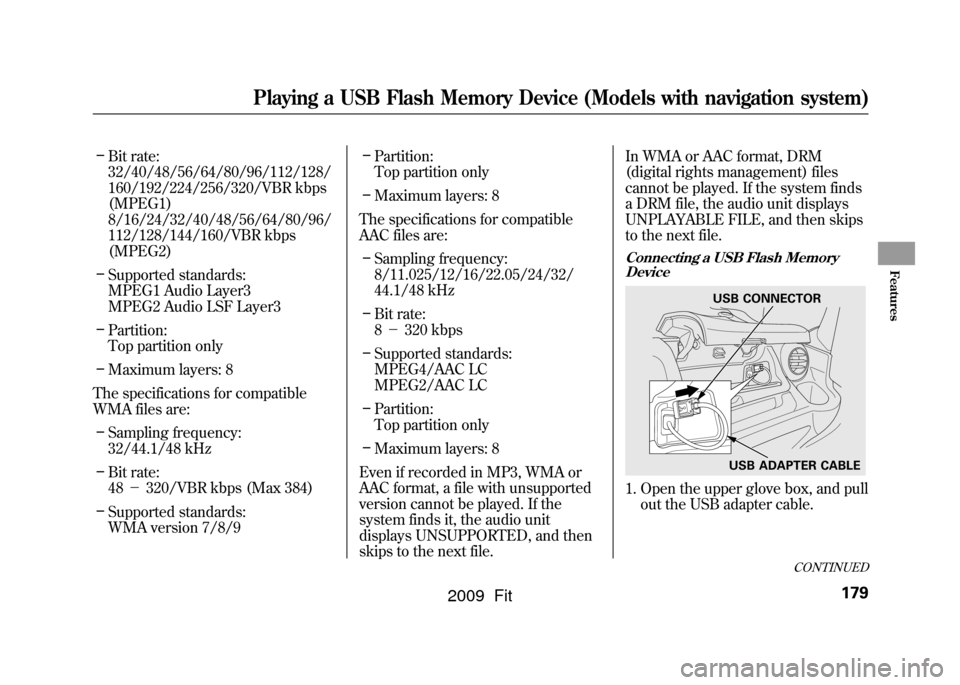
Select the desired mode by touching
the appropriate icon, or move the
joystick, then press the ENT.
If you select ‘‘ALL ’’on either the
artists or albums list, all available
files on the selected list are played.
Press the AUDIO button to go back
to the normal audio playing display.
Pressing the CANCEL button goes
back to the previous screen, and
pressing the MAP button cancels the
audio control display on the screen.
CONTINUED
Playing an iPod
®
(Models with navigation system)
173
Features
2009 Fit
Page 178 of 352

ALBUM RANDOM-This feature
plays all available albums from the
selected items in the iPod menu list
(playlists, artists, albums or songs) in
random order. The files in each
album are played in the recored
order. To activate the album random
feature, press and hold the RDM
button (Preset 2). You will see
‘‘ ALBUM RANDOM ’’in the display.
To turn it off, press and hold the
RDM button (Preset 2).
You can also select another list from
the iPod menu while keeping the
random function.
NOTE:
Available operating function varies
on models or versions. Some
functions may not be available on the
vehicle ’s audio system. To Stop Playing Your iPod
To play the radio when an iPod is
playing, press the FM/AM button or
touch the FM1, FM2, or AM icon. If
a disc is in the audio unit, press the
CD/AUX button or touch the CD
icon to play the disc. If a PC card is in
the audio unit, Press the CD/AUX
button or touch the CARD icon to
play a PC card.
Press the CD/AUX button again or
touch the AUX icon to switch back to
the iPod.
Disconnecting an iPodYou can disconnect the iPod at any
time when you see
‘‘OK to
Disconnect ’’message
ꭧin the iPod
display. Always make sure you see
‘‘ OK to Disconnect ’’message in the
iPod display before you disconnect it.
Make sure to follow the iPod ’s
instructions on how to disconnect the
dock connector from the USB
adapter cable. ꭧ
: The displayed message may vary
on models or versions. On some
models, there is no message to
disconnect.
When you disconnect the iPod while
it is playing, the navigation screen
shows ‘‘NO DATA. ’’
If you reconnect the same iPod, the
system may begin playing where it
left off, depending on what mode the
iPod is in when it is reconnected.
iPod Error Messages
If you see an error message on the
screen, see page 176.
Playing an iPod
®
(Models with navigation system)
175
Features
2009 Fit
Page 181 of 352

To Play a USB Flash Memory
Device
This audio system can operate the
audio files on a USB flash memory
device with the same controls used
for the in-dash disc player. To play a
USB flash memory device, connect it
to the USB adapter cable in the
upper glove box, then press the CD/
AUX button. The ignition switch
must be in the ACCESSORY (I) or
ON (II) position.
The audio system reads and plays
the audio files on the USB flash
memory device in MP3, WMA or
AAC
ꭧformats. Depending on the
format, the display shows MP3,
WMA or AAC when a USB flash
memory device is playing. The USB
flash memory device limit is up to
700 folders or up to 65535 files.
ꭧ : Only AAC format files recorded
with iTunes are playable on this
audio unit. The recommended USB flash
memory devices are 256 Mbyte or
higher. Some digital audio players
may be compatible as well.
Some USB flash memory device
(such as devices with security
lockout features, etc.) will not work
in this audio unit.
NOTE:
●Do not use a device such as a card
reader or hard drive as the device
or your files may be damaged.●Do not connect your USB flash
memory device using a HUB.●Do not use an extension cable to
the USB adapter cable equipped
with your vehicle.●Do not keep the USB flash
memory device in the vehicle.
Direct sunlight and high heat will
damage it.
●We recommend backing up your
data before playing a USB flash
memory device.●Depending on the type and
number of files, it may take some
time before they begin to play.●Depending on the software the
files were made with, it may not be
possible to play some files, or
display some text data.
Voice Control SystemYou can select the AUX mode by
using the navigation system voice
control buttons, but cannot operate
the play mode functions.
The specifications for compatible
MP3 files are:
– Sampling frequency:
32/44.1/48 kHz (MPEG1)
16/22.05/24 kHz (MPEG2)
Playing a USB Flash Memory Device (Models with navigation system)178
2009 Fit
Page 182 of 352

–Bit rate:
32/40/48/56/64/80/96/112/128/
160/192/224/256/320/VBR kbps
(MPEG1)
8/16/24/32/40/48/56/64/80/96/
112/128/144/160/VBR kbps
(MPEG2)
– Supported standards:
MPEG1 Audio Layer3
MPEG2 Audio LSF Layer3
– Partition:
Top partition only
– Maximum layers: 8
The specifications for compatible
WMA files are: – Sampling frequency:
32/44.1/48 kHz
– Bit rate:
48 -320/VBR kbps (Max 384)
– Supported standards:
WMA version 7/8/9 –
Partition:
Top partition only
– Maximum layers: 8
The specifications for compatible
AAC files are: – Sampling frequency:
8/11.025/12/16/22.05/24/32/
44.1/48 kHz
– Bit rate:
8- 320 kbps
– Supported standards:
MPEG4/AAC LC
MPEG2/AAC LC
– Partition:
Top partition only
– Maximum layers: 8
Even if recorded in MP3, WMA or
AAC format, a file with unsupported
version cannot be played. If the
system finds it, the audio unit
displays UNSUPPORTED, and then
skips to the next file. In WMA or AAC format, DRM
(digital rights management) files
cannot be played. If the system finds
a DRM file, the audio unit displays
UNPLAYABLE FILE, and then skips
to the next file.
Connecting a USB Flash Memory
Device1. Open the upper glove box, and pull out the USB adapter cable.
USB CONNECTOR
USB ADAPTER CABLE
CONTINUED
Playing a USB Flash Memory Device (Models with navigation system)
179
Features
2009 Fit
Page 184 of 352

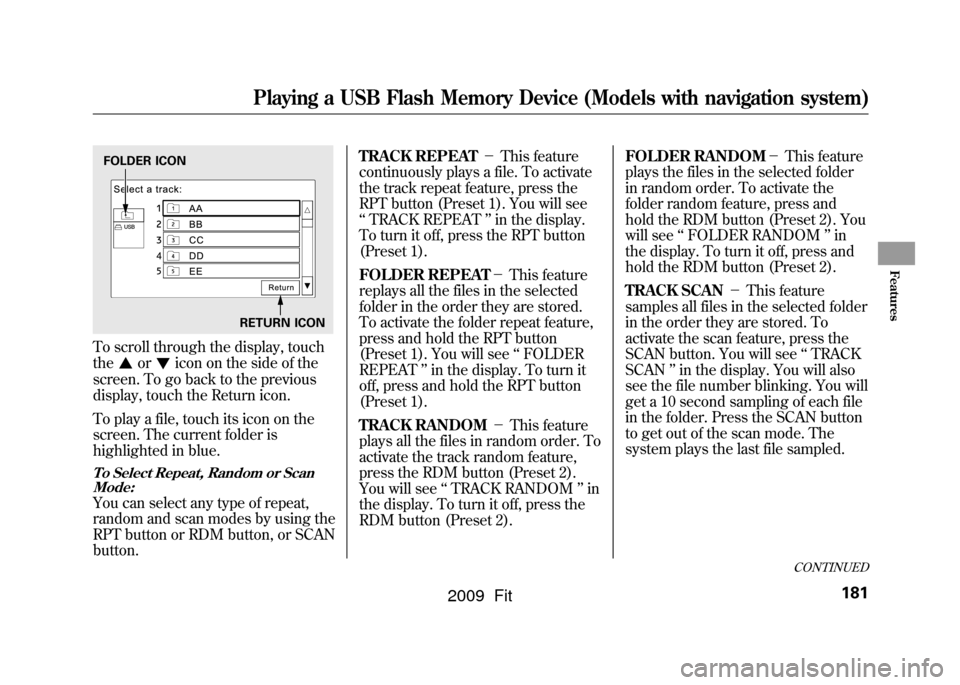
To scroll through the display, touch
the
or
icon on the side of the
screen. To go back to the previous
display, touch the Return icon.
To play a file, touch its icon on the
screen. The current folder is
highlighted in blue.
To Select Repeat, Random or Scan Mode:You can select any type of repeat,
random and scan modes by using the
RPT button or RDM button, or SCAN
button. TRACK REPEAT
-This feature
continuously plays a file. To activate
the track repeat feature, press the
RPT button (Preset 1). You will see
‘‘ TRACK REPEAT ’’in the display.
To turn it off, press the RPT button
(Preset 1).
FOLDER REPEAT -This feature
replays all the files in the selected
folder in the order they are stored.
To activate the folder repeat feature,
press and hold the RPT button
(Preset 1). You will see ‘‘FOLDER
REPEAT ’’in the display. To turn it
off, press and hold the RPT button
(Preset 1).
TRACK RANDOM -This feature
plays all the files in random order. To
activate the track random feature,
press the RDM button (Preset 2).
You will see ‘‘TRACK RANDOM ’’in
the display. To turn it off, press the
RDM button (Preset 2). FOLDER RANDOM
-This feature
plays the files in the selected folder
in random order. To activate the
folder random feature, press and
hold the RDM button (Preset 2). You
will see ‘‘FOLDER RANDOM ’’in
the display. To turn it off, press and
hold the RDM button (Preset 2).
TRACK SCAN -This feature
samples all files in the selected folder
in the order they are stored. To
activate the scan feature, press the
SCAN button. You will see ‘‘TRACK
SCAN ’’in the display. You will also
see the file number blinking. You will
get a 10 second sampling of each file
in the folder. Press the SCAN button
to get out of the scan mode. The
system plays the last file sampled.FOLDER ICON
RETURN ICON
CONTINUED
Playing a USB Flash Memory Device (Models with navigation system)
181
Features
2009 Fit
Page 185 of 352

FOLDER SCAN-This feature
samples the first file in each folder in
the order they are stored. To activate
the folder scan feature, press and
hold the SCAN button. You will see
‘‘ FOLDER SCAN ’’in the display.
You will also see the folder number
blinking. You will get a 10 second
sampling of each first file in the
folder(s). Press the SCAN button to
get out of the scan mode. The system
plays the last file sampled. To Stop Playing a USB Flash
Memory Device
To play the radio when a USB flash
memory device is playing, press the
FM/AM button or touch the FM1,
FM2, or AM icon. If a disc is in the
audio unit, press the CD/AUX button
or touch the CD icon to play the disc.
If a PC card is in the audio unit, press
the CD/AUX button or touch the
CARD icon to play a PC card.
Press the CD/AUX button again or
touch the AUX icon to switch back to
the USB flash memory device.
Disconnecting a USB Flash Memory
DeviceYou can disconnect the USB flash
memory device in any time even if
the USB mode is selected on the
audio system. Always follow the USB
flash memory device ’s instructions
when you remove it.
When you disconnect the USB flash
memory device while it is playing,
the navigation screen shows ‘‘NO
DATA. ’’
If you reconnect the same USB flash
memory device, the system will
begin playing where it left off.
USB Flash Memory Device Error
Messages
If you see an error message on the
screen, see page 183.
Playing a USB Flash Memory Device (Models with navigation system)182
2009 Fit
Page 196 of 352

On Sport modelThe security system helps to protect
your vehicle and valuables from
theft. The horn sounds and a
combination of headlights, parking/
side marker lights and taillights
flashes if someone attempts to break
into your vehicle or remove the audio
unit. This alarm continues for 2
minutes, then the system resets. To
reset an activated system before the
2 minutes have elapsed, unlock the
driver's door with the key or the
remote transmitter.
The security system automatically
sets 15 seconds after you lock the
doors, hood, and the tailgate. For the
system to activate, you must lock the
doors and the tailgate from the
outside with the key, driver's lock
tab, door lock master switch, or
remote transmitter. The security
system indicator on the instrument
panel starts blinking immediately to
show you the system is setting itself.
Once the security system is set,
opening any door, the tailgate, or the
hood without using the key or the
remote transmitter, will cause it to
alarm. It also alarms if the radio is
removed from the dashboard or the
wiring is cut.
The alarm will also be activated if a
passenger inside the locked vehicle
turns the ignition switch on.The security system will not set if the
hood, tailgate, or any door is not fully
closed. If the system will not set,
check the door and tailgate open
indicator on the instrument panel
(see page
62)to see if the doors and
tailgate are fully closed. Since it is
not part of the monitor display,
manually check the hood.
NOTE: To see if the system is set
after you exit the vehicle, press the
LOCK button on the remote
transmitter within 5 seconds. If the
system is set, the horn will beep
once.
Do not attempt to alter this system or
add other devices to it.
SECURITY SYSTEM INDICATOR
Security System
193
Features
2009 Fit
Page 197 of 352

On Sport model and Canadian LX modelCruise control allows you to maintain
a set speed above 25 mph (40 km/h)
without keeping your foot on the
accelerator pedal. It should be used
for cruising on straight, open
highways. It is not recommended for
city driving, winding roads, slippery
roads, heavy rain, or bad weather.
Improper use of the cruise
control can lead to a crash.
Use the cruise control only
when traveling on open
highways in good weather.Using the Cruise Control
1. Press the CRUISE button on the
steering wheel. The CRUISE
MAIN indicator on the instrument
panel comes on.
NOTE: The main switch can be left
on, even when the system is not in
use.
2. Accelerate to the desired cruising speed above 25 mph (40 km/h). 3. Press the SET/DECEL button on
the steering wheel. The CRUISE
CONTROL indicator on the
instrument panel comes on to
show the system is now activated.
Cruise control may not hold the set
speed when you are going up and
down hills. If your speed increases
going down a hill, use the brakes to
slow down. This will cancel cruise
control. To resume the set speed,
press the RES/ACCEL button. The
indicator on the instrument panel will
come back on.
When climbing a steep hill, the
automatic transmission may
downshift to hold the set speed.CRUISE BUTTON
SET/DECEL BUTTON CANCEL
BUTTON
RES/ACCEL
BUTTON
Cruise Control194
2009 Fit