2009 HONDA FIT change wheel
[x] Cancel search: change wheelPage 192 of 352

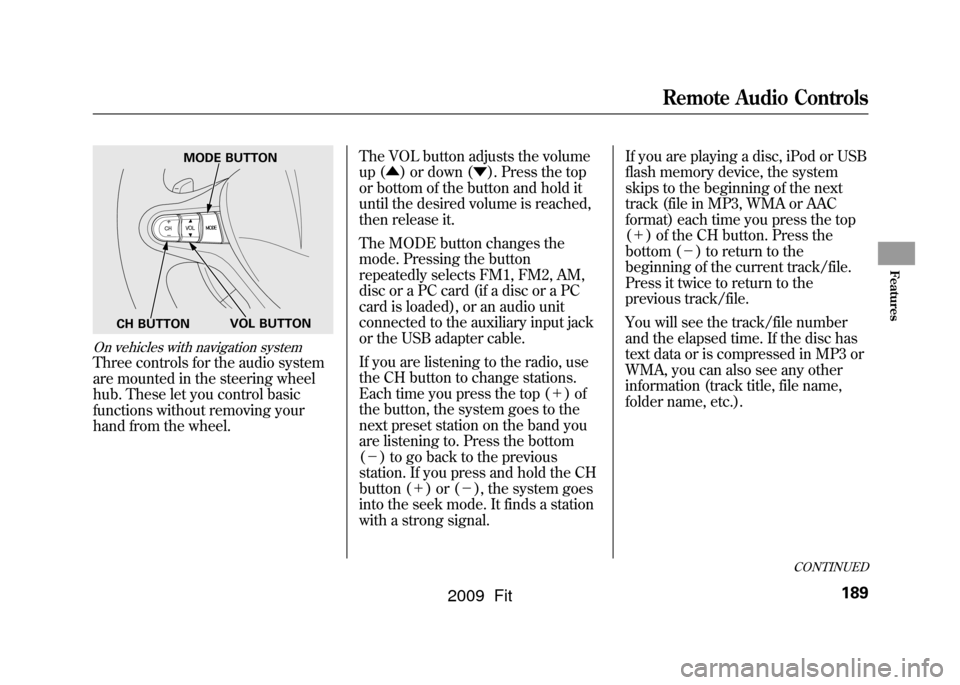
On vehicles with navigation systemThree controls for the audio system
are mounted in the steering wheel
hub. These let you control basic
functions without removing your
hand from the wheel.The VOL button adjusts the volume
up (
▲) or down ( ▼). Press the top
or bottom of the button and hold it
until the desired volume is reached,
then release it.
The MODE button changes the
mode. Pressing the button
repeatedly selects FM1, FM2, AM,
disc or a PC card (if a disc or a PC
card is loaded), or an audio unit
connected to the auxiliary input jack
or the USB adapter cable.
If you are listening to the radio, use
the CH button to change stations.
Each time you press the top ( +)of
the button, the system goes to the
next preset station on the band you
are listening to. Press the bottom
( - ) to go back to the previous
station. If you press and hold the CH
button ( +)or( -), the system goes
into the seek mode. It finds a station
with a strong signal. If you are playing a disc, iPod or USB
flash memory device, the system
skips to the beginning of the next
track (file in MP3, WMA or AAC
format) each time you press the top
(
+ ) of the CH button. Press the
bottom ( -) to return to the
beginning of the current track/file.
Press it twice to return to the
previous track/file.
You will see the track/file number
and the elapsed time. If the disc has
text data or is compressed in MP3 or
WMA, you can also see any other
information (track title, file name,
folder name, etc.).
MODE BUTTON
VOL BUTTON
CH BUTTON
CONTINUED
Remote Audio Controls
189
Features
2009 Fit
Page 235 of 352

If the ABS indicator and the brake
system indicator come on together,
and the parking brake is fully
released, the EBD system may also
be shut down.
Test your brakes as instructed on
page305.If the brakes feel normal,
drive slowly and have your vehicle
repaired by your dealer as soon as
possible. Avoid sudden hard braking
which could cause the rear wheels to
lock up and possibly lead to a loss of
control.On vehicles with VSA systemThe VSA indicator will come on
along with the ABS indicator.Important Safety Reminders
ABS does not reduce the time or
distance it takes to stop the
vehicle.
It only helps with the
steering control during braking.
ABS will not prevent a skid that
results from changing direction
abruptly, such as trying to take a
corner too fast or making a sudden
lane change. Always drive at a safe
speed for the road and weather
conditions.
ABS cannot prevent a loss of
stability. Always steer moderately
when you are braking hard. Severe
or sharp steering wheel movement
can still cause your vehicle to veer
into oncoming traffic or off the road. A vehicle with ABS may require a
longer distance to stop
on loose or
uneven surfaces, such as gravel or
snow, than a vehicle without anti-
lock.Anti-lock Brakes (ABS)232
2009 Fit
Page 240 of 352

Changing a Tire with TPMS
If you have a flat tire, the low tire
pressure indicator will come on.
Replace the flat tire with the compact
spare tire (see page284).
Each wheel (except the compact
spare tire wheel) is equipped with a
tire pressure sensor mounted inside
the tire behind the valve stem. You
must use TPMS specific wheels. It is
recommended that you always have
your tires serviced by your dealer or
qualified technician.
After you replace the flat tire with the
compact spare tire, the low tire
pressure indicator stays on. This is
normal; the system is not monitoring
the spare tire pressure. Manually
check the spare tire pressure to be
sure it is correct. After several miles
(kilometers) driving with the
compact spare tire, the TPMS
indicator comes on and the low tire
pressure indicator goes off.The low tire pressure indicator or the
TPMS indicator will go off, after
several miles (kilometers) driving,
when you replace the spare tire with
the specified regular tire equipped
with the tire pressure monitor
sensor.
Never use a puncture-repairing agent
in a flat tire. If used, you will have to
replace the tire pressure sensor.
Have the flat tire repaired by your
dealer as soon as possible.
As required by the FCC: This device
complies with Part 15 of the FCC rules.
Operation is subject to the following twoconditions: (1) This device may notcause harmful interference, and (2) thisdevice must accept any interference
received, including interference that maycause undesired operation.
Changes or modifications not expresslyapproved by the party responsible forcompliance could void the user'sauthority to operate the equipment.
This device complies with IndustryCanada Standard RSS-210. Operation issubject to the following two conditions:(1) this device may not causeinterference, and (2) this device must
accept any interference that may causeundesired operation of the device.
Tire Pressure Monitoring System (TPMS)
237
Driving
2009 Fit
Page 290 of 352

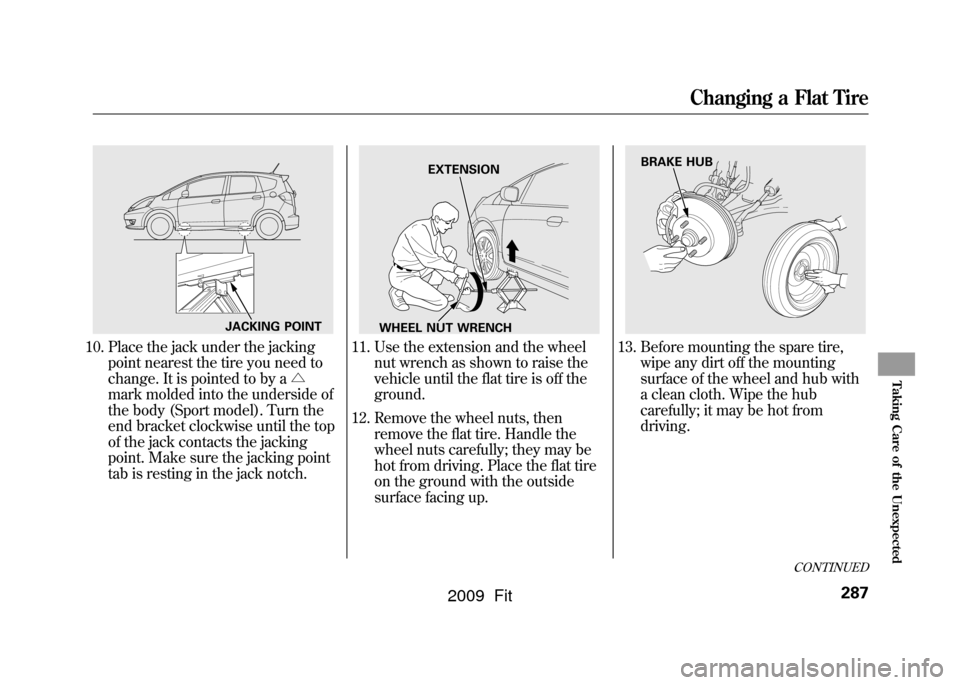
10. Place the jack under the jackingpoint nearest the tire you need to
change. It is pointed to by a △
mark molded into the underside of
the body (Sport model). Turn the
end bracket clockwise until the top
of the jack contacts the jacking
point. Make sure the jacking point
tab is resting in the jack notch.
11. Use the extension and the wheel nut wrench as shown to raise the
vehicle until the flat tire is off the
ground.
12. Remove the wheel nuts, then remove the flat tire. Handle the
wheel nuts carefully; they may be
hot from driving. Place the flat tire
on the ground with the outside
surface facing up.
13. Before mounting the spare tire,wipe any dirt off the mounting
surface of the wheel and hub with
a clean cloth. Wipe the hub
carefully; it may be hot from
driving.
JACKING POINT
EXTENSION
WHEEL NUT WRENCH
BRAKE HUB
CONTINUED
Changing a Flat Tire
287
Taking Care of the Unexpected
2009 Fit
Page 349 of 352

Tether Anchorage Points
.............
47
Theft Protection, Radio
..............
191
Three Way Catalytic Converter
...............................
328
Tilt the Steering Wheel
................
77
Time, Setting the
........................
192
Tire Chains
................................
278
Tire, How to Change a Flat
........
285
Tire Information
.........................
323
Tire Labeling
..............................
323
Tire Pressure Monitoring System (TPMS)
...........................
235, 324
Tires
..........................................
273
Air Pressure
............................
274
Chains
.....................................
278
Checking Wear
.......................
275
Compact Spare
........................
284
DOT Tire Quality Grading (U.S. Vehicles)
.............................
321
Inflation
...................................
273
Inspection
...............................
275
Labeling
..................................
323
Low Tire Pressure Indicator
(U.S. only)
.....................
64, 235
Maintenance
...........................
276 Pressure Monitoring System
(U.S. only)
...........................
235
Replacing
................................
276
Rotating
..................................
276
Snow
.......................................
278
Specifications
..........................
320
Tools, Tire Changing
.................
285
Towing A Trailer
..................................
238
Emergency Wrecker
...............
311
TPMS (Tire Pressure Monitoring System) (U.S. only)
............
235
Indicator (U.S.only)
...........
64, 236
Required Federal Explanation
.........................
324
Transmission Checking Fluid Level, Automatic
............................
259
Checking Fluid Level, Manual
................................
260
Fluid Selection
................
259, 260
Identification Number
.............
316
Shifting the Automatic
.............
219
Shifting the Manual
.................
217
Treadwear
..................................
321
Trip Meter
...................................
69 Turn Signals
.................................
63
U
Unexpected, Taking Care of the
..........................................
283
Uniform Tire Quality Grading (U.S. only)
..............................
321
Unleaded Gasoline
.....................
198
Upper Glove Box
........................
105
USB Flash Memory Device Error Messages
........................
142, 183
Used Oil, How to Dispose of......
255
V
Vehicle Capacity Load
................
209
Vehicle Dimensions
...................
318
Vehicle Identification Number
...
316
Vehicle Stability Assist (VSA
®),
aka Electronic Stability Control (ESC), System....
233
VSA System Indicator
..............
67
Vehicle Storage
..........................
281
IndexX
2009 Fit