2009 HONDA FIT door lock
[x] Cancel search: door lockPage 62 of 352

ꭧ: If equippedSECURITY SYSTEM INDICATOR
ꭧ(P. 66, 193)
WASHER LEVEL
INDICATOR
ꭧ(P.65)
MALFUNCTION
INDICATOR LAMP (P. 304)
CHARGING SYSTEM
INDICATOR (P. 60,303)
LOW OIL PRESSURE
INDICATOR (P. 60,303) IMMOBILIZER SYSTEM
INDICATOR (P.
66)
FOG LIGHT INDICATOR
ꭧ(P.
64) LIGHTS ON INDICATOR (P.
64)
SUPPLEMENTAL RESTRAINT
SYSTEM INDICATOR (P. 30,61)
MAINTENANCE MINDER
INDICATOR (P.
66) CRUISE MAIN INDICATOR
ꭧ(P.
65)
CRUISE CONTROL
INDICATOR
ꭧ(P. 65)
LOW TEMPERATURE INDICATOR (P. 63)
ELECTRIC POWER
STEERING (EPS)
INDICATOR (P.
62)
HIGH BEAM INDICATOR (P.
65)
LOW FUEL INDICATOR
(P.62)
TPMS INDICATOR
ꭧ(P.
64)
SEAT BELT REMINDER
INDICATOR (P. 60)
PARKING BRAKE AND
BRAKE SYSTEM INDICATOR
(P. 60, 305)
DAYTIME RUNNING LIGHTS INDICATOR (P.
65)
HIGH TEMPERATURE
INDICATOR (P. 63)
VEHICLE STABILITY ASSIST (VSA)
SYSTEM INDICATOR
ꭧ(P.
67)
VSA OFF INDICATORꭧ
(P. 67) SIDE AIRBAG OFF INDICATOR (P.
31,61)
LOW TIRE PRESSURE INDICATOR
ꭧ(P. 64)
ANTI-LOCK BRAKE SYSTEM
INDICATOR (P. 62)
DOOR AND TAILGATE OPEN
INDICATOR (P.
62)
Instrument Panel
59
Instruments and Controls
2009 Fit
Page 65 of 352

Anti-lock Brake System
(ABS) Indicator
This indicator normally comes on for
a few seconds when you turn the
ignition switch to the ON (II)
position, and when the ignition
switch is turned to the START (III)
position. If it comes on at any other
time, there is a problem with the
ABS. If this happens, have your
vehicle checked at a dealer. With this
indicator on, your vehicle still has
normal braking ability but no anti-
lock function. For more information,
see page231.
Electric Power Steering
(EPS) Indicator
This indicator normally comes on when
you turn the ignition switch to the ON
(II) position and goes off after the
engine starts. If it comes on at any
other time, there is a problem in the
electric power steering system. If this
happens, stop the vehicle in a safe
place and turn off the engine. Reset the
system by restarting the engine. The
indicator will not turn off immediately.
If it does not go off after driving a short
distance, or comes back on again while
driving, take the vehicle to your dealer
to have it checked. With the indicator
on, the EPS may be turned off, making
the vehicle harder to steer.
If you turn the steering wheel to the
full left or right position repeatedly
while stopping or driving at very low
speed, you may feel slightly harder
steering in order to prevent damage to
the steering box caused by
overheating.
Low Fuel Indicator
This indicator comes on as a
reminder that you must refuel soon.
When the indicator comes on, there
is about 1.64 US gal (6.2 L) of fuel
remaining in the tank before the
needle reaches E. There is a small
reserve of fuel remaining in the tank
when the needle does reach E.Door and Tailgate Open
Indicator
This indicator comes on if any door
or the tailgate is not closed tightly.
Instrument Panel Indicators62
2009 Fit
Page 67 of 352

Low Tire Pressure
Indicator
U.S. models onlyThis indicator normally comes on for
a few seconds when you turn the
ignition switch to the ON (II)
position. If it comes on while driving,
it indicates that one or more of your
vehicle's tires are significantly low on
pressure.
If this happens, pull to the side of the
road when it is safe, check which tire
has lost the pressure, and determine
the cause. If it is because of a flat tire,
replace the flat tire with the compact
spare (see page284),and have the
flat tire repaired as soon as possible.
If two or more tires are underinflated,
call a professional towing service
(see page311).For more
information, see page235.
Tire Pressure Monitoring
System (TPMS) Indicator
U.S. models onlyThis indicator normally comes on for
a few seconds when you turn the
ignition switch to the ON (II)
position.
If this indicator comes on and stays
on at any other time, or if it does not
come on when you turn the ignition
switch to the ON (II) position, there
is a problem with the TPMS. With
this indicator on, the low tire
pressure indicator will not come on
when a tire loses pressure. Take the
vehicle to your dealer to have the
system checked.
Lights On Indicator
This indicator reminds you that the
exterior lights are on. It comes on
when the light switch is in either the
or
position. If you turn the
ignition switch to the ACCESSORY
(I) or LOCK (0) position without
turning off the light switch, this
indicator will stay on. A reminder
chime will also sound when you open
the driver's door.Fog Light Indicator
On Sport modelThis indicator comes on when you
turn on the fog lights. For more
information, see page75.
Instrument Panel Indicators64
2009 Fit
Page 78 of 352

Headlights-Turning the switch to
the ‘‘
’’position turns on the
parking lights, taillights, instrument
panel lights, side-marker lights, and
rear license plate lights.
Turning the switch to the ‘‘
’’
position turns on the headlights.
When the light switch is in the
‘‘
’’ or ‘‘
’’position, the lights
on indicator comes on as a reminder.
This indicator stays on if you leave
the light switch on and turn the
ignition switch to the ACCESSORY
(I) or the LOCK (0) position.
If you leave the lights on with the key
removed from the ignition switch,
you will hear a reminder chime when
you open the driver’s door. High Beams
-Push the lever
forward and the high beam indicator
will come on (see page65).Pull it
back to return to low beams.
To flash the high beams, pull the
lever back lightly, then release it.
The high beams will stay on as long
as you hold the lever back.
Fog Lights
On Sport modelTurn the fog lights on and off by
turning the switch next to the
headlight switch.
You can use the fog lights only when
the headlights are on low beam.They
will go off when the headlights are
turned off. Daytime Running Lights
With the headlight switch off or in
the
position, the high beam
headlights and the high beam
indicator come on with reduced
brightness when you turn the
ignition switch to the ON (II)
position and release the parking
brake. They remain on until you turn
the ignition switch off, even if you set
the parking brake.
The headlights revert to normal
operation when you turn them on
with the switch.
Headlights
75
Instruments and Controls
2009 Fit
Page 83 of 352

The ignition switch has four positions:
LOCK (0), ACCESSORY (I), ON (II),
and START (III).
LOCK (0)-You can insert or remove
the key only in this position. To turn
the key, push it in slightly. If your
vehicle has an automatic transmission,
the shift lever must also be in Park.
If the front wheels are turned, the anti-
theft lock may make it difficult to turn
the key. Firmly turn the steering wheel
to the left or right as you turn the key.
ACCESSORY (I) -You can operate
the audio system and the accessory
power socket in this position.
ON (II) -This is the normal key
position when driving. Several of the
indicators on the instrument panel
come on as a test when you turn the
ignition switch from the
ACCESSORY (I) to the ON (II)
position.
START (III) -Use this position
only to start the engine. The switch
returns to the ON (II) position when
you let go of the key.
You will hear a reminder beeper if
you leave the key in the LOCK (0) or
the ACCESSORY (I) position and
open the driver's door. Remove the
key to turn off the beeper.
If your vehicle has an automatic
transmission, the shift lever must be
in Park before you can remove the
key from the ignition switch.
Removing the key from the
ignition switch while driving
locks the steering. This can
cause you to lose control of the
vehicle.
Remove the key from the
ignition switch only when
parked.
Ignition Switch80
2009 Fit
Page 84 of 352

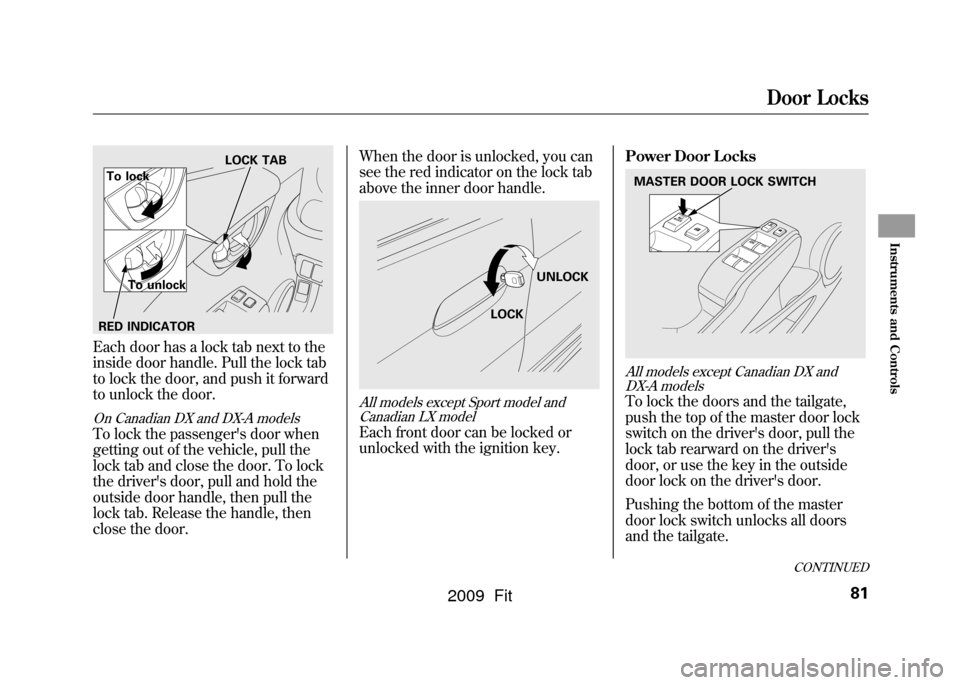
Each door has a lock tab next to the
inside door handle. Pull the lock tab
to lock the door, and push it forward
to unlock the door.On Canadian DX and DX-A modelsTo lock the passenger's door when
getting out of the vehicle, pull the
lock tab and close the door. To lock
the driver's door, pull and hold the
outside door handle, then pull the
lock tab. Release the handle, then
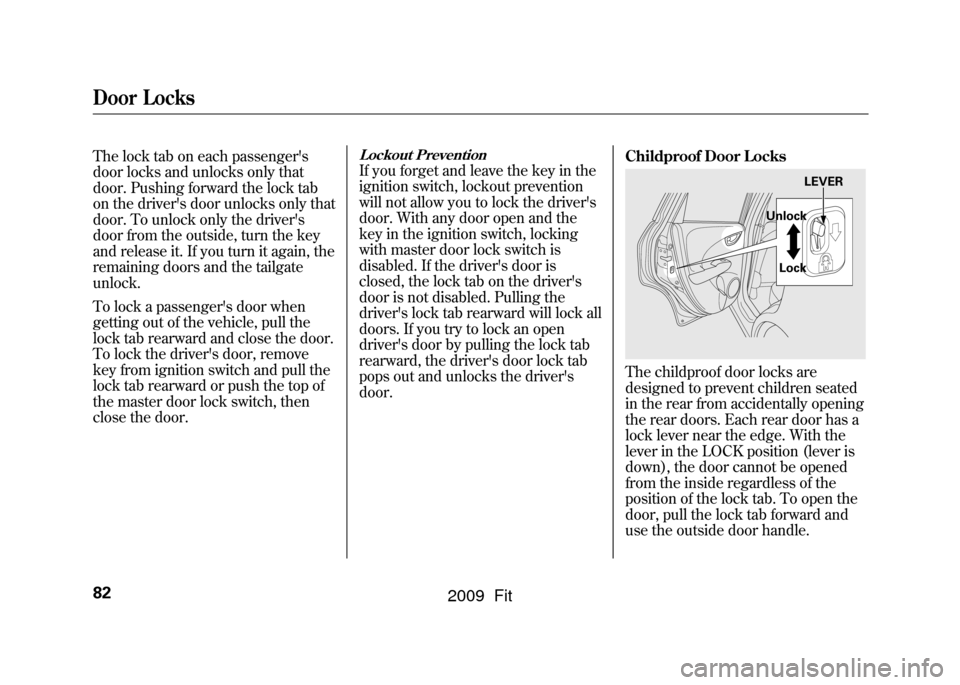
close the door.When the door is unlocked, you can
see the red indicator on the lock tab
above the inner door handle.
All models except Sport model and
Canadian LX modelEach front door can be locked or
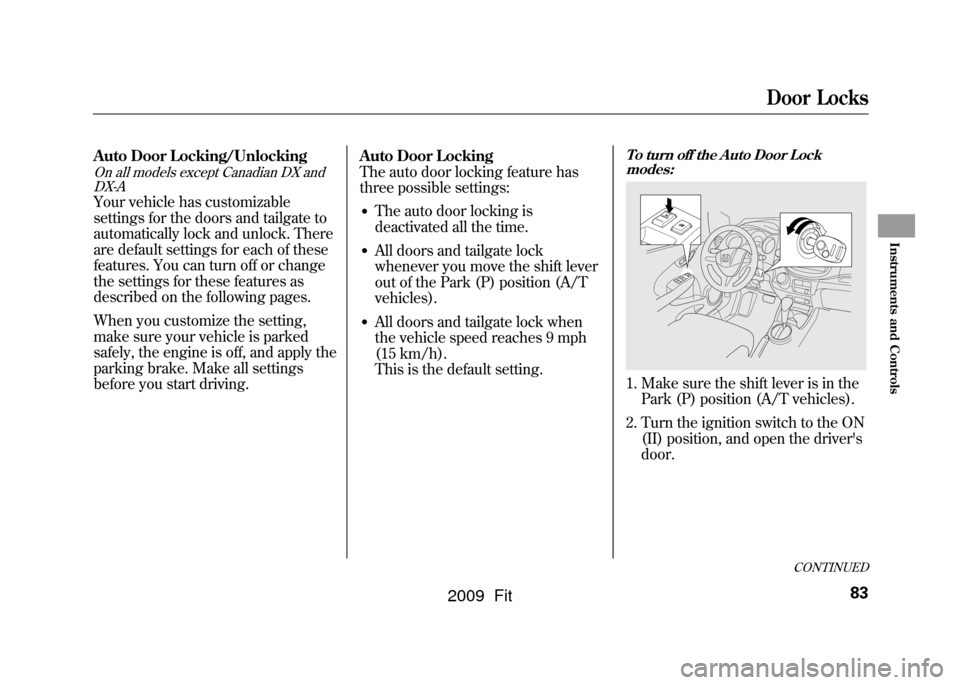
unlocked with the ignition key. Power Door Locks
All models except Canadian DX and
DX-A modelsTo lock the doors and the tailgate,
push the top of the master door lock
switch on the driver's door, pull the
lock tab rearward on the driver's
door, or use the key in the outside
door lock on the driver's door.
Pushing the bottom of the master
door lock switch unlocks all doors
and the tailgate.
LOCK TAB
To lock
To unlock
RED INDICATOR
LOCK UNLOCK
MASTER DOOR LOCK SWITCH
CONTINUED
Door Locks
81
Instruments and Controls
2009 Fit
Page 85 of 352

The lock tab on each passenger's
door locks and unlocks only that
door. Pushing forward the lock tab
on the driver's door unlocks only that
door. To unlock only the driver's
door from the outside, turn the key
and release it. If you turn it again, the
remaining doors and the tailgate
unlock.
To lock a passenger's door when
getting out of the vehicle, pull the
lock tab rearward and close the door.
To lock the driver's door, remove
key from ignition switch and pull the
lock tab rearward or push the top of
the master door lock switch, then
close the door.
Lockout PreventionIf you forget and leave the key in the
ignition switch, lockout prevention
will not allow you to lock the driver's
door. With any door open and the
key in the ignition switch, locking
with master door lock switch is
disabled. If the driver's door is
closed, the lock tab on the driver's
door is not disabled. Pulling the
driver's lock tab rearward will lock all
doors. If you try to lock an open
driver's door by pulling the lock tab
rearward, the driver's door lock tab
pops out and unlocks the driver's
door.Childproof Door Locks
The childproof door locks are
designed to prevent children seated
in the rear from accidentally opening
the rear doors. Each rear door has a
lock lever near the edge. With the
lever in the LOCK position (lever is
down), the door cannot be opened
from the inside regardless of the
position of the lock tab. To open the
door, pull the lock tab forward and
use the outside door handle.
LEVER
Unlock
Lock
Door Locks82
2009 Fit
Page 86 of 352

CONTINUED
Door Locks
83
Instruments and Controls
Auto Door Locking/UnlockingOn all models except Canadian DX andDX-AYour vehicle has customizable
settings for the doors and tailgate to
automatically lock and unlock. There
are default settings for each of these
features. You can turn off or change
the settings for these features as
described on the following pages.
When you customize the setting,
make sure your vehicle is parked
safely, the engine is off, and apply the
parking brake. Make all settings
before you start driving. Auto Door Locking
The auto door locking feature has
three possible settings:
●The auto door locking is
deactivated all the time.●All doors and tailgate lock
whenever you move the shift lever
out of the Park (P) position (A/T
vehicles).●All doors and tailgate lock when
the vehicle speed reaches 9 mph
(15 km/h).
This is the default setting.
To turn off the Auto Door Lock
modes:1. Make sure the shift lever is in the Park (P) position (A/T vehicles).
2. Turn the ignition switch to the ON (II) position, and open the driver's
door.
2009 Fit