2009 HONDA FIT mirror controls
[x] Cancel search: mirror controlsPage 6 of 352
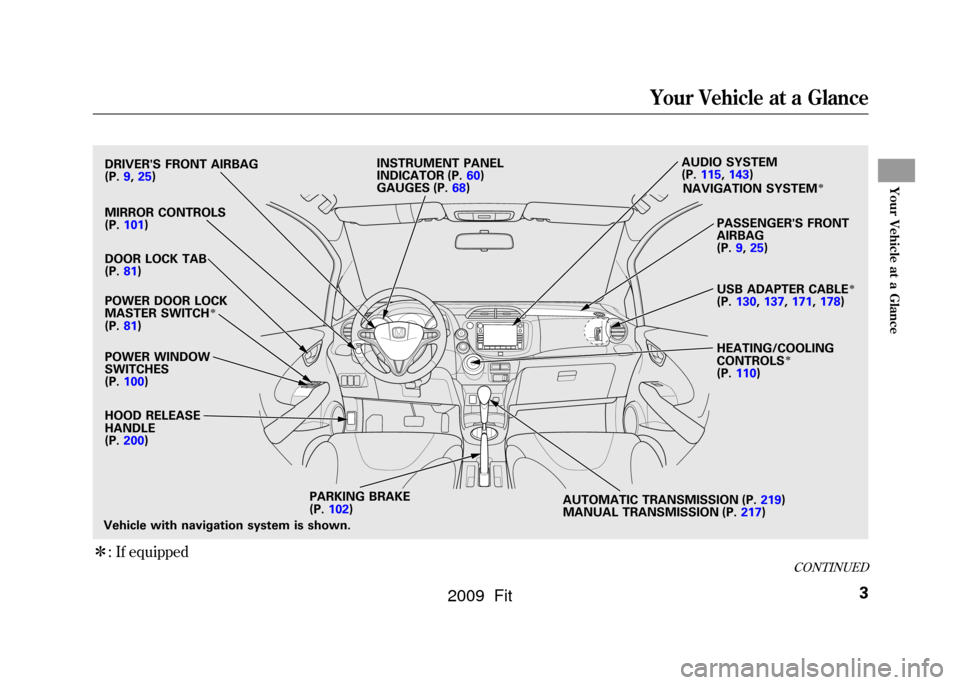
ꭧ: If equippedVehicle with navigation system is shown.DRIVER'S FRONT AIRBAG
(P.
9,25)
MIRROR CONTROLS
(P. 101 )
DOOR LOCK TAB
(P. 81)
POWER DOOR LOCK
MASTER SWITCH
ꭧ
(P. 81)
POWER WINDOW
SWITCHES
(P. 100 )
HOOD RELEASE
HANDLE
(P. 200 ) INSTRUMENT PANEL
INDICATOR (P.
60)
GAUGES (P. 68) AUDIO SYSTEM
(P.
115, 143)
PASSENGER'S FRONT
AIRBAG
(P. 9,25)
USB ADAPTER CABLE
ꭧ
(P. 130, 137,171, 178)
HEATING/COOLING
CONTROLS
ꭧ
(P. 110)
PARKING BRAKE
(P. 102) AUTOMATIC TRANSMISSION (P.
219)
MANUAL TRANSMISSION (P. 217)
NAVIGATION SYSTEM
ꭧ
CONTINUED
Your Vehicle at a Glance
3
Your Vehicle at a Glance
2009 Fit
Page 60 of 352

This section gives information about
the controls and displays that
contribute to the daily operation of
your vehicle. All the essential
controls are within easy reach.Control Locations
..........................
58
Instrument Panel
..........................
59
Instrument Panel Indicators
..........
60
Gauges
..........................................
68
Trip Meter
................................
69
Current Fuel Mileage
................
70
Average Fuel Mileage
...............
70
Odometer
..................................
70
Fuel Gauge
...............................
70
Check Fuel Cap Indicator
.........
70
Maintenance Minder
................
71
Controls Near the Steering
Wheel
.......................................
72
Windshield Wipers and Washers
................................
73
Windshield Wipers
...................
73
Rear Window Wiper and
Washer
.................................
73
Turn Signal and Headlights
..........
74
Headlights
....................................
75
Instrument Panel Brightness
........
76
Hazard Warning Button
................
76
Rear Window Defogger
.................
76
Steering Wheel Adjustment
..........
77
Keys and Locks
.............................
78 Immobilizer System
......................
79
Ignition Switch
..............................
80
Door Locks
...................................
81
Power Door Locks
....................
81
Childproof Door Locks
..............
82
Auto Door Locking/
Unlocking
.............................
83
Auto Door Locking
...................
83
Auto Door Unlocking
................
85
Tailgate
.........................................
88
Remote Transmitter
......................
90
Seats
.............................................
93
Power Windows
..........................
100
Mirrors
.......................................
101
Parking Brake
.............................
102
Interior Convenience Items
.........
104
Lower Glove Box
....................
105
Upper Glove Box
.....................
105
Beverage Holders
...................
106
Seat Under Box
.......................
106
Accessory Power Socket
.........
106
Sun Visor
................................
106
Interior Lights
.............................
107
Instruments and Controls
57
Instruments and Controls
2009 Fit
Page 61 of 352
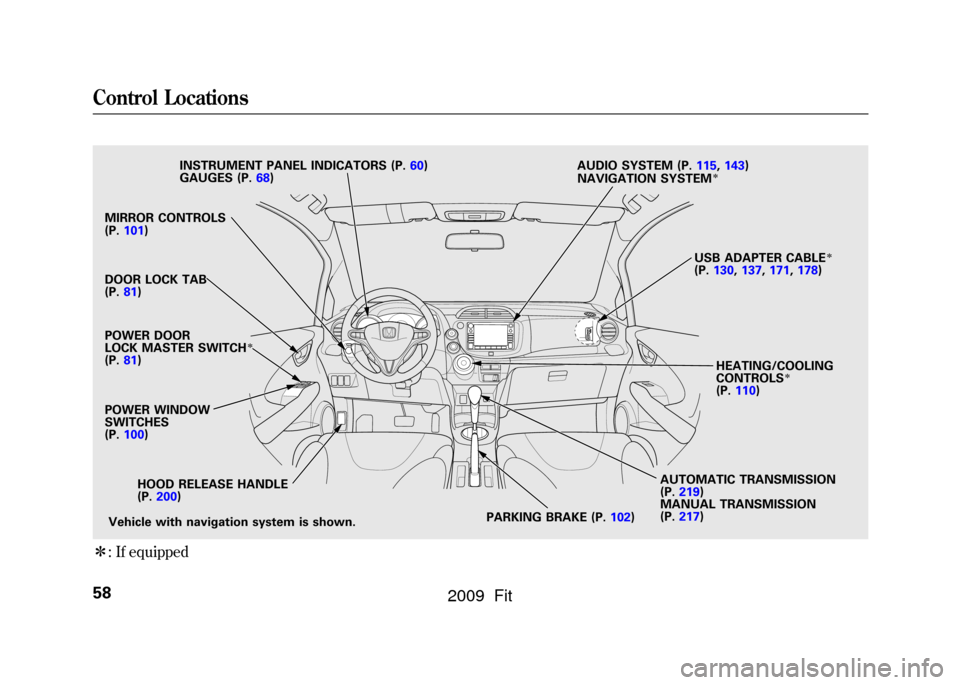
ꭧ: If equippedMIRROR CONTROLS
(P. 101)
POWER DOOR
LOCK MASTER SWITCH
ꭧ
(P. 81)
HOOD RELEASE HANDLE
(P. 200)
POWER WINDOW
SWITCHES
(P.
100)
PARKING BRAKE (P.102)AUTOMATIC TRANSMISSION
(P.
219)
MANUAL TRANSMISSION
(P. 217) HEATING/COOLING
CONTROLS
ꭧ
(P.
110)
AUDIO SYSTEM (P.
115,143)
INSTRUMENT PANEL INDICATORS (P. 60)
GAUGES (P. 68)
DOOR LOCK TAB
(P. 81)
Vehicle with navigation system is shown. USB ADAPTER CABLE
ꭧ
(P.
130, 137,171,178)
NAVIGATION SYSTEM
ꭧ
Control Locations58
2009 Fit
Page 75 of 352

ꭧ1: To use the horn, press the center pad of the steering wheel.
ꭧ 2: If equipped.
ꭧ 3: Only on vehicles equipped with navigation system. Refer to the navigation system manual.PADDLE SHIFTER (DOWNSHIFT)
ꭧ 2
(P. 224)
HEADLIGHTS/
TURN SIGNAL/
FOG LIGHTS
ꭧ 2
(P. 74)
NAVIGATION SYSTEM
VOICE CONTROL
BUTTONS
ꭧ 3
STEERING WHEEL
ADJUSTMENTS
(P.77) CRUISE CONTROL
BUTTONS
ꭧ
2
(P. 194) AUXILIARY INPUT JACK
(P.
190)
ACCESSORY POWER SOCKET
(P. 106) PASSENGER AIRBAG OFF
INDICATOR
(P.31)
REAR WINDOW
DEFOGGER/HEATED
MIRROR BUTTON
ꭧ
2
(P. 76/102)
WINDSHIELD
WIPERS/WASHERS
(P.
73)
HAZARD WARNING
BUTTON
(P.76)
PADDLE SHIFTER
(UPSHIFT)
ꭧ
2
(P. 224)
INSTRUMENT PANEL
BRIGHTNESS
(P.76)
REMOTE AUDIO
CONTROL BUTTONS
ꭧ 2
(P. 189)
VEHICLE STABILITY
ASSIST (VSA) SYSTEM
OFF SWITCH
ꭧ 2
(P. 234)
Vehicle with navigation system is shown. HORN
ꭧ
1
Controls Near the Steering Wheel72
2009 Fit
Page 80 of 352

Make sure the rear window is clear
and you have good visibility before
starting to drive.
The defogger wires on the inside of
the rear window can be accidentally
damaged. When cleaning the glass,
always wipe side-to-side.If equippedPushing this button also turns the
mirror heaters on or off. For more
information, see page102.Steering Wheel Adjustment
Make any steering wheel adjustment
before you start driving.
Adjusting the steering wheel
position while driving may
cause you to lose control of the
vehicle and be seriously injured
in a crash.
Adjust the steering wheel only
when the vehicle is stopped.
1. Pull the lever under the steering column toward you until it stops.
2. Move the steering wheel up or down, and in or out, so it points
toward your chest, not toward your
face. Make sure you can see the
instrument panel gauges and
indicators.
3. Push the lever forward fully to lockthe steering wheel in position.
4. Make sure you have securely locked the steering wheel in place
by trying to move it up, down, in,
and out.
Rear Window Defogger, Steering Wheel Adjustment
77
Instruments and Controls
2009 Fit
Page 104 of 352
AUTO-To open or close the
driver's window, push or pull the
window switch firmly down or up to
the second detent, and release it.
The window will automatically go
down or up all the way. To stop the
window, pull or push the window
switch briefly.
AUTO REVERSE -If the driver ’s
window senses any obstacle while it
is closing automatically, it will
reverse direction, and then stop. To
close the window, remove the
obstacle, then use the window switch
again.
Auto reverse stops sensing when the
window is almost closed. You should
always check that all passengers and
objects are away from the window
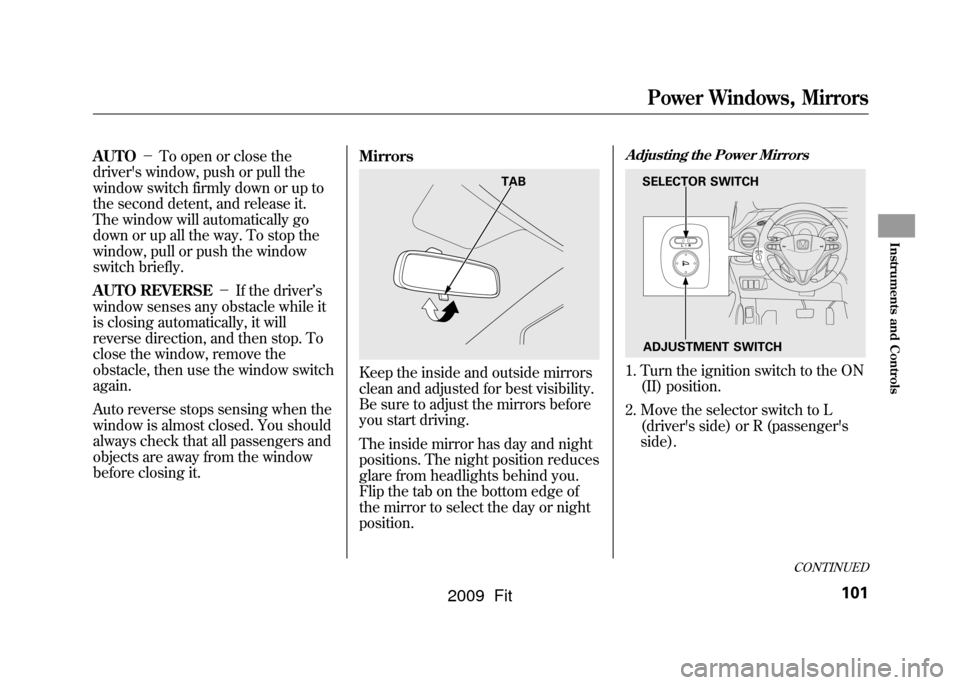
before closing it. Mirrors
Keep the inside and outside mirrors
clean and adjusted for best visibility.
Be sure to adjust the mirrors before
you start driving.
The inside mirror has day and night
positions. The night position reduces
glare from headlights behind you.
Flip the tab on the bottom edge of
the mirror to select the day or night
position.
Adjusting the Power Mirrors1. Turn the ignition switch to the ON
(II) position.
2. Move the selector switch to L (driver's side) or R (passenger's
side).
TAB
SELECTOR SWITCH
ADJUSTMENT SWITCH
CONTINUED
Power Windows, Mirrors
101
Instruments and Controls
2009 Fit
Page 114 of 352
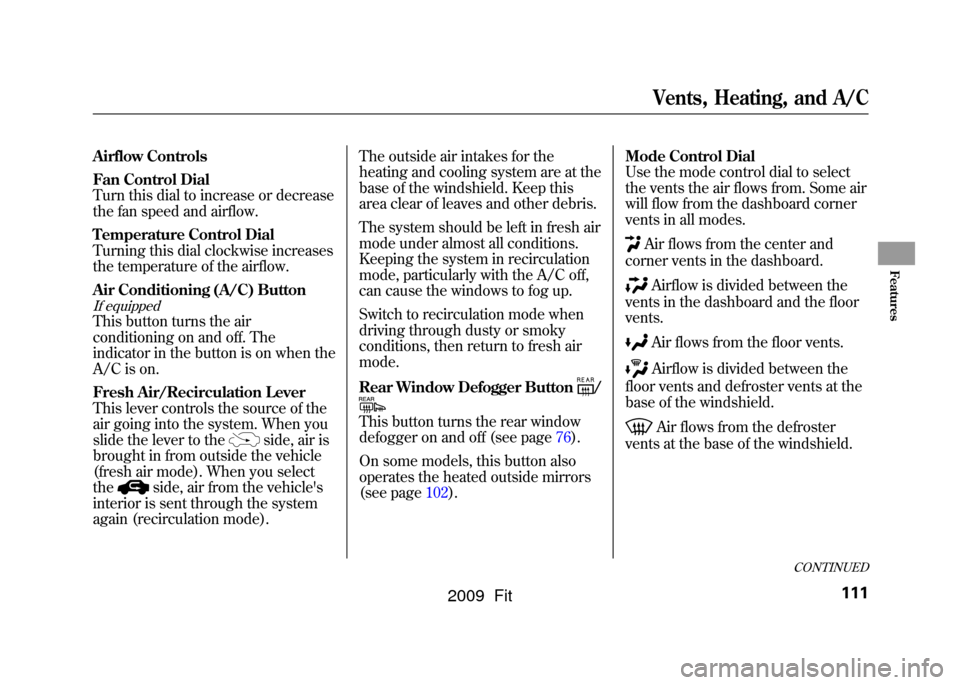
Airflow Controls
Fan Control Dial
Turn this dial to increase or decrease
the fan speed and airflow.
Temperature Control Dial
Turning this dial clockwise increases
the temperature of the airflow.
Air Conditioning (A/C) ButtonIf equippedThis button turns the air
conditioning on and off. The
indicator in the button is on when the
A/C is on.
Fresh Air/Recirculation Lever
This lever controls the source of the
air going into the system. When you
slide the lever to the
side, air is
brought in from outside the vehicle
(fresh air mode). When you select
the
side, air from the vehicle's
interior is sent through the system
again (recirculation mode). The outside air intakes for the
heating and cooling system are at the
base of the windshield. Keep this
area clear of leaves and other debris.
The system should be left in fresh air
mode under almost all conditions.
Keeping the system in recirculation
mode, particularly with the A/C off,
can cause the windows to fog up.
Switch to recirculation mode when
driving through dusty or smoky
conditions, then return to fresh air
mode.
Rear Window Defogger Button
/
This button turns the rear window
defogger on and off (see page76).
On some models, this button also
operates the heated outside mirrors
(see page102).
Mode Control Dial
Use the mode control dial to select
the vents the air flows from. Some air
will flow from the dashboard corner
vents in all modes.
Air flows from the center and
corner vents in the dashboard.Airflow is divided between the
vents in the dashboard and the floor
vents.Air flows from the floor vents.Airflow is divided between the
floor vents and defroster vents at the
base of the windshield.Air flows from the defroster
vents at the base of the windshield.
CONTINUED
Vents, Heating, and A/C
111
Features
2009 Fit
Page 345 of 352
Inflation, Proper Tire
..................
273
Recommended Pressures
.......
274
Inside Mirror
.............................
101
Inspection, Tire
..........................
275
Installing a Child Seat
..................
42
Instrument Panel
..........................
59
Instrument Panel Brightness
.......
76
Instruments and Controls
.............
57
Interior Lights
............................
107
Introduction
...................................
i
iPod
®Error Messages
.........
135, 176
J
Jacking up the Vehicle
...............
285
Jack, Tire
...................................
285
Jump Starting
.............................
299
K
Keys
.............................................
78 L
Label, Certification
.....................
316
Lane Change, Signaling
...............
74
Lap/Shoulder Belt
.................
14, 19
LATCH Anchorage System
..........
43
Lights Bulb Replacement
...................
262
Indicator
...................................
59
Interior
....................................
107
Parking
....................................
74
Turn Signal
..............................
74
Load Limit
..................................
209
LOCK (Ignition Key Position)
......
80
Locks Anti-theft Steering Column
.......
80
Childproof Door
.......................
82
Fuel Fill Door
..........................
199
Lockout Prevention
..................
82
Power Door
..............................
81
Tailgate
....................................
88
Low Coolant Level
......................
202
Lower Anchors
.............................
43
Lower Glove Box
........................
105
Low Fuel Indicator
.......................
62 Low Oil Pressure
Indicator
...........................
60, 303
Lubricant Specifications Chart...
319
Luggage, Storing (cargo)
...........
208
M
Maintenance
..............................
243
Main Items and Sub Items
......
248
Minder
....................................
245
Minder Indicator
......................
66
Owner's Maintenance Checks
................................
250
Safety
......................................
244
Schedule
.................................
251
Malfunction Indicator Lamp
.......
304
Manual Transmission
.................
217
Checking Fluid Level
..............
260
Shifting
...................................
217
Manual Transmission Fluid
.......
260
Meters, Gauges
............................
68
Methanol in Gasoline
.................
198
Mirrors, Adjusting
......................
101
Modifications
.............................
207
Modifying Your Vehicle
.............
207
IndexVI
2009 Fit