Page 18 of 351

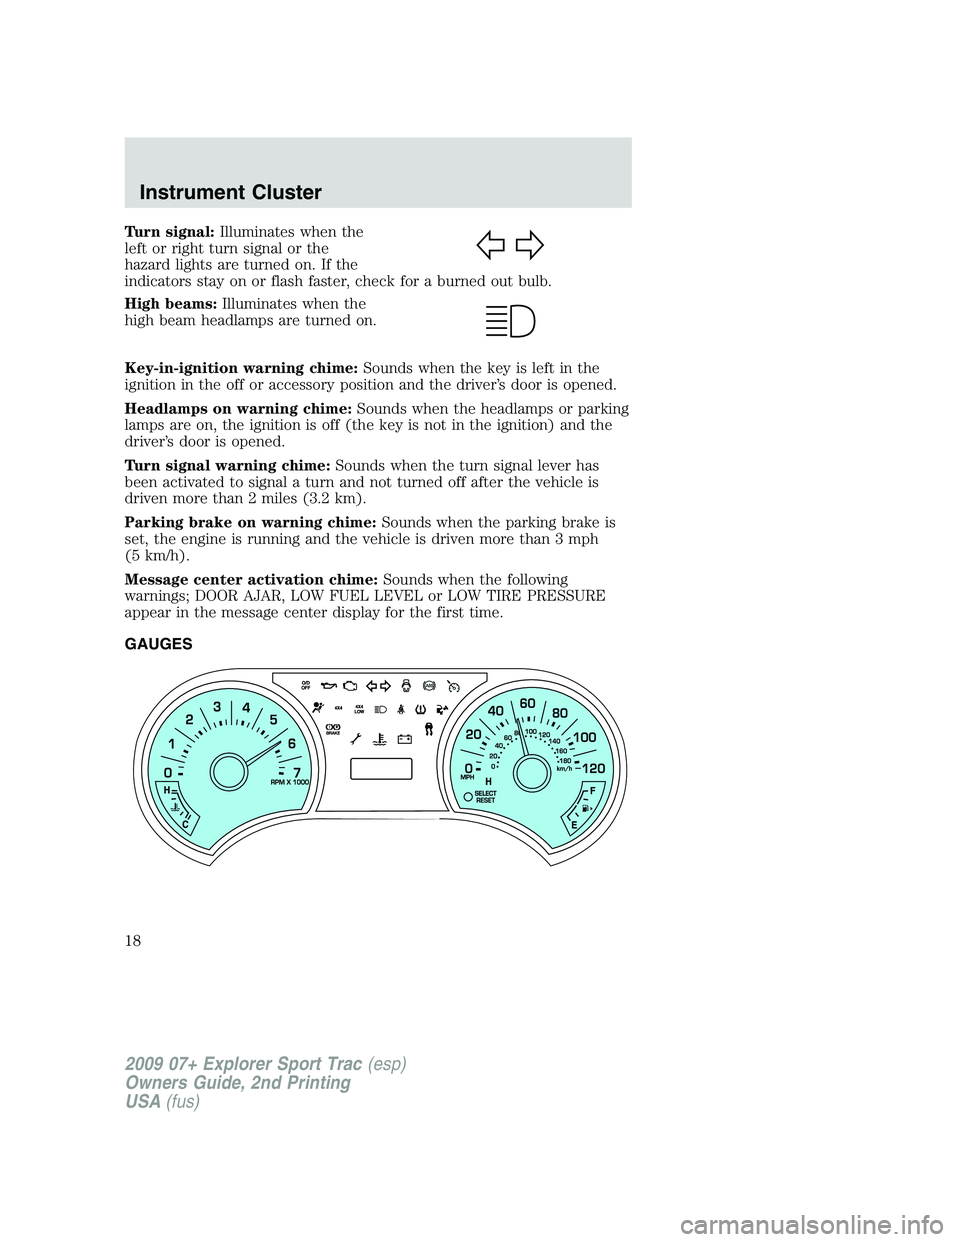
Turn signal:Illuminates when the
left or right turn signal or the
hazard lights are turned on. If the
indicators stay on or flash faster, check for a burned out bulb.
High beams:Illuminates when the
high beam headlamps are turned on.
Key-in-ignition warning chime:Sounds when the key is left in the
ignition in the off or accessory position and the driver’s door is opened.
Headlamps on warning chime:Sounds when the headlamps or parking
lamps are on, the ignition is off (the key is not in the ignition) and the
driver’s door is opened.
Turn signal warning chime:Sounds when the turn signal lever has
been activated to signal a turn and not turned off after the vehicle is
driven more than 2 miles (3.2 km).
Parking brake on warning chime:Sounds when the parking brake is
set, the engine is running and the vehicle is driven more than 3 mph
(5 km/h).
Message center activation chime:Sounds when the following
warnings; DOOR AJAR, LOW FUEL LEVEL or LOW TIRE PRESSURE
appear in the message center display for the first time.
GAUGES
2009 07+ Explorer Sport Trac(esp)
Owners Guide, 2nd Printing
USA(fus)
Instrument Cluster
18
Page 57 of 351

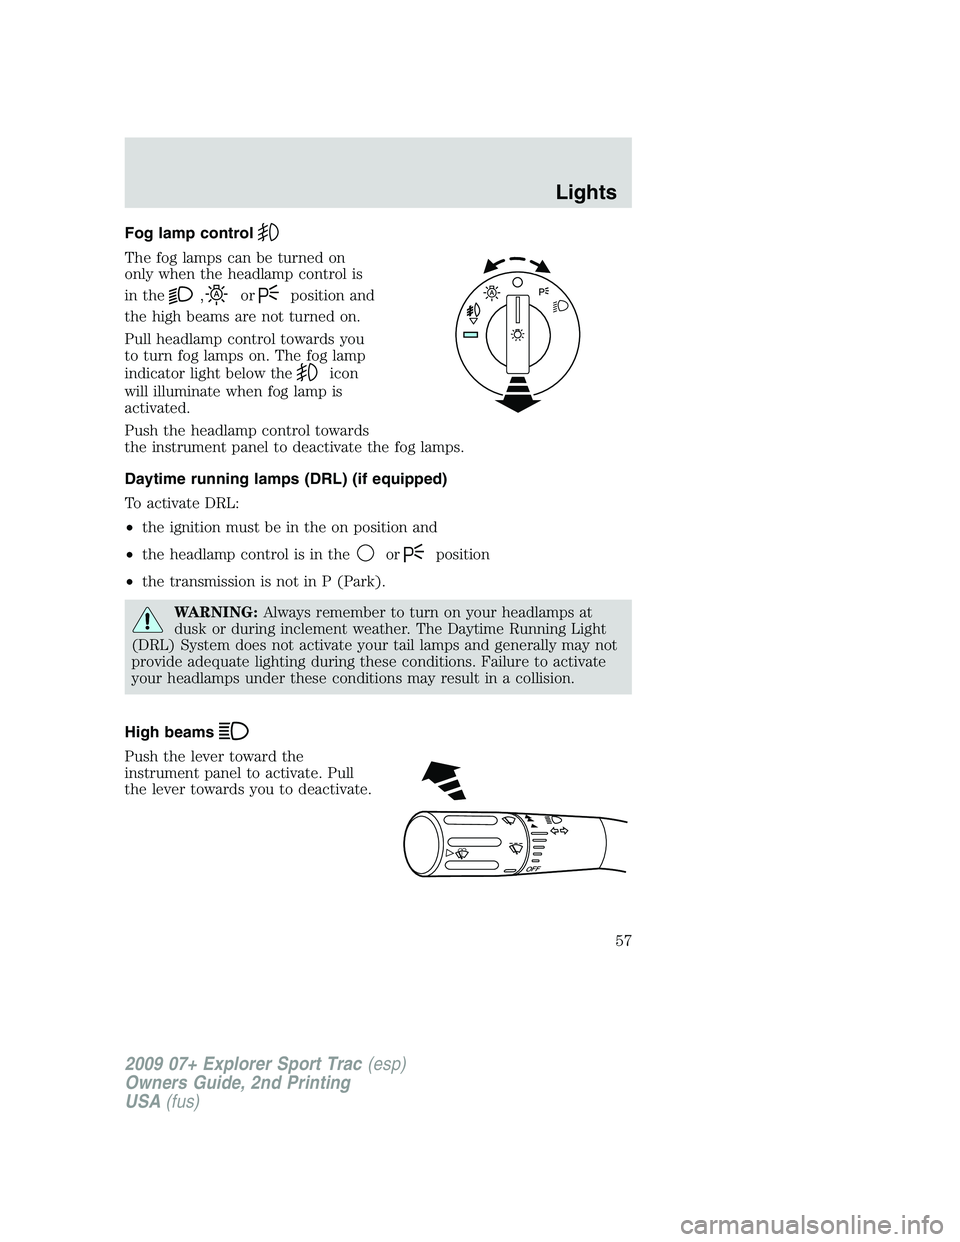
Fog lamp control
The fog lamps can be turned on
only when the headlamp control is
in the
,orposition and
the high beams are not turned on.
Pull headlamp control towards you
to turn fog lamps on. The fog lamp
indicator light below the
icon
will illuminate when fog lamp is
activated.
Push the headlamp control towards
the instrument panel to deactivate the fog lamps.
Daytime running lamps (DRL) (if equipped)
To activate DRL:
•the ignition must be in the on position and
•the headlamp control is in the
orposition
•the transmission is not in P (Park).
WARNING:Always remember to turn on your headlamps at
dusk or during inclement weather. The Daytime Running Light
(DRL) System does not activate your tail lamps and generally may not
provide adequate lighting during these conditions. Failure to activate
your headlamps under these conditions may result in a collision.
High beams
Push the lever toward the
instrument panel to activate. Pull
the lever towards you to deactivate.
O
F
F
2009 07+ Explorer Sport Trac(esp)
Owners Guide, 2nd Printing
USA(fus)
Lights
57
Page 59 of 351

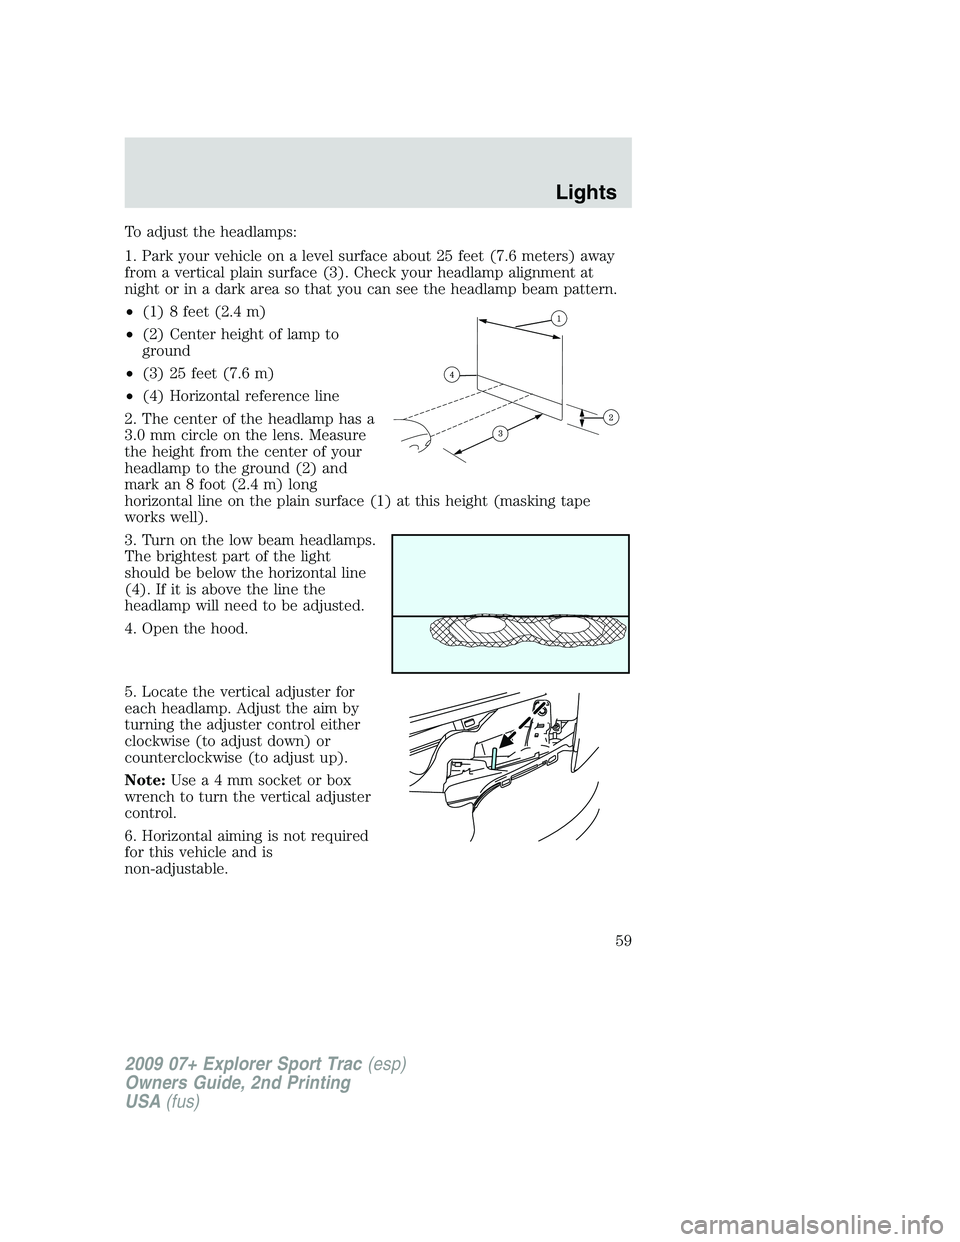
To adjust the headlamps:
1. Park your vehicle on a level surface about 25 feet (7.6 meters) away
from a vertical plain surface (3). Check your headlamp alignment at
night or in a dark area so that you can see the headlamp beam pattern.
•(1) 8 feet (2.4 m)
•(2) Center height of lamp to
ground
•(3) 25 feet (7.6 m)
•(4) Horizontal reference line
2. The center of the headlamp has a
3.0 mm circle on the lens. Measure
the height from the center of your
headlamp to the ground (2) and
mark an 8 foot (2.4 m) long
horizontal line on the plain surface (1) at this height (masking tape
works well).
3. Turn on the low beam headlamps.
The brightest part of the light
should be below the horizontal line
(4). If it is above the line the
headlamp will need to be adjusted.
4. Open the hood.
5. Locate the vertical adjuster for
each headlamp. Adjust the aim by
turning the adjuster control either
clockwise (to adjust down) or
counterclockwise (to adjust up).
Note:Usea4mmsocket or box
wrench to turn the vertical adjuster
control.
6. Horizontal aiming is not required
for this vehicle and is
non-adjustable.
2009 07+ Explorer Sport Trac(esp)
Owners Guide, 2nd Printing
USA(fus)
Lights
59
Page 61 of 351

Examples of acceptable condensation are:
•Presence of thin mist (no streaks, drip marks or droplets)
•Fine mist covers less than 50% of the lens
Examples of unacceptable moisture (usually caused by a lamp water
leak) are:
•Water puddle inside the lamp
•Large water droplets, drip marks or streaks present on the interior of
the lens
Take your vehicle to dealer for service if any of the above conditions of
unacceptable moisture are present.
Using the right bulbs
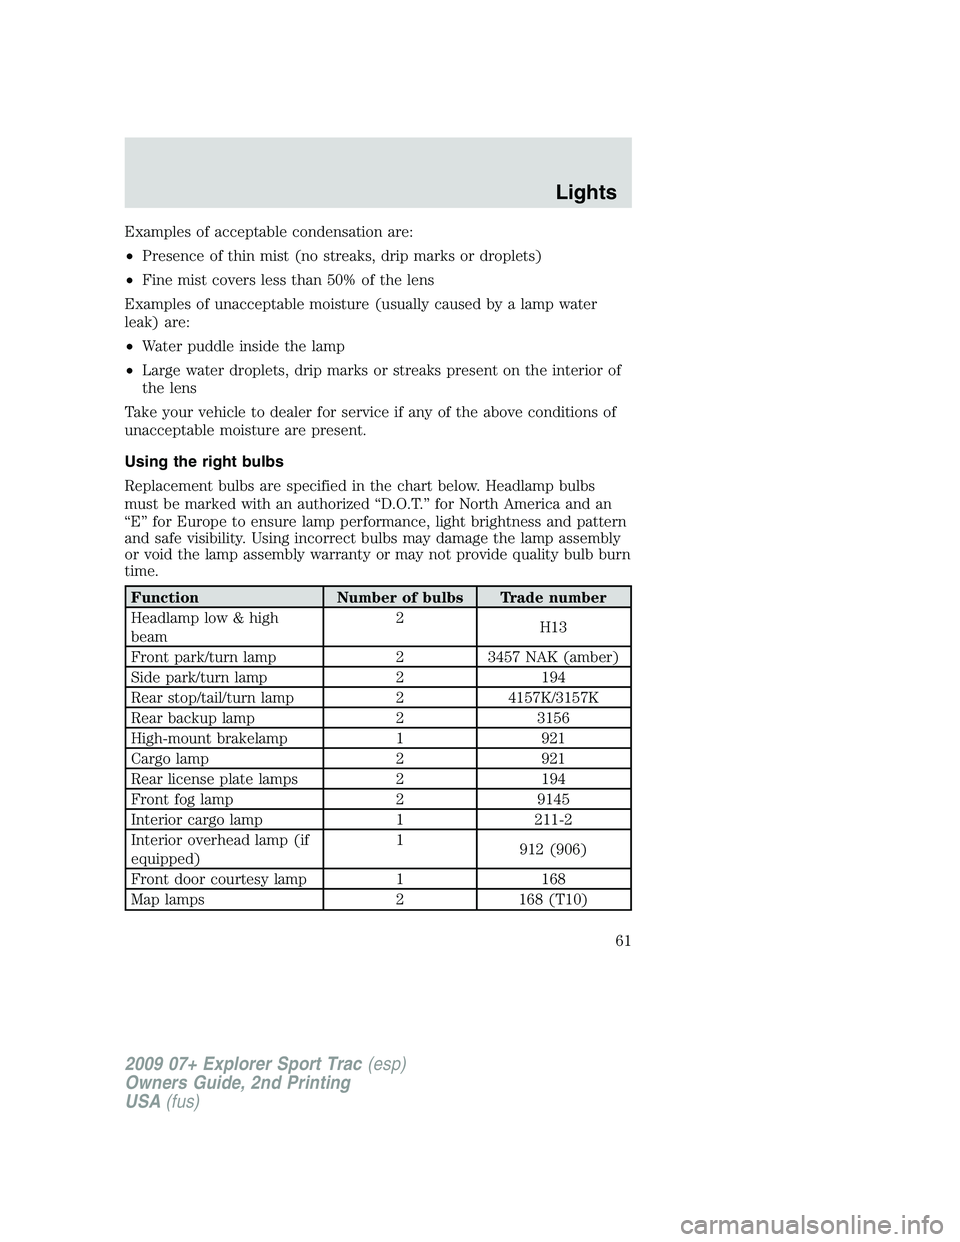
Replacement bulbs are specified in the chart below. Headlamp bulbs
must be marked with an authorized “D.O.T.” for North America and an
“E” for Europe to ensure lamp performance, light brightness and pattern
and safe visibility. Using incorrect bulbs may damage the lamp assembly
or void the lamp assembly warranty or may not provide quality bulb burn
time.
Function Number of bulbs Trade number
Headlamp low & high
beam2
H13
Front park/turn lamp 2 3457 NAK (amber)
Side park/turn lamp 2 194
Rear stop/tail/turn lamp 2 4157K/3157K
Rear backup lamp 2 3156
High-mount brakelamp 1 921
Cargo lamp 2 921
Rear license plate lamps 2 194
Front fog lamp 2 9145
Interior cargo lamp 1 211-2
Interior overhead lamp (if
equipped)1
912 (906)
Front door courtesy lamp 1 168
Map lamps 2 168 (T10)
2009 07+ Explorer Sport Trac(esp)
Owners Guide, 2nd Printing
USA(fus)
Lights
61
Page 270 of 351
Fuse/Relay
LocationFuse Amp
RatingProtected Circuits
16 40A** Blower motor
17 30A** Trailer tow electronic brakes
18 — Not used
19 — Not used
20 30A** Front wiper motor
21 20A* Rear of console power point
22 20A* Subwoofer
23 20A* 4x4 module
24 10A* Powertrain Control Module (PCM)
Keep Alive Power, Canister vent
25 20A* Front of console power point/Cigar
lighter
26 20A* 4x4 module, AWD module
27 20A* 6–speed transmission control module
(TCM) (4.6L engine only)
28 20A* Heated seats
29 15A* Right high/low beam headlamp
30 20A* Cargo bed power point
31 15A* Fog lamps
32 5A* Power mirrors
33 30A* ABS valves
34 15A* Left high/low beam headlamp
35 10A* AC clutch
36 20A* Console bin power point
37 30A* Driver window motor
38 15A* 5–speed transmission (4.0L engine
only)
39 15A* PCM power
40 15A* Fan clutch, PCV valve, AC clutch
relay
41 15A* SDARS, DVD, SYNC
2009 07+ Explorer Sport Trac(esp)
Owners Guide, 2nd Printing
USA(fus)
Roadside Emergencies
270