2009 FIAT SEDICI brakes
[x] Cancel search: brakesPage 208 of 270
207
STEERING
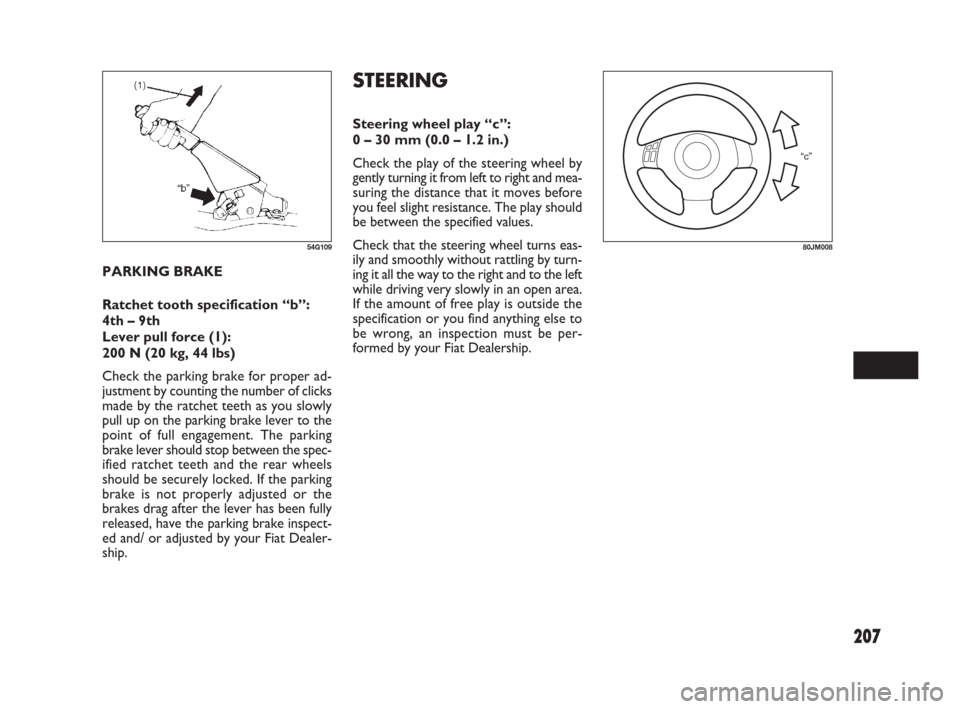
Steering wheel play “c”:
0 – 30 mm (0.0 – 1.2 in.)
Check the play of the steering wheel by
gently turning it from left to right and mea-
suring the distance that it moves before
you feel slight resistance. The play should
be between the specified values.
Check that the steering wheel turns eas-
ily and smoothly without rattling by turn-
ing it all the way to the right and to the left
while driving very slowly in an open area.
If the amount of free play is outside the
specification or you find anything else to
be wrong, an inspection must be per-
formed by your Fiat Dealership. PARKING BRAKE
Ratchet tooth specification “b”:
4th – 9th
Lever pull force (1):
200 N (20 kg, 44 lbs)
Check the parking brake for proper ad-
justment by counting the number of clicks
made by the ratchet teeth as you slowly
pull up on the parking brake lever to the
point of full engagement. The parking
brake lever should stop between the spec-
ified ratchet teeth and the rear wheels
should be securely locked. If the parking
brake is not properly adjusted or the
brakes drag after the lever has been fully
released, have the parking brake inspect-
ed and/ or adjusted by your Fiat Dealer-
ship.
54G109
“c”
80JM008
183-230 SEDICI LUM FL GB 1E 19-06-2009 11:00 Pagina 207
Page 235 of 270
234
❒Turn off all vehicle accessories, except
those necessary for safety reasons (for
example, headlights or hazard lights).
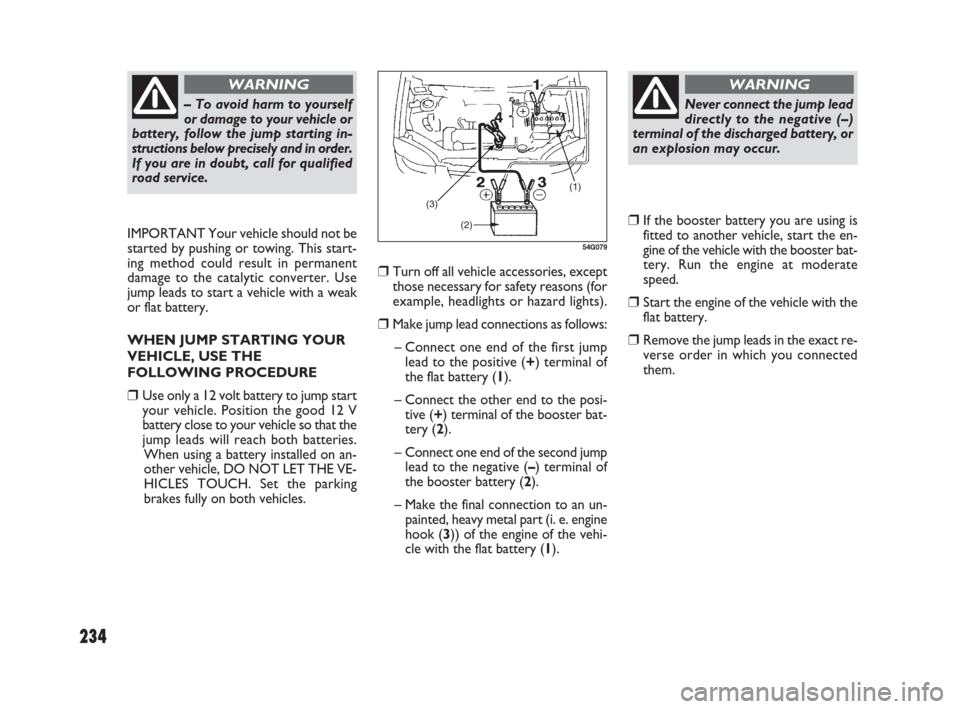
❒Make jump lead connections as follows:
– Connect one end of the first jump
lead to the positive (+) terminal of
the flat battery (1).
– Connect the other end to the posi-
tive (+) terminal of the booster bat-
tery (2).
– Connect one end of the second jump
lead to the negative (–) terminal of
the booster battery (2).
– Make the final connection to an un-
painted, heavy metal part (i. e. engine
hook (3)) of the engine of the vehi-
cle with the flat battery (1).
❒If the booster battery you are using is
fitted to another vehicle, start the en-
gine of the vehicle with the booster bat-
tery. Run the engine at moderate
speed.
❒Start the engine of the vehicle with the
flat battery.
❒Remove the jump leads in the exact re-
verse order in which you connected
them. IMPORTANT Your vehicle should not be
started by pushing or towing. This start-
ing method could result in permanent
damage to the catalytic converter. Use
jump leads to start a vehicle with a weak
or flat battery.
WHEN JUMP STARTING YOUR
VEHICLE, USE THE
FOLLOWING PROCEDURE
❒Use only a 12 volt battery to jump start
your vehicle. Position the good 12 V
battery close to your vehicle so that the
jump leads will reach both batteries.
When using a battery installed on an-
other vehicle, DO NOT LET THE VE-
HICLES TOUCH. Set the parking
brakes fully on both vehicles.
– To avoid harm to yourself
or damage to your vehicle or
battery, follow the jump starting in-
structions below precisely and in order.
If you are in doubt, call for qualified
road service.
WARNING
(1)
(3)
(2)
54G079
Never connect the jump lead
directly to the negative (–)
terminal of the discharged battery, or
an explosion may occur.
WARNING
231-238 SEDICI LUM FL GB 1E 19-06-2009 11:06 Pagina 234
Page 244 of 270
243
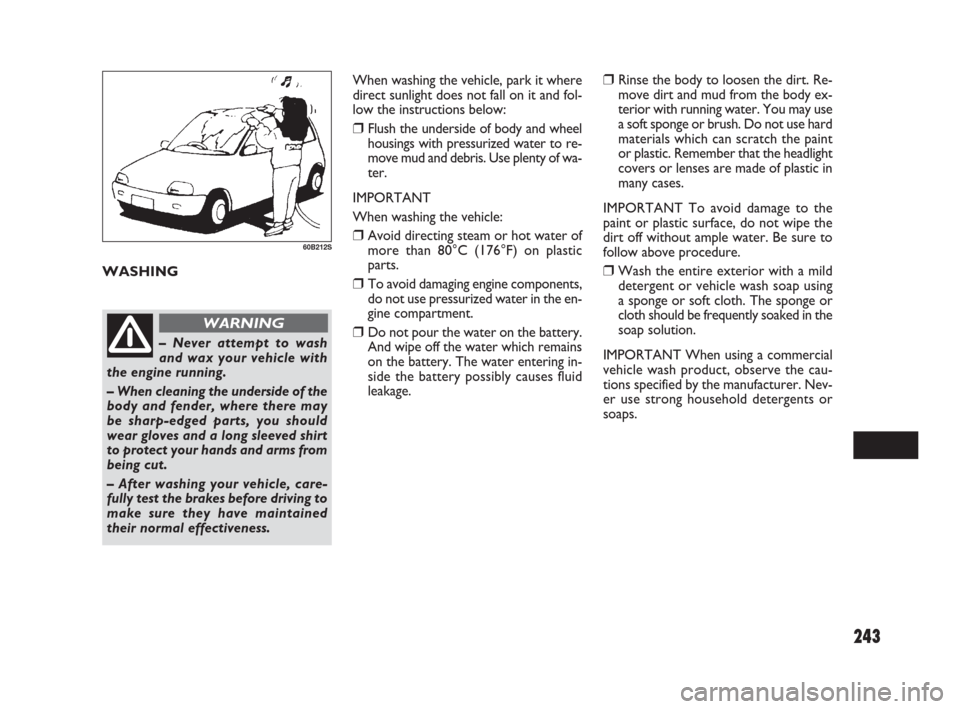
When washing the vehicle, park it where
direct sunlight does not fall on it and fol-
low the instructions below:
❒Flush the underside of body and wheel
housings with pressurized water to re-
move mud and debris. Use plenty of wa-
ter.
IMPORTANT
When washing the vehicle:
❒Avoid directing steam or hot water of
more than 80°C (176°F) on plastic
parts.
❒To avoid damaging engine components,
do not use pressurized water in the en-
gine compartment.
❒Do not pour the water on the battery.
And wipe off the water which remains
on the battery. The water entering in-
side the battery possibly causes fluid
leakage.
❒Rinse the body to loosen the dirt. Re-
move dirt and mud from the body ex-
terior with running water. You may use
a soft sponge or brush. Do not use hard
materials which can scratch the paint
or plastic. Remember that the headlight
covers or lenses are made of plastic in
many cases.
IMPORTANT To avoid damage to the
paint or plastic surface, do not wipe the
dirt off without ample water. Be sure to
follow above procedure.
❒Wash the entire exterior with a mild
detergent or vehicle wash soap using
a sponge or soft cloth. The sponge or
cloth should be frequently soaked in the
soap solution.
IMPORTANT When using a commercial
vehicle wash product, observe the cau-
tions specified by the manufacturer. Nev-
er use strong household detergents or
soaps.
– Never attempt to wash
and wax your vehicle with
the engine running.
– When cleaning the underside of the
body and fender, where there may
be sharp-edged parts, you should
wear gloves and a long sleeved shirt
to protect your hands and arms from
being cut.
– After washing your vehicle, care-
fully test the brakes before driving to
make sure they have maintained
their normal effectiveness.
WARNING
60B212S
WASHING
239-244 SEDICI LUM FL GB 1E 19-06-2009 11:08 Pagina 243
Page 250 of 270
249
T T
E E
C C
H H
N N
I I
C C
A A
L L
S S
P P
E E
C C
I I
F F
I I
C C
A A
T T
I I
O O
N N
S S
ENGINE................................................................................... 250
FUEL FEED – IGNITION..................................................... 250
ELECTRICAL COMPONENTS.......................................... 251
BULBS...................................................................................... 251
TRANSMISSION.................................................................... 252
BRAKES................................................................................... 252
SUSPENSIONS....................................................................... 252
STEERING ............................................................................... 252
WHEELS.................................................................................. 253
DIMENSIONS......................................................................... 253
WEIGHTS............................................................................... 254
PERFORMANCE................................................................... 254
CAPACITIES ........................................................................... 254
12
249-254 SEDICI LUM FL GB 1E 19-06-2009 11:09 Pagina 249
Page 253 of 270
252
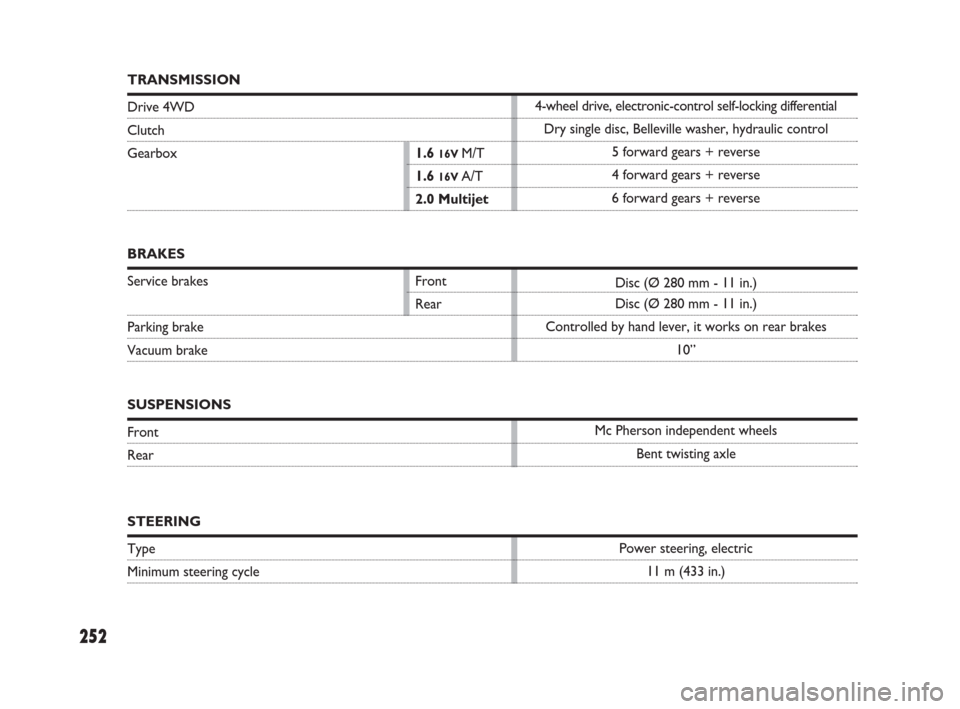
BRAKES
Service brakes Front
Rear
Parking brake
Vacuum brake
SUSPENSIONS
Front
Rear
STEERING
Type
Minimum steering cycleDisc (Ø 280 mm - 11 in.)
Disc (Ø 280 mm - 11 in.)
Controlled by hand lever, it works on rear brakes
10”
Mc Pherson independent wheels
Bent twisting axle
Power steering, electric
11 m (433 in.)
TRANSMISSION
Drive 4WD
Clutch
Gearbox1.6 16V M/T
1.6 16V A/T
2.0 Multijet4-wheel drive, electronic-control self-locking differential
Dry single disc, Belleville washer, hydraulic control
5 forward gears + reverse
4 forward gears + reverse
6 forward gears + reverse
249-254 SEDICI LUM FL GB 1E 19-06-2009 11:10 Pagina 252
Page 262 of 270
261
– Fluid level check............................. 196
– Gearshift lever............................... 132
– If you cannot shift lever out
of “P” (Park)................................... 238
– Selector position indicator .......... 89
– Specific fluid.................................... 196
– Using the transaxle........................ 156
Battery ................................................. 213
– Replacement ................................... 214
Before driving....................................... 9
Bodywork care..................................... 239
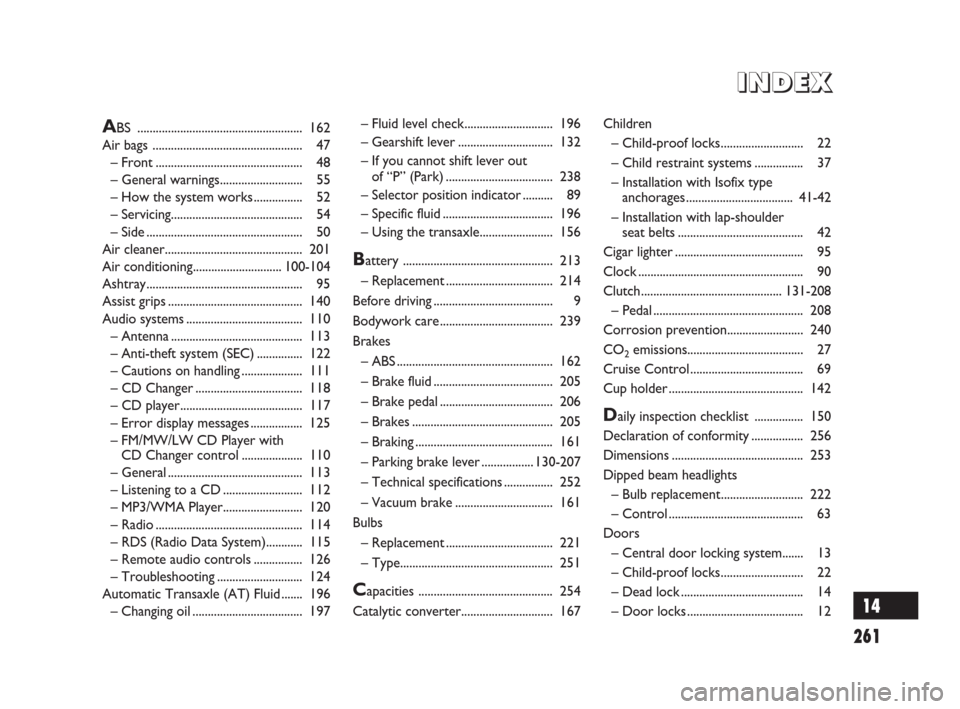
Brakes
– ABS................................................... 162
– Brake fluid....................................... 205
– Brake pedal ..................................... 206
– Brakes.............................................. 205
– Braking ............................................. 161
– Parking brake lever.................130-207
– Technical specifications ................ 252
– Vacuum brake ................................ 161
Bulbs
– Replacement ................................... 221
– Type.................................................. 251
Capacities ............................................ 254
Catalytic converter.............................. 167Children
– Child-proof locks........................... 22
– Child restraint systems ................ 37
– Installation with Isofix type
anchorages...................................41-42
– Installation with lap-shoulder
seat belts......................................... 42
Cigar lighter .......................................... 95
Clock ...................................................... 90
Clutch..............................................131-208
– Pedal................................................. 208
Corrosion prevention......................... 240
CO
2emissions...................................... 27
Cruise Control ..................................... 69
Cup holder ............................................ 142
Daily inspection checklist ................ 150
Declaration of conformity ................. 256
Dimensions........................................... 253
Dipped beam headlights
– Bulb replacement........................... 222
– Control ............................................ 63
Doors
– Central door locking system....... 13
– Child-proof locks........................... 22
– Dead lock ........................................ 14
– Door locks ...................................... 12
ABS ...................................................... 162
Air bags ................................................. 47
– Front................................................ 48
– General warnings........................... 55
– How the system works ................ 52
– Servicing........................................... 54
– Side................................................... 50
Air cleaner............................................. 201
Air conditioning.............................100-104
Ashtray................................................... 95
Assist grips............................................ 140
Audio systems...................................... 110
– Antenna ........................................... 113
– Anti-theft system (SEC) ............... 122
– Cautions on handling .................... 111
– CD Changer................................... 118
– CD player........................................ 117
– Error display messages................. 125
– FM/MW/LW CD Player with
CD Changer control .................... 110
– General ............................................ 113
– Listening to a CD .......................... 112
– MP3/WMA Player.......................... 120
– Radio................................................ 114
– RDS (Radio Data System)............ 115
– Remote audio controls ................ 126
– Troubleshooting ............................ 124
Automatic Transaxle (AT) Fluid ....... 196
– Changing oil .................................... 197
I I
N N
D D
E E
X X
14
261-268 SEDICI LUM FL GB 1E 19-06-2009 11:12 Pagina 261