2009 FIAT SEDICI child seat
[x] Cancel search: child seatPage 41 of 270
CHILD RESTRAINT SYSTEM FOR EU COUNTRIES
CHILD RESTRAINT
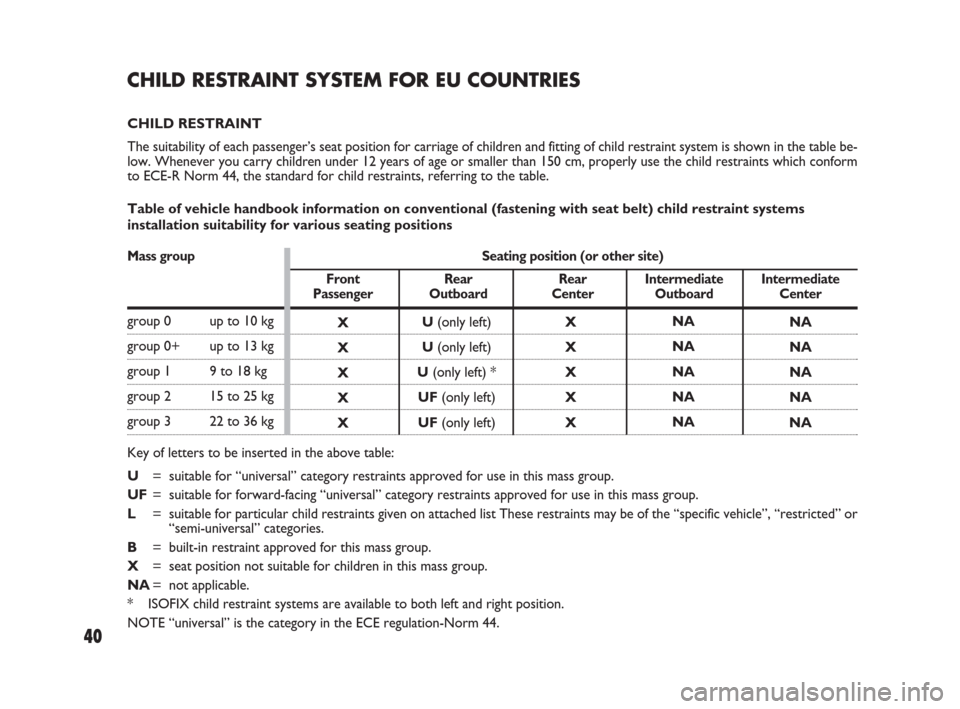
The suitability of each passenger’s seat position for carriage of children and fitting of child restraint system is shown in the table be-
low. Whenever you carry children under 12 years of age or smaller than 150 cm, properly use the child restraints which conform
to ECE-R Norm 44, the standard for child restraints, referring to the table.
Table of vehicle handbook information on conventional (fastening with seat belt) child restraint systems
installation suitability for various seating positions
Mass group Seating position (or other site)
Front Rear Rear Intermediate Intermediate
Passenger Outboard Center Outboard Center
group 0 up to 10 kg
group 0+ up to 13 kg
group 1 9 to 18 kg
group 2 15 to 25 kg
group 3 22 to 36 kg
Key of letters to be inserted in the above table:
U= suitable for “universal” category restraints approved for use in this mass group.
UF= suitable for forward-facing “universal” category restraints approved for use in this mass group.
L= suitable for particular child restraints given on attached list These restraints may be of the “specific vehicle”, “restricted” or
“semi-universal” categories.
B= built-in restraint approved for this mass group.
X= seat position not suitable for children in this mass group.
NA= not applicable.
* ISOFIX child restraint systems are available to both left and right position.
NOTE “universal” is the category in the ECE regulation-Norm 44.
40
X
X
X
X
XX
X
X
X
XNA
NA
NA
NA
NANA
NA
NA
NA
NA U(only left)
U(only left)
U(only left) *
UF(only left)
UF(only left)
009-056 SEDICI LUM FL GB 1E 19-06-2009 14:11 Pagina 40
Page 43 of 270
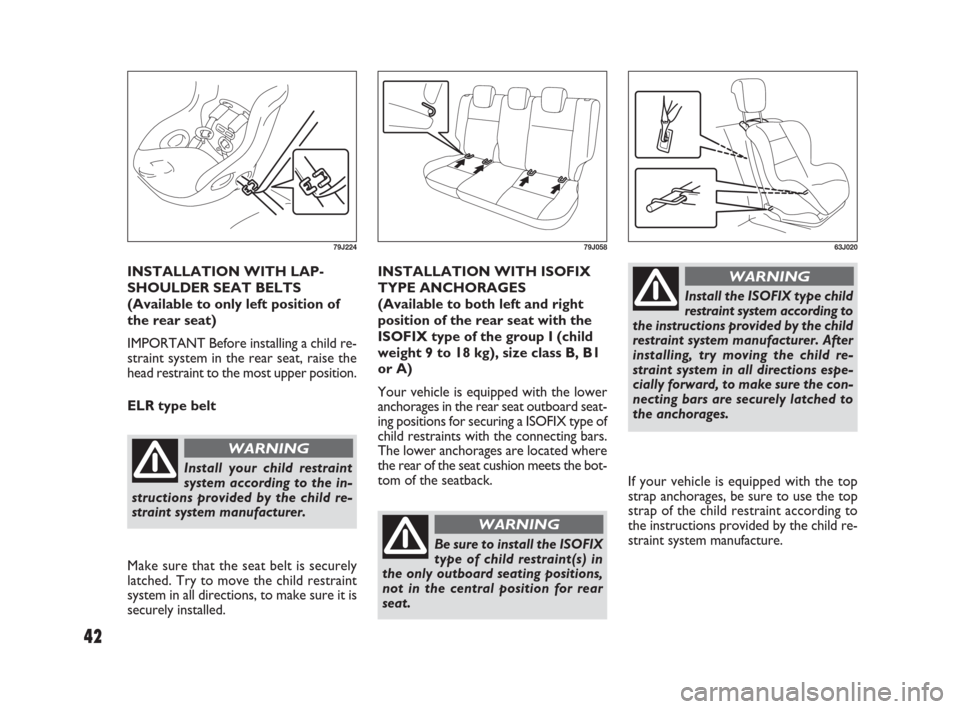
INSTALLATION WITH LAP-
SHOULDER SEAT BELTS
(Available to only left position of
the rear seat)
IMPORTANT Before installing a child re-
straint system in the rear seat, raise the
head restraint to the most upper position.
ELR type belt
Make sure that the seat belt is securely
latched. Try to move the child restraint
system in all directions, to make sure it is
securely installed.
Install your child restraint
system according to the in-
structions provided by the child re-
straint system manufacturer.
WARNING
79J224
INSTALLATION WITH ISOFIX
TYPE ANCHORAGES
(Available to both left and right
position of the rear seat with the
ISOFIX type of the group I (child
weight 9 to 18 kg), size class B, B1
or A)
Your vehicle is equipped with the lower
anchorages in the rear seat outboard seat-
ing positions for securing a ISOFIX type of
child restraints with the connecting bars.
The lower anchorages are located where
the rear of the seat cushion meets the bot-
tom of the seatback.
79J058
Be sure to install the ISOFIX
type of child restraint(s) in
the only outboard seating positions,
not in the central position for rear
seat.
WARNING
If your vehicle is equipped with the top
strap anchorages, be sure to use the top
strap of the child restraint according to
the instructions provided by the child re-
straint system manufacture.
63J020
Install the ISOFIX type child
restraint system according to
the instructions provided by the child
restraint system manufacturer. After
installing, try moving the child re-
straint system in all directions espe-
cially forward, to make sure the con-
necting bars are securely latched to
the anchorages.
WARNING
42
009-056 SEDICI LUM FL GB 1E 19-06-2009 14:11 Pagina 42
Page 44 of 270
43
78F11454G18354G184
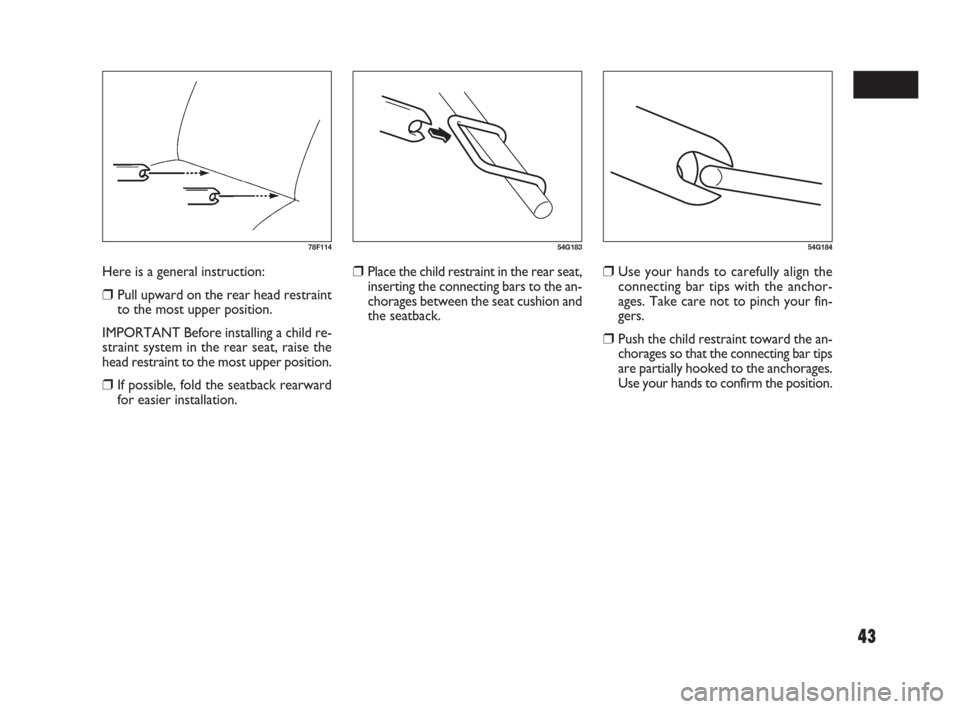
❒Place the child restraint in the rear seat,
inserting the connecting bars to the an-
chorages between the seat cushion and
the seatback.❒Use your hands to carefully align the
connecting bar tips with the anchor-
ages. Take care not to pinch your fin-
gers.
❒Push the child restraint toward the an-
chorages so that the connecting bar tips
are partially hooked to the anchorages.
Use your hands to confirm the position. Here is a general instruction:
❒Pull upward on the rear head restraint
to the most upper position.
IMPORTANT Before installing a child re-
straint system in the rear seat, raise the
head restraint to the most upper position.
❒If possible, fold the seatback rearward
for easier installation.
009-056 SEDICI LUM FL GB 1E 19-06-2009 14:11 Pagina 43
Page 45 of 270
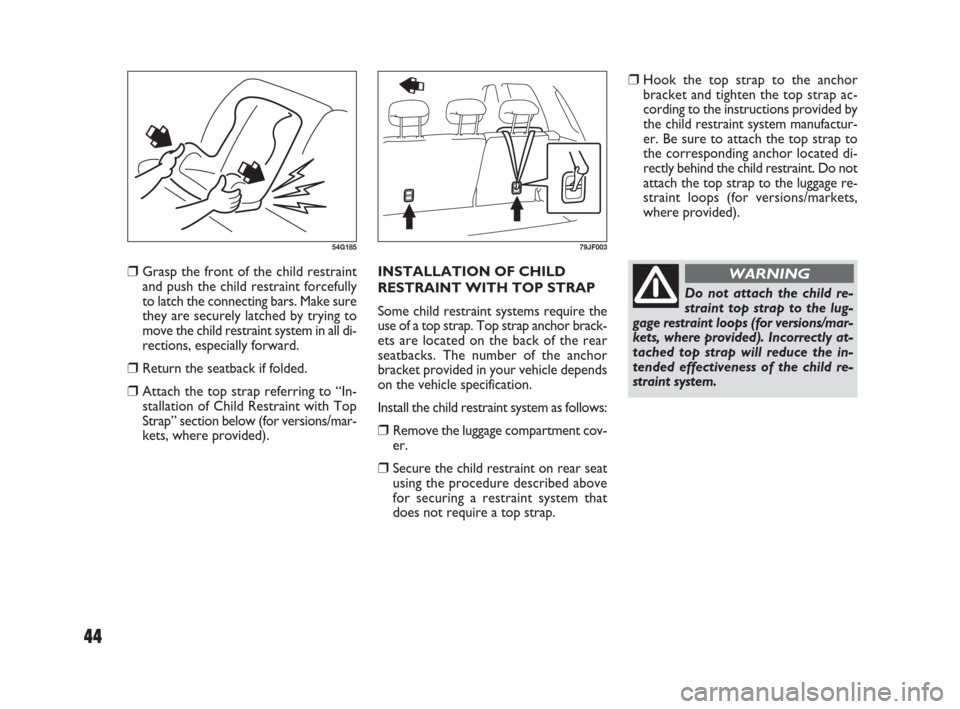
❒Hook the top strap to the anchor
bracket and tighten the top strap ac-
cording to the instructions provided by
the child restraint system manufactur-
er. Be sure to attach the top strap to
the corresponding anchor located di-
rectly behind the child restraint. Do not
attach the top strap to the luggage re-
straint loops (for versions/markets,
where provided).
Do not attach the child re-
straint top strap to the lug-
gage restraint loops (for versions/mar-
kets, where provided). Incorrectly at-
tached top strap will reduce the in-
tended effectiveness of the child re-
straint system.
WARNING❒Grasp the front of the child restraint
and push the child restraint forcefully
to latch the connecting bars. Make sure
they are securely latched by trying to
move the child restraint system in all di-
rections, especially forward.
❒Return the seatback if folded.
❒Attach the top strap referring to “In-
stallation of Child Restraint with Top
Strap” section below (for versions/mar-
kets, where provided).INSTALLATION OF CHILD
RESTRAINT WITH TOP STRAP
Some child restraint systems require the
use of a top strap. Top strap anchor brack-
ets are located on the back of the rear
seatbacks. The number of the anchor
bracket provided in your vehicle depends
on the vehicle specification.
Install the child restraint system as follows:
❒Remove the luggage compartment cov-
er.
❒Secure the child restraint on rear seat
using the procedure described above
for securing a restraint system that
does not require a top strap.
54G18579JF003
44
009-056 SEDICI LUM FL GB 1E 19-06-2009 14:11 Pagina 44
Page 47 of 270
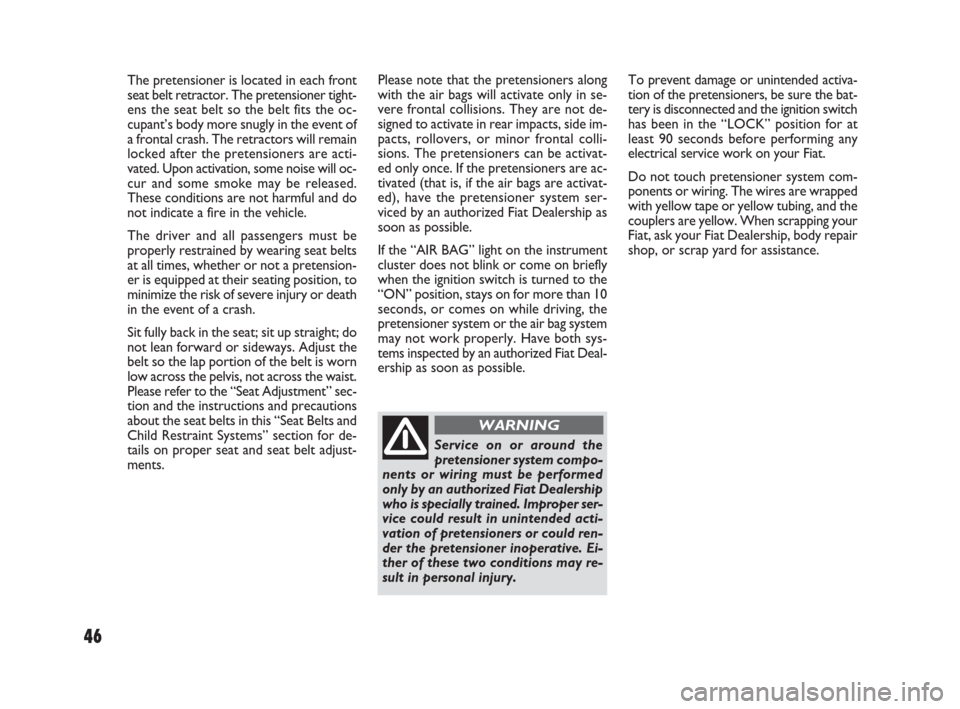
The pretensioner is located in each front
seat belt retractor. The pretensioner tight-
ens the seat belt so the belt fits the oc-
cupant’s body more snugly in the event of
a frontal crash. The retractors will remain
locked after the pretensioners are acti-
vated. Upon activation, some noise will oc-
cur and some smoke may be released.
These conditions are not harmful and do
not indicate a fire in the vehicle.
The driver and all passengers must be
properly restrained by wearing seat belts
at all times, whether or not a pretension-
er is equipped at their seating position, to
minimize the risk of severe injury or death
in the event of a crash.
Sit fully back in the seat; sit up straight; do
not lean forward or sideways. Adjust the
belt so the lap portion of the belt is worn
low across the pelvis, not across the waist.
Please refer to the “Seat Adjustment” sec-
tion and the instructions and precautions
about the seat belts in this “Seat Belts and
Child Restraint Systems” section for de-
tails on proper seat and seat belt adjust-
ments.
Service on or around the
pretensioner system compo-
nents or wiring must be performed
only by an authorized Fiat Dealership
who is specially trained. Improper ser-
vice could result in unintended acti-
vation of pretensioners or could ren-
der the pretensioner inoperative. Ei-
ther of these two conditions may re-
sult in personal injury.
WARNING
To prevent damage or unintended activa-
tion of the pretensioners, be sure the bat-
tery is disconnected and the ignition switch
has been in the “LOCK” position for at
least 90 seconds before performing any
electrical service work on your Fiat.
Do not touch pretensioner system com-
ponents or wiring. The wires are wrapped
with yellow tape or yellow tubing, and the
couplers are yellow. When scrapping your
Fiat, ask your Fiat Dealership, body repair
shop, or scrap yard for assistance. Please note that the pretensioners along
with the air bags will activate only in se-
vere frontal collisions. They are not de-
signed to activate in rear impacts, side im-
pacts, rollovers, or minor frontal colli-
sions. The pretensioners can be activat-
ed only once. If the pretensioners are ac-
tivated (that is, if the air bags are activat-
ed), have the pretensioner system ser-
viced by an authorized Fiat Dealership as
soon as possible.
If the “AIR BAG” light on the instrument
cluster does not blink or come on briefly
when the ignition switch is turned to the
“ON” position, stays on for more than 10
seconds, or comes on while driving, the
pretensioner system or the air bag system
may not work properly. Have both sys-
tems inspected by an authorized Fiat Deal-
ership as soon as possible.
46
009-056 SEDICI LUM FL GB 1E 19-06-2009 14:11 Pagina 46
Page 50 of 270
49
If you must use a front- facing child re-
straint in the front passenger’s seat, be
sure to move the front passenger’s seat as
far back as possible. Please refer to the
“Seat Belts and Child Restraint Systems”
section in the “BEFORE DRIVING” sec-
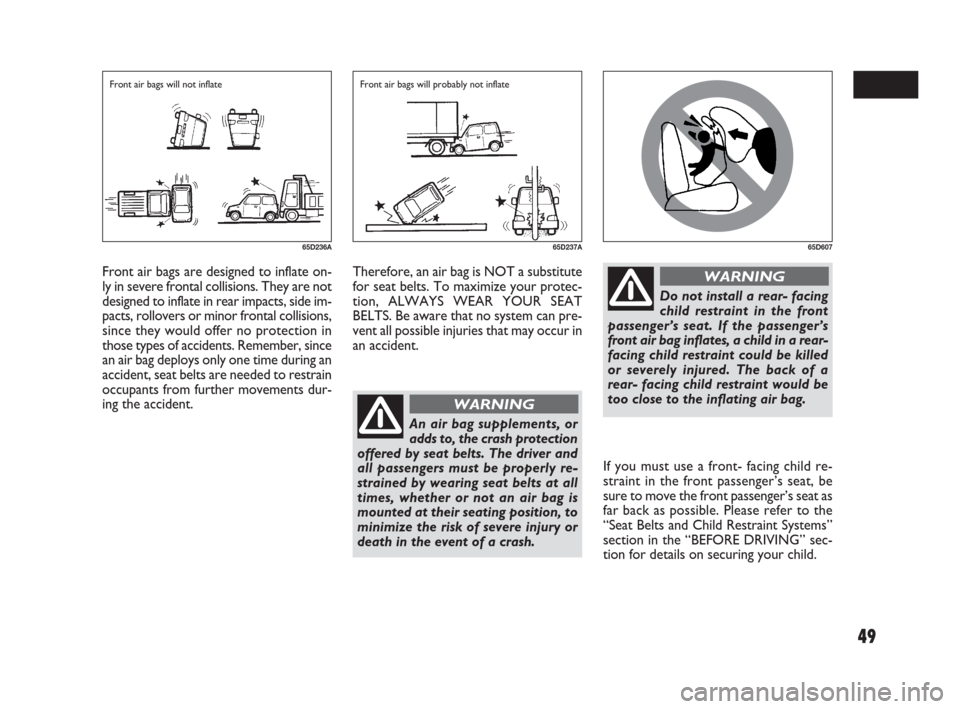
tion for details on securing your child. Front air bags are designed to inflate on-
ly in severe frontal collisions. They are not
designed to inflate in rear impacts, side im-
pacts, rollovers or minor frontal collisions,
since they would offer no protection in
those types of accidents. Remember, since
an air bag deploys only one time during an
accident, seat belts are needed to restrain
occupants from further movements dur-
ing the accident.
65D236A65D237A
Therefore, an air bag is NOT a substitute
for seat belts. To maximize your protec-
tion, ALWAYS WEAR YOUR SEAT
BELTS. Be aware that no system can pre-
vent all possible injuries that may occur in
an accident.
An air bag supplements, or
adds to, the crash protection
offered by seat belts. The driver and
all passengers must be properly re-
strained by wearing seat belts at all
times, whether or not an air bag is
mounted at their seating position, to
minimize the risk of severe injury or
death in the event of a crash.
WARNING
Do not install a rear- facing
child restraint in the front
passenger’s seat. If the passenger’s
front air bag inflates, a child in a rear-
facing child restraint could be killed
or severely injured. The back of a
rear- facing child restraint would be
too close to the inflating air bag.
WARNING
65D607
Front air bags will not inflate Front air bags will probably not inflate
009-056 SEDICI LUM FL GB 1E 19-06-2009 14:11 Pagina 49
Page 51 of 270
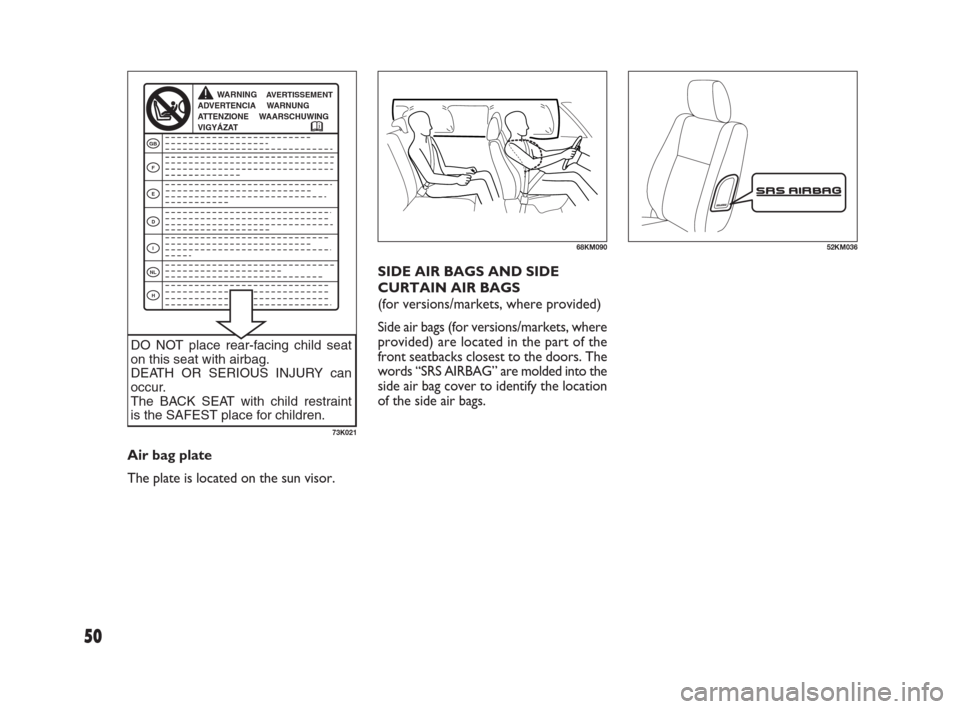
SIDE AIR BAGS AND SIDE
CURTAIN AIR BAGS
(for versions/markets, where provided)
Side air bags (for versions/markets, where
provided) are located in the part of the
front seatbacks closest to the doors. The
words “SRS AIRBAG” are molded into the
side air bag cover to identify the location
of the side air bags.
Air bag plate
The plate is located on the sun visor.
68KM09052KM036
AVERTISSEMENTWARNINGADVERTENCIA WARNUNG
ATTENZIONE WAARSCHUWING
VIGYÁZAT
GB
F
E
D
I
NL
H
DO NOT place rear-facing child seat
on this seat with airbag.
DEATH OR SERIOUS INJURY can
occur.
The BACK SEAT with child restraint
is the SAFEST place for children.
73K021
50
009-056 SEDICI LUM FL GB 1E 19-06-2009 14:11 Pagina 50
Page 52 of 270
51
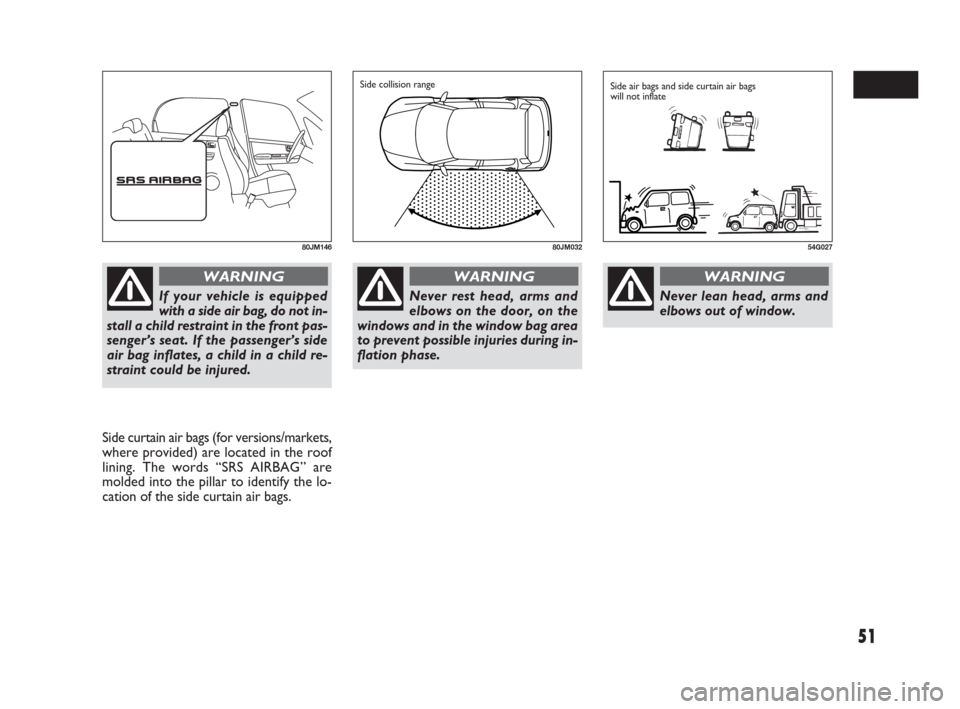
Side curtain air bags (for versions/markets,
where provided) are located in the roof
lining. The words “SRS AIRBAG” are
molded into the pillar to identify the lo-
cation of the side curtain air bags.
80JM146
If your vehicle is equipped
with a side air bag, do not in-
stall a child restraint in the front pas-
senger’s seat. If the passenger’s side
air bag inflates, a child in a child re-
straint could be injured.
WARNING
80JM032
Side collision range
54G027
Side air bags and side curtain air bags
will not inflate
Never rest head, arms and
elbows on the door, on the
windows and in the window bag area
to prevent possible injuries during in-
flation phase.
WARNING
Never lean head, arms and
elbows out of window.
WARNING
009-056 SEDICI LUM FL GB 1E 19-06-2009 14:11 Pagina 51