2009 DODGE RAM 3500 DIESEL air condition
[x] Cancel search: air conditionPage 245 of 532
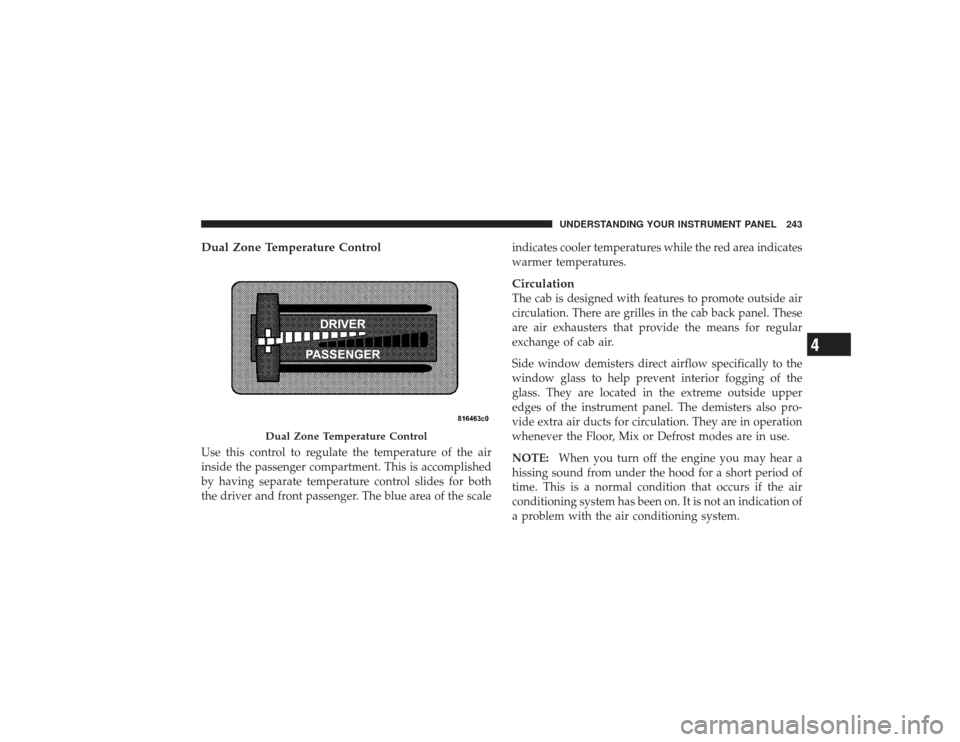
Dual Zone Temperature ControlUse this control to regulate the temperature of the air
inside the passenger compartment. This is accomplished
by having separate temperature control slides for both
the driver and front passenger. The blue area of the scaleindicates cooler temperatures while the red area indicates
warmer temperatures.
CirculationThe cab is designed with features to promote outside air
circulation. There are grilles in the cab back panel. These
are air exhausters that provide the means for regular
exchange of cab air.
Side window demisters direct airflow specifically to the
window glass to help prevent interior fogging of the
glass. They are located in the extreme outside upper
edges of the instrument panel. The demisters also pro-
vide extra air ducts for circulation. They are in operation
whenever the Floor, Mix or Defrost modes are in use.
NOTE:
When you turn off the engine you may hear a
hissing sound from under the hood for a short period of
time. This is a normal condition that occurs if the air
conditioning system has been on. It is not an indication of
a problem with the air conditioning system.
Dual Zone Temperature Control
UNDERSTANDING YOUR INSTRUMENT PANEL 243
4
Page 246 of 532
Operating Tips
Fast CooldownFor a fast cooldown, turn the blower fan rotary knob to
the extreme right position, turn the mode control to the
panel fresh position, press the snowflake button to turn
on the air conditioning, and drive with the windows
open for the first few minutes. Once the hot air has been
expelled, close the windows and press the recirculation
pushbutton, on dual-zone control, or switch the mode
from panel/fresh to panel/recirculate on single-zone
control. When a comfortable condition has been reached,
choose a mode position and adjust the temperature
control slide and blower speed as necessary to maintain
comfort. For high humidity conditions it may be neces-
sary to remain in the Recirculation mode to maintain
comfort.
Window FoggingWindows will fog on the inside when the humidity inside
the vehicle is high. This often occurs in mild or cool
temperatures when it’s rainy or humid. In most cases
turning on the air conditioning (pressing the snowflake
button) will clear the fog. Adjust the temperature control,
air direction and blower speed to maintain comfort.
As the temperature gets colder it may be necessary to
direct air onto the windshield by using MIX Mode
position on the control. Adjust the temperature control
and blower speed to maintain comfort. Higher blower
speeds will reduce fogging. Interior fogging on the
windshield can be quickly removed by selecting the
defrost mode.
Regular cleaning of the inside of the windows with a
non-filming cleaning solution (vinegar and water works
very well) will help prevent contaminates (cigarette
smoke, perfumes, etc.) from sticking to the windows.
Contaminates increase the rate of window fogging.
244 UNDERSTANDING YOUR INSTRUMENT PANEL
Page 247 of 532
Summer OperationAir conditioned vehicles must be protected with a high
quality antifreeze coolant during summer to provide
proper corrosion protection and to raise the boiling point
of the coolant for protection against overheating. A 50 %
concentration is recommended. For proper coolant type,
refer to “Recommended Fluids and Genuine Parts” in
Section 7.
When using the air conditioner in extremely heavy traffic
in hot weather, especially when towing a trailer, addi-
tional engine cooling may be required. If this situation is
encountered, operate the transmission in a lower gear to
increase engine RPM, coolant flow and fan speed. When
stopped in heavy traffic, it may be necessary to shift into
NEUTRAL and depress the accelerator slightly for fast
idle operation to increase coolant flow and fan speed.NOTE:
On models equipped with Diesel engines, the
idle speed will automatically increase to 1000 rpm at
elevated coolant temperatures to improve engine cooling.
Your air conditioning system is also equipped with an
automatic recirculation system. When the system senses
a heavy load or high heat conditions, it may use partial
Recirculation A/C mode to provide additional comfort.
Winter OperationWhen operating the system during the Winter months,
make sure the air intake, located directly in front of the
windshield, is free of ice, slush, snow, or other obstructions.
UNDERSTANDING YOUR INSTRUMENT PANEL 245
4
Page 298 of 532

your vehicle’s abilities and be able to recover it if
something goes wrong. You should never stop or shut a
vehicle off when crossing deep water unless you ingested
water into the engine air intake. If the engine stalls do not
attempt to restart it. Determine if it has ingested water
first. The key to any crossing is low and slow. You want
to use 1st gear in 4L (Low Range) and proceed very
slowly with a constant slow speed (3-5 mph [5–8 km/h]
maximum) and light throttle. Keep the vehicle moving;
do not try to accelerate through the crossing. After
crossing any water higher than the bottom of the axle
differentials, you should inspect all of the vehicle fluids
for signs of water ingestion.
CAUTION!
Water ingestion into the axles, transmission, transfer
case, engine or vehicle interior can occur if you drive
too fast or through too deep of water. Water can cause
permanent damage to engine, driveline or other
vehicle components and your brakes will be less
effective once wet and/or muddy•
Before You Cross Any Type Of Water– As you
approach any type of water you need to determine if
you can cross it safely and responsibly. If necessary, get
out and walk through the water or probe it with a
stick. You need to be sure of its depth, approach angle,
current and bottom condition. Be careful of murky or
muddy waters, check for hidden obstacles. Make sure
you will not be intruding on any wildlife and you can
recover the vehicle if necessary. The key to a safe
296 STARTING AND OPERATING
Page 300 of 532
downstream out of control if the water is deep enough
to push on the large surface area of the vehicle’s body.
Before you proceed determine the speed of the current,
the water’s depth, approach angle, bottom condition
and if there are any obstacles, then cross at an angle
heading slightly upstream using the low and slow
technique.
WARNING!
Never drive through fast moving deep water. It can
push your vehicle downstream, sweeping it out of
control. This could put you and your passengers at
risk of injury or drowning.Airing Down For Off-Road DrivingRunning lower tire pressure off-road can improve your
ride comfort and vehicle traction. Reducing the tire air
pressure allows the tire to bulge slightly, improving its
surface area for better flotation and ability to mold orform to the ground contour. Different terrain, tires, and
vehicles require different tire pressure. Hard surfaces like
rock and heavier vehicles require higher pressures than
softer surfaces such as sand and lighter vehicles. You will
need to experiment to determine what is right for your
situation. It is easier and faster to let air out than it is to
replace it so, start high and lower it as required. Remem-
ber you must return the tires to normal air pressure
before driving on road or at highway conditions. Be sure
you have a way to return the tires to their normal on road
air pressure.
CAUTION!
Reduced tire pressure increases the risk of tire dam-
age and may cause tire unseating with total loss of air
pressure. To reduce the risk of tire unseating, while at
a reduced tire pressure, drive at slower speeds and
avoid sharp turns or abrupt maneuvers.
298 STARTING AND OPERATING
Page 358 of 532
CAUTION!
After inspecting or adjusting the tire pressure, al-
ways reinstall the valve stem cap. This will prevent
moisture and dirt from entering the valve stem,
which could damage the valve stem.
Inflation pressures specified on the placard are always
“cold tire inflation pressure.” Cold tire inflation pressure
is defined as the tire pressure after the vehicle has not
been driven for at least three hours, or driven less than
1 mile (1.6 km) after a three hour period. The cold tire
inflation pressure must not exceed the maximum infla-
tion pressure molded into the tire sidewall.
Check tire pressures more often if subject to a wide range
of outdoor temperatures, as tire pressures vary with
temperature changes. Tire pressures change by approximately 1 psi (7 kPa) per
12°F (7°C) of air temperature change. Keep this in mind
when checking tire pressure inside a garage, especially in
the Winter.
Example: If garage temperature = 68°F (20°C) and the
outside temperature = 32°F (0°C) then the cold tire
inflation pressure should be increased by 3 psi (21 kPa),
which equals 1 psi (7 kPa) for every 12°F (7°C) for this
outside temperature condition.
Tire pressure may increase from 2 to 6 psi (13 to 40 kPa)
during operation. DO NOT reduce this normal pressure
build up or your tire pressure will be too low.
Tire Pressures for High Speed OperationThe manufacturer advocates driving at safe speeds
within posted speed limits. Where speed limits or condi-
tions are such that the vehicle can be driven at high
speeds, maintaining correct tire inflation pressure is very
important. Increased tire pressure and reduced vehicle
356 STARTING AND OPERATING
Page 359 of 532

loading may be required for high-speed vehicle opera-
tion. Refer to original equipment or an authorized tire
dealer for recommended safe operating speeds, loading
and cold tire inflation pressures.
WARNING!
High speed driving with your vehicle under maxi-
mum load is dangerous. The added strain on your
tires could cause them to fail. You could have a
serious accident. Do not drive a vehicle loaded to the
maximum capacity at continuous speeds above
75 mph (120 km/h).
Radial Ply Tires
WARNING!
Combining radial ply tires with other types of tires
on your vehicle will cause your vehicle to handle
poorly. The instability could cause an accident. Al-
ways use radial ply tires in sets of four (or six, in case
of trucks with dual rear wheels). Never combine
them with other types of tires.
Cuts and punctures in radial tires are repairable only in
the tread area because of sidewall flexing. Consult your
authorized tire dealer for radial tire repairs.Tire SpinningWhen stuck in mud, sand, snow, or ice conditions, DO
NOT spin your vehicle’s wheels faster than 30 mph
(48 km/h) or for longer than 30 seconds continuously
without stopping when you are stuck.
STARTING AND OPERATING 357
5
Page 376 of 532

1. This spare tire does not have a tire pressure monitor-
ing sensor. Therefore, the TPMS will not monitor the tire
pressure in the spare tire.
2. If you install the full size spare tire in place of a road
tire that has a pressure below the low-pressure warning
limit, upon the next ignition key cycle, a chime will
sound and the “TPM Telltale Light” will still turn ON
due to the low tire.
3. However, after driving the vehicle for up to 20 min-
utes above 15 mph (25 km/h), the “TPM Telltale Light”
will flash on and off for 75 seconds and then remain on
solid.
4. For each subsequent ignition key cycle, a chime will
sound and the “TPM Telltale Light” will flash on and off
for 75 seconds and then remain on solid.5. Once you repair or replace the original road tire, and
reinstall it on the vehicle in place of the full size spare tire,
the TPMS will update automatically and the “TPM
Telltale Light” will turn OFF, as long as no tire pressure is
below the low-pressure warning limit in any of the four
active road tires. The vehicle may need to be driven for
up to 20 minutes above 15 mph (25 km/h) in order for the
TPMS to receive this information.
General InformationThis device complies with part 15 of the FCC rules and
RSS 210 of Industry Canada. Operation is subject to the
following conditions:•
This device may not cause harmful interference.
•
This device must accept any interference received,
including interference that may cause undesired
operation.
374 STARTING AND OPERATING