2009 DODGE DAKOTA lock
[x] Cancel search: lockPage 39 of 449
Research has shown that seat belts save lives, and that
they can reduce the seriousness of injuries in a collision.
Some of the worst injuries happen when people are
thrown from the vehicle. Seat belts reduce the possibility
of ejection and the risk of injury caused by striking the
inside of the vehicle.Everyonein a motor vehicle should
be belted at all times.
Lap/Shoulder Belts
All seating positions, except the front center seating
position (with full bench seat), have combination lap/
shoulder belts. The belt webbing retractor is designed to
lock during very sudden stops or collisions. This feature
allows the shoulder part of the belt to move freely with
you under normal conditions. But in a collision, the belt
will lock and reduce the risk of your striking the inside of
the vehicle or being thrown out.
WARNING!
²It is extremely dangerous to ride in a cargo area,
inside or outside of a vehicle. In a collision, people
riding in these areas are more likely to be seri-
ously injured or killed.
²Do not allow people to ride in any area of your
vehicle that is not equipped with seats and seat
belts.
²Be sure everyone in your vehicle is in a seat and
using a seat belt properly.
(Continued)
THINGS TO KNOW BEFORE STARTING YOUR VEHICLE 37
2
Page 44 of 449
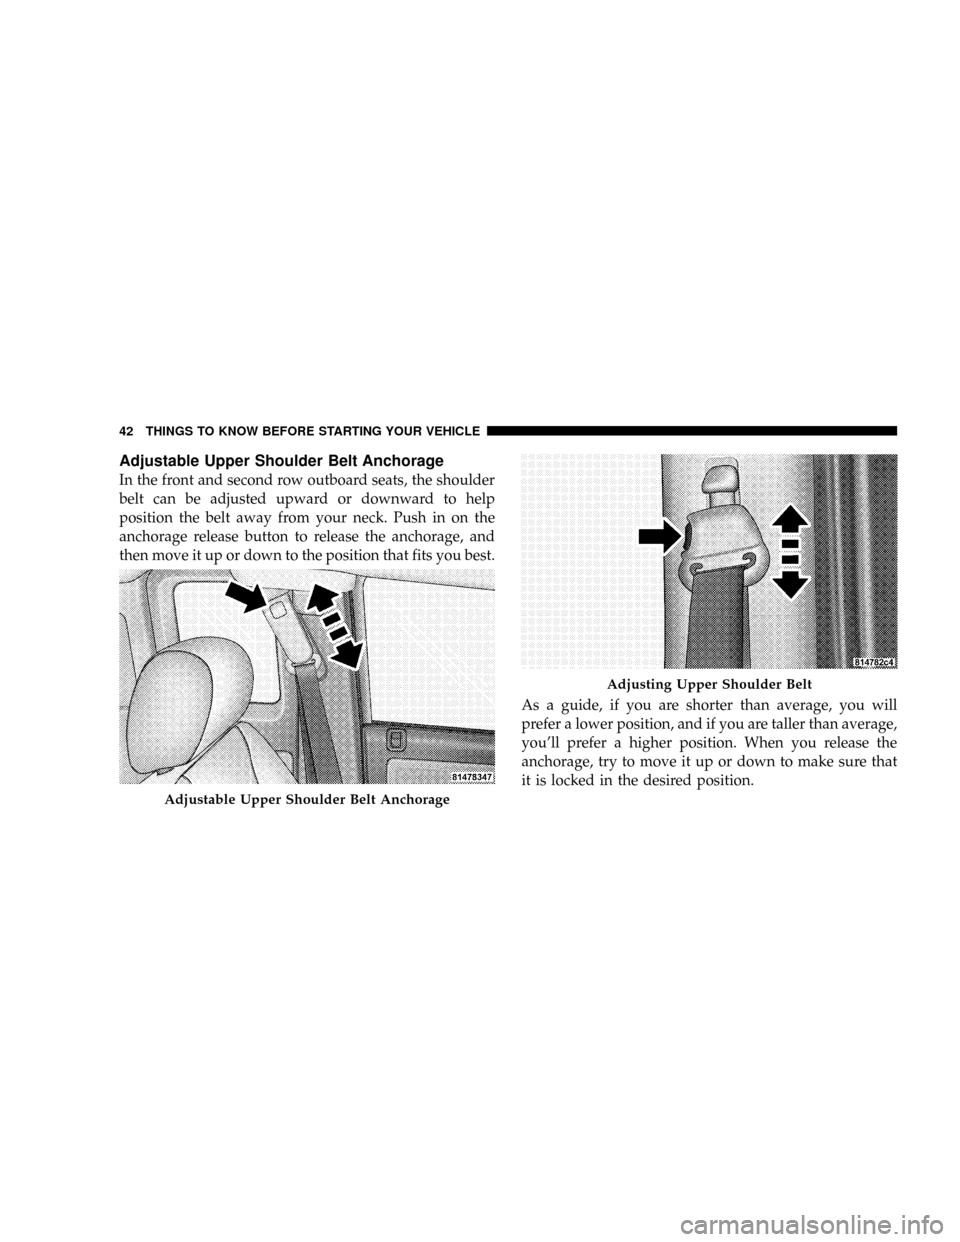
Adjustable Upper Shoulder Belt Anchorage
In the front and second row outboard seats, the shoulder
belt can be adjusted upward or downward to help
position the belt away from your neck. Push in on the
anchorage release button to release the anchorage, and
then move it up or down to the position that fits you best.
As a guide, if you are shorter than average, you will
prefer a lower position, and if you are taller than average,
you'll prefer a higher position. When you release the
anchorage, try to move it up or down to make sure that
it is locked in the desired position.
Adjustable Upper Shoulder Belt Anchorage
Adjusting Upper Shoulder Belt
42 THINGS TO KNOW BEFORE STARTING YOUR VEHICLE
Page 45 of 449
The adjuster has an easy up (EZ Up) feature, which will
allow it to be moved up without engaging the button.
Automatic Locking Retractors (ALR) Mode ± If
Equipped
In this mode, the shoulder belt is automatically pre-
locked. The belt will still retract to remove any slack in
the shoulder belt. The automatic locking mode is avail-
able on all passenger seating positions with a combina-
tion lap/shoulder belt.
When to Use the Automatic Locking Mode
Use the Automatic Locking Mode anytime a child safety
seat is installed in a passenger seating position. Children
12 years old, and younger, should be properly restrained
in the rear seat, whenever possible.
How to Use the Automatic Locking Mode
1. Buckle the combination lap/shoulder belt.2. Grasp the shoulder portion and pull downward until
the entire belt is fully extended.
3. Allow the belt to retract. As the belt retracts, you will
hear a clicking sound. This indicates the safety belt is
now in the Automatic Locking mode.
How to Disengage the Automatic Locking Mode
To disengage the Automatic Locking Mode, disconnect
the combination lap/shoulder belt and allow it to retract
completely. The vehicle sensitive (emergency) locking
mode is automatically activated.
Center Lap Belts
The center seat position on the front seat bench has a lap
belt only. To fasten the lap belt, slide the latch plate into
the buckle until you hear a ªclick.º To lengthen the lap
belt, tilt the latch plate and pull. To remove slack, pull the
loose end of the webbing. Wear the lap belt snug against
the hips. Sit back and erect in the seat, then adjust the belt
as tightly as is comfortable.
THINGS TO KNOW BEFORE STARTING YOUR VEHICLE 43
2
Page 49 of 449
The front airbags have a multistage inflator design. This
may allow the airbag to have different rates of inflation
that are based on collision severity and occupant size.
This vehicle may also be equipped with window bags to
protect the driver, and front and rear passengers sitting
next to a window. If the vehicle is equipped with window
bags, they are located above the side windows. Their
covers are also labeled SRS AIRBAG.
NOTE:Airbag covers may not be obvious in the interior
trim; but they will open to allow airbag deployment.WARNING!
²Do not put anything on or around the front airbag
covers or attempt to manually open them. You may
damage the airbags and you could be injured
because the airbags are no longer functional.
These protective covers for the airbag cushions are
designed to open only when the airbags are inflat-
ing.
²If your vehicle is equipped with window bags, do
not stack luggage or other cargo up high enough to
block the location of the window bag. The area
where the window bag is located should remain
free from any obstructions.
(Continued)
THINGS TO KNOW BEFORE STARTING YOUR VEHICLE 47
2
Page 57 of 449
WARNING! (Continued)
²It is dangerous to try to repair any part of the airbag
system yourself. Be sure to tell anyone who works
on your vehicle that it has an airbag system.
NOTE:Perchlorate Material ± special handling may apply.
See www.dtsc.ca.gov/hazardouswaste/perchlorate.
Enhanced Accident Response System
If the airbags deploy after an impact and the electrical
system remains functional, vehicles equipped with
power door locks will unlock automatically. In addition,
approximately five seconds after the vehicle has stopped
moving, the interior lights will light until the ignition
switch is turned off.
Airbag Warning Light
You will want to have the airbags ready to
inflate for your protection in an impact. While
the airbag system is designed to be mainte-
nance free, if any of the following occurs, have
an authorized dealer service the system promptly:
²The Airbag Warning Light does not come on or flickers
during the six to eight seconds when the ignition
switch is first turned on.
²The light remains on or flickers after the six to eight
second interval.
²The light flickers or comes on and remains on while
driving.
NOTE:If the speedometer, tachometer or any engine
related gauges are not working, the Occupant Restraint
Controller (ORC) may also be disabled. The airbags may
not be ready to inflate for your protection. Promptly
THINGS TO KNOW BEFORE STARTING YOUR VEHICLE 55
2
Page 58 of 449

check the fuse block for blown fuses. Refer to the label
located on the inside of the fuse block cover for the
proper airbag fuses. See your authorized dealer if the
fuse is good.
Event Data Recorder (EDR)
In the event of an accident, your vehicle is designed to
record up to five seconds of specific vehicle data param-
eters (see the following list) in an event data recorder,
prior to the moment of airbag deployment, or near
deployment, and up to a quarter-second of high-speed
deceleration data during, and/or after, airbag deploy-
ment. EDR data are ONLY recorded if an airbag deploys,
or nearly deploys, and are otherwise unavailable.
NOTE:
1. A near-deployment event occurs when the airbag
sensor detects severe vehicle deceleration usually indica-
tive of a crash, but not severe enough to warrant airbag
deployment.2. Under certain circumstances, EDR data may not be
recorded (e.g., loss of battery power).
In conjunction with other data gathered during a com-
plete accident investigation, the electronic data may be
used by Chrylser LLC, and others, to learn more about
the possible causes of crashes and associated injuries, in
order to assess and improve vehicle performance. In
addition to crash investigations initiated by Chrylser
LLC, such investigations may be requested by customers,
insurance carriers, government officials, and professional
crash researchers, such as those associated with univer-
sities, and with hospital and insurance organizations.
In the event that an investigation is undertaken by
Chrylser LLC (regardless of initiative), the company, or
its designated representative, will first obtain permission
of the appropriate custodial entity for the vehicle (usually
the vehicle owner or lessee) before accessing the elec-
tronic data stored, unless ordered to download data by a
56 THINGS TO KNOW BEFORE STARTING YOUR VEHICLE
Page 63 of 449
²Carefully follow the instructions that come with the
restraint. If you install the restraint improperly, it may
not work when you need it.
²The Extended Cab first, and Club/Crew Cab second
row outside seating positions, have cinching latch
plates. These are designed to keep the lap portion tight
around the child restraint so that it is not necessary to
use a locking clip. If the seat belt has a cinching latch
plate, pulling up on the shoulder portion of the
lap/shoulder belt will tighten the belt. The cinching
latch plate will keep the belt tight, however, any seat
belt system will loosen with time, so check the belt
occasionally and pull it tight, if necessary.
²Buckle the child into the restraint exactly as the
manufacturer's instructions tell you.
²When your child restraint is not in use, secure it in the
vehicle with the seat belt or remove it from the vehicle.Do not leave it loose in the vehicle. In a sudden stop or
collision, it could strike the occupants or seatbacks and
cause serious personal injury.
LATCH - Child Seat Anchorage System (Lower
Anchors and Tether for CHildren) Ð if equipped
Each vehicle is equipped with the child restraint anchor-
age system called LATCH, which stands for Lower
Anchors and Tethers for CHildren. The LATCH system
provides for the installation of the child restraint without
using the vehicle's seat belts, instead securing the child
restraint using lower anchorages and upper tether straps
from the child restraint to the vehicle structure. LATCH-
compatible child restraint systems are now available.
However, because the lower anchorages are to be intro-
duced over a period of years, child restraint systems
having attachments for those anchorages will continue to
also have features for installation using the vehicle's seat
belts. Child restraints having tether straps and hooks for
THINGS TO KNOW BEFORE STARTING YOUR VEHICLE 61
2
Page 67 of 449
reach. If the buckled seat belt interferes with the child
restraint installation, instead of tucking the seat belt
behind the child restraint, route the seat belt through the
child restraint belt path and then buckle it. This should
stow the seat belt out of the reach of an inquisitive child.
Remind all children in the vehicle that the seat belts are
not toys and should not be played with, and never leave
your child unattended in the vehicle.
WARNING!
Improper installation of a child restraint to the
LATCH anchorages can lead to failure of an infant or
child restraint. The child could be badly injured or
killed. Follow the manufacturer's directions exactly
when installing an infant or child restraint.
Installing Child Restraints Using the Vehicle Seat
Belt
The passenger seat belts are equipped with either cinch-
ing latch plates or automatic locking retractors, which are
designed to keep the lap portion tight around the child
restraint, so that it should not be necessary to use a
locking clip. If the seat belt has a cinching latch plate,
pulling up on the shoulder portion of the lap/shoulder
belt will tighten the belt. The cinching latch plate will
keep the belt tight; however, any seat belt system will
loosen with time, so check the belt occasionally and pull
it tight if necessary. If the seat belt has an automatic
locking retractor, it will have a distinctive label. Pull the
belt from the retractor until there is enough to allow you
to pass through the child restraint and slide the latch
plate into the buckle. Then, pull the belt until it is fully
extended from the retractor. Allow the belt to return to
the retractor, pulling on the excess webbing to tighten the
lap portion about the child restraint. For automatic
THINGS TO KNOW BEFORE STARTING YOUR VEHICLE 65
2