2009 DODGE DAKOTA reset
[x] Cancel search: resetPage 173 of 449
is not functioning and that service is required. However,
the conventional brake system will continue to operate
normally if the BRAKE warning light is not on.
If the ABS light is on, the brake system should be serviced
as soon as possible to restore the benefits of Anti-Lock
brakes. If the ABS light does not illuminate when the
Ignition switch is turned to the ON position, have the
light inspected by an authorized dealer.
12. Oil Pressure Warning Light
The Oil Pressure Warning Light illuminates when
the engine oil pressure has become too low. For a
bulb check, this light will come on momentarily when the
ignition is turned ON. If the light turns on while driving,
stop the vehicle and shut off the engine as soon as
possible. Immediate service should be obtained.
13. Tachometer
The tachometer gauge measures engine revolutions-per-
minute (rpm x 1000).14. Shift Lever Indicator
The electronic shift lever indicator is self-contained
within the instrument cluster. It displays the position of
the automatic transmission shift lever, and the relation of
each position to all other positions. The display will place
a box around the selected transmission range (PRND21).
If the PRNDL displays only the characters PRND21 (no
boxes), have the system checked by an authorized dealer.
15. Trip Odometer
The trip odometer shows individual trip mileage. To
switch from odometer to trip odometer, press and release
the trip odometer button.
To reset a trip odometer, display the trip odometer then
push and hold the button until the display resets (ap-
proximately two seconds).
The odometer will also display messages such as: door
ajar, low wash, No-fuse, Lo Tire (display will toggle
between Lo and Tire for three cycles - if equipped),
UNDERSTANDING YOUR INSTRUMENT PANEL 171
4
Page 174 of 449
CHAngE OIL and the outside temperature on vehicles
that are not equipped with the Overhead Console with
Compass/Temperature Mini-Trip Computer.
If the vehicle diagnostic system determines that the fuel
filler cap is loose, improperly installed, or damaged,
ªGASCAPº will be displayed in the instrument cluster.
Tighten the fuel filler cap properly and press the odom-
eter RESET button to turn the ªGASCAPº message off. If
the problem continues, the message will appear the next
time the vehicle is started.
Change Oil Message
Your vehicle is equipped with an engine oil change
indicator system. The ªCHAngE OILº message will flash
in the instrument cluster odometer for approximately
12 seconds after a single chime has sounded, to indicate
the next scheduled oil change interval. The engine oil
change indicator system is duty cycle based, which
means the engine oil change interval may fluctuate
dependent upon your personal driving style.Unless reset, this message will continue to display each
time you turn the ignition switch to the ON/RUN
position. To turn off the message temporarily, press and
release the Trip Odometer button on the instrument
cluster. To reset the oil change indicator system (after
performing the scheduled maintenance) refer to the fol-
lowing procedure.
1. Turn the ignition switch to the ON position(do not
start the engine).
2. Fully depress the accelerator pedal slowly three
times within 10 seconds.
3. Turn the ignition switch to the OFF/LOCK position.
NOTE:If the indicator message illuminates when you
start the vehicle, the oil change indicator system did not
reset. If necessary, repeat this procedure.
172 UNDERSTANDING YOUR INSTRUMENT PANEL
Page 181 of 449
27. Cargo Light
The Cargo Light indicator will illuminate when the Cargo
Light is activated by pressing the CARGO LIGHT button,
located on the headlight switch.
28. TOW/HAUL
The TOW/HAUL button is located at the end of the gear
shift lever. This light will illuminate when the TOW/
HAUL button has been selected.
29. 4WD LOW Indicator
The 4WD Low indicator illuminates when the transfer
case is in 4WD LOW position.
30. Odometer/Trip Odometer Button
Press the ODOMETER/TRIP ODOMETER button to
toggle between the odometer and the trip odometer
display. Holding the button in, resets the trip odometer
reading.ELECTRONIC DIGITAL CLOCK
The clock and radio each use the display panel built into
the radio. A digital readout shows the frequency and/or
time in hours and minutes (depending on your radio
model), whenever the ignition switch is in the ON or
ACC position.
When the ignition switch is in the OFF position, or when
the radio frequency is being displayed, timekeeping is
accurately maintained.
On the AM/FM/CD (6-disc) radio, the time button
alternates the location of the time and frequency on the
display. On the AM/FM/CD (single-disc) radio, only one
of the two, time or frequency, is displayed.
Clock Setting Procedure
1. Press and hold the TIME button until the hours blink.
2. Adjust the hours by turning the TUNE/AUDIO con-
trol knob.
UNDERSTANDING YOUR INSTRUMENT PANEL 179
4
Page 187 of 449
Program Type16-Digit Character
Display
Top 40 Top 40
Weather Weather
By pressing the SEEK button when the Music Type icon
is displayed, the radio will be tuned to the next frequency
station with the same selected Music Type name. The
Music Type function only operates when in the FM
mode.
If a preset button is activated while in the Music Type
(Program Type) mode, the Music Type mode will be
exited and the radio will tune to the preset station.
SETUP Button
Pressing the SETUP button allows you to select between
the following items:NOTE:Turn the TUNE/SCROLL control knob to scroll
through the entries. Push the AUDIO/SELECT button to
select an entry and make changes.
²DVD Enter -When the disc is in DVD Menu mode,
selecting DVD Enter will allow you to play the current
highlighted selection. Use the remote control to scroll
up and down the menu (if equipped).
²DISC Play/Pause -You can toggle between
playing the DVD and pausing the DVD by
pushing the SELECT button (if equipped).
²DVD Play Options -Selecting the DVD Play Options
will display the following:
²Subtitle ± Repeatedly pressing SELECT will switch
subtitles to different subtitle languages that are
available on the disc (if equipped).
UNDERSTANDING YOUR INSTRUMENT PANEL 185
4
Page 190 of 449
NOTE:The user will have to set these defaults before
loading a disc. If changes are made to these settings after
a disc is loaded, changes will not be effective. Also, the
defaults are effective only if the disc supports the
customer-preferred settings.
AM and FM Buttons
Press the buttons to select AM or FM Modes.
SET Button Ð To Set the Pushbutton Memory
When you are receiving a station that you wish to
commit to pushbutton memory, press the SET button.
The symbol SET 1 will now show in the display window.
Select the button (1-6) you wish to lock onto this station
and press and release that button. If a button is not
selected within five seconds after pressing the SET but-
ton, the station will continue to play but will not be
stored into pushbutton memory.
You may add a second station to each pushbutton by
repeating the above procedure with this exception: Pressthe SET button twice and SET 2 will show in the display
window. Each button can be set for SET 1 and SET 2 in
both AM and FM. This allows a total of 12 AM, 12 FM,
and 12 Satellite (if equipped) stations to be stored into
pushbutton memory. The stations stored in SET 2
memory can be selected by pressing the pushbutton
twice.
Every time a preset button is used, a corresponding
button number will display.
Buttons1-6
These buttons tune the radio to the stations that you
commit to pushbutton memory {12 AM, 12 FM, and 12
Satellite (if equipped) stations}.
DISC Button
Pressing the DISC button will allow you to switch from
AM/FM modes to Disc modes.
188 UNDERSTANDING YOUR INSTRUMENT PANEL
Page 203 of 449
Push the rotary Tune/Scroll control knob a fourth time
and BALANCE will display. Turn the Tune/Scroll control
knob to the right or left to adjust the sound level from the
right or left side speakers.
Push the rotary Tune/Scroll control knob a fifth time and
FADE will display. Turn the Tune/Scroll control knob to
the left or right to adjust the sound level between the
front and rear speakers.
Push the rotary Tune/Scroll control knob again to exit
setting tone, balance, and fade.
AM/FM Button
Press the buttons to select either AM or FM mode.
SET/RND Button Ð To Set the Pushbutton
Memory
When you are receiving a station that you wish to
commit to pushbutton memory, press the SET/RND
button. The symbol SET 1 will now show in the displaywindow. Select the button (1 to 6) you wish to lock onto
this station and press and release that button. If a button
is not selected within five seconds after pressing the
SET/RND button, the station will continue to play but
will not be stored into pushbutton memory.
You may add a second station to each pushbutton by
repeating the above procedure with this exception: Press
the SET/RND button twice and SET 2 will show in the
display window. Each button can be set for SET 1 and
SET 2 in both AM and FM. This allows a total of 12 AM
and 12 FM stations to be stored into pushbutton memory.
The stations stored in SET 2 memory can be selected by
pressing the pushbutton twice.
Every time a preset button is used, a corresponding
button number will display.
UNDERSTANDING YOUR INSTRUMENT PANEL 201
4
Page 214 of 449
Program Type16-Digit Character
Display
News News
Nostalgia Nostalga
Oldies Oldies
Personality Persnlty
Public Public
Rhythm and Blues R & B
Religious Music Rel Musc
Religious Talk Rel Talk
Rock Rock
Soft Soft
Soft Rock Soft Rck
Soft Rhythm and Blues Soft R&B
Sports Sports
Talk Talk
Top 40 Top 40Program Type16-Digit Character
Display
Weather Weather
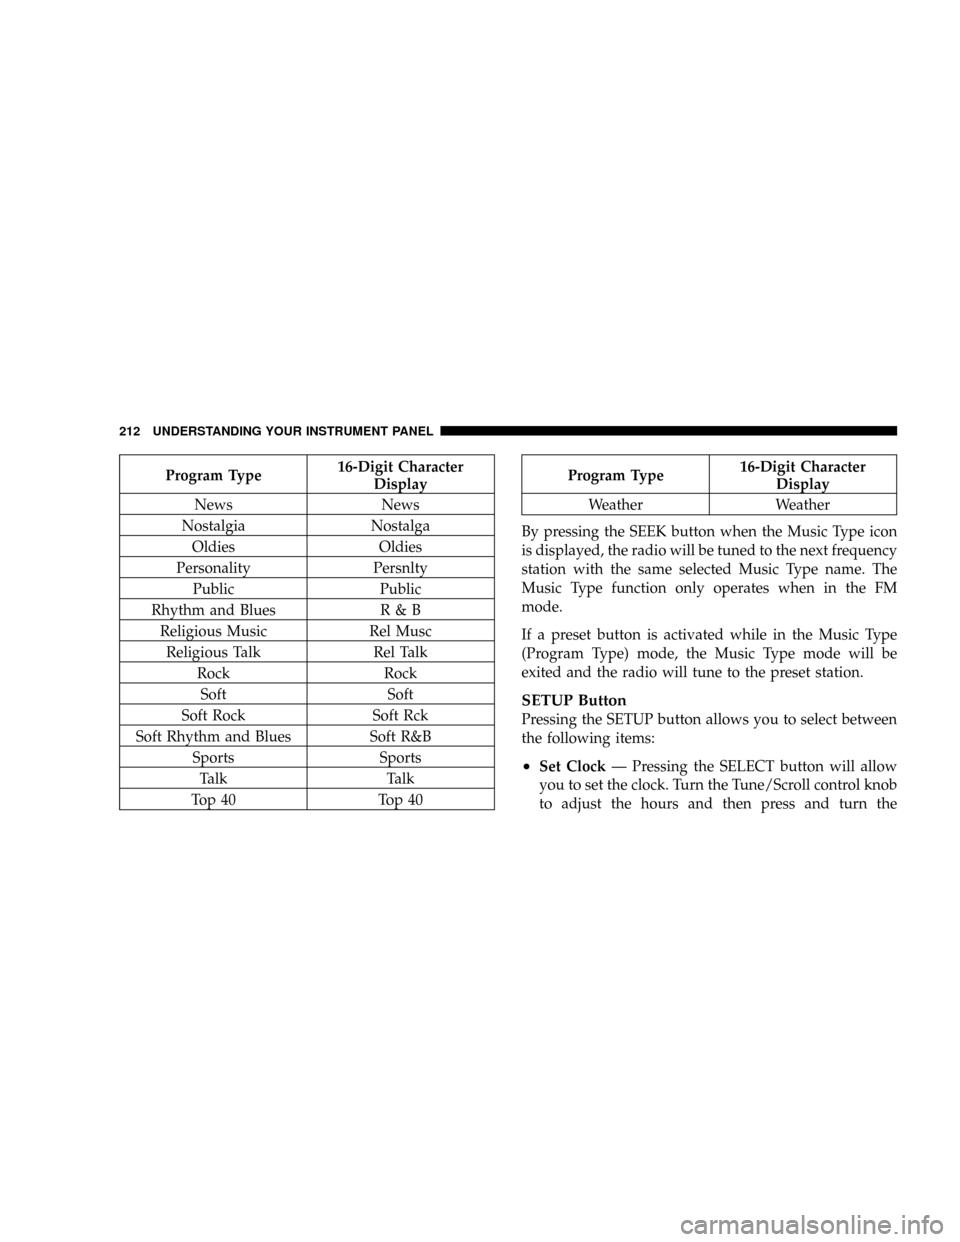
By pressing the SEEK button when the Music Type icon
is displayed, the radio will be tuned to the next frequency
station with the same selected Music Type name. The
Music Type function only operates when in the FM
mode.
If a preset button is activated while in the Music Type
(Program Type) mode, the Music Type mode will be
exited and the radio will tune to the preset station.
SETUP Button
Pressing the SETUP button allows you to select between
the following items:
²Set ClockÐ Pressing the SELECT button will allow
you to set the clock. Turn the Tune/Scroll control knob
to adjust the hours and then press and turn the
212 UNDERSTANDING YOUR INSTRUMENT PANEL
Page 215 of 449
Tune/Scroll control knob to adjust the minutes. Press
the Tune/Scroll control knob again to save changes.
AM/FM Button
Press the button to select either AM or FM mode.
SET/RND Button Ð To Set the Pushbutton
Memory
When you are receiving a station that you wish to
commit to pushbutton memory, press the SET/RND
button. The symbol SET 1 will now show in the display
window. Select the button (1 to 6) you wish to lock onto
this station and press and release that button. If a button
is not selected within five seconds after pressing the
SET/RND button, the station will continue to play but
will not be stored into pushbutton memory.
You may add a second station to each pushbutton by
repeating the above procedure with this exception: Press
the SET/RND button twice and SET 2 will show in the
display window. Each button can be set for SET 1 andSET 2 in both AM and FM. This allows a total of 12 AM
and 12 FM stations to be stored into pushbutton memory.
The stations stored in SET 2 memory can be selected by
pressing the pushbutton twice.
Every time a preset button is used, a corresponding
button number will display.Buttons1-6
These buttons tune the radio to the stations that you
commit to pushbutton memory (12 AM and 12 FM
stations).
DISC/AUX Button
Pressing the DISC/AUX button will allow you to switch
from AM/FM modes to DISC/AUX mode.
UNDERSTANDING YOUR INSTRUMENT PANEL 213
4