2009 DODGE DAKOTA cooling
[x] Cancel search: coolingPage 170 of 449
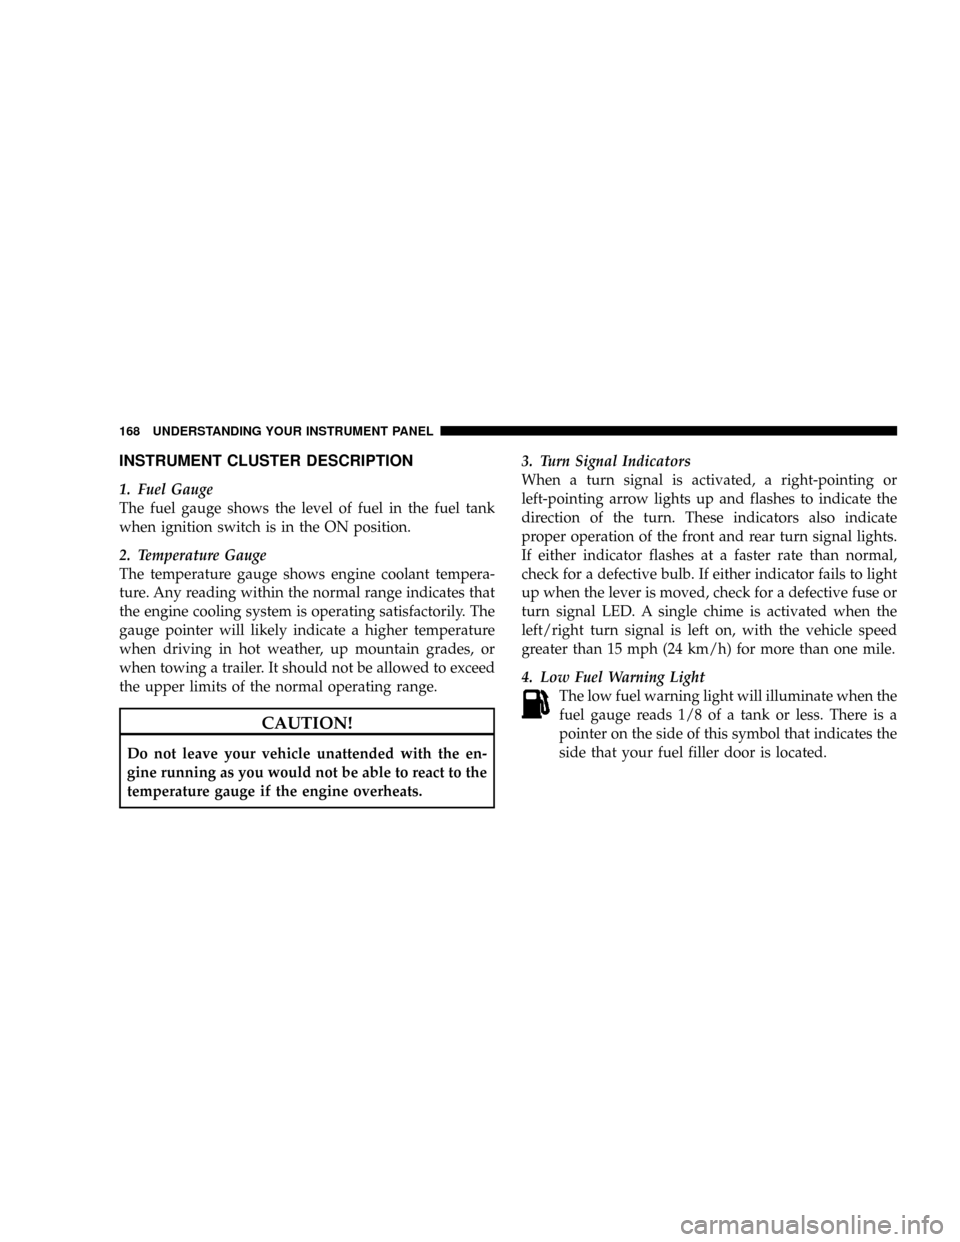
INSTRUMENT CLUSTER DESCRIPTION
1. Fuel Gauge
The fuel gauge shows the level of fuel in the fuel tank
when ignition switch is in the ON position.
2. Temperature Gauge
The temperature gauge shows engine coolant tempera-
ture. Any reading within the normal range indicates that
the engine cooling system is operating satisfactorily. The
gauge pointer will likely indicate a higher temperature
when driving in hot weather, up mountain grades, or
when towing a trailer. It should not be allowed to exceed
the upper limits of the normal operating range.
CAUTION!
Do not leave your vehicle unattended with the en-
gine running as you would not be able to react to the
temperature gauge if the engine overheats.3. Turn Signal Indicators
When a turn signal is activated, a right-pointing or
left-pointing arrow lights up and flashes to indicate the
direction of the turn. These indicators also indicate
proper operation of the front and rear turn signal lights.
If either indicator flashes at a faster rate than normal,
check for a defective bulb. If either indicator fails to light
up when the lever is moved, check for a defective fuse or
turn signal LED. A single chime is activated when the
left/right turn signal is left on, with the vehicle speed
greater than 15 mph (24 km/h) for more than one mile.
4. Low Fuel Warning Light
The low fuel warning light will illuminate when the
fuel gauge reads 1/8 of a tank or less. There is a
pointer on the side of this symbol that indicates the
side that your fuel filler door is located.
168 UNDERSTANDING YOUR INSTRUMENT PANEL
Page 171 of 449
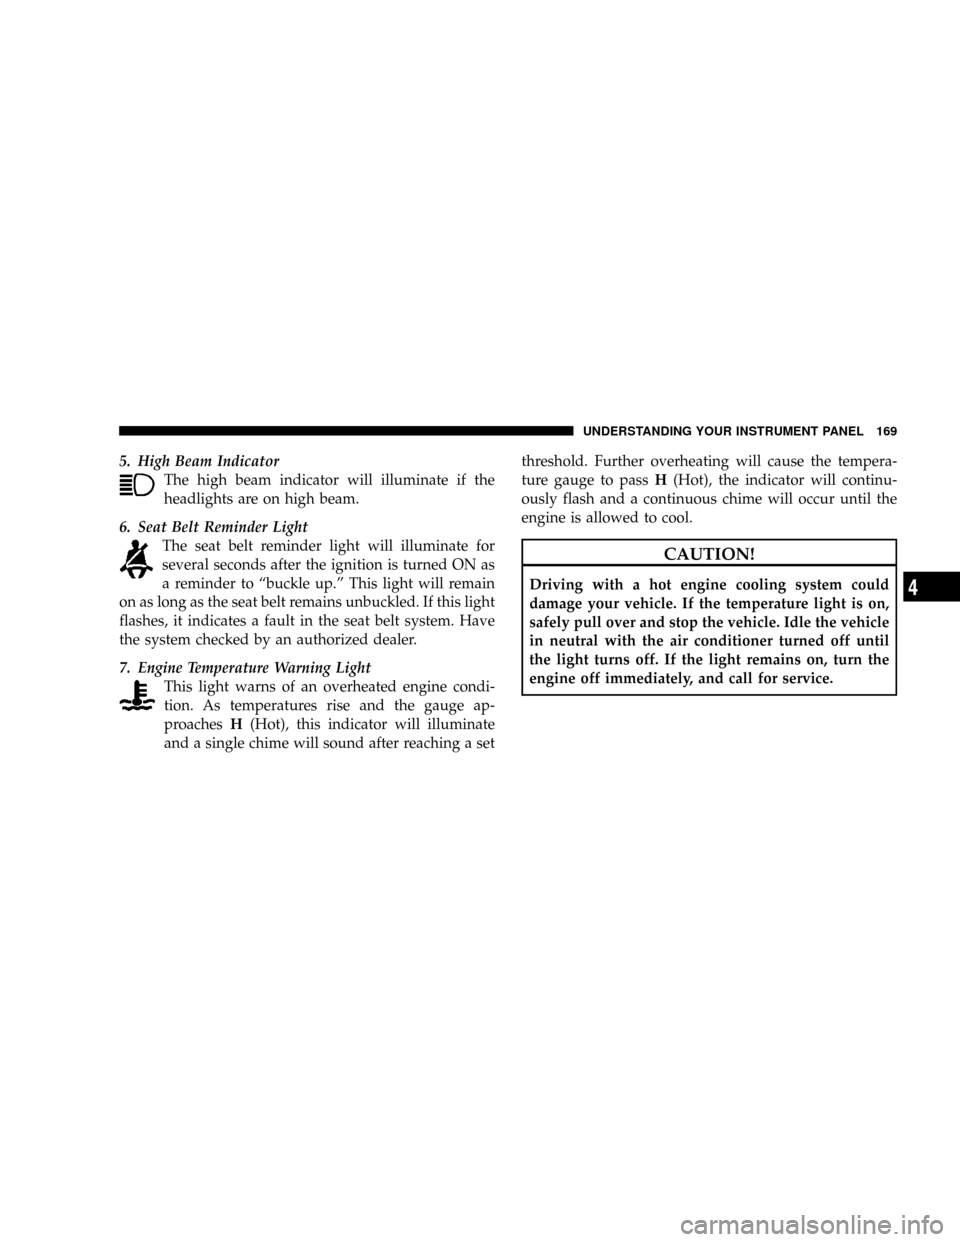
5. High Beam Indicator
The high beam indicator will illuminate if the
headlights are on high beam.
6. Seat Belt Reminder Light
The seat belt reminder light will illuminate for
several seconds after the ignition is turned ON as
a reminder to ªbuckle up.º This light will remain
on as long as the seat belt remains unbuckled. If this light
flashes, it indicates a fault in the seat belt system. Have
the system checked by an authorized dealer.
7. Engine Temperature Warning Light
This light warns of an overheated engine condi-
tion. As temperatures rise and the gauge ap-
proachesH(Hot), this indicator will illuminate
and a single chime will sound after reaching a setthreshold. Further overheating will cause the tempera-
ture gauge to passH(Hot), the indicator will continu-
ously flash and a continuous chime will occur until the
engine is allowed to cool.
CAUTION!
Driving with a hot engine cooling system could
damage your vehicle. If the temperature light is on,
safely pull over and stop the vehicle. Idle the vehicle
in neutral with the air conditioner turned off until
the light turns off. If the light remains on, turn the
engine off immediately, and call for service.
UNDERSTANDING YOUR INSTRUMENT PANEL 169
4
Page 172 of 449
WARNING!
A hot engine cooling system is dangerous. You or
others could be badly burned by steam or boiling
coolant. You may want to call a service center if your
vehicle overheats. If you decide to look under the
hood yourself, see Section 7 of this manual. Follow
the warnings under the Cooling System Pressure Cap
paragraph.
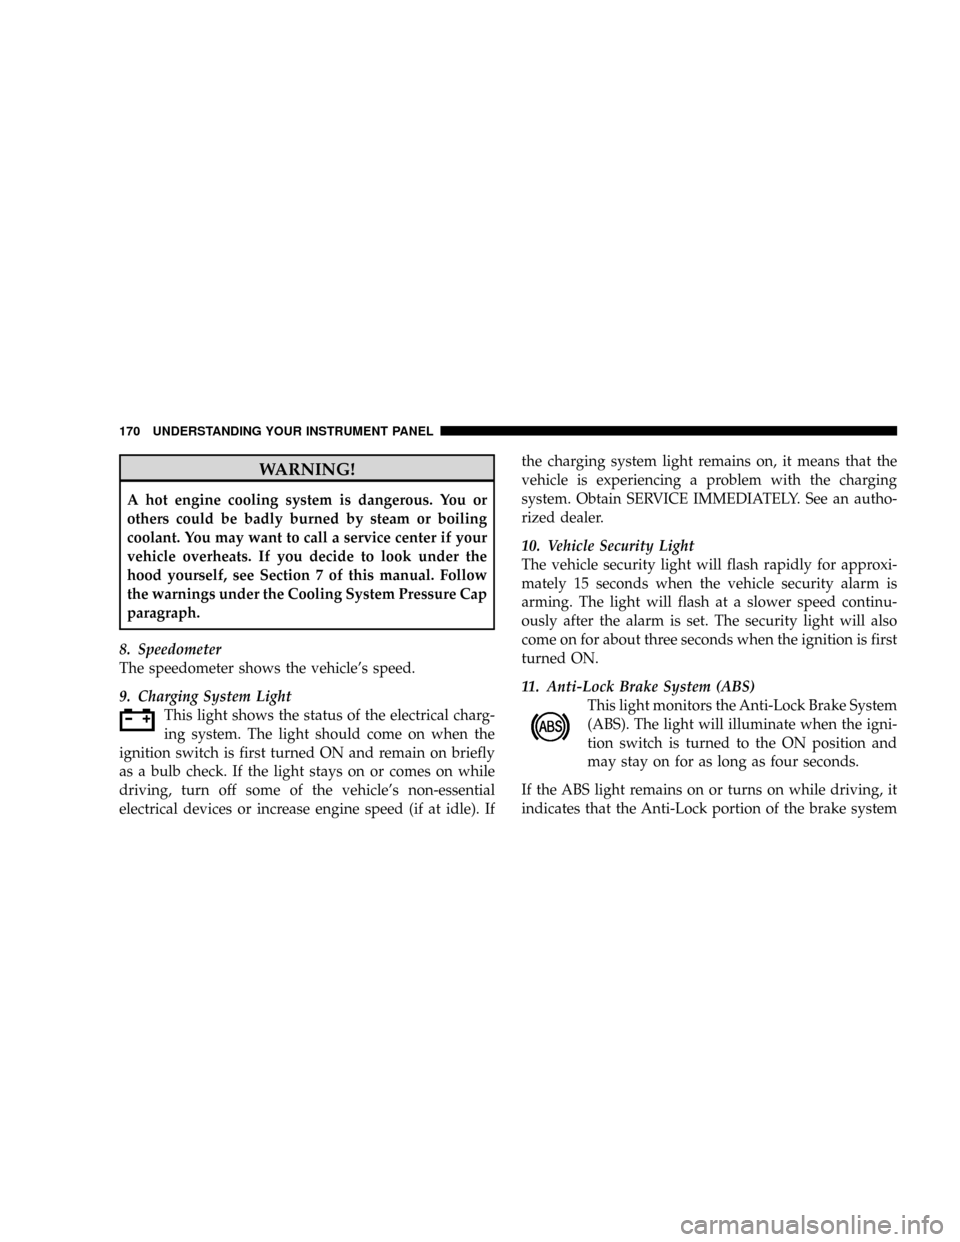
8. Speedometer
The speedometer shows the vehicle's speed.
9. Charging System Light
This light shows the status of the electrical charg-
ing system. The light should come on when the
ignition switch is first turned ON and remain on briefly
as a bulb check. If the light stays on or comes on while
driving, turn off some of the vehicle's non-essential
electrical devices or increase engine speed (if at idle). Ifthe charging system light remains on, it means that the
vehicle is experiencing a problem with the charging
system. Obtain SERVICE IMMEDIATELY. See an autho-
rized dealer.
10. Vehicle Security Light
The vehicle security light will flash rapidly for approxi-
mately 15 seconds when the vehicle security alarm is
arming. The light will flash at a slower speed continu-
ously after the alarm is set. The security light will also
come on for about three seconds when the ignition is first
turned ON.
11. Anti-Lock Brake System (ABS)
This light monitors the Anti-Lock Brake System
(ABS). The light will illuminate when the igni-
tion switch is turned to the ON position and
may stay on for as long as four seconds.
If the ABS light remains on or turns on while driving, it
indicates that the Anti-Lock portion of the brake system
170 UNDERSTANDING YOUR INSTRUMENT PANEL
Page 232 of 449
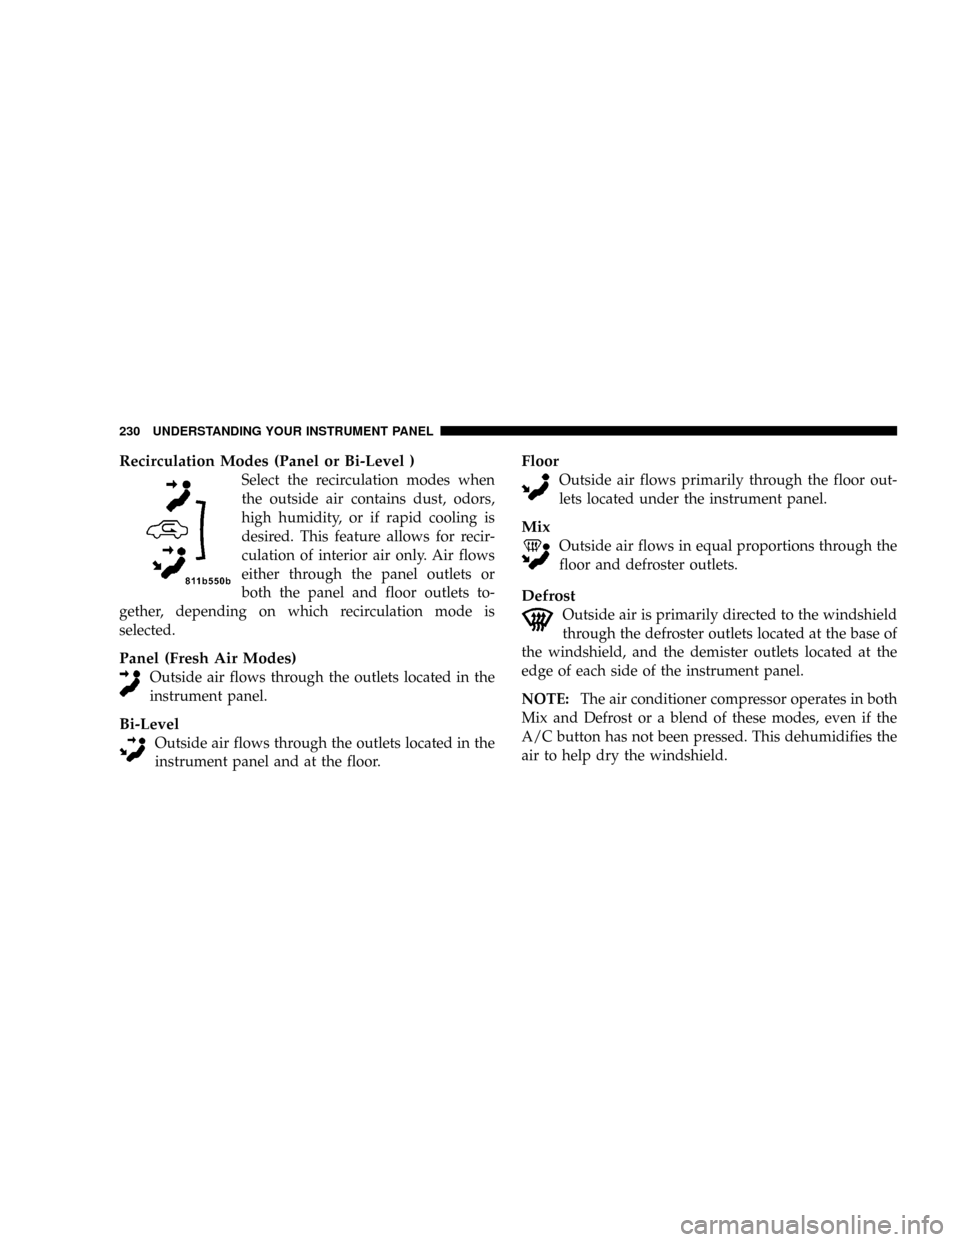
Recirculation Modes (Panel or Bi-Level )
Select the recirculation modes when
the outside air contains dust, odors,
high humidity, or if rapid cooling is
desired. This feature allows for recir-
culation of interior air only. Air flows
either through the panel outlets or
both the panel and floor outlets to-
gether, depending on which recirculation mode is
selected.
Panel (Fresh Air Modes)
Outside air flows through the outlets located in the
instrument panel.
Bi-Level
Outside air flows through the outlets located in the
instrument panel and at the floor.
Floor
Outside air flows primarily through the floor out-
lets located under the instrument panel.
Mix
Outside air flows in equal proportions through the
floor and defroster outlets.
Defrost
Outside air is primarily directed to the windshield
through the defroster outlets located at the base of
the windshield, and the demister outlets located at the
edge of each side of the instrument panel.
NOTE:The air conditioner compressor operates in both
Mix and Defrost or a blend of these modes, even if the
A/C button has not been pressed. This dehumidifies the
air to help dry the windshield.
230 UNDERSTANDING YOUR INSTRUMENT PANEL
Page 235 of 449
As the temperature gets colder it may be necessary to
direct air onto the windshield by using MIX Mode
position on the control. Adjust the temperature control
and blower speed to maintain comfort. High blower
speeds will reduce fogging. Interior fogging on the
windshield can be quickly removed by selecting the
defrost mode.
Regular cleaning of the inside of the windows with a
non-filming cleaning solution (vinegar and water works
very well) will help prevent contaminates (cigarette
smoke, perfumes, etc.) from sticking to the windows.
Contaminates on the inside of windows can increase the
rate of window fogging.
Summer Operation
Air conditioned vehicles must be protected with a high
quality antifreeze coolant during summer, to provide
proper corrosion protection and to raise the boiling point
of the coolant for protection against overheating. A 50%concentration of engine coolant to distilled water is
recommended. Refer to ªCooling Systemº under ªMain-
tenance Proceduresº in Section 7.
When using the air conditioner in extremely heavy
traffic, in hot weather, especially when towing a trailer,
additional engine cooling may be required. If this situa-
tion is encountered, operate the transmission in a lower
gear and set the air conditioner to recirculation mode.
Operating the air conditioner in recirculation mode pro-
vides the maximum performance from your air condi-
tioning. When stopped in heavy traffic, it may be neces-
sary to shift into NEUTRAL and depress the accelerator
slightly for fast idle operation.
Winter Operation
When operating the system during the winter months,
make sure the air intake, located directly in front of the
windshield, is free of ice, slush, snow, or other obstruc-
tions. This will help prevent snow going into the ducts.
UNDERSTANDING YOUR INSTRUMENT PANEL 233
4
Page 325 of 449

þWhen using the speed control, if you experience speed
drops greater than 10 mph (16 km/h), disengage until
you can resume cruising speed.
þUse speed control in flat terrain and with light loads to
maximize fuel efficiency.
Towing Tips Ð Cooling System
To reduce potential for engine and transmission over-
heating, take the following actions:
þCity Driving
When stopped for short periods of time, put transmission
in NEUTRAL and increase engine idle speed.
þHighway Driving
Reduce speed.
þAir Conditioning
Turn off temporarily.
SNOWPLOW
Snow plows, winches, and other aftermarket equipment
shouldnotbe added to the front end of your vehicle. The
airbag crash sensors may be affected by the change in the
front end structure. The airbags could deploy unexpect-
edly or could fail to deploy during a collision.
WARNING!
Do not add a snow plow, winches, or any other
aftermarket equipment to the front of your vehicle.
This could adversely affect the functioning of the
airbag system and you could be injured.
STARTING AND OPERATING 323
5
Page 352 of 449
NExhaust System...................... 363
NCooling System...................... 366
NBrake System....................... 371
NClutch Hydraulic System............... 372
NManual Transmission.................. 372
NAutomatic Transmission................ 372
NTransfer Case....................... 375
NAxles............................. 375
NAppearance Care And Protection From
Corrosion.......................... 376
mFuses.............................. 381
NUnderhood Fuses (Power Distribution
Center)............................ 381
mVehicle Storage....................... 386mReplacement Light Bulbs................. 387
mBulb Replacement..................... 387
NHeadlight (Halogen)/Front Park And Turn
Lights............................. 387
NRear Side Marker, Taillamps/Stop Lamps,
And Turn Signal Bulbs Ð Replacement..... 389
NCenter High-Mounted Stop Light And Cargo
Lamp............................. 391
NLicense Lamps...................... 394
NFog Lights......................... 395
mFluids And Capacities................... 396
mFluids, Lubricants And Genuine Parts....... 397
NEngine............................ 397
NChassis............................ 398
350 MAINTAINING YOUR VEHICLE
Page 368 of 449
Cooling System
WARNING!
You or others can be badly burned by hot coolant or
steam from your radiator. If you see or hear steam
coming from under the hood, do not open the hood
until the radiator has had time to cool. Never try to
open a cooling system pressure cap when the radiator
is hot.
Engine Coolant Checks
Check the engine coolant (antifreeze) protection every
12 months (before the onset of freezing weather, where
applicable). If the engine coolant (antifreeze) is dirty or
rusty in appearance, the system should be drained,
flushed and refilled with fresh engine coolant (anti-
freeze). Check the front of the A/C condenser and
radiator for any accumulation of bugs, leaves, etc. If dirty,clean by gently spraying water from a garden hose
vertically down the face of the condenser and radiator.
Check the coolant recovery bottle tubing for brittle rub-
ber, cracking, tears, cuts and tightness of the connection
at the bottle and radiator. Inspect the entire system for
leaks.
With the engine at normal operating temperature (but
not running), check the cooling system pressure cap for
proper vacuum sealing by draining a small amount of
engine coolant (antifreeze) from the radiator drain cock.
If the cap is sealing properly, the engine coolant (anti-
freeze) will begin to drain from the coolant recovery
bottle. DO NOT REMOVE THE COOLANT PRESSURE
CAP WHEN THE COOLING SYSTEM IS HOT.
Cooling System Ð Drain, Flush and Refill
If the engine coolant (antifreeze) is dirty or contains a
considerable amount of sediment, clean and flush with a
reliable cooling system cleaner. Follow with a thorough
366 MAINTAINING YOUR VEHICLE