Page 249 of 534

CAUTION!
The TPMS has been optimized for the original
equipment tires and wheels. TPMS pressures and
warning have been established for the tire size
equipped on your vehicle. Undesirable system opera-
tion or sensor damage may result when using re-
placement equipment that is not of the same size,
type, and/or style. Aftermarket wheels can cause
sensor damage. Do not use tire sealant from a can, or
balance beads if your vehicle is equipped with a
TPMS, as damage to the sensors may result.
26. Electronic Stability Program (ESP) Indicator Light
/ Brake Assist System (BAS) Warning Light
The malfunction lamp for the Electronic Stabil-
ity Program (ESP) is combined with Brake
Assist System (BAS). The yellow “ESP/BAS
Warning Lamp” comes on when the ignitionswitch is turned to the “ON” position. They should go
out with the engine running. If the “ESP/BAS Warning
Lamp” comes on continuously with the engine running,
a malfunction has been detected in either the ESP or the
BAS system. If this light remains on after several ignition
cycles, and the vehicle has been driven several miles/
kilometers at speeds greater than 30 mph (48 km/h), see
an authorized dealer as soon as possible.
27. Compass Mini-Trip Computer (CMTC) Reset
Button
Press the reset button to scroll through sub menus (i.e.,
Outside Temperature, Trip Functions: AVG Fuel
Economy, DTE, Elapsed Time, and Units. Press and hold
the reset button for approximately two seconds to reset
the display shown.
NOTE:For more detailed operation, refer to “Compass
Mini-Trip Computer” later in this section.
UNDERSTANDING YOUR INSTRUMENT PANEL 247
4
ProCarManuals.com
Page 253 of 534

NOTE:Magnetic and battery powered devices, (such as
cell phones, IPOD’s, radar detectors, PDA’s and laptops)
should be kept away from the top of the instrument
panel. This is where the compass module is located and
such devices may interfere and cause false compass
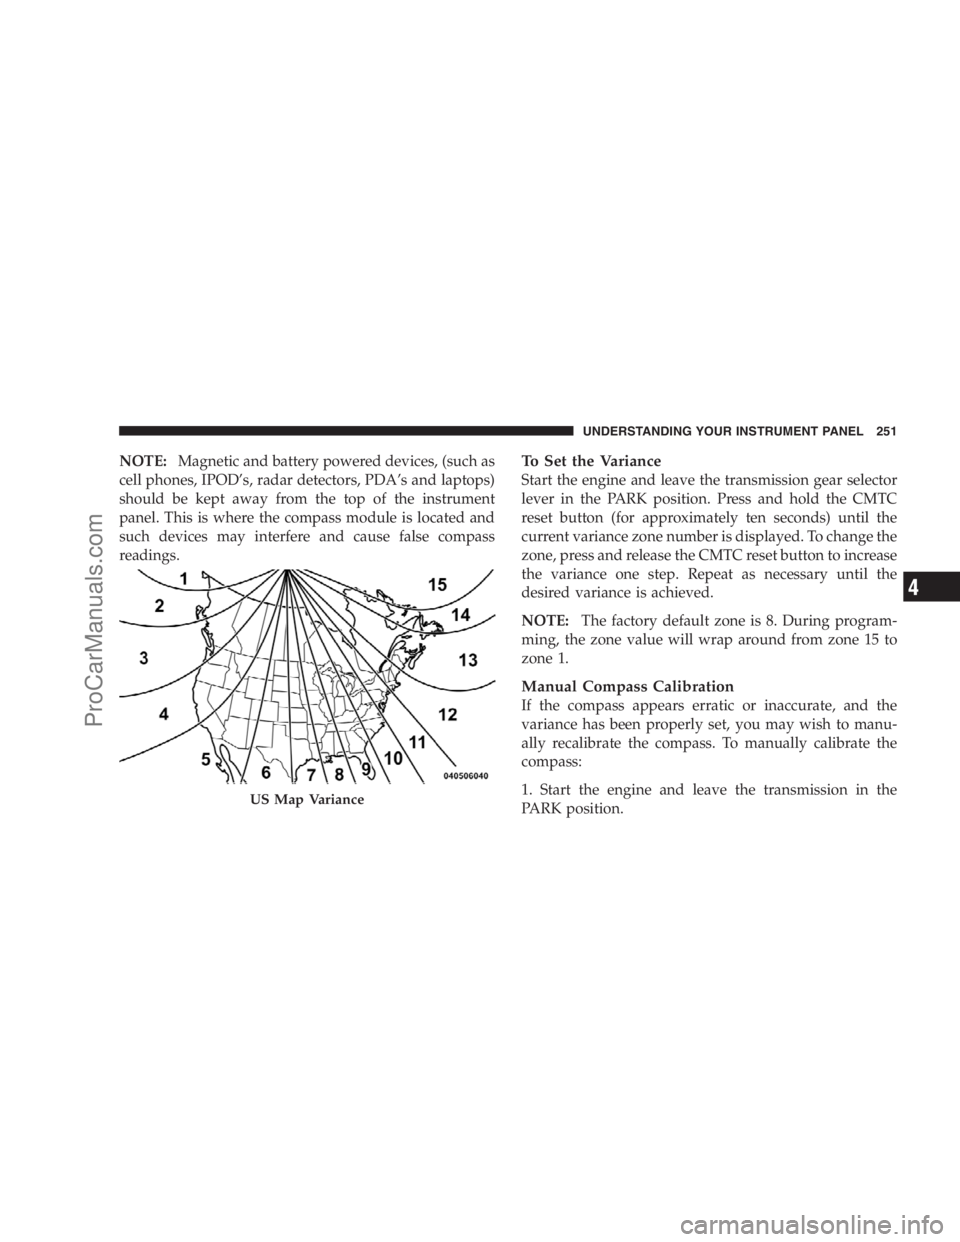
readings.To Set the Variance
Start the engine and leave the transmission gear selector
lever in the PARK position. Press and hold the CMTC
reset button (for approximately ten seconds) until the
current variance zone number is displayed. To change the
zone, press and release the CMTC reset button to increase
the variance one step. Repeat as necessary until the
desired variance is achieved.
NOTE:The factory default zone is 8. During program-
ming, the zone value will wrap around from zone 15 to
zone 1.
Manual Compass Calibration
If the compass appears erratic or inaccurate, and the
variance has been properly set, you may wish to manu-
ally recalibrate the compass. To manually calibrate the
compass:
1. Start the engine and leave the transmission in the
PARK position.
US Map Variance
UNDERSTANDING YOUR INSTRUMENT PANEL 251
4
ProCarManuals.com
Page 257 of 534

•Right Rear Turn Signal Light Out
•Park Assist Disabled
•Service Park Assist System
•Personal Settings Not Available — Vehicle Not in Park
Oil Change Required
Your vehicle is equipped with an engine oil change
indicator system. TheOil Change Requiredmessage will
flash in the EVIC display for approximately 10 seconds,
after a single chime has sounded, to indicate the next
scheduled oil change interval. The engine oil change
indicator system is duty-cycle based, which means the
engine oil change interval may fluctuate dependent upon
your personal driving style.
Unless reset, this message will continue to display each
time you turn the ignition switch to the ON/RUN
position. To turn off the message temporarily, press andrelease the Menu button. To reset the oil change indicator
system (after performing the scheduled maintenance)
perform the following steps.
1. Turn the ignition switch to the ON position (do not
start the engine).
2. Fully depress the accelerator pedal, slowly, three times
within 10 seconds.
3. Turn the ignition switch to the OFF/LOCK position.
NOTE:If the indicator message illuminates when you
start the engine, the oil change indicator system did not
reset. If necessary, repeat these steps.
Trip Functions
Press and release the MENU button until one of the
following Trip Functions displays in the EVIC.
Press the STEP button to scroll through all the Trip
Computer functions.
UNDERSTANDING YOUR INSTRUMENT PANEL 255
4
ProCarManuals.com
Page 308 of 534
NOTE:For maximum airflow to the rear, the center
instrument panel outlets can be directed toward the rear
seat passengers.
Economy Mode
If ECONOMY mode is desired, press the A/C button to
turn off the indicator light and the A/C compressor.
Rotate the temperature control knob to the desired
temperature.
Air Conditioning Operation
Push on this button to engage the Air
Conditioning (A/C). A light will illu-
minate when the A/C System is en-
gagedNOTE:The air conditioning compressor will not engage
until the engine has been running for about 10 seconds.
Max A/C
For maximum cooling use the A/C and RECIRCULA-
TION mode buttons at the same time.
Three-Zone Basic Temperature Control — If
Equipped
With the Three-Zone Basic Temperature Control System,
each front seat occupant can independently control the
Heating, Ventilation, and Air Conditioning (HVAC) op-
erations coming from the outlets on their side of the
vehicle.
306 UNDERSTANDING YOUR INSTRUMENT PANEL
ProCarManuals.com
Page 315 of 534

NOTE:
•It is not necessary to move the temperature settings for
cold or hot vehicles. The system automatically adjusts
the temperature, mode and fan speed to provide
comfort as quickly as possible.
•The temperature can be displayed in U.S. or Metric
units by selecting the US/M customer-programmable
feature. Refer to the “Electronic Vehicle Information
Center (EVIC) — Customer-Programmable Features”
in this Section of the manual.
To provide you with maximum comfort in the automatic
mode, during cold start-ups, the blower fan will remain
on low and the DELAY symbol will appear in the front
ATC display, until the engine warms up. The fan will
engage immediately if the DEFROST mode is selected, or
by pressing the Front Upper ATC Panel blower rocker
button and setting the fan to any fixed blower speed.
Manual Operation
This system offers a full complement of manual override
features. The AUTO symbol in the front ATC display will
be turned off when the system is being used in the
manual mode.
NOTE:Each of these features operate independently
from each other. If any one feature is controlled manually,
the temperature doors will continue to operate automati-
cally.
The blower fan speed can be set to any fixed speed by
pressing the Front Upper ATC Panel blower rocker
button. The fan will now operate at a fixed speed until
additional speeds are selected. This allows the front
occupants to control the volume of air circulated in the
vehicle and cancel the AUTO mode.
The operator can also select the direction of the airflow
by selecting one of the following positions.
UNDERSTANDING YOUR INSTRUMENT PANEL 313
4
ProCarManuals.com
Page 320 of 534

Rear Temperature Control
To change the temperature in the rear of the vehicle,
rotate the temperature knob counterclockwise to lower
the temperature, and clockwise to increase the tempera-
ture. The REAR temperature settings are displayed in the
front upper ATC panel.
When rear controls are locked by the front system, the
LOCK symbol on the temperature knob is illuminated
and any rear overhead adjustments are ignored.
Rear Mode Control
Auto Mode
The rear system automatically maintains the correct
mode and comfort level desired by the rear seat occu-
pants.Headliner Mode
Air comes from the outlets in the headliner. Each of
these outlets can be individually adjusted to direct
the flow of air. Moving the air vanes of the outlets to one
side will shut off the airflow.
Bi-Level Mode
Air comes from both the headliner outlets and the
floor outlets.
NOTE:In many temperature positions, the BI-LEVEL
mode is designed to provide cooler air out of the head-
liner outlets and warmer air from the floor outlets.
Floor Mode
Air comes from the floor outlets.
Summer Operation
The engine cooling system in air conditioned vehicles
must be protected with a high-quality antifreeze coolant
318 UNDERSTANDING YOUR INSTRUMENT PANEL
ProCarManuals.com
Page 321 of 534

to provide proper corrosion protection and to protect
against engine overheating. A 50% solution of ethylene
glycol antifreeze coolant in water is recommended. Refer
to “Maintenance Procedures” in Section 7 of this manual
for proper coolant selection.
Winter Operation
To ensure the best possible heater and defroster perfor-
mance, make sure the engine cooling system is function-
ing properly and the proper amount, type, and concen-
tration of coolant is used. Refer to “Maintenance
Procedures” in section 7 of this manual for proper coolant
selection. Use of the air RECIRCULATION mode during
Winter months is not recommended, because it may
cause window fogging.
Vacation/Storage
Anytime you store your vehicle, or keep it out of service
(i.e., vacation) for two weeks or more, run the air
conditioning system at idle for about five minutes, infresh air with the blower setting in high. This will ensure
adequate system lubrication to minimize the possibility
of compressor damage when the system is started again.
Window Fogging
Vehicle windows tend to fog on the inside in mild, rainy
and/or humid weather. To clear the windows, select
DEFROST or MIX mode and increase the front blower
speed. Do not use the RECIRCULATION mode without
A/C for long periods, as fogging may occur.
Outside Air Intake
Make sure the air intake, located directly in front of the
windshield, is free of obstructions such as leaves. Leaves
collected in the air intake may reduce airflow, and if they
enter the plenum they could plug the water drains. In
Winter months make sure the air intake is clear of ice,
slush and snow.
UNDERSTANDING YOUR INSTRUMENT PANEL 319
4
ProCarManuals.com
Page 323 of 534
STARTING AND OPERATING
CONTENTS
�Starting Procedures.................... 324
▫Automatic Transaxle.................. 324
�Engine Block Heater — If Equipped......... 327
�Automatic Transaxle.................... 327
▫Brake/Transaxle Interlock System......... 328
▫Four-Speed Or Six-Speed Automatic
Transaxle.......................... 329
▫Reset Mode - Electronic Transaxle......... 334
�Driving On Slippery Surfaces............. 334▫Acceleration........................ 334
▫Traction........................... 335
�Driving Through Water.................. 335
▫Flowing/Rising Water................. 336
▫Shallow Standing Water................ 336
�Power Steering........................ 338
▫Power Steering Fluid Check............. 338
�Parking Brake........................ 339
5
ProCarManuals.com