Page 115 of 534
, to o")
RCP monitors the rear detection zones on both sides of
the vehicle, for objects that are moving toward the side of
the vehicle with a minimum speed of approximately 1 to
2 mph (1 km/h to 3 km/h), to objects moving a maxi-
mum of approximately 10 mph (16 km/h), such as in
parking lot situations.NOTE:In a parking lot situation, oncoming vehicles can
be obscured by vehicles parked on either side. If the
sensors are blocked by other structures or vehicles, the
system will not be able to alert the driver.
When RCP is on and the vehicle is in REVERSE, the
driver is alerted using both the visual and audible
alarms, including radio muting.
WARNING!
RCP is not a Back Up Aid system. It is intended to be
used to help a driver detect an oncoming vehicle in a
parking lot situation. Drivers must be careful when
backing up, even when using RCP. Always check
carefully behind your vehicle, look behind you, and
be sure to check for pedestrians, animals, other
vehicles, obstructions, and blind spots before back-
ing up. Failure to do so can result in serious injury or
death.
RCP Detection Zones
UNDERSTANDING THE FEATURES OF YOUR VEHICLE 113
3
ProCarManuals.com
Page 118 of 534

UConnect�allows you to transfer calls between the
system and your cellular phone as you enter or exit your
vehicle and enables you to mute the system’s microphone
for private conversation.
The UConnect�system is driven through your
Bluetooth�“Hands-Free profile” cellular phone.
UConnect�features Bluetooth�technology - the global
standard that enables different electronic devices to con-
nect to each other without wires or a docking station, so
UConnect�works no matter where you stow your cellu-
lar phone (be it your purse, pocket, or briefcase), as long
as your phone is turned on and has been paired to the
vehicle’s UConnect�system. The UConnect�system
allows up to seven cellular phones to be linked to the
system. Only one linked (or paired) cellular phone can be
used with the system at a time. The system is available in
English, Spanish, or French languages.Phone Button
The rearview mirror contains the microphone
for the system (depending on the type of
mirror and radio equipped), and either the
radio or the mirror has the two control buttons
(PHONE Button and VOICE RECOGNITION button)
that will enable you to access the system.
Voice Recognition Button
Actual button location may vary with radio.
The individual buttons are described in the
“Operation” section.
The UConnect�system can be used with any Hands-Free
Profile certified Bluetooth�cellular phone. See the
UConnect�website for supported phones. If your cellu-
lar phone supports a different profile (e.g., Headset
Profile) you may not be able to use any UConnect�
features. Refer to your cellular service provider or the
phone manufacturer for details.
116 UNDERSTANDING THE FEATURES OF YOUR VEHICLE
ProCarManuals.com
Page 131 of 534
. The number dialed may
not be applicable with the available cellular service
and area.
•If supported, this number may be programmable on
some systems. To do this, press �")
Canada and 060 for Mexico). The number dialed may
not be applicable with the available cellular service
and area.
•If supported, this number may be programmable on
some systems. To do this, press ‘Phone’ button and say
‘Setup’, followed by ‘Emergency’.
•The UConnect�system does slightly lower your
chances of successfully making a phone call as to that
for the cell phone directly.
WARNING!
Your phone must be turned on and paired to the
UConnect�system to allow use of this vehicle feature
in emergency situations, when the cell phone has
network coverage and stays paired to the UConnect�
system.
Towing Assistance
If you need towing assistance:
•Press the PHONE button to begin.
•After the�Ready�prompt and the following beep, say
�Towing Assistance.�
NOTE:
•The Towing Assistance number dialed is based on the
country where the vehicle is purchased (1-800-528-
2069 for the U.S., 1-877-213-4525 for Canada, 55-14-
3454 for Mexico City and 1-800-712-3040 for outside
Mexico City in Mexico).
•If supported, this number may be programmable on
some systems. To do this, press ‘Phone’ button and say
‘Setup’, followed by ‘Towing Assistance’.
Paging
To learn how to page, refer to�Working with Automated
Systems.�Paging works properly except for pagers of
UNDERSTANDING THE FEATURES OF YOUR VEHICLE 129
3
ProCarManuals.com
Page 144 of 534
Voice Commands
Primary Alternate(s)
language
list names
list phones
mobile
mute
mute off
new entry
no
pager
pair a phone
phone pairing pairing
phonebook phone book
previous
record again
redialVoice Commands
Primary Alternate(s)
return to main menu return or main menu
select phone select
send
set up phone settings or phone
set up
towing assistance
transfer call
UConnect�Tutorial
try again
voice training
work
yes
142 UNDERSTANDING THE FEATURES OF YOUR VEHICLE
ProCarManuals.com
Page 151 of 534
WARNING!
DO NOT ride with the seatback reclined so that the
shoulder belt is no longer resting against your chest.
In a collision you could slide under the seat belt and
be seriously or fatally injured. Use the recliner only
when the vehicle is parked.
Manual Lumbar Adjust Lever — If Equipped
The lumbar adjustment lever is located on the outboard
side of the seat. To increase the support, rotate the lever
downward. To decrease the support, rotate the handle
upward.
Stow ’n Go Seating — If Equipped
On vehicles equipped with Stow ’n Go seating, the
second and third row seats may be folded into the floor
for convenient storage.
Manual Lumbar Lever
UNDERSTANDING THE FEATURES OF YOUR VEHICLE 149
3
ProCarManuals.com
Page 155 of 534
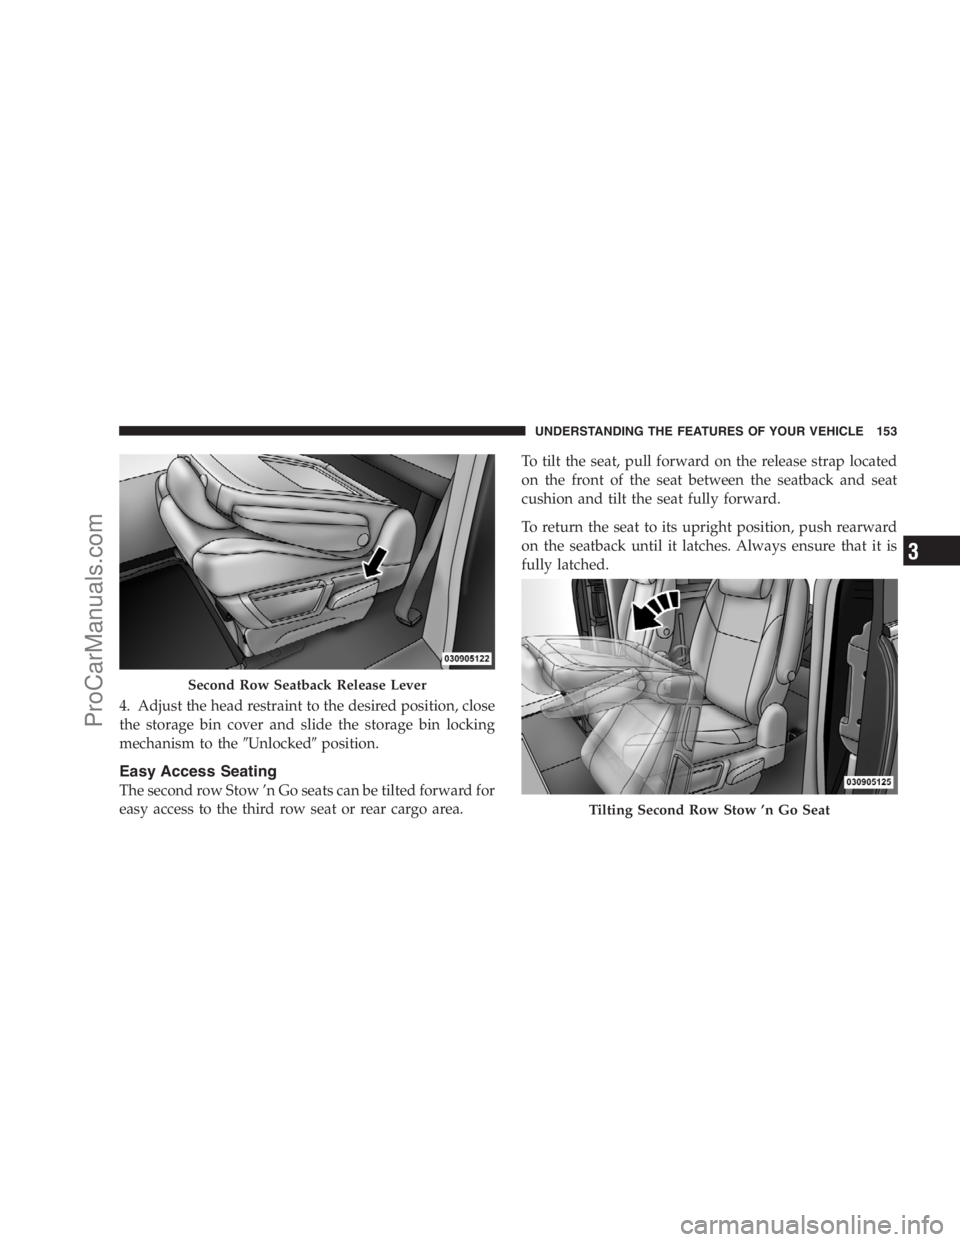
4. Adjust the head restraint to the desired position, close
the storage bin cover and slide the storage bin locking
mechanism to the�Unlocked�position.
Easy Access Seating
The second row Stow ’n Go seats can be tilted forward for
easy access to the third row seat or rear cargo area.To tilt the seat, pull forward on the release strap located
on the front of the seat between the seatback and seat
cushion and tilt the seat fully forward.
To return the seat to its upright position, push rearward
on the seatback until it latches. Always ensure that it is
fully latched.
Second Row Seatback Release Lever
Tilting Second Row Stow ’n Go Seat
UNDERSTANDING THE FEATURES OF YOUR VEHICLE 153
3
ProCarManuals.com
Page 156 of 534
WARNING!
In the event of a collision you could be injured if the
seat is not fully latched.
Swivel ’n Go Premium Seating — If Equipped
Premium second row Swivel ’n Go Seating features
include:
•A table that installs between the second and third row
seats. The table disassembles and stows in the hidden
second row floor storage bin
•Seats rotate to face forward or rearward
•Seat belts are integrated into the swivel seats
•Dual folding armrests
•A side storage pocket that will accommodate a phone
or handheld game
•Seats are removable
To swivel the seat: Pull the lower handle on the outboard
side of the seat and push the side of the seatback to begin
Swivel ’n Go Seating Features
1 — Moveable Armrest 4 — Fore-Aft Adjustment
2 — Seatback Release 5 — Seat Release
3 — Swivel Release 154 UNDERSTANDING THE FEATURES OF YOUR VEHICLE
ProCarManuals.com
Page 158 of 534
WARNING! (Continued)
•Occupants riding in Swivel ’n Go seating must be
wearing their seat belt and the seat must be locked
in either the forward-facing or rearward-facing
position.
•Make sure the Swivel ’n Go seat is in a locked
position with the release handle fully engaged.
Test the seat after it is locked to see that it doesn’t
swivel.
Removing Swivel ’n Go Premium Seating — If
Equipped
1. Remove any obstructions from the floor behind the
seat, and stow the third row seat.
2. Pull up on the release bar located at the bottom front
edge of the swivel seat.3. From behind the seat, lift up on the rear of the seat
cushion while pulling the seat in a rearward direction.
4. Remove the seat from vehicle through the liftgate.
Rollers are part of the seat frame and will ease the
removal process.
Release Bar
156 UNDERSTANDING THE FEATURES OF YOUR VEHICLE
ProCarManuals.com

language
list names
list phones
mobile
mute
mute off
new entry
no
pager
pair a phone
phone pairing pairing
phonebook phone book
previous
record again
redialVoice Co")


•Occupants riding in Swivel ’n Go seating must be
wearing their seat belt and the seat must be locked
in either the forward-facing or rearward-facing
position.
•Make sure th")