Page 163 of 534
Plastic Grocery Bag Retainer Hooks
Retainer hooks which will hold plastic grocery bag
handles are built into the seatbacks of all rear seats and
some front seats. The floor supports the partial weight of
the bagged goods.
Second Row Bench Seat — If Equipped
While the bench seat does not stow in the floor, it is
removable for added cargo space. Release levers are
located on the rear leg assemblies, near the floor. To
remove the seat, squeeze each release handle and rotate
downwards to deploy the wheels. A lock indicator button
pops up when the seat is unlocked. The seat assembly
can now be removed from the vehicle and moved on its
Easy Out�Rollers.To reinstall the seat, align the seat into the detent posi-
tions on the floor. Squeeze the release handle and rotate
upward until the lock indicator button returns into the
handle.
Release Handles
UNDERSTANDING THE FEATURES OF YOUR VEHICLE 161
3
ProCarManuals.com
Page 164 of 534
WARNING!
If not properly latched, the bench seats could become
loose. Personal injuries could result. After reinstall-
ing these seats, be sure the red indicator button on
the release handles return into the handles.
Third Row Power Seat — If Equipped
The third row power seat offers the following features:
•The seatbacks can be folded forward for additional
cargo space if needed.
•Head restraints can be stowed with the seat.
•Tailgate mode flips the seat rearward to face out the
tailgate.
The power recline feature, located on the side of the seat
cushion, adjusts the seatback angle forward/rearward
for occupant comfort.Third Row Power Seat Switch — If Equipped
A one-touch power folding seat switch is located in the
left rear trim panel as part of a switch bank.
Third Row Power Seat Switch
162 UNDERSTANDING THE FEATURES OF YOUR VEHICLE
ProCarManuals.com
Page 165 of 534
The rear switch bank allows multiple power folding and
unfolding positions for the third row seats.
Left and right third row seats can be folded individually
or together. The third row power folding seat adjusts to
the following positions using the switch bank located on
the left rear trim panel:NOTE:The third row power seat system includes
obstacle detection for safe operation. When the system
detects an obstacle, the motors will stop and reverse the
One Touch Folding Seat Third RowRear Panel Power Switch Bank
1 — Open to Normal 4 — Fold Flat
2 — Stow 5 — Right/Left Seats
3 — Tailgate 5 — Both SeatsUNDERSTANDING THE FEATURES OF YOUR VEHICLE 163
3
ProCarManuals.com
Page 181 of 534

High Beam/Low Beam Select Switch
When the headlights are turned on, pushing the multi-
function lever toward the instrument panel will switch
from Low beams to High beams. Pulling back to the
neutral position returns the headlights to the Low beam
operation.
Flash-To-Pass
You can signal another vehicle with your headlights by
lightly pulling the multifunction lever toward you. This
will cause the headlights to turn on at High beam and
remain on until the multifunction lever is released.
WINDSHIELD WIPER AND WASHERS
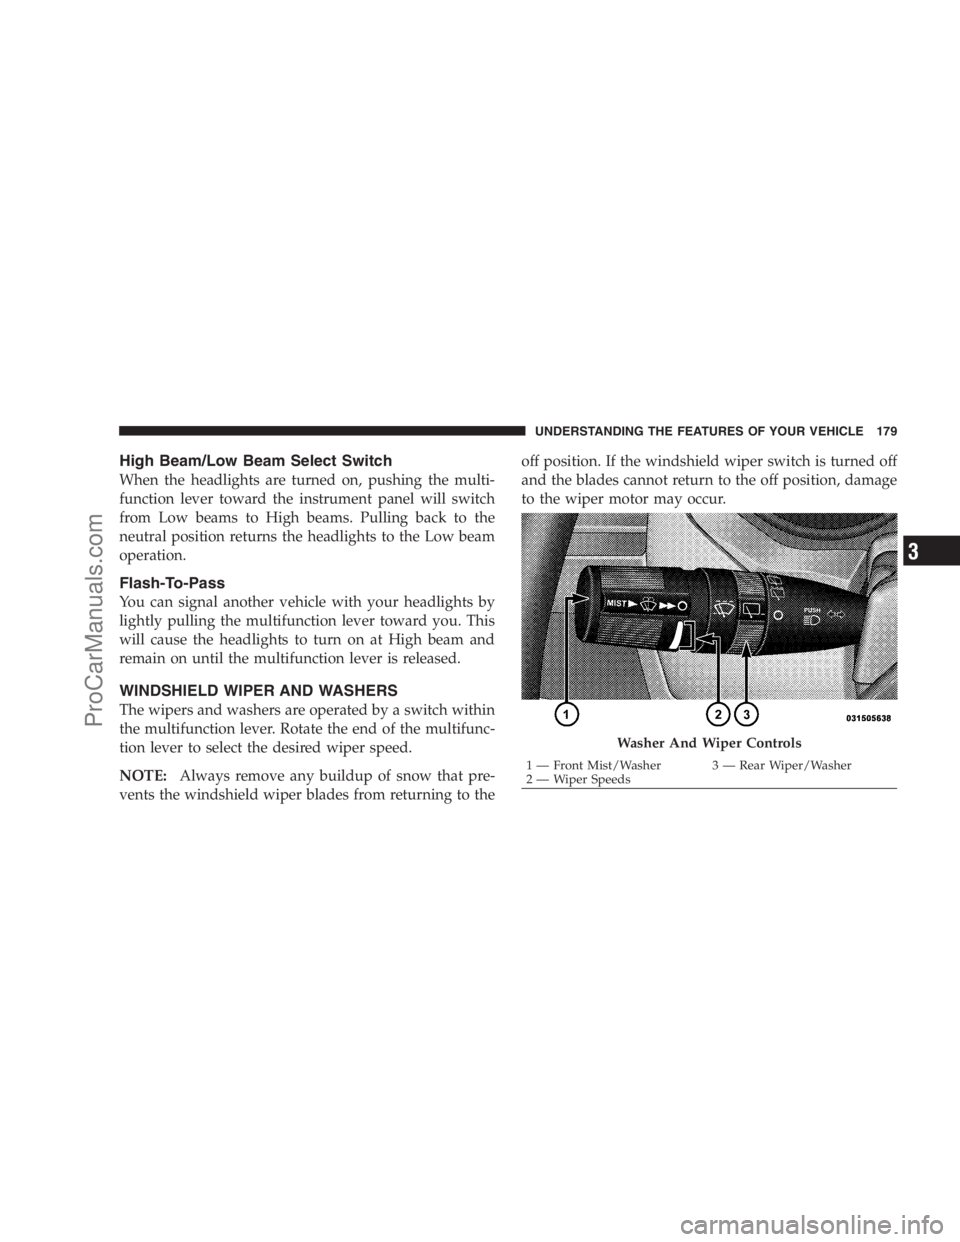
The wipers and washers are operated by a switch within
the multifunction lever. Rotate the end of the multifunc-
tion lever to select the desired wiper speed.
NOTE:Always remove any buildup of snow that pre-
vents the windshield wiper blades from returning to theoff position. If the windshield wiper switch is turned off
and the blades cannot return to the off position, damage
to the wiper motor may occur.
Washer And Wiper Controls
1 — Front Mist/Washer 3 — Rear Wiper/Washer
2 — Wiper SpeedsUNDERSTANDING THE FEATURES OF YOUR VEHICLE 179
3
ProCarManuals.com
Page 184 of 534
ADJUSTABLE PEDALS — IF EQUIPPED
This feature allows both the brake and accelerator pedals
to move toward, or away, from the driver to provideimproved position with the steering wheel. The adjust-
able pedal system is designed to allow a greater range of
driver comfort for steering wheel tilt and seat positions.
The switch is located on the left side of the steering
column.
Tilt Steering Column Lever
1 — Closed
2 — Opened
Adjustable Pedal Switch
182 UNDERSTANDING THE FEATURES OF YOUR VEHICLE
ProCarManuals.com
Page 185 of 534

Press the button forward to move the pedals forward
(toward the front of the vehicle).
Press the button rearward to move the pedals rearward
(toward the driver).
•The pedals can be adjusted with the ignition OFF.
•The pedals can be adjusted while driving.
•The pedalscannotbe adjusted when the vehicle is in
REVERSE or when the Electronic Speed Control Sys-
tem is on. The following messages will be displayed
on vehicles equipped with the Electronic Vehicle In-
formation System (EVIC) if the pedals are attempted to
be adjusted when the system is locked out (“Adjust-
able Pedal Disabled — Cruise Control Engaged” or
“Adjustable Pedal Disabled — Vehicle In Reverse”.
CAUTION!
Do not place any article under the adjustable pedals
or impede its ability to move, as it may cause damage
to the pedal controls. Pedal travel may become lim-
ited if movement is stopped by an obstruction in the
adjustable pedal’s path.
ELECTRONIC SPEED CONTROL — IF EQUIPPED
When engaged, Electronic Speed Control takes over the
accelerator operation at speeds greater than 25 mph
(40 km/h).
UNDERSTANDING THE FEATURES OF YOUR VEHICLE 183
3
ProCarManuals.com
Page 187 of 534

Deactivating Electronic Speed Control
A soft tap on the brake pedal or pulling the Electronic
Speed Control lever (CANCEL) toward you will deacti-
vate the Electronic Speed Control without erasing the set
speed memory. Pushing the ON/OFF button to the OFF
position or turning OFF the ignition erases the set speed
memory.
Resuming Speed
To resume a previously set speed, raise the Electronic
Speed Control lever (RESUME/ACCEL) upward, and
release. Resume can be used at any speed above 25 mph
(40 km/h).
Varying The Speed Setting
When the Electronic Speed Control is SET, speed can be
increased by raising and holding the RESUME/ACCEL
lever upwards. When released, a new set speed will be
established.Raising the RESUME/ACCEL lever upward, once, will
result in a 1 mph (1 km/h) speed increase. Each time the
lever is tapped upward speed increases, so tapping the
Electronic Speed Control lever three times will increase
speed by 3 mph (5 km/h), etc.
To decrease speed while speed control is set, press the
SET/DECEL lever downward, and hold. Release the
Electronic Speed Control lever when the desired speed is
reached, and the new speed will be set.
Tapping the SET/DECEL lever downward, once, will
result in a 1 mph (1 km/h) speed decrease. Each time the
Electronic Speed Control lever is tapped downward,
speed decreases.
NOTE:In order to ensure proper operation the Elec-
tronic Speed Control system has been designed to shut
down if multiple speed control switch functions are
operated simultaneously. If this occurs, the Electronic
UNDERSTANDING THE FEATURES OF YOUR VEHICLE 185
3
ProCarManuals.com
Page 192 of 534

WARNING!
•Drivers must be careful when backing up, even
when using the Rear Park Assist System. Always
check carefully behind your vehicle, and be sure to
check for pedestrians, animals, other vehicles, ob-
structions, or blind spots before backing up. You
are responsible for the safety of your surroundings
and must continue to pay attention while backing
up. Failure to do so can result in serious injury or
death.
(Continued)
WARNING! (Continued)
•Before using the Rear Park Assist system, it is
strongly recommended that the ball mount and
hitch ball assembly be disconnected from the
vehicle, when the vehicle is not used for towing.
Failure to do so can result in injury or damage to
vehicles or obstacles, because the hitch ball will be
much closer to the obstacle than the rear fascia
when the warning display turns the red LEDs on.
Also, the sensors could detect the ball mount and
hitch ball assembly, depending on its size and
shape, giving a false indication that an obstacle is
behind the vehicle.
190 UNDERSTANDING THE FEATURES OF YOUR VEHICLE
ProCarManuals.com