Page 177 of 410
Compass/Temperature Display
Compass Variance
Compass Variance is the difference between Magnetic
North and Geographic North. To ensure compass accu-
racy, the compass variance should be properly set accord-
ing to the variance map for the zone where the vehicle
will be driven. When properly set, the compass will
automatically account for this difference.
NOTE:Magnetic and battery powered devices, (such as
cell phones, iPod’s, radar detectors, PDA’s and laptops)
should be kept away from the top of the instrument
panel. This is where the compass module is located and
such devices may interfere and cause false compass
readings. To Set the Variance
Start the engine, and leave the transmission shift lever in
the PARK position. Press and hold (approximately ten
seconds) the compass/temperature RESET button until
the current variance zone number is displayed. To change
Compass Variance Map
4
UNDERSTANDING YOUR INSTRUMENT PANEL 175
Page 178 of 410

the zone, press and release the RESET button to incre-
ment the variance one step. Repeat as necessary, until the
desired variance is achieved.
NOTE:Zone 8 is the factory default. During program-
ming, the Zone Number will wrap around from Zone 15
to 1. Please refer to the Compass Variance Zone Map in
the following section: “Electronic Vehicle Information
Center (EVIC)”
Automatic Compass Calibration
The compass on your vehicle is self-calibrating, eliminat-
ing the need to manually calibrate the compass. When
the vehicle is new, the compass may appear erratic and
the CAL indicator message will flash in the CMTC until
the calibration is complete.
A good calibration requires a level surface and an envi-
ronment free from large metallic objects such as build-
ings, bridges, underground cables, railroad tracks, etc. Calibrate the compass by driving slowly, under 5 mph
(8 km/h) in one or more complete circles in a area free
from large metallic objects, until the CAL indicator in the
CMTC turns off. The compass will now function
normally.
Manual Compass Calibration
If the compass appears erratic or inaccurate, and the
variance has been properly set, you may wish to manu-
ally recalibrate the compass. To manually calibrate the
compass:
1. Start the engine, and leave the transmission shift lever
in the PARK position.
2. Press and hold (approximately 10 seconds) the
Compass/Temperature RESET button until the current
variance zone number is displayed.
176 UNDERSTANDING YOUR INSTRUMENT PANEL
Page 179 of 410

3. Release the RESET button, then press and hold again
(approximately 10 seconds), until the direction is dis-
played with the CAL indicator on continuously in the
display.
4. To complete the compass calibration, drive the vehicle
in one or more complete 360 degree circles, under 5 mph
(8 km/h) in an area free from power lines and large
metallic objects, until the CAL indicator turns off. The
compass will now function normally.
Odometer Display
When the appropriate conditions exist, the following
odometer messages will display:
CRUISE...................... Cruise Activated
gASCAP ....................... Fuel Cap Fault
noFUSE .......................... Fuse Fault
These messages can be manually turned off by pressing
the right reset button (on the instrument cluster).
Trip Odometer (ODO)
This display shows the distance traveled since the last
reset. Press and release the right button (on the instru-
ment cluster) to switch from odometer, to trip A or trip B.
Press and hold the right button while the odometer/trip
odometer is displayed, to reset.
Trip A
Shows the total distance traveled for trip A since the last
reset.
Trip B
Shows the total distance traveled for trip B since the last
reset.
4
UNDERSTANDING YOUR INSTRUMENT PANEL 177
Page 182 of 410

•Tire Pressure Monitor (TPM)
•Personal Settings
To Reset the Display
Pressing and holding the EVIC button once will clear the
resettable function currently being displayed. Reset will
only occur if a resettable function is currently beingdisplayed. To reset all resettable functions, press and
release the EVIC button a second time within three
seconds of resetting the currently-displayed function
(Reset ALL will be displayed during this three-second
window).
Compass/Temperature/Audio
Press and release the EVIC button to display one of eight
compass headings to indicate the direction the vehicle is
facing, the outside temperature, and the current radio
station.
For additional information regarding the compass, refer
to “Personal Settings (Customer-Programmable Fea-
tures)” in this section.
Average Fuel Economy
Shows the average fuel economy since the last reset.
When the fuel economy is reset, the display will read
RESET, or show dashes for two seconds. Then, the
EVIC Button
180 UNDERSTANDING YOUR INSTRUMENT PANEL
Page 183 of 410

history information will be erased, and the averaging will
continue from where it was before the reset.
Distance To Empty (DTE)
Shows the estimated distance that can be travelled with
the fuel remaining in the tank. This estimated distance is
determined by a weighted average of the instantaneous
and average fuel economy, according to the current fuel
tank level. This is not resettable.
NOTE:Significant changes in driving style or vehicle
loading will greatly affect the actual drivable distance of
the vehicle, regardless of the DTE displayed value.
When the DTE value is less than 30 miles (48 km)
estimated driving distance, the DTE display will change
to a text display of LOW FUEL. This display will con-
tinue until the vehicle runs out of fuel. Adding a signifi-
cant amount of fuel to the vehicle will turn off the LOW FUEL text and a new DTE value will be displayed, based
on the current values in the DTE calculation and the
current fuel tank level.Elapsed Time
Shows the total elapsed time of travel since the last reset
when the ignition switch is in the ACC position. Elapsed
time will increment when the ignition switch is in the ON
or START position.
Tire Pressure Monitor (TPM)
Refer to Section 5 “Tire Pressure Monitoring System
(TPMS),” for system operation.
Personal Settings (Customer-Programmable
Features)
This allows the driver to set and recall features when the
shift lever is in PARK (automatic transmission) or the
vehicle is stopped (manual transmission).
4
UNDERSTANDING YOUR INSTRUMENT PANEL 181
Page 194 of 410

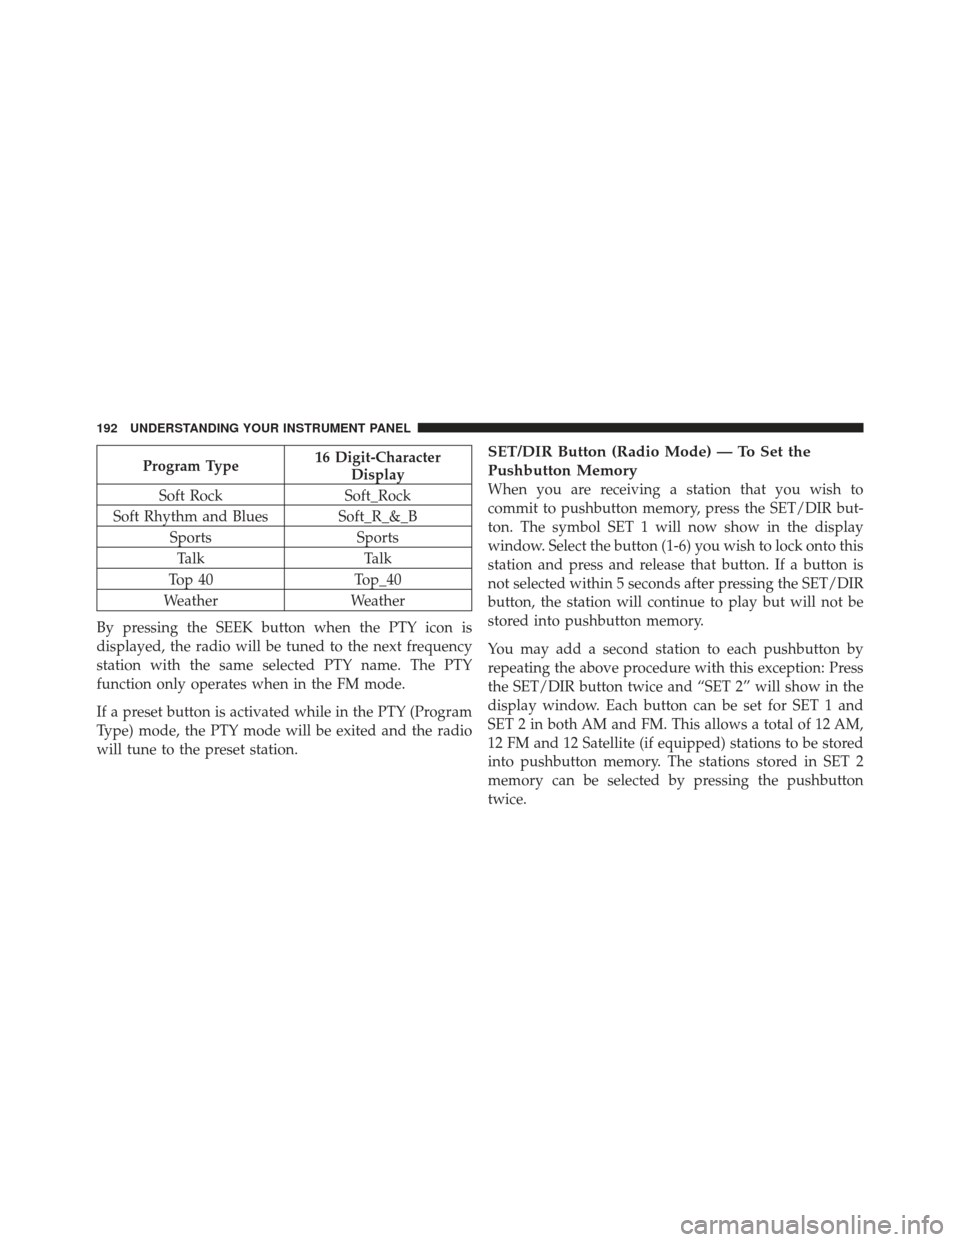
Program Type16 Digit-Character
Display
Soft Rock Soft_Rock
Soft Rhythm and Blues Soft_R_&_B Sports SportsTalk Talk
Top 40 Top_40
Weather Weather
By pressing the SEEK button when the PTY icon is
displayed, the radio will be tuned to the next frequency
station with the same selected PTY name. The PTY
function only operates when in the FM mode.
If a preset button is activated while in the PTY (Program
Type) mode, the PTY mode will be exited and the radio
will tune to the preset station.SET/DIR Button (Radio Mode) — To Set the
Pushbutton Memory
When you are receiving a station that you wish to
commit to pushbutton memory, press the SET/DIR but-
ton. The symbol SET 1 will now show in the display
window. Select the button (1-6) you wish to lock onto this
station and press and release that button. If a button is
not selected within 5 seconds after pressing the SET/DIR
button, the station will continue to play but will not be
stored into pushbutton memory.
You may add a second station to each pushbutton by
repeating the above procedure with this exception: Press
the SET/DIR button twice and “SET 2” will show in the
display window. Each button can be set for SET 1 and
SET 2 in both AM and FM. This allows a total of 12 AM,
12 FM and 12 Satellite (if equipped) stations to be stored
into pushbutton memory. The stations stored in SET 2
memory can be selected by pressing the pushbutton
twice.
192 UNDERSTANDING YOUR INSTRUMENT PANEL
Page 195 of 410

Every time a preset button is used a corresponding
button number will be displayed.
Buttons1-6(Radio Mode)
These buttons tune the radio to the stations that you
commit to pushbutton memory {12 AM, 12 FM, and 12
Satellite (if equipped) stations}.
Operation Instructions - (CD Mode for CD Audio
Play)
NOTE:
•The ignition switch must be in the ON or ACC
position to operate the radio.
•Note: This radio is capable of playing compact discs
(CD), recordable compact discs (CD-R), rewritable
compact discs (CD-RW) compact discs with MP3
tracks and multisession compact discs with CD and
MP3 tracks.
Inserting Compact Disc(s)
Gently insert one CD into the CD player with the CD
label facing up. The CD will automatically be pulled into
the CD player and the CD icon will illuminate on the
radio display.
CAUTION!
This CD player will accept 4 3/4 inch (12 cm) discs
only. The use of other sized discs may damage the
CD player mechanism.
You may eject a disc with the radio OFF.
If you insert a disc with the ignition ON and the radio
ON, the unit will switch from radio to CD mode and
begin to play when you insert the disc. The display will
show the disc number, the track number, and index time
in minutes and seconds. Play will begin at the start of
track 1.4
UNDERSTANDING YOUR INSTRUMENT PANEL 193
Page 205 of 410

SCAN Button (Radio Mode)
Pressing the SCAN button causes the tuner to search for
the next listenable station in either, AM, FM, or Satellite
(if equipped) frequencies, pausing for five seconds at
each listenable station before continuing to the next. To
stop the search, press SCAN a second time.
PSCAN Button (Radio Mode)
Pressing the PSCAN button causes the tuner to scan
through preset stations in either AM, FM, or Satellite (if
equipped) frequencies, pausing for five seconds at each
preset station before continuing to the next. To stop the
search, press PSCAN a second time.
TIME Button
Press the TIME button and the time of day will display
for five seconds.
Clock Setting Procedure
1. Press and hold the TIME button until the hours blink.2. Adjust the hours by turning the TUNE/AUDIO con-
trol.
3. After the hours are adjusted, press the TUNE/AUDIO
control to set the minutes. The minutes will begin to
blink.
4. Adjust the minutes using the TUNE/AUDIO control.
5. To exit, press any button/knob or wait five seconds.
RW/FF (Radio Mode)
Pressing the Rewind/Fast Forward button causes the
tuner to search for the next frequency in the direction of
the arrows. This feature operates in either AM, FM or
Satellite (if equipped) frequencies.
TUNE Control (Radio Mode)
Turn the rotary TUNE control clockwise to increase or
counterclockwise to decrease the frequency.
4
UNDERSTANDING YOUR INSTRUMENT PANEL 203