Page 308 of 410

▫Exhaust System ..................... 321
▫ Cooling System ..................... 323
▫ Brake System ....................... 329
▫ Automatic Transaxle .................. 331
▫ Manual Transaxle .................... 334
▫ Appearance Care And Protection From
Corrosion .......................... 334
� Fuses .............................. 340
▫ Integrated Power Module (IPM) .......... 340
� Vehicle Storage ....................... 344
� Replacement Bulbs .................... 344 �
Bulb Replacement ..................... 345
▫ Headlights ......................... 345
▫ Front Parking, Turn Signal, And Side Marker
Lights ............................ 346
▫ Front Fog Lights — If Equipped .......... 347
▫ Tail/Stop Lights And Rear
Turn Signal Lights .................... 347
▫ Backup Lights ...................... 348
▫ Center High-Mounted Stop Light (CHMSL) . . 348
� Fluids And Capacities .................. 349
� Fluids, Lubricants And Genuine Parts ....... 350
▫ Engine ............................ 350
▫ Chassis ........................... 351
306 MAINTAINING YOUR VEHICLE
Page 309 of 410
ENGINE COMPARTMENT — 2.4L
1 — Washer Fluid Reservoir7 — Battery
2 — Power Steering Fluid Reservoir 8 — Automatic Transaxle Dipstick
3 — Engine Coolant Reservoir 9 — Engine Oil Dipstick
4 — Brake Fluid Reservoir 10 — Engine Oil Fill
5 — Power Distribution Center 11 — Coolant Pressure Cap
6 — Air Cleaner Filter
7
MAINTAINING YOUR VEHICLE 307
Page 310 of 410
ENGINE COMPARTMENT — 2.4L TURBO
1 — Engine Oil Fill6 — Battery
2 — Washer Fluid Reservoir 7 — Engine Oil Dipstick
3 — Engine Coolant Reservoir 8 — Power Steering Fluid Reservoir
4 — Brake Fluid Reservoir 9 — Coolant Pressure Cap
5 — Air Cleaner Filter
308 MAINTAINING YOUR VEHICLE
Page 331 of 410

Brake System
In order to assure brake system performance, all brake
system components should be inspected periodically.
Refer to the “Maintenance Schedules” in Section 8 for the
proper maintenance intervals.
WARNING!
Riding the brakes can lead to brake failure and
possibly an accident. Driving with your foot resting
or riding on the brake pedal can result in abnormally
high brake temperatures, excessive lining wear, and
possible brake damage. You would not have your full
braking capacity in an emergency.
Master Cylinder - Brake Fluid Level Check
Check the fluid level in the master cylinder immediately
if the Brake System Warning Telltale Light indicates
system failure.Check the fluid level in the master cylinder when per-
forming underhood services.
Clean the top of the master cylinder area before removing
the cap. If necessary, add fluid to bring the fluid level up
to the requirements described on the brake fluid reser-
voir.
Overfilling of fluid is not recommended because it may
cause leaking in the system.
Fluid level can be expected to fall as the brake pads wear.
Brake fluid level should be checked when pads are
replaced. However, low fluid level may be caused by a
leak and a checkup may be needed.
NOTE:
If your vehicle is equipped with a manual
transaxle, the Brake Fluid Reservoir supplies fluid to both
the Brake System and the Clutch Release System. The
two systems are separated in the reservoir and a leak in
one system will not affect the other system. The manual
7
MAINTAINING YOUR VEHICLE 329
Page 332 of 410

transaxle Clutch Release System should not require fluid
replacement during the life of the vehicle. If the Brake
Fluid Reservoir is low, and the brake system does not
indicate any leaks or other problems, it may be a result of
a leak in the Hydraulic Clutch Release System. See your
local authorized dealer for service.
Use only manufacturer’s recommended brake fluid. Re-
fer to “Fluids, Lubricants, and Genuine Parts”, found
later in this section, for the correct fluid type.
WARNING!
Use of a brake fluid that has a lower initial boiling
point than the recommended MOPAR�DOT 3 prod-
uct, or a brake fluid that is unidentified as to FMVSS
specification, may result in sudden brake failure
during hard, prolonged braking. You could have an
accident.
CAUTION!
Use of improper brake fluids will affect overall
clutch system performance. Improper brake fluids
may damage the clutch system resulting in loss of
clutch function and the ability to shift the transaxle.
WARNING!
Overfilling the brake fluid reservoir can result in
spilling brake fluid on hot engine parts and the
brake fluid catching fire.
330 MAINTAINING YOUR VEHICLE
Page 333 of 410

CAUTION!
Do not allow petroleum-based fluid to contaminate
the brake fluid; all brake seal components could be
damaged causing partial or complete brake failure.
Use only brake fluid that has been in a tightly closed
container to avoid contamination from foreign mat-
ter.
Automatic Transaxle
The automatic transaxle and differential assembly are
contained within a single housing.
The fluid level in the automatic transaxle should be
checked whenever the vehicle is serviced. Operation with
an improper fluid level will greatly reduce the life of the
transaxle and the fluid.
Fluid Level Check
Use the following procedure to check the automatic
transaxle fluid level properly:
1. Park the vehicle on level ground.
2. Run the engine at curb idle speed for a minimum of
60 seconds.
3. Apply the parking brake fully.
4. Place the shift lever momentarily in each gear posi-
tion, ending with the shift lever in PARK.
5. Wipe the area around the dipstick clean to eliminate
the possibility of dirt entering the transaxle.
7
MAINTAINING YOUR VEHICLE 331
Page 353 of 410
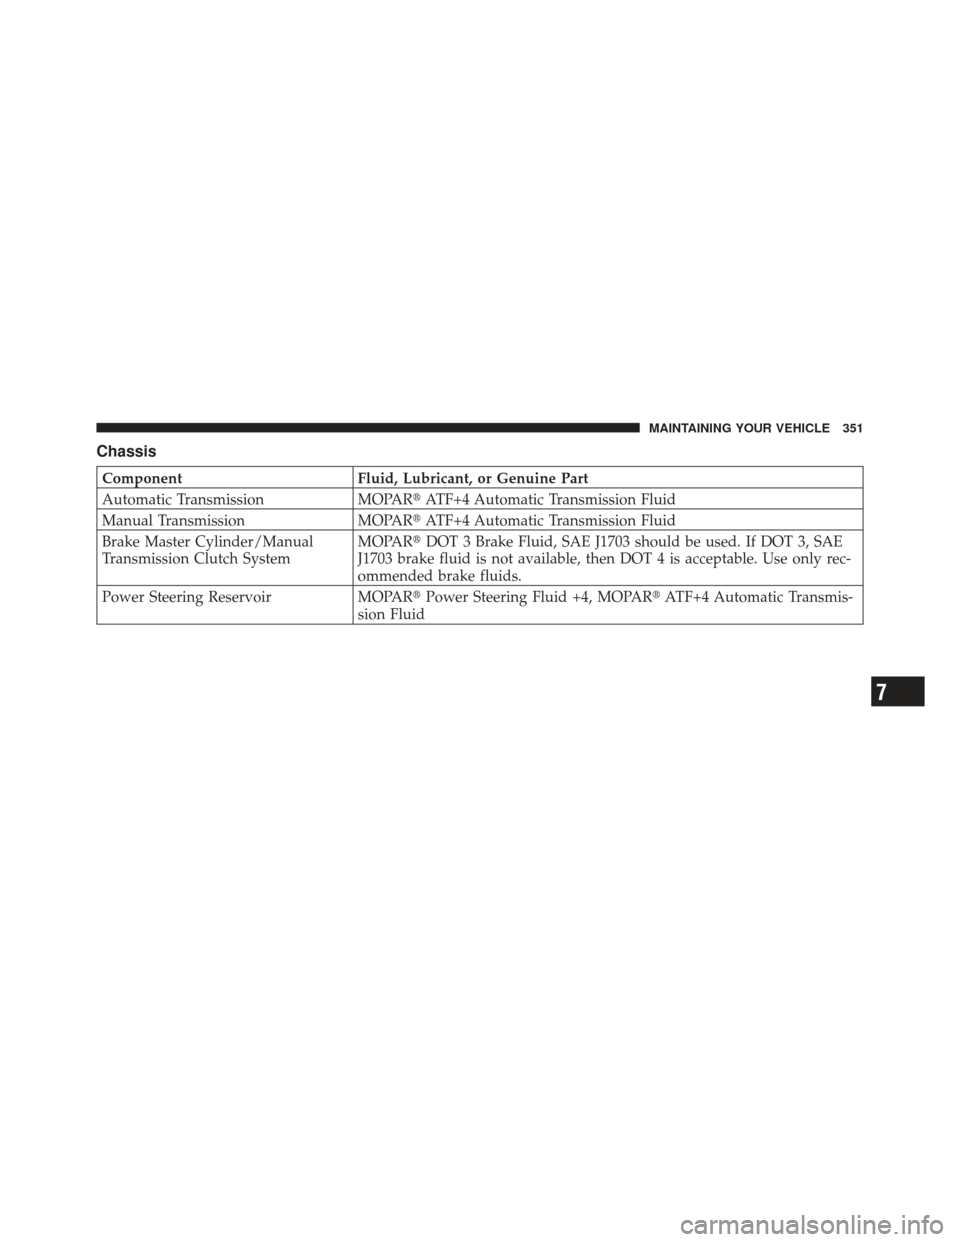
Chassis
ComponentFluid, Lubricant, or Genuine Part
Automatic Transmission MOPAR�ATF+4 Automatic Transmission Fluid
Manual Transmission MOPAR�ATF+4 Automatic Transmission Fluid
Brake Master Cylinder/Manual
Transmission Clutch System MOPAR�
DOT 3 Brake Fluid, SAE J1703 should be used. If DOT 3, SAE
J1703 brake fluid is not available, then DOT 4 is acceptable. Use only rec-
ommended brake fluids.
Power Steering Reservoir MOPAR�Power Steering Fluid +4, MOPAR� ATF+4 Automatic Transmis-
sion Fluid
7
MAINTAINING YOUR VEHICLE 351
Page 358 of 410

At Each Stop for Fuel
•
Check the engine oil level about five minutes after a
fully warmed engine is shut off. Checking the oil level
while the vehicle is on level ground will improve the
accuracy of the oil level reading. Add oil only when
the level is at or below the ADD or MIN mark.
•Check the windshield washer solvent and add if
required.
Once a Month
•
Check tire pressure and look for unusual wear or
damage.
•Inspect the battery and clean and tighten the terminals
as required.
•Check the fluid levels of coolant reservoir, brake
master cylinder and transaxle, and add as needed.
•Check all lights and all other electrical items for correct
operation.
•Check rubber seals on each side of the radiator for
proper fit.
At Each Oil Change
•
Change the engine oil filter.
•Inspect the exhaust system.
•Inspect the brake hoses.
•Inspect the CV joints and front suspension compo-
nents.
•Check the automatic transaxle fluid level.
•Check the manual transaxle fluid level and fill plug
condition.
•Check the coolant level, hoses, and clamps.
8
MA I
N T
E
N A
N CE
S
C
H E
D
U L
E
S356 MAINTENANCE SCHEDULES