2009 CHEVROLET HHR wheel
[x] Cancel search: wheelPage 270 of 450
Towing a Trailer
(Automatic Transmission)
{CAUTION:
The driver can lose control when pulling a trailer if
the correct equipment is not used or the vehicle is
not driven properly. For example, if the trailer is too
heavy, the brakes may not work well — or even at
all. The driver and passengers could be seriously
injured. The vehicle may also be damaged; the
resulting repairs would not be covered by the
vehicle warranty. Pull a trailer only if all the steps in
this section have been followed. Ask your dealer/
retailer for advice and information about towing a
trailer with the vehicle.
The vehicle can tow a trailer if it is equipped with an
automatic transmission and the proper trailer towing
equipment. If the vehicle is not equipped as stated
above, do not tow a trailer. To identify the trailering
capacity of the vehicle, read the information in “Weight
of the Trailer” that appears later in this section.Trailering is different than just driving the vehicle by itself.
Trailering means changes in handling, acceleration,
braking, cooling, durability and fuel economy. Successful,
safe trailering takes correct equipment, and it has to be
used properly.
The following information has many time-tested,
important trailering tips and safety rules. Many of these
are important for your safety and that of your passengers.
So please read this section carefully before pulling a
trailer.
Load-pulling components such as the engine,
transmission, wheel assemblies and tires are forced to
work harder against the drag of the added weight. The
engine is required to operate at relatively higher speeds
and under greater loads, generating extra heat. Also, the
trailer adds considerably to wind resistance, increasing
the pulling requirements.
SS Package
If the vehicle has the SS package, it is neither designed
nor intended to tow a trailer.
4-34
Page 275 of 450
During the trip, check occasionally to be sure that the
load is secure, and that the lamps and any trailer brakes
are still working.
Following Distance
Stay at least twice as far behind the vehicle ahead as
you would when driving the vehicle without a trailer.
This can help to avoid situations that require heavy
braking and sudden turns.
Passing
More passing distance is needed when towing a trailer.
Because the rig is longer, it is necessary to go much
farther beyond the passed vehicle before returning to
the lane.
Backing Up
Hold the bottom of the steering wheel with one hand.
Then, to move the trailer to the left, move that hand
to the left. To move the trailer to the right, move your
hand to the right. Always back up slowly and, if possible,
have someone guide you.
Making Turns
When turning with a trailer, make wider turns than
normal. Do this so the trailer will not strike soft
shoulders, curbs, road signs, trees or other objects.
Avoid jerky or sudden maneuvers. Signal well in
advance.
Turn Signals When Towing a Trailer
The arrows on the instrument panel ash whenever
signaling a turn or lane change. Properly hooked up, the
trailer lamps also ash, telling other drivers the vehicle
is turning, changing lanes or stopping.
When towing a trailer, the arrows on the instrument panel
ash for turns even if the bulbs on the trailer are burned
out. For this reason you may think other drivers are
seeing the signal when they are not. It is important to
check occasionally to be sure the trailer bulbs are still
working.
4-39
Page 276 of 450
Driving on Grades
Notice:Do not tow on steep continuous grades
exceeding 6 miles (9.6 km). Extended, higher than
normal engine and transmission temperatures may
result and damage the vehicle. Frequent stops are
very important to allow the engine and transmission
to cool.
When towing under severe conditions such as hot
ambient temperatures or steep grades, the vehicle may
experience more transmission shifting. A COOLING
MODE ON message may also appear in the DIC.
This alerts the driver that the shifting mode is in progress
and is aiding engine cooling. SeeDIC Warnings and
Messages on page 3-50DIC Warnings and Messages
for more information.
Reduce speed and shift to a lower gearbeforestarting
down a long or steep downgrade. If the transmission is
not shifted down, the brakes might have to be used so
much that they would get hot and no longer work well.
Pay attention to the engine coolant gage. If the indicator
is in the red area, turn off the air conditioning to reduce
engine load. SeeEngine Overheating on page 5-32.
Parking on Hills
{CAUTION:
Parking the vehicle on a hill with the trailer
attached can be dangerous. If something goes
wrong, the rig could start to move. People can be
injured, and both the vehicle and the trailer can be
damaged. When possible, always park the rig on a
at surface.
If parking the rig on a hill:
1. Press the brake pedal, but do not shift into P (Park)
yet. Turn the wheels into the curb if facing downhill
or into traffic if facing uphill.
2. Have someone place chocks under the trailer
wheels.
3. When the wheel chocks are in place, release the
brake pedal until the chocks absorb the load.
4. Reapply the brake pedal. Then apply the parking
brake and shift into P (Park).
5. Release the brake pedal.
4-40
Page 280 of 450
When It Is Time for New Tires.......................5-69
Buying New Tires.........................................5-70
Different Size Tires and Wheels......................5-71
Uniform Tire Quality Grading..........................5-72
Wheel Alignment and Tire Balance..................5-73
Wheel Replacement......................................5-73
Tire Chains..................................................5-74
If a Tire Goes Flat........................................5-75
Changing a Flat Tire.....................................5-76
Removing the Spare Tire and Tools................5-77
Removing the Flat Tire and Installing the
Spare Tire (All Models Except SS)...............5-80
Removing the Flat Tire and Installing the
Spare Tire (SS Model)...............................5-85
Storing a Flat or Spare Tire and Tools............5-94
Compact Spare Tire......................................5-98
Appearance Care............................................5-99
Interior Cleaning...........................................5-99
Fabric/Carpet..............................................5-100
Leather......................................................5-101
Instrument Panel, Vinyl, and Other
Plastic Surfaces.......................................5-102
Care of Safety Belts....................................5-102
Weatherstrips.............................................5-102Washing Your Vehicle..................................5-103
Cleaning Exterior Lamps/Lenses....................5-103
Finish Care................................................5-104
Windshield and Wiper Blades.......................5-104
Aluminum or Chrome-Plated Wheels
and Trim................................................5-105
Tires.........................................................5-106
Sheet Metal Damage...................................5-106
Finish Damage...........................................5-106
Underbody Maintenance...............................5-106
Chemical Paint Spotting...............................5-106
Vehicle Identication.....................................5-107
Vehicle Identication Number (VIN)
................5-107
Service Parts Identication Label...................5-107
Electrical System..........................................5-108
Add-On Electrical Equipment.........................5-108
Headlamp Wiring........................................5-108
Windshield Wiper Fuses...............................5-108
Power Windows and Other Power Options......5-108
Fuses and Circuit Breakers..........................5-109
Floor Console Fuse Block............................5-109
Engine Compartment Fuse Block...................5-111
Capacities and Specications........................5-114
Section 5 Service and Appearance Care
5-2
Page 315 of 450
Brake Wear
This vehicle has front disc brakes and could have rear
drum brakes or rear disc brakes.
Disc brake pads have built-in wear indicators that make
a high-pitched warning sound when the brake pads are
worn and new pads are needed. The sound can come
and go or be heard all the time the vehicle is moving,
except when applying the brake pedal rmly.
{CAUTION:
The brake wear warning sound means that soon
the brakes will not work well. That could lead to an
accident. When the brake wear warning sound is
heard, have the vehicle serviced.
Notice:Continuing to drive with worn-out brake
pads could result in costly brake repair.
Some driving conditions or climates can cause a brake
squeal when the brakes are rst applied or lightly applied.
This does not mean something is wrong with the brakes.Properly torqued wheel nuts are necessary to help
prevent brake pulsation. When tires are rotated, inspect
brake pads for wear and evenly tighten wheel nuts in
the proper sequence to torque specications in
Capacities and Specifications on page 5-114.
If the vehicle has rear drum brakes, they do not have
wear indicators, but if a rear brake rubbing noise is heard,
have the rear brake linings inspected immediately. Rear
brake drums should be removed and inspected each time
the tires are removed for rotation or changing. When the
front brake pads are replaced, have the rear brakes
inspected, too.
Brake linings should always be replaced as complete
axle sets.
Brake Pedal Travel
See your dealer/retailer if the brake pedal does not
return to normal height, or if there is a rapid increase in
pedal travel. This could be a sign that brake service
might be required.
Brake Adjustment
Every time the brakes are applied, with or without the
vehicle moving, the brakes adjust for wear.
5-37
Page 326 of 450
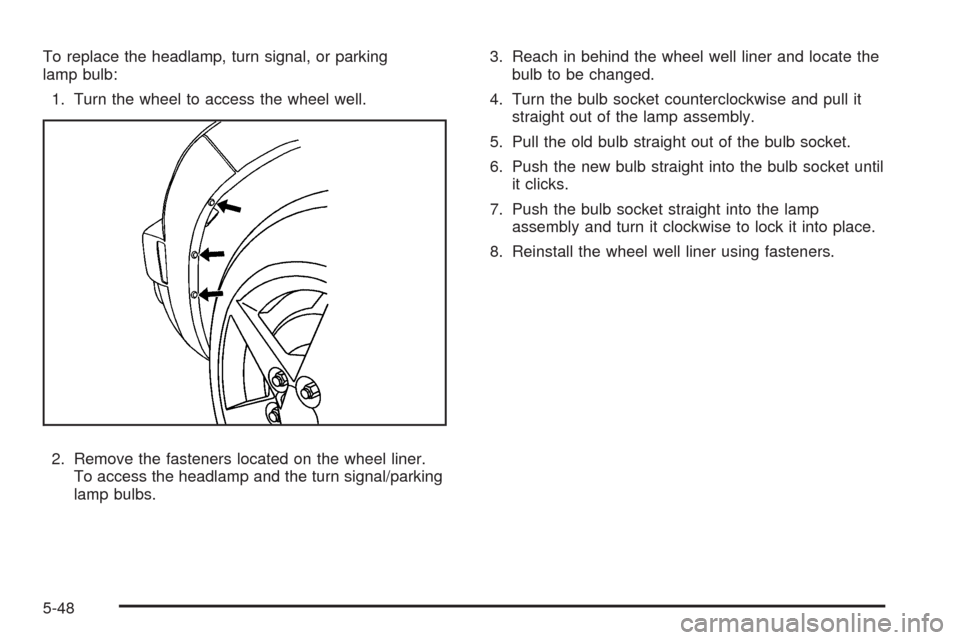
To replace the headlamp, turn signal, or parking
lamp bulb:
1. Turn the wheel to access the wheel well.
2. Remove the fasteners located on the wheel liner.
To access the headlamp and the turn signal/parking
lamp bulbs.3. Reach in behind the wheel well liner and locate the
bulb to be changed.
4. Turn the bulb socket counterclockwise and pull it
straight out of the lamp assembly.
5. Pull the old bulb straight out of the bulb socket.
6. Push the new bulb straight into the bulb socket until
it clicks.
7. Push the bulb socket straight into the lamp
assembly and turn it clockwise to lock it into place.
8. Reinstall the wheel well liner using fasteners.
5-48
Page 332 of 450
Low-Prole Performance Tire
If your vehicle has P225/45R18 size tires, they are
classied as low-prole performance tires. These
tires are designed for very responsive driving on
wet or dry pavement. You may also notice more
road noise with low-prole performance tires and
that they tend to wear faster.
Notice:If the vehicle has low-prole tires,
they are more susceptible to damage from road
hazards or curb impact than standard prole
tires. Tire and/or wheel assembly damage
can occur when coming into contact with
road hazards like, potholes, or sharp edged
objects, or when sliding into a curb. The
vehicle warranty does not cover this type of
damage. Keep tires set to the correct ination
pressure and, when possible avoid contact
with curbs, potholes, and other road hazards.
Tire Sidewall Labeling
Useful information about a tire is molded into its
sidewall. The examples below show a typical
passenger vehicle tire and a compact spare tire
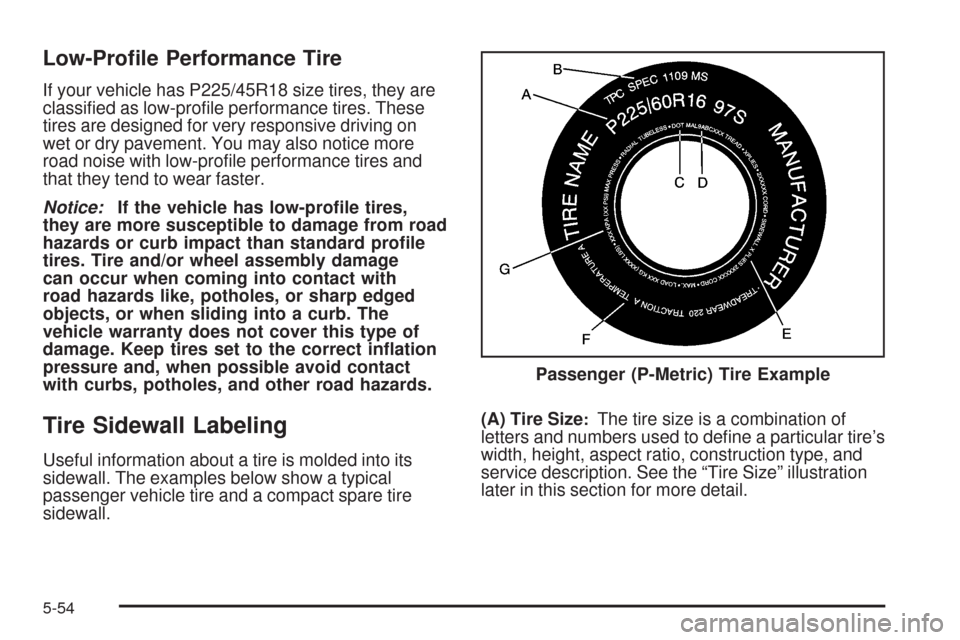
sidewall.(A) Tire Size
:The tire size is a combination of
letters and numbers used to dene a particular tire’s
width, height, aspect ratio, construction type, and
service description. See the “Tire Size” illustration
later in this section for more detail.Passenger (P-Metric) Tire Example
5-54
Page 335 of 450
(F) Tire Size:A combination of letters and
numbers dene a tire’s width, height, aspect
ratio, construction type, and service description.
The letter T as the rst character in the tire size
means the tire is for temporary use only.
(G) TPC Spec (Tire Performance Criteria
Specication)
:Original equipment tires designed
to GM’s specic tire performance criteria have
a TPC specication code molded onto the sidewall.
GM’s TPC specications meet or exceed all
federal safety guidelines.
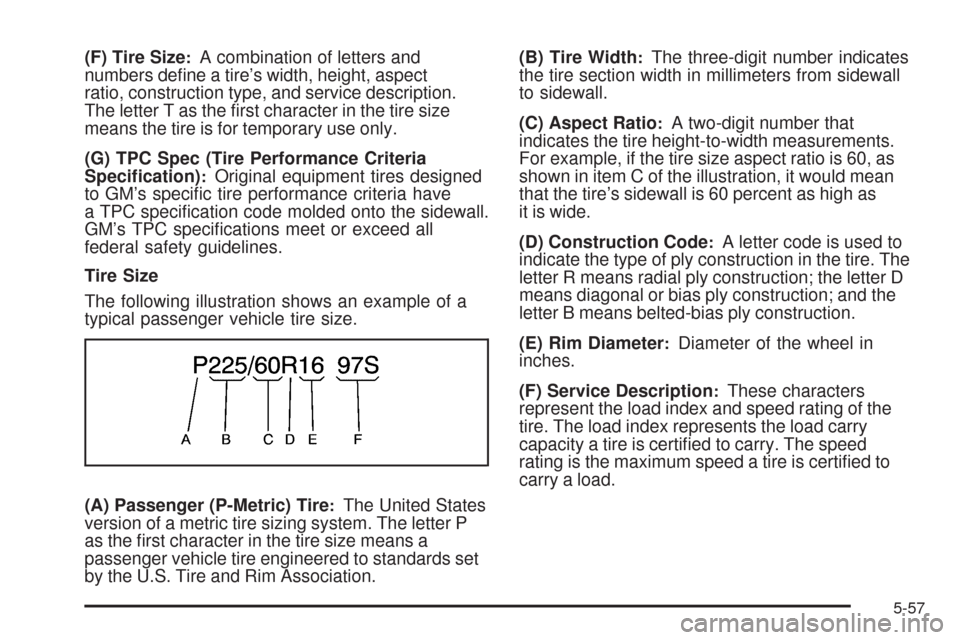
Tire Size
The following illustration shows an example of a
typical passenger vehicle tire size.
(A) Passenger (P-Metric) Tire
:The United States
version of a metric tire sizing system. The letter P
as the rst character in the tire size means a
passenger vehicle tire engineered to standards set
by the U.S. Tire and Rim Association.(B) Tire Width
:The three-digit number indicates
the tire section width in millimeters from sidewall
to sidewall.
(C) Aspect Ratio
:A two-digit number that
indicates the tire height-to-width measurements.
For example, if the tire size aspect ratio is 60, as
shown in item C of the illustration, it would mean
that the tire’s sidewall is 60 percent as high as
it is wide.
(D) Construction Code
:A letter code is used to
indicate the type of ply construction in the tire. The
letter R means radial ply construction; the letter D
means diagonal or bias ply construction; and the
letter B means belted-bias ply construction.
(E) Rim Diameter
:Diameter of the wheel in
inches.
(F) Service Description
:These characters
represent the load index and speed rating of the
tire. The load index represents the load carry
capacity a tire is certied to carry. The speed
rating is the maximum speed a tire is certied to
carry a load.
5-57