2009 CHEVROLET EXPRESS CARGO VAN buttons
[x] Cancel search: buttonsPage 128 of 408
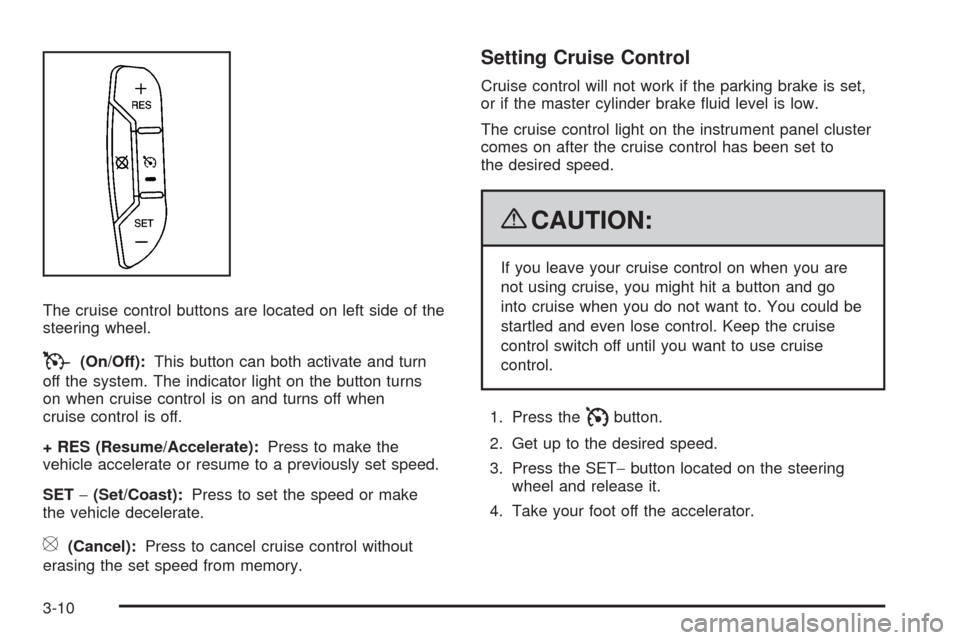
The cruise control buttons are located on left side of the
steering wheel.
T(On/Off):This button can both activate and turn
off the system. The indicator light on the button turns
on when cruise control is on and turns off when
cruise control is off.
+ RES (Resume/Accelerate):Press to make the
vehicle accelerate or resume to a previously set speed.
SET−(Set/Coast):Press to set the speed or make
the vehicle decelerate.
[(Cancel):Press to cancel cruise control without
erasing the set speed from memory.
Setting Cruise Control
Cruise control will not work if the parking brake is set,
or if the master cylinder brake fluid level is low.
The cruise control light on the instrument panel cluster
comes on after the cruise control has been set to
the desired speed.
{CAUTION:
If you leave your cruise control on when you are
not using cruise, you might hit a button and go
into cruise when you do not want to. You could be
startled and even lose control. Keep the cruise
control switch off until you want to use cruise
control.
1. Press the
Ibutton.
2. Get up to the desired speed.
3. Press the SET−button located on the steering
wheel and release it.
4. Take your foot off the accelerator.
3-10
Page 159 of 408
Driver Information Center (DIC)
Your vehicle has a Driver Information Center (DIC).
All messages will appear in the DIC display located
at the bottom of the instrument panel cluster. The DIC
buttons are located on the instrument panel, next to the
instrument panel cluster.
The DIC comes on when the ignition is on. After a short
delay, the DIC will display the information that was
last displayed before the engine was turned off.
The DIC displays trip, fuel, and vehicle system
information, and warning messages if a system
problem is detected.
If your vehicle has these features, the DIC also displays
the compass direction and the outside air temperature
when viewing the trip and fuel information. The compass
direction appears on the top right corner of the DIC
display. The outside air temperature automatically
appears in the bottom right corner of the DIC display.
If there is a problem with the system that controls the
temperature display, the numbers will be replaced with
dashes. If this occurs, have the vehicle serviced by your
dealer/retailer.
The DIC also allows some features to be customized.
SeeDIC Vehicle Customization on page 3-57for
more information.
DIC Operation and Displays
The DIC has different displays which can be accessed
by pressing the DIC buttons located on the instrument
panel, next to the instrument panel cluster.
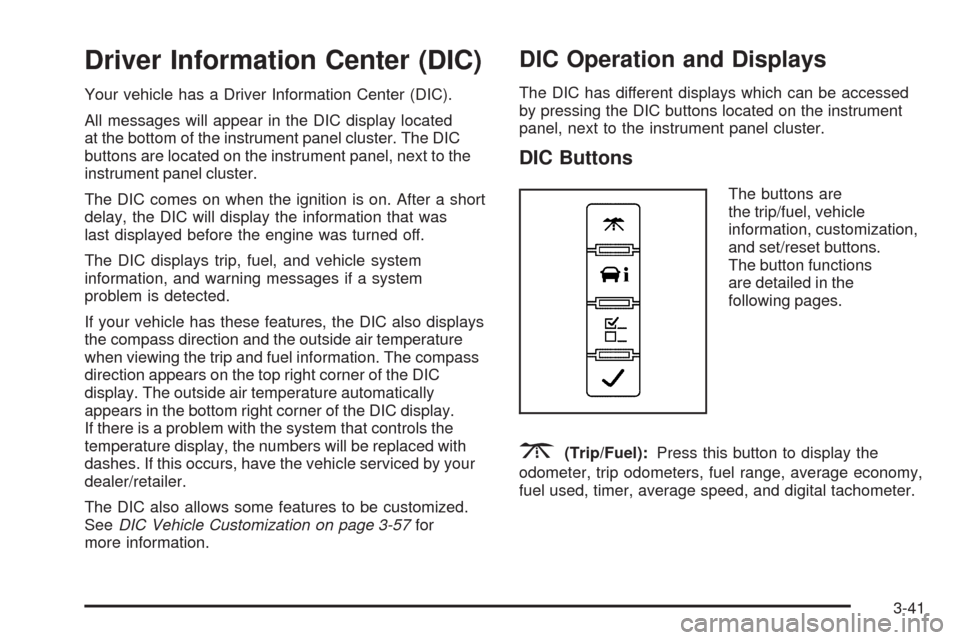
DIC Buttons
The buttons are
the trip/fuel, vehicle
information, customization,
and set/reset buttons.
The button functions
are detailed in the
following pages.
3(Trip/Fuel):Press this button to display the
odometer, trip odometers, fuel range, average economy,
fuel used, timer, average speed, and digital tachometer.
3-41
Page 164 of 408
Relearn Remote Key
To access this display, the vehicle must be in P (Park).
This display allows you to match Remote Keyless
Entry (RKE) transmitters to your vehicle. To match an
RKE transmitter to your vehicle:
1. Press the vehicle information button until
PRESS
VTO RELEARN REMOTE KEY displays.
2. Press the set/reset button until REMOTE KEY
LEARNING ACTIVE is displayed.
3. Press and hold the lock and unlock buttons on
the first transmitter at the same time for about
15 seconds.
A chime will sound indicating that the transmitter is
matched.
4. To match additional transmitters at this time, repeat
Step 3.
Each vehicle can have a maximum of four
transmitters matched to it.
5. To exit the programming mode, you must cycle the
key to LOCK/OFF.
Blank Display
This display shows no information.
DIC Compass
Your vehicle may have a compass in the Driver
Information Center (DIC).
Compass Zone
Your dealer/retailer will set the correct zone for your
location.
Under certain circumstances, such as during a long
distance cross-country trip or moving to a new state
or province, it will be necessary to compensate for
compass variance by resetting the zone through the
DIC if the zone is not set correctly.
Compass variance is the difference between the earth’s
magnetic north and true geographic north. If the compass
is not set to the zone where you live, the compass may
give false readings. The compass must be set to the
variance zone in which the vehicle is traveling.
3-46
Page 166 of 408
To calibrate the compass, use the following procedure:
Compass Calibration Procedure
1. Before calibrating the compass, make sure the
compass zone is set to the variance zone in
which the vehicle is located. See “Compass
Variance (Zone) Procedure” earlier in this section.
Do not operate any switches such as window,
sunroof, climate controls, seats, etc. during
the calibration procedure.
2. Press the vehicle information button until
PRESS
VTO CALIBRATE COMPASS displays.
3. Press the set/reset button to start the compass
calibration.
4. The DIC will display CALIBRATING: DRIVE IN
CIRCLES. Drive the vehicle in tight circles at
less than 5 mph (8 km/h) to complete the calibration.
The DIC will display CALIBRATION COMPLETE
for a few seconds when the calibration is complete.
The DIC display will then return to PRESS
VTO
CALIBRATE COMPASS.
DIC Warnings and Messages
Messages are displayed on the DIC to notify the driver
that the status of the vehicle has changed and that
some action may be needed by the driver to correct
the condition. Multiple messages may appear one after
another.
Some messages may not require immediate action, but
you can press any of the DIC buttons on the instrument
panel to acknowledge that you received the messages
and to clear them from the display.
Some messages cannot be cleared from the DIC
display because they are more urgent. These messages
require action before they can be cleared. You should
take any messages that appear on the display seriously
and remember that clearing the messages will only
make the messages disappear, not correct the problem.
The following are the possible messages that can be
displayed and some information about them.
If your vehicle has the DURAMAX
®Diesel engine, see
the DURAMAX®Diesel manual for more information.
3-48
Page 181 of 408
EXIT FEATURE SETTINGS
This feature allows you to exit the feature settings menu.
Press the customization button until FEATURE
SETTINGS PRESS
VTO EXIT appears in the DIC
display. Press the set/reset button once to exit the menu.
If you do not exit, pressing the customization button
again will return you to the beginning of the feature
settings menu.
Exiting the Feature Settings Menu
The feature settings menu will be exited when any of
the following occurs:
•The vehicle is no longer in ON/RUN.
•The trip/fuel or vehicle information DIC buttons are
pressed.
•The end of the feature settings menu is reached
and exited.
•A 40 second time period has elapsed with no
selection made.
Audio System(s)
If the vehicle came without a radio, the wiring provisions
for a radio and an antenna were installed at the assembly
plant, so that if you want, a radio can be installed at the
dealer/retailer.
Determine which radio the vehicle has and read the
following pages to become familiar with its features.
{CAUTION:
Taking your eyes off the road for extended periods
could cause a crash resulting in injury or death to
you or others. Do not give extended attention to
entertainment tasks while driving.
This system provides access to many audio and non
audio listings.
3-63
Page 188 of 408
Setting Preset Stations
If the radio does not have XM™, up to 18 stations
(six FM1, six FM2, and six AM), can be programmed
on the six numbered pushbuttons, by performing
the following steps:
1. Turn the radio on.
2. Press BAND to select FM1, FM2, or AM.
3. Tune in the desired station.
4. Press and hold one of the six numbered
pushbuttons for three seconds until a beep sounds.
When that pushbutton is pressed and released,
the station that was set, returns.
5. Repeat the Steps 2 through 4 for each pushbutton.
Storing a Radio Station as a Favorite
Drivers are encouraged to set up their radio station
favorites while the vehicle is parked. Tune to favorite
stations using the presets, favorites button, and
steering wheel controls, if the vehicle has this feature.
SeeDefensive Driving on page 4-2.FAV (Favorites):If the vehicle has XM™ and has
a FAV button, a maximum of 36 stations can be
programmed as favorites using the six pushbuttons
positioned below the radio station frequency labels and
by using the radio favorites page button (FAV button).
Press the FAV button to go through up to six pages
of favorites, each having six favorite stations available
per page. Each page of favorites can contain any
combination of AM and FM stations.
The balance/fade and tone settings that were previously
adjusted, are stored with the favorite stations.
To store a station as a favorite:
1. Tune to the desired radio station.
2. Press the FAV button to display the page where the
station is to be stored.
3. Press and hold one of the six pushbuttons until a
beep sounds. When that pushbutton is pressed
and released, the station that was set, returns.
4. Repeat the steps for each pushbutton radio station
you want stored as a favorite.
3-70
Page 194 of 408
Playing an MP3 CD-R or CD-RW Disc
The radio with a Single CD player or a Six-Disc CD
player has the capability of playing an MP3 CD-R or
CD-RW disc. For more information on how to play
an MP3 CD-R or CD-RW disc, see “Using an MP3”
in the index.
CD Messages
REMOVE/CHECK DISC:Radios with a Single CD
player or radios with a Six-Disc player displays
CHECK DISC and/or ejects the CD if an error occurs.
ERR (Error):If this message displays and/or the
CD comes out, it could be for one of the following
reasons:
•It is very hot. When the temperature returns to
normal, the CD should play.
•You are driving on a very rough road. When the
road becomes smoother, the CD should play.
•The CD is dirty, scratched, wet, or upside down.
•The air is very humid. If so, wait about an hour and
try again.
•There could have been a problem while burning the
CD-R or CD-RW.
•The label could be caught in the CD player.
NO:This message displays if the EJECT or CD/AUX
buttons are pressed and a CD has not been inserted into
the player.
If the CD is not playing correctly, for any other reason,
try a known good CD.
If any error occurs repeatedly or if an error cannot
be corrected, contact your dealer/retailer. If the radio
displays an error message, write it down and provide it
to your dealer/retailer while reporting the problem.
3-76
Page 196 of 408
MP3 Format
If you burn your own MP3 disc on a personal computer:
•Make sure the MP3 files are recorded on a CD-R
or CD-RW disc.
•Do not mix standard audio and MP3 files on
one disc.
•The CD player is able to read and play a maximum
of 50 folders, 15 playlists, and 512 folders and files.
•Create a folder structure that makes it easy to find
songs while driving. Organize songs by albums
using one folder for each album. Each folder
or album should contain 18 songs or less.
•Avoid subfolders. The system can support up to
eight subfolders deep, however, keep the total
number of folders to a minimum in order to reduce
the complexity and confusion in trying to locate
a particular folder during playback.
•Make sure playlists have a .mp3 or .wpl extension
(other file extensions might not work).
•Minimize the length of the file, folder, or playlist
names. Long file, folder, or playlist names, or a
combination of a large number of files and folders,
or playlists could cause the player to be unable
to play up to the maximum number of files, folders,
playlists, or sessions. If you wish to play a large
number of files, folders, playlists or sessions,
minimize the length of the file, folder, or playlist
name. Long names also take up more space on
the display, potentially getting cut off.
•Finalize the audio disc before you burn it. Trying to
add music to an existing disc could cause the disc
not to function in the player.
Playlists can be changed by using the
Sc(previous)
and
cT(next) folder buttons, thefknob, or
the
©SEEK¨arrows. You can also play an MP3
CD-R or CD-RW that was recorded using no file folders.
If a CD-R or CD-RW contains more than the maximum
of 50 folders, 15 playlists, and 512 folders and files, the
player lets you access and navigate up to the maximum,
but all items over the maximum are not accessible.
3-78