2009 CHEVROLET EXPRESS CARGO VAN belt
[x] Cancel search: beltPage 1 of 408

Seats and Restraint System............................. 1-1
Front Seats
............................................... 1-2
Rear Seats
............................................... 1-6
Safety Belts
.............................................1-10
Child Restraints
.......................................1-30
Airbag System
.........................................1-58
Restraint System Check
............................1-78
Features and Controls..................................... 2-1
Keys
........................................................ 2-2
Doors and Locks
....................................... 2-6
Windows
.................................................2-13
Theft-Deterrent Systems
............................2-16
Starting and Operating Your Vehicle
...........2-19
Mirrors
....................................................2-32
Storage Areas
.........................................2-34
Instrument Panel............................................. 3-1
Instrument Panel Overview
.......................... 3-4
Climate Controls
......................................3-19
Warning Lights, Gages, and Indicators
........3-23
Driver Information Center (DIC)
..................3-41
Audio System(s)
.......................................3-63
Driving Your Vehicle....................................... 4-1
Your Driving, the Road, and the Vehicle
....... 4-2
Towing
...................................................4-25Service and Appearance Care.......................... 5-1
Service
..................................................... 5-3
Fuel
......................................................... 5-5
Checking Things Under the Hood
...............5-12
All-Wheel Drive
........................................5-44
Rear Axle
...............................................5-45
Front Axle
...............................................5-46
Noise Control System
...............................5-47
Bulb Replacement
....................................5-48
Windshield Wiper Blade Replacement
.........5-53
Tires
......................................................5-54
Appearance Care
.....................................5-97
Vehicle Identification
...............................5-104
Electrical System
....................................5-105
Capacities and Specifications
...................5-111
Maintenance Schedule..................................... 6-1
Maintenance Schedule
................................ 6-2
Customer Assistance Information.................... 7-1
Customer Assistance and Information
........... 7-2
Reporting Safety Defects
...........................7-15
Vehicle Data Recording and Privacy
...........7-18
Index................................................................ 1
2009 Chevrolet Express Owner ManualM
Page 4 of 408

Vehicle Symbols
The vehicle has components and labels that use
symbols instead of text. Symbols are shown along with
the text describing the operation or information
relating to a specific component, control, message,
gage, or indicator.
M:This symbol is shown when you need to see your
owner manual for additional instructions or information.
*:This symbol is shown when you need to see a
service manual for additional instructions or information.
Vehicle Symbol Chart
Here are some additional symbols that may be found on
the vehicle and what they mean. For more information
on the symbol, refer to the index.
9:Airbag Readiness Light
#:Air Conditioning
!:Antilock Brake System (ABS)
g:Audio Steering Wheel Controls or OnStar®
$:Brake System Warning Light
":Charging System
I:Cruise Control
B:Engine Coolant Temperature
O:Exterior Lamps
#:Fog Lamps
.:Fuel Gage
+:Fuses
i:Headlamp High/Low-Beam Changer
j:LATCH System Child Restraints
*:Malfunction Indicator Lamp
::Oil Pressure
}:Power
/:Remote Vehicle Start
>:Safety Belt Reminders
7:Tire Pressure Monitor
_:Tow/Haul Mode
F:Traction Control
M:Windshield Washer Fluid
iv
Page 5 of 408
Front Seats......................................................1-2
Manual Seats................................................1-2
Power Seat...................................................1-3
Reclining Seatbacks........................................1-3
Rear Seats.......................................................1-6
Rear Seat Operation.......................................1-6
Safety Belts...................................................1-10
Safety Belts: They Are for Everyone................1-10
How to Wear Safety Belts Properly.................1-15
Lap-Shoulder Belt.........................................1-24
Safety Belt Use During Pregnancy..................1-29
Safety Belt Extender.....................................1-30
Child Restraints.............................................1-30
Older Children..............................................1-30
Infants and Young Children............................1-33
Child Restraint Systems.................................1-37
Where to Put the Restraint.............................1-39
Lower Anchors and Tethers for Children
(LATCH)..................................................1-41
Securing a Child Restraint in a Rear Seat
Position...................................................1-48Securing a Child Restraint in the Right Front
Seat Position (With Passenger Sensing
System)...................................................1-50
Securing a Child Restraint in the Right Front
Seat Position (With Airbag On-Off Switch).....1-54
Airbag System...............................................1-58
Where Are the Airbags?................................1-60
When Should an Airbag Inflate?.....................1-63
What Makes an Airbag Inflate?.......................1-64
How Does an Airbag Restrain?.......................1-65
What Will You See After an Airbag Inflates?.....1-65
Airbag Off Switch..........................................1-67
Passenger Sensing System............................1-70
Servicing Your Airbag-Equipped Vehicle...........1-76
Adding Equipment to Your Airbag-Equipped
Vehicle....................................................1-76
Restraint System Check..................................1-78
Checking the Restraint Systems......................1-78
Replacing Restraint System Parts After
a Crash...................................................1-79
Section 1 Seats and Restraint System
1-1
Page 9 of 408
{CAUTION:
Sitting in a reclined position when the vehicle is in
motion can be dangerous. Even if when buckled
up, the safety belts cannot do their job when
reclined like this.
The shoulder belt cannot do its job because it will
not be against your body. Instead, it will be in front
of you. In a crash, you could go into it, receiving
neck or other injuries.
CAUTION: (Continued)
CAUTION: (Continued)
The lap belt cannot do its job either. In a crash,
the belt could go up over your abdomen. The belt
forces would be there, not at your pelvic bones.
This could cause serious internal injuries.
For proper protection when the vehicle is in
motion, have the seatback upright. Then sit well
back in the seat and wear the safety belt properly.
Do not have a seatback reclined if the vehicle is
moving.
1-5
Page 10 of 408
Rear Seats
Rear Seat Operation
Removing the Rear Seat
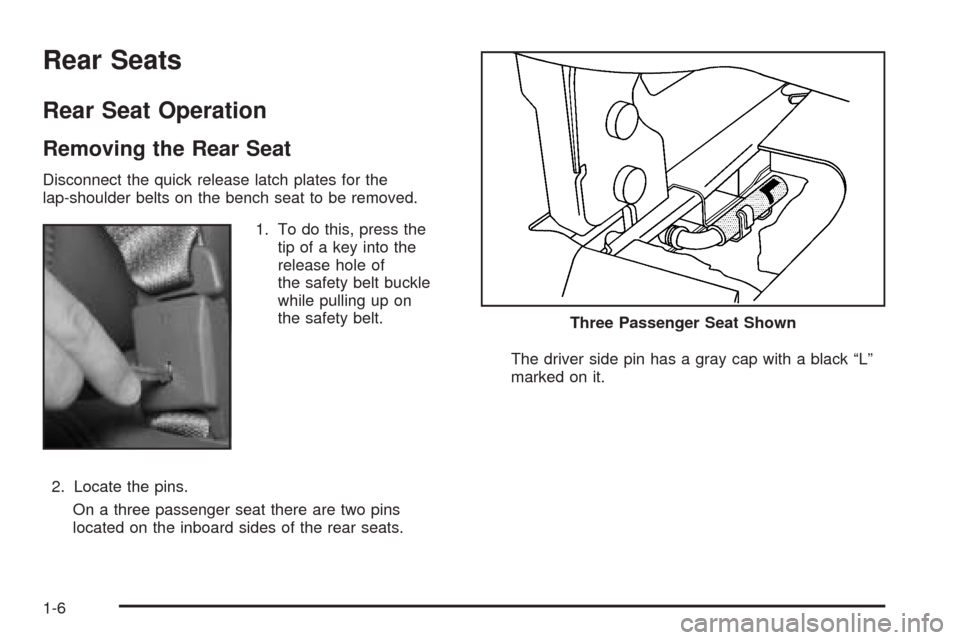
Disconnect the quick release latch plates for the
lap-shoulder belts on the bench seat to be removed.
1. To do this, press the
tip of a key into the
release hole of
the safety belt buckle
while pulling up on
the safety belt.
2. Locate the pins.
On a three passenger seat there are two pins
located on the inboard sides of the rear seats.The driver side pin has a gray cap with a black “L”
marked on it.
Three Passenger Seat Shown
1-6
Page 11 of 408
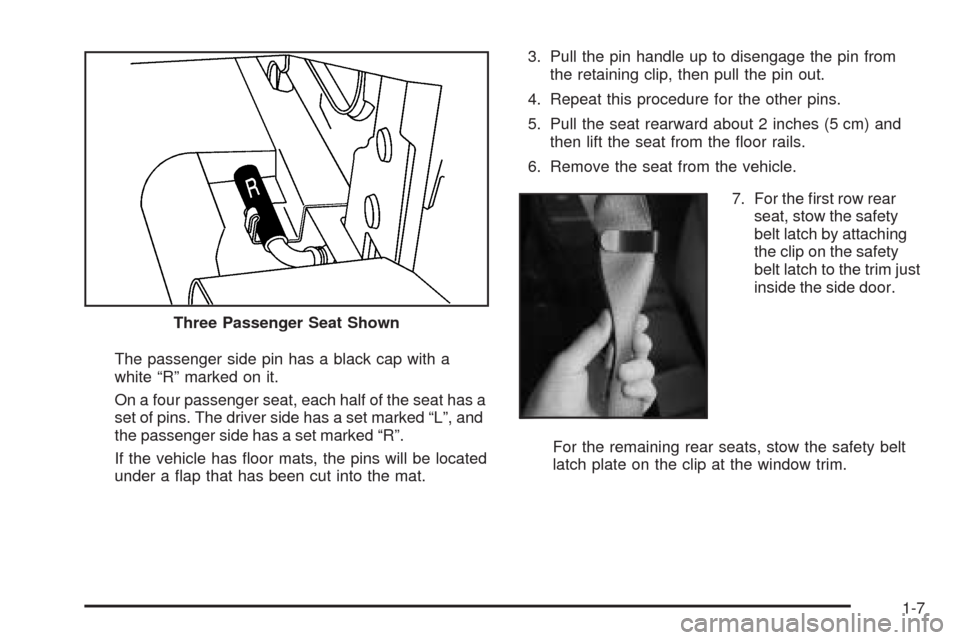
The passenger side pin has a black cap with a
white “R” marked on it.
On a four passenger seat, each half of the seat has a
set of pins. The driver side has a set marked “L”, and
the passenger side has a set marked “R”.
If the vehicle has floor mats, the pins will be located
under a flap that has been cut into the mat.3. Pull the pin handle up to disengage the pin from
the retaining clip, then pull the pin out.
4. Repeat this procedure for the other pins.
5. Pull the seat rearward about 2 inches (5 cm) and
then lift the seat from the floor rails.
6. Remove the seat from the vehicle.
7. For the first row rear
seat, stow the safety
belt latch by attaching
the clip on the safety
belt latch to the trim just
inside the side door.
For the remaining rear seats, stow the safety belt
latch plate on the clip at the window trim. Three Passenger Seat Shown
1-7
Page 12 of 408
Replacing the Rear Seats
{CAUTION:
A seat that is not locked into place properly can
move around in a collision or sudden stop. People
in the vehicle could be injured. Be sure to lock the
seat into place properly when installing it.
{CAUTION:
A safety belt that is improperly routed, not properly
attached, or twisted will not provide the protection
needed in a crash. The person wearing the belt
could be seriously injured. After raising the rear
CAUTION: (Continued)
CAUTION: (Continued)
seatback, always check to be sure that the safety
belts are properly routed and attached, and are
not twisted.
1. Position the seat into the open slots in both rails.
Push the seat forward in the rail, hooking both
seat bases onto the pins inside of the rails.
2. Locate the hole in the rail to install the locking pins at
the rear of the seat base. If the vehicle has floor
mats, pull the flap that has been cut into the mat.
3. Insert the locking pins into the seat base and push
the seat to line up the pins with the base.
On a three passenger seat, the pin with the black
cap marked “R” must be installed on the passenger
side and the pin with the gray cap marked “L” on
the driver side.
On a four passenger seat, the pins marked “R”
must be installed on the half of the seat on
the passenger side. The pins marked “L” must be
installed on the half of the seat on the driver side.
1-8
Page 13 of 408
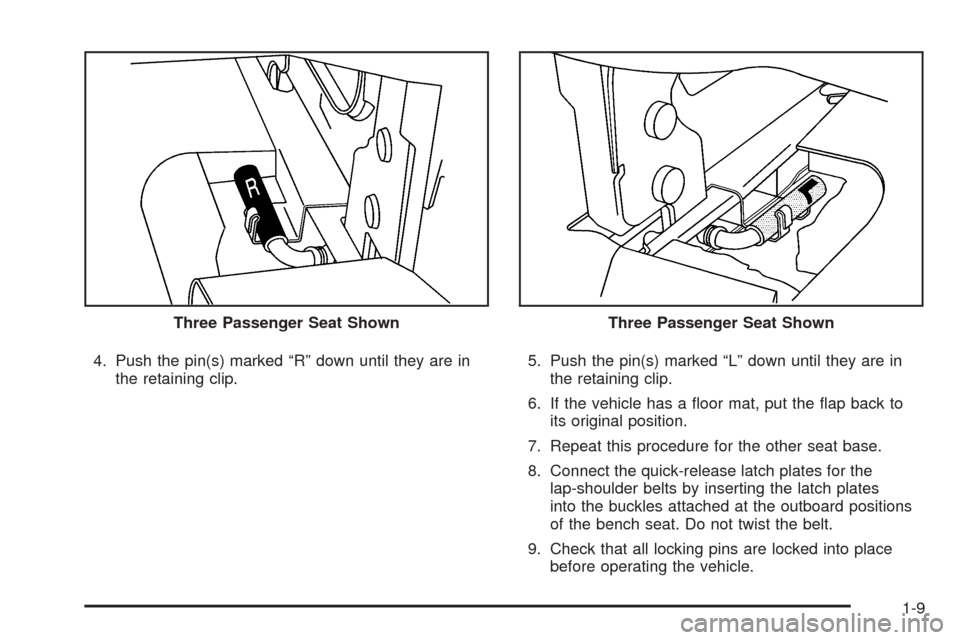
4. Push the pin(s) marked “R” down until they are in
the retaining clip.5. Push the pin(s) marked “L” down until they are in
the retaining clip.
6. If the vehicle has a floor mat, put the flap back to
its original position.
7. Repeat this procedure for the other seat base.
8. Connect the quick-release latch plates for the
lap-shoulder belts by inserting the latch plates
into the buckles attached at the outboard positions
of the bench seat. Do not twist the belt.
9. Check that all locking pins are locked into place
before operating the vehicle. Three Passenger Seat Shown
Three Passenger Seat Shown
1-9