2009 CHEVROLET EXPRESS CARGO VAN brake
[x] Cancel search: brakePage 247 of 408
Service
For service and parts needs, visit your dealer/retailer.
You will receive genuine GM parts and GM-trained and
supported service people.
Genuine GM parts have one of these marks:
Accessories and Modi�cations
When non-dealer/non-retailer accessories are added
to the vehicle, they can affect vehicle performance and
safety, including such things as airbags, braking, stability,
ride and handling, emissions systems, aerodynamics,
durability, and electronic systems like antilock brakes,
traction control, and stability control. Some of these
accessories could even cause malfunction or damage
not covered by the vehicle warranty.
GM Accessories are designed to complement and
function with other systems on the vehicle. Your GM
dealer/retailer can accessorize the vehicle using genuine
GM Accessories. When you go to your GM dealer/retailer
and ask for GM Accessories, you will know that
GM-trained and supported service technicians will
perform the work using genuine GM Accessories.
Also, seeAdding Equipment to Your Airbag-Equipped
Vehicle on page 1-76.
5-3
Page 256 of 408
Filling a Portable Fuel Container
{CAUTION:
Never fill a portable fuel container while it is in
the vehicle. Static electricity discharge from the
container can ignite the fuel vapor. You can be
badly burned and the vehicle damaged if this
occurs. To help avoid injury to you and others:
•Dispense fuel only into approved containers.
•Do not fill a container while it is inside a
vehicle, in a vehicle’s trunk, pickup bed,
or on any surface other than the ground.
•Bring the fill nozzle in contact with the inside
of the fill opening before operating the nozzle.
Contact should be maintained until the filling
is complete.
•Do not smoke while pumping fuel.
•Do not use a cellular phone while
pumping fuel.
Checking Things Under
the Hood
{CAUTION:
Things that burn can get on hot engine or fuel
operated heater (FOH) parts and start a fire.
These include liquids like fuel, oil, coolant, brake
fluid, windshield washer and other fluids, and
plastic or rubber. You or others could be burned.
Be careful not to drop or spill things that will burn
onto a hot engine or fuel operated heater (FOH).
5-12
Page 259 of 408
A. Battery. SeeBattery on page 5-39.
B. Radiator Pressure Cap. SeeRadiator Pressure Cap
on page 5-31.
C. Coolant Recovery Tank. SeeCooling System on
page 5-24.
D. Automatic Transmission Fluid Dipstick.
See “Checking the Fluid Level” underAutomatic
Transmission Fluid on page 5-21.
E. Engine Oil Fill Cap. See “When to Add Engine Oil”
underEngine Oil on page 5-15.
F. Engine Oil Dipstick. See “Checking Engine Oil”
underEngine Oil on page 5-15.
G. Engine Air Cleaner/Filter. SeeEngine Air
Cleaner/Filter on page 5-20.
H. Power Steering Fluid Reservoir. SeePower Steering
Fluid on page 5-34.
I. Brake Master Cylinder Reservoir. See “Brake Fluid”
underBrakes on page 5-36.
J. Windshield Washer Fluid Reservoir. See “Adding
Washer Fluid” underWindshield Washer Fluid
on page 5-35.Engine Oil
For diesel engine vehicles, see “Engine Oil” in the
DURAMAX®Diesel manual.
Checking Engine Oil
It is a good idea to check the engine oil every time you
get fuel. In order to get an accurate reading, the oil
must be warm and the vehicle must be on level ground.
The engine oil dipstick handle is a yellow loop.
SeeEngine Compartment Overview on page 5-14
for the location of the engine oil dipstick.
1. Turn off the engine and give the oil several minutes
to drain back into the oil pan. If you do not do this,
the oil dipstick might not show the actual level.
2. Pull out the dipstick and clean it with a paper towel
or cloth, then push it back in all the way. Remove it
again, keeping the tip down, and check the level.
5-15
Page 266 of 408
How to Check Automatic Transmission
Fluid
Because this operation can be a little difficult, you may
choose to have this done at the dealer/retailer service
department.
If you do it yourself, be sure to follow all the instructions
here, or you could get a false reading on the dipstick.
Notice:Too much or too little �uid can damage
your transmission. Too much can mean that some
of the �uid could come out and fall on hot engine
parts or exhaust system parts, starting a �re.
Too little �uid could cause the transmission to
overheat. Be sure to get an accurate reading if
you check your transmission �uid.
Wait at least 30 minutes before checking the
transmission fluid level if you have been driving:
•When outside temperatures are above 90°F (32°C).
•At high speed for quite a while.
•In heavy traffic — especially in hot weather.
•While pulling a trailer.
To get the right reading, the fluid should be at normal
operating temperature, which is 180°F to 200°F
(82°C to 93°C).Get the vehicle warmed up by driving about
15 miles (24 km) when outside temperatures are above
50°F (10°C). If it is colder than 50°F (10°C), drive the
vehicle in D (DRIVE) until the engine temperature gage
moves and then remains steady for 10 minutes.
A cold fluid check can be made after the vehicle has
been sitting for eight hours or more with the engine off,
but this is used only as a reference. Let the engine run
at idle for five minutes if outside temperatures are 50°F
(10°C) or more. If it is colder than 50°F (10°C), you may
have to idle the engine longer. Should the fluid level be
low during this cold check, you must check the fluid hot
before adding fluid. Checking the fluid hot will give you a
more accurate reading of the fluid level.
Checking the Fluid Level
Prepare your vehicle as follows:
1. Park your vehicle on a level place. Keep the engine
running.
2. With the parking brake applied, place the shift lever
in P (PARK).
3. With your foot on the brake pedal, move the shift
lever through each gear range, pausing for about
three seconds in each range. Then, position
the shift lever in P (PARK).
4. Let the engine run at idle for three minutes or more.
5-22
Page 278 of 408
Power Steering Fluid
The power steering fluid
reservoir is located in the
engine compartment on the
driver’s side of the vehicle.
SeeEngine Compartment
Overview on page 5-14for
reservoir location.
When to Check Power Steering Fluid
It is not necessary to regularly check power steering
fluid unless you suspect there is a leak in the system or
you hear an unusual noise. A fluid loss in this system
could indicate a problem. Have the system inspected
and repaired.
How to Check Power Steering Fluid
To check the power steering fluid, do the following:
1. Turn the key off and let the engine compartment
cool down.
2. Wipe the cap and the top of the reservoir clean.
3. Unscrew the cap and wipe the dipstick with a
clean rag.
4. Replace the cap and completely tighten it.
5. Then remove the cap again and look at the fluid
level on the dipstick.
The level should be at the COLD FILL mark.
If necessary, add only enough fluid to bring the
level up to the mark.
To prevent contamination of brake fluid, never check or
fill the power steering reservoir with the brake master
cylinder cover off.
What to Use
To determine what kind of fluid to use, see
Recommended Fluids and Lubricants on page 6-13.
Always use the proper fluid. Failure to use the proper
fluid can cause leaks and damage hoses and seals.
5-34
Page 280 of 408
Brakes
Brake Fluid
The brake master cylinder
reservoir is filled with
DOT-3 brake fluid. See
Engine Compartment
Overview on page 5-14for
the location of the reservoir.
There are only two reasons why the brake fluid level in
the reservoir might go down:
•The brake fluid level goes down because of normal
brake lining wear. When new linings are installed,
the fluid level goes back up.
•A fluid leak in the brake hydraulic system can also
cause a low fluid level. Have the brake hydraulic
system fixed, since a leak means that sooner
or later the brakes will not work well.Do not top off the brake fluid. Adding fluid does not
correct a leak. If fluid is added when the linings
are worn, there will be too much fluid when new brake
linings are installed. Add or remove brake fluid, as
necessary, only when work is done on the brake
hydraulic system.
{CAUTION:
If too much brake fluid is added, it can spill
on the engine and/or fuel operated heater parts,
if equipped. If the vehicle has a diesel engine and a
fuel operated heater, see “Fuel Operated Heater
(FOH)” in the diesel engine supplement. The fluid
will burn if the engine is hot enough. You or others
could be burned, and the vehicle could be
damaged. Add brake fluid only when work is done
on the brake hydraulic system. See “Checking
Brake Fluid” in this section.
Refer to the Maintenance Schedule to determine when
to check the brake fluid. SeeScheduled Maintenance
on page 6-4.
5-36
Page 281 of 408
Checking Brake Fluid
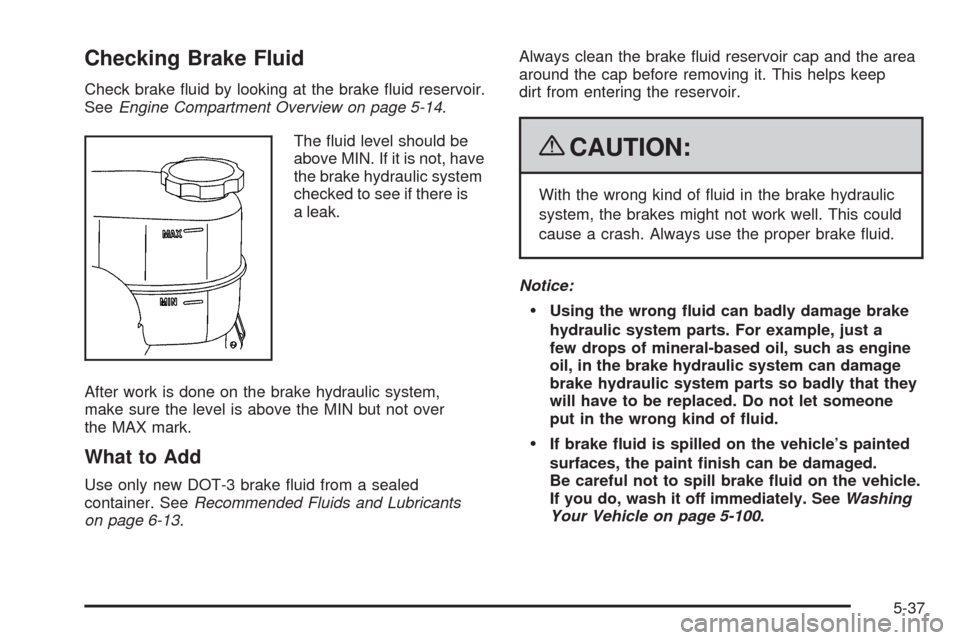
Check brake fluid by looking at the brake fluid reservoir.
SeeEngine Compartment Overview on page 5-14.
The fluid level should be
above MIN. If it is not, have
the brake hydraulic system
checked to see if there is
a leak.
After work is done on the brake hydraulic system,
make sure the level is above the MIN but not over
the MAX mark.
What to Add
Use only new DOT-3 brake fluid from a sealed
container. SeeRecommended Fluids and Lubricants
on page 6-13.Always clean the brake fluid reservoir cap and the area
around the cap before removing it. This helps keep
dirt from entering the reservoir.
{CAUTION:
With the wrong kind of fluid in the brake hydraulic
system, the brakes might not work well. This could
cause a crash. Always use the proper brake fluid.
Notice:
Using the wrong �uid can badly damage brake
hydraulic system parts. For example, just a
few drops of mineral-based oil, such as engine
oil, in the brake hydraulic system can damage
brake hydraulic system parts so badly that they
will have to be replaced. Do not let someone
put in the wrong kind of �uid.
If brake �uid is spilled on the vehicle’s painted
surfaces, the paint �nish can be damaged.
Be careful not to spill brake �uid on the vehicle.
If you do, wash it off immediately. SeeWashing
Your Vehicle on page 5-100.
5-37
Page 282 of 408
Brake Wear
This vehicle has disc brakes. Disc brake pads have
built-in wear indicators that make a high-pitched warning
sound when the brake pads are worn and new pads
are needed. The sound can come and go or be heard
all the time the vehicle is moving, except when applying
the brake pedal firmly.
{CAUTION:
The brake wear warning sound means that soon
the brakes will not work well. That could lead to an
accident. When the brake wear warning sound is
heard, have the vehicle serviced.
Notice:Continuing to drive with worn-out brake
pads could result in costly brake repair.Some driving conditions or climates can cause a brake
squeal when the brakes are first applied or lightly
applied. This does not mean something is wrong
with the brakes.
Properly torqued wheel nuts are necessary to help
prevent brake pulsation. When tires are rotated, inspect
brake pads for wear and evenly tighten wheel nuts
in the proper sequence to torque specifications
inCapacities and Specifications on page 5-111.
Brake linings should always be replaced as complete
axle sets.Brake Pedal Travel
See your dealer/retailer if the brake pedal does not
return to normal height, or if there is a rapid increase in
pedal travel. This could be a sign that brake service
might be required.
Brake Adjustment
Every brake stop, the brakes adjust for wear.
5-38