2009 CHEVROLET CORVETTE turn signal
[x] Cancel search: turn signalPage 231 of 434

XM Radio Messages
XL (Explicit Language Channels):These
channels, or any others, can be blocked by calling
1-800-852-XMXM (9696).
Updating:The encryption code in the receiver is being
updated, and no action is required. This process
should take no longer than 30 seconds.
No Signal:The system is functioning correctly, but the
vehicle is in a location that is blocking the XM signal.
When the vehicle is moved into an open area, the signal
should return.
Loading XM:The audio system is acquiring and
processing audio and text data. No action is needed.
This message should disappear shortly.
CH Off Air:This channel is not currently in service.
Tune in to another channel.
CH Unauth:This channel is blocked or cannot be
received with your XM Subscription package.
CH Unavail:This previously assigned channel is no
longer assigned. Tune to another station. If this station
was one of the presets, choose another station for
that preset button.No Info:No artist, song title, category, or text
information is available at this time on this channel.
The system is working properly.
Not Found:There are no channels available for the
selected category. The system is working properly.
XM Locked:The XM receiver in the vehicle may have
previously been in another vehicle. For security
purposes, XM receivers cannot be swapped between
vehicles. If this message is received after having
the vehicle serviced, check with your dealer/retailer.
Radio ID:If tuned to channel 0, this message will
alternate with the XM Radio 8 digit radio ID label.
This label is needed to activate the service.
Unknown:If this message is received when tuned to
channel 0, there may be a receiver fault. Consult
with your dealer/retailer.
Chk XMRcvr:If this message does not clear within a
short period of time, the receiver may have a fault.
Consult with your dealer/retailer.
Navigation/Radio System
For vehicles with a navigation radio system, see the
separate Navigation System manual.
3-95
Page 243 of 434
bg(Mute/Push to Talk):Press to silence the vehicle
speakers only. Press again to turn the sound on.
For vehicles with OnStar
®or Bluetooth systems press
and hold
Vgfor longer than two seconds to
interact with those systems. SeeOnStar®System on
page 2-40andBluetooth®on page 3-96in this manual
for more information.
c(Phone On Hook):Press to reject an incoming
call, or end a current call.
wx(Next/Previous):Press to change radio stations
or select tracks on a CD.
To change radio stations:
Pressworxto go to the next or to the previous
radio station and stay there. The radio only seeks
stations with a strong signal that are in the
selected band.
Press and holdworxfor two seconds until SCAN
displays and a beep sounds to scan stations.
The radio goes to a station, plays for a few seconds,
then goes to the next station. Press again to stop
scanning.
Press and holdworxfor four seconds until
PRESET SCAN displays and a beep sounds to scan
presets. The radio goes to a station, plays for a
few seconds, then goes to the next station.
Press again to stop scanning.
To select tracks on a CD:
Pressworxto go to the next or to the previous
track when a CD is playing.
Press and holdworxfor more than two seconds
to scan the current CD. The CD goes to the next
track, plays the �rst 10 seconds, then goes to
the next track. Press again to stop scanning.
Press and holdworxfor more than four seconds
to scan all of the CDs loaded. The CD goes to the
next CD, plays the �rst 10 seconds of each
track, then goes to the next CD. Press again to
stop scanning.
+
e−e(Volume):Press to increase or to decrease
the radio volume.
1–6 (Preset Pushbuttons):Press to play stations that
are programmed on the radio preset pushbuttons.
3-107
Page 244 of 434
Radio Reception
Frequency interference and static can occur during
normal radio reception if items such as cell phone
chargers, vehicle convenience accessories, and external
electronic devices are plugged into the accessory power
outlet. If there is interference or static, unplug the
item from the accessory power outlet.
AM
The range for most AM stations is greater than for FM,
especially at night. The longer range can cause station
frequencies to interfere with each other. For better radio
reception, most AM radio stations boost the power levels
during the day, and then reduce these levels during the
night. Static can also occur when things like storms and
power lines interfere with radio reception. When this
happens, try reducing the treble on the radio.
FM Stereo
FM signals only reach about 10 to 40 miles (16 to 65 km).
Although the radio has a built-in electronic circuit that
automatically works to reduce interference, some static
can occur, especially around tall buildings or hills,
causing the sound to fade in and out.
XM™ Satellite Radio Service
XM Satellite Radio Service gives digital radio reception
from coast-to-coast in the 48 contiguous United States,
and in Canada. Just as with FM, tall buildings or hills caninterfere with satellite radio signals, causing the sound to
fade in and out. In addition, traveling or standing under
heavy foliage, bridges, garages, or tunnels may cause
loss of the XM signal for a period of time.
Cellular Phone Usage
Cellular phone usage may cause interference with the
vehicle’s radio. This interference may occur when
making or receiving phone calls, charging the phone’s
battery, or simply having the phone on. This interference
causes an increased level of static while listening to
the radio. If static is received while listening to the radio,
unplug the cellular phone and turn it off.
Diversity Antenna System
The AM-FM antenna is a hidden self tuning system.
It optimizes the AM and FM signals relative to the
vehicle’s position and radio station source.
No maintenance or adjustments are needed.
XM™ Satellite Radio Antenna System
For vehicles with XM Satellite Radio Service, the
antenna is located on the roof or on the trunk lid of the
vehicle. Keep the antenna clear of obstructions for
clear radio reception.
3-108
Page 265 of 434
CAUTION: (Continued)
For more information about carbon monoxide, see
Engine Exhaust on page 2-35.
Snow can trap exhaust gases under your vehicle.
This can cause deadly CO (carbon monoxide) gas
to get inside. CO could overcome you and kill you.
You cannot see it or smell it, so you might not
know it is in your vehicle. Clear away snow from
around the base of your vehicle, especially any
that is blocking the exhaust.
Run the engine for short periods only as needed to
keep warm, but be careful.
To save fuel, run the engine for only short periods as
needed to warm the vehicle and then shut the engine off
and close the window most of the way to save heat.
Repeat this until help arrives but only when you
feel really uncomfortable from the cold. Moving about
to keep warm also helps.
If it takes some time for help to arrive, now and then
when you run the engine, push the accelerator
pedal slightly so the engine runs faster than the idle
speed. This keeps the battery charged to restart
the vehicle and to signal for help with the headlamps.
Do this as little as possible to save fuel.
If Your Vehicle is Stuck in Sand,
Mud, Ice, or Snow
Slowly and cautiously spin the wheels to free the
vehicle when stuck in sand, mud, ice, or snow. See
Rocking Your Vehicle to Get It Out on page 4-22.
If the vehicle has a traction system, it can often help to
free a stuck vehicle. Refer to the vehicle’s traction
system in the Index. If stuck too severely for the traction
system to free the vehicle, turn the traction system off
and use the rocking method.
{CAUTION:
If you let your vehicle’s tires spin at high speed,
they can explode, and you or others could be
injured. The vehicle can overheat, causing an
engine compartment �re or other damage. Spin
the wheels as little as possible and avoid going
above 35 mph (55 km/h) as shown on the
speedometer.
For information about using tire chains on the vehicle,
seeTire Chains on page 5-85.
4-21
Page 273 of 434

Service............................................................5-3
Accessories and Modi�cations..........................5-3
California Proposition 65 Warning.....................5-4
California Perchlorate Materials Requirements.....5-4
Doing Your Own Service Work.........................5-5
Adding Equipment to the Outside of the
Vehicle......................................................5-5
Fuel................................................................5-6
Gasoline Octane............................................5-6
Gasoline Speci�cations....................................5-6
California Fuel...............................................5-7
Additives.......................................................5-7
Fuels in Foreign Countries...............................5-8
Filling the Tank..............................................5-9
Filling a Portable Fuel Container.....................5-12
Checking Things Under the Hood....................5-12
Hood Release..............................................5-13
Engine Compartment Overview.......................5-14
Engine Oil...................................................5-20
Engine Oil Life System..................................5-26
Engine Air Cleaner/Filter................................5-28
Automatic Transmission Fluid.........................5-30
Manual Transmission Fluid.............................5-31
Hydraulic Clutch...........................................5-31
Cooling System (Engine)................................5-32
Cooling System (Intercooler)...........................5-33Engine Coolant.............................................5-34
Engine Overheating.......................................5-39
Overheated Engine Protection
Operating Mode........................................5-41
Power Steering Fluid.....................................5-42
Windshield Washer Fluid................................5-43
Brakes........................................................5-44
Battery........................................................5-50
Jump Starting...............................................5-51
Rear Axle.......................................................5-55
Headlamp Aiming...........................................5-56
Bulb Replacement..........................................5-56
High Intensity Discharge (HID) Lighting............5-56
Halogen Bulbs..............................................5-57
Headlamps, Front Turn Signal, and
Parking Lamps..........................................5-57
Taillamps, Turn Signal, and Stoplamps............5-59
Replacement Bulbs.......................................5-59
Windshield Replacement.................................5-60
Windshield Wiper Blade Replacement..............5-60
Tires..............................................................5-62
Winter Tires.................................................5-63
Tire Sidewall Labeling...................................5-64
Tire Terminology and De�nitions.....................5-66
Run-Flat Tires..............................................5-69
Section 5 Service and Appearance Care
5-1
Page 329 of 434
Halogen Bulbs
{CAUTION:
Halogen bulbs have pressurized gas inside and
can burst if you drop or scratch the bulb. You or
others could be injured. Be sure to read and follow
the instructions on the bulb package.
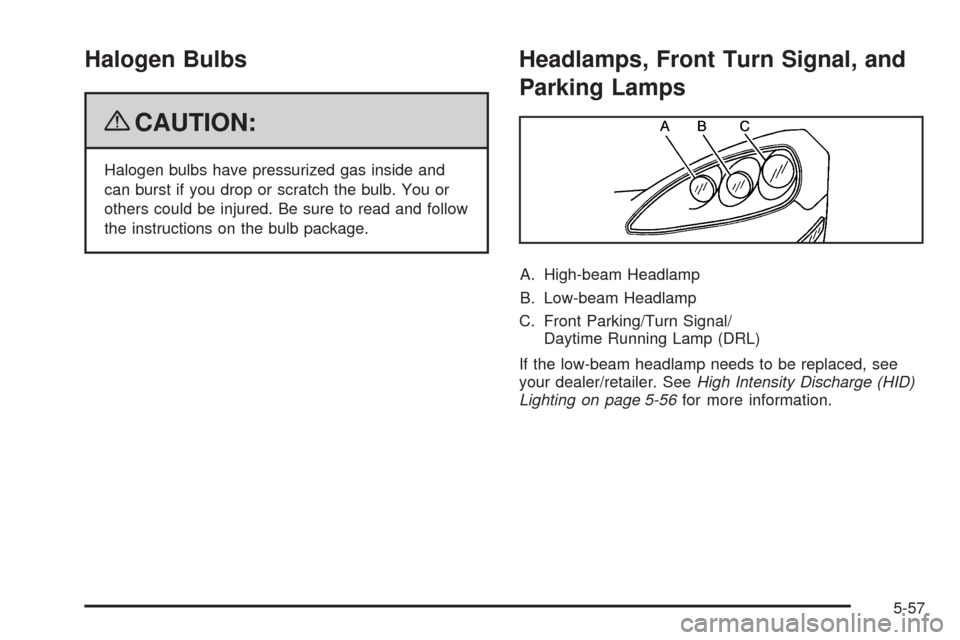
Headlamps, Front Turn Signal, and
Parking Lamps
A. High-beam Headlamp
B. Low-beam Headlamp
C. Front Parking/Turn Signal/
Daytime Running Lamp (DRL)
If the low-beam headlamp needs to be replaced, see
your dealer/retailer. SeeHigh Intensity Discharge (HID)
Lighting on page 5-56for more information.
5-57
Page 330 of 434
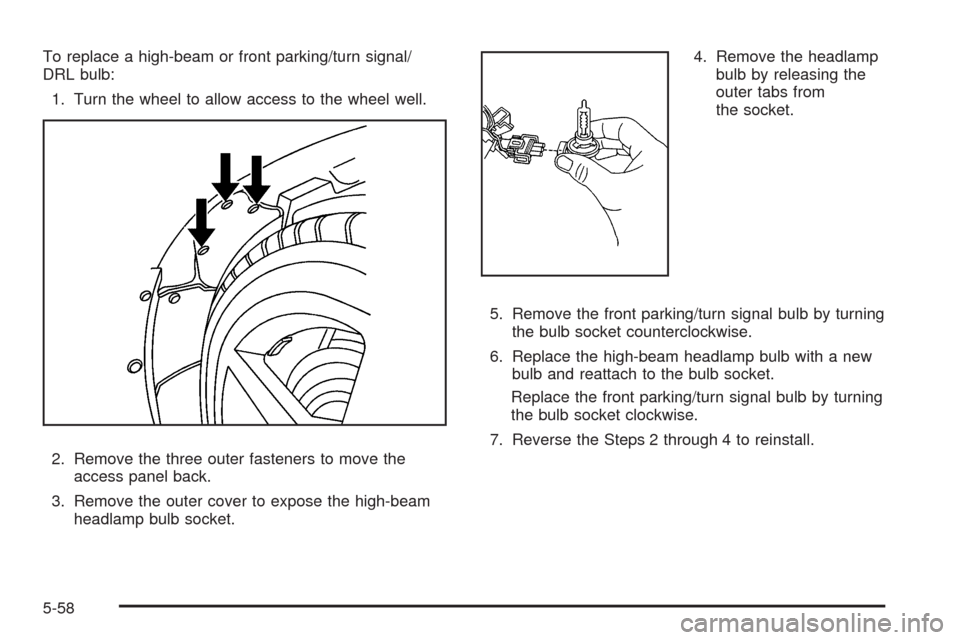
To replace a high-beam or front parking/turn signal/
DRL bulb:
1. Turn the wheel to allow access to the wheel well.
2. Remove the three outer fasteners to move the
access panel back.
3. Remove the outer cover to expose the high-beam
headlamp bulb socket.4. Remove the headlamp
bulb by releasing the
outer tabs from
the socket.
5. Remove the front parking/turn signal bulb by turning
the bulb socket counterclockwise.
6. Replace the high-beam headlamp bulb with a new
bulb and reattach to the bulb socket.
Replace the front parking/turn signal bulb by turning
the bulb socket clockwise.
7. Reverse the Steps 2 through 4 to reinstall.
5-58
Page 331 of 434
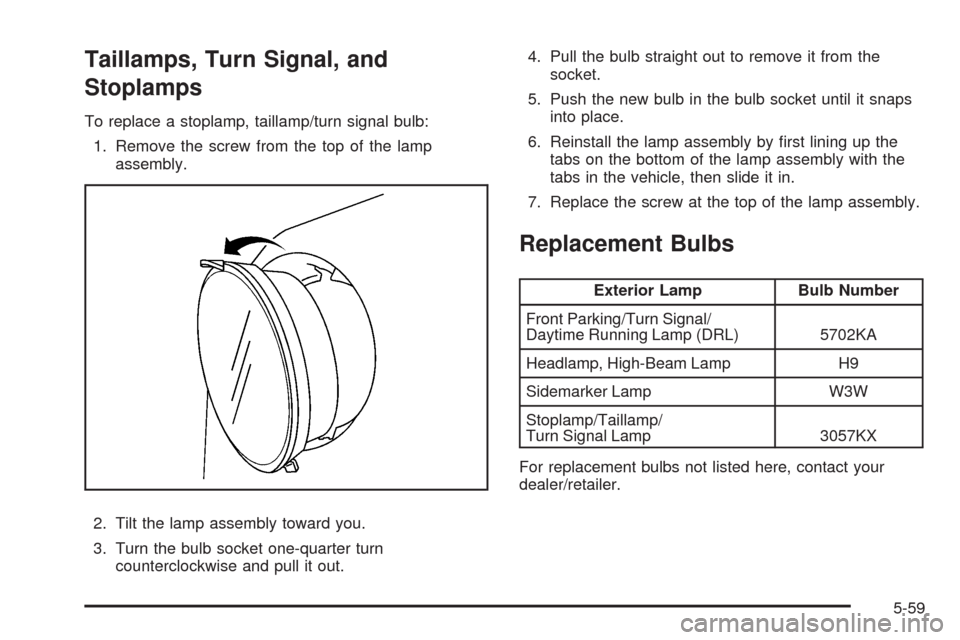
Taillamps, Turn Signal, and
Stoplamps
To replace a stoplamp, taillamp/turn signal bulb:
1. Remove the screw from the top of the lamp
assembly.
2. Tilt the lamp assembly toward you.
3. Turn the bulb socket one-quarter turn
counterclockwise and pull it out.4. Pull the bulb straight out to remove it from the
socket.
5. Push the new bulb in the bulb socket until it snaps
into place.
6. Reinstall the lamp assembly by �rst lining up the
tabs on the bottom of the lamp assembly with the
tabs in the vehicle, then slide it in.
7. Replace the screw at the top of the lamp assembly.
Replacement Bulbs
Exterior Lamp Bulb Number
Front Parking/Turn Signal/
Daytime Running Lamp (DRL) 5702KA
Headlamp, High-Beam Lamp H9
Sidemarker Lamp W3W
Stoplamp/Taillamp/
Turn Signal Lamp 3057KX
For replacement bulbs not listed here, contact your
dealer/retailer.
5-59