Page 1196 of 1903
Downloaded from www.Manualslib.com manuals search engine Special Tools
Installer ConnectorMB-990926
Installer ConnectorMB-990934
Installer ConnectorMB-990935
Fluid Seal/Differential Installer MB-998325
GENERAL INFORMATION
08
08–253Chery Automobile Co., Ltd.
Page 1216 of 1903
Downloaded from www.Manualslib.com manuals search engine 12. Tap the transaxle housing and use a suitable toolto remove the transaxle housing.
13. Remove the 3 front bearing input shaft bolts (1). (Tighten: Bearing input shaft bolts to 18 N·m)
14. Grasp the input shaft assembly, output shaft assembly, 1st-2nd shift fork, 3rd-4th shift fork and 5th-reverse fork shaft together and remove.
15. Remove the differential assembly (1) upward (as shown in the figure).
NOTE: Pre-tighten the shim of the differential cone
bearing.
16. Remove the magnet (1) and wipe the magnet clean.
MANUAL TRANSAXLE UNIT REPAIR
VISM080019
LTSM080127
LTSM080129
LTSM080130
08
08–273Chery Automobile Co., Ltd.
Page 1217 of 1903

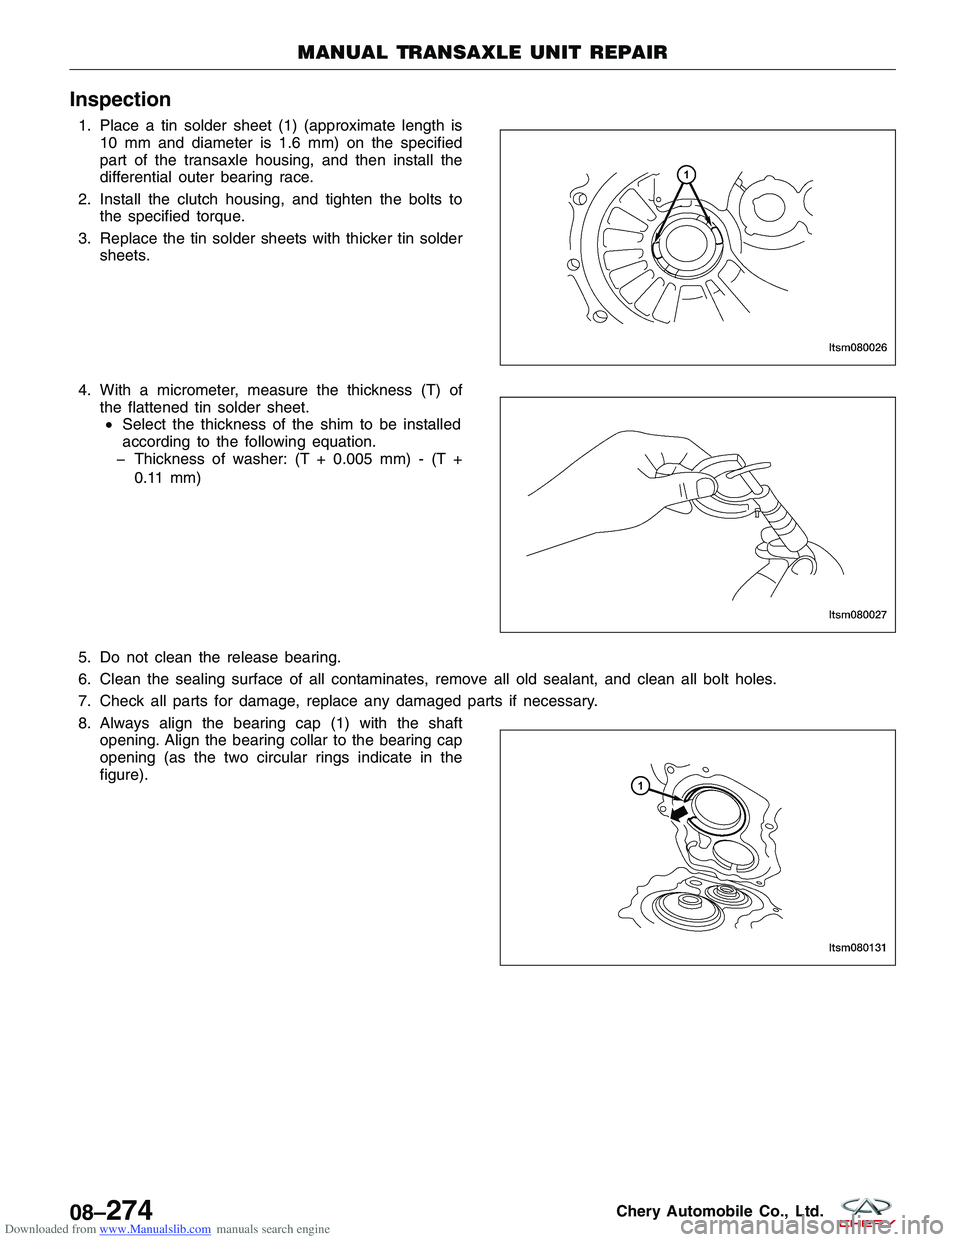
Downloaded from www.Manualslib.com manuals search engine Inspection
1. Place a tin solder sheet (1) (approximate length is10 mm and diameter is 1.6 mm) on the specified
part of the transaxle housing, and then install the
differential outer bearing race.
2. Install the clutch housing, and tighten the bolts to the specified torque.
3. Replace the tin solder sheets with thicker tin solder sheets.
4. With a micrometer, measure the thickness (T) of the flattened tin solder sheet.• Select the thickness of the shim to be installed
according to the following equation.
� Thickness of washer: (T + 0.005 mm) - (T +
0.11 mm)
5. Do not clean the release bearing.
6. Clean the sealing surface of all contaminates, remove all old sealant, and clean all bolt holes.
7. Check all parts for damage, replace any damaged parts if necessary.
8. Always align the bearing cap (1) with the shaft opening. Align the bearing collar to the bearing cap
opening (as the two circular rings indicate in the
figure).
MANUAL TRANSAXLE UNIT REPAIR
LTSM080026
LTSM080027
LTSM080131
08–274Chery Automobile Co., Ltd.
Page 1245 of 1903
Downloaded from www.Manualslib.com manuals search engine NOTE :
The following special tools are required to perform the repair procedure:
•MB-998772 - Valve Spring Compressor
• MB-999566 - Hook
• MB-990938 - Handle
• MB-990935 - Installer Connector
• MB-990934 - Installer Connector
• MB-998325 - Fluid Seal Installer
• MB-990926 - Installer Connector
1. Using special tools MB-999566 (1), MB-996772 (3), and MD-998348 (4), disassemble the outer race of
the front/rear bearing (2) of the differential.
1 - Clutch Housing
2 - Pin GB119 A10×20
3 - Fluid Seal-Input Shaft
4 - Bushing-Gear Shifting Mechanism
5 - Output Shaft Front Bearing
6 - Bearing-Gear Shifting Mechanism
7 - Magnetic Assembly8 - Front/Rear Bearing Of Differential
9 - Fluid Seal-Differential
10 - Speedometer Banking Cover
11 - Bolt GB5787 M6×12
12 - Release Bearing Race
13 - Buttonhead-Seat Release Fork
MANUAL TRANSAXLE UNIT REPAIR
LTSM080095
LTSM080096
08–302Chery Automobile Co., Ltd.
Page 1247 of 1903
Downloaded from www.Manualslib.com manuals search engine 3. Using special tools MB - 990938 (1), and MB - 990935(2), install the race-differential bearing.
4. Using special tools MB-998325 (1),
install the fluid
seal-differential.
Apply transaxle fluid
on the fluid seal lip.
(Specified fluid: 75W-90)
5. Using special tool MB-990938 (1) and MB-990926 (2), install the input shaft fluid seal.
Apply the lubricating grease on the fluid seal lip.
(Specified lubricating grease: Mobilux Ep2 or
equivalents)
MANUAL TRANSAXLE UNIT REPAIR
LTSM080102
LTSM080103
LTSM080105
08–304Chery Automobile Co., Ltd.
Page 1248 of 1903
Downloaded from www.Manualslib.com manuals search engine Transaxle Main Housing Assembly
Assembly
NOTE :
The following special tools are required to perform the repair procedure:
•MD-998325 - Fluid Installer
1 - Transaxle Housing
2 - Bearing-Gear Shifting Mechanism
3 - Pin GB119
4 - Outer Race Of Front/Rear Bearing Of Differential
5 - Adjustment Gasket-Differential Rear Bearing
6 - Fluid Seal-Differential7 - Fluid Baffle
8 - Fluid Draining Screw Plug
9 - Plain Washer-Fluid Draining Screw Plug
10 - Plain Washer-Fluid Limiting Screw Plug
11 - Fluid Limiting Screw Plug
MANUAL TRANSAXLE UNIT REPAIR
LTSM080106
08
08–305Chery Automobile Co., Ltd.
Page 1249 of 1903
Downloaded from www.Manualslib.com manuals search engine 1. Install the bearing-gear shifting mechanism (1).Press the bearing in until it is flush with the surface
of housing.
2. Install the differential fluid seal. Inspect the fluid seal for damage. Apply lubricating
grease on the external diameter and inner lip of the
fluid seal, and then use special tool MD-998325 (1)
to install the seal into position.
(Lubricating grease: Mobilux Ep2)
MANUAL TRANSAXLE UNIT REPAIR
LTSM080107
LTSM080108
08–306Chery Automobile Co., Ltd.
Page 1250 of 1903
Downloaded from www.Manualslib.com manuals search engine FRONT DIFFERENTIAL
GENERAL INFORMATION08-308
Description 08-308
Operation 08-310
Specifications 08-310
Special Tools 08-310DIFFERENTIAL UNIT REPAIR08-312
Differential Carrier 08-312
Removal & Installation 08-312
Inspection 08-313
Assembly 08-313
08
08–307Chery Automobile Co., Ltd.