Page 9 of 24
. The memory but-
tons are located on the driver’s door.")
9
Memory settings can be programmed for
the position of the driver’s seat, outside
mirrors and power adjustable steering
wheel (if equipped). The memory but-
tons are located on the driver’s door.
To save memory settings:
1. Adjust the driver’s seat, outside mir-
rors, and power adjustable steering
wheel to the desired position.
2. Press and hold button 1 until two
beeps sound.
Repeat these steps using button 2 for a
second driver.
To recall the memory settings, press
button 1 or 2 with the vehicle in Park.
The memory seat setting also can be
programmed in the DIC to be recalled
automatically when using the Remote
Keyless Entry transmitter.
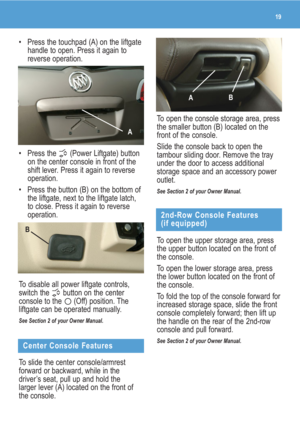
Easy Exit Seat
With the vehicle in Park, press the
(Easy Exit Seat) button to recall the exit
Memory Seat and Mirrors
(if equipped)
Adjust the driver’s seat to a comfortable
position before adjusting the steering
wheel.
Manual Adjustment
To tilt and tele-
scope the
position of the
steering
wheel:
1. Push down
the lever on
the left side of the steering column.
2. Adjust the wheel to a comfortable
position by moving it up or down
as well as forward or backward.
3. Pull up the lever to lock the wheel
in place.
Power Adjustment (if equipped)
To operate the
power tilt and
telescope fea-
ture, use the
control located
on the left side
of the steering
column.
To tilt the
steering wheel up or down, push the
control up or down.
To move the steering wheel away from
you or toward you, push the control
forward or rearward.
See Section 3 of your Owner Manual.
Steering Wheel Adjustment
position for the driver’s seat. The easy
exit seat setting also can be pro-
grammed in the DIC to be recalled when
removing the key from the ignition.
See Section 1 of your Owner Manual.
(Cooled Seat):Press the top button
to turn on the cooled seat.
Continue to press the desired button to
cycle through the temperature settings
of High (three indicator lights), Medium
(two indicator lights), Low (one indicator
light), and Off (no indicator lights).
See Section 1 of your Owner Manual.
Page 10 of 24

Getting to Know Your Enclave10
The automatic climate control system
maintains the desired individual
temperature for the driver and front seat
passenger. The system adjusts the
airflow mode, fan speed, air conditioning
and recirculation functions to reach
the set temperature(s) as quickly as
possible.
Automatic Operation
To set the automatic system:
1. Press the AUTO button.
2. Set the desired driver’s and front
passenger’s temperature using the
+ or – temperature buttons. Allow
time for the system to reach the
desired temperature.
3. Rear seat passengers can adjust rear
temperature, fan speed and airflow
using the rear controls.
Manual Operation
To operate the system manually, use the
following controls:
(On/Off):Press this button to turn
the system on or off.
Temperature Control: Press the + or –
button(s) to raise or lower the tempera-
ture setting(s).
PASS (Passenger Temperature
Control):Press this button to turn the
passenger temperature setting on or off.
Until adjusted, the passenger tempera-
ture will be the same as the driver’s.
(Fan): Press the up or down button
to increase or decrease fan speed.
(Airflow Mode):Press the up or
down button to change the direction
of the airflow to the vent, floor or defog
outlets.
(Air Conditioning): Press this but-
ton to turn the air conditioning system
on or off.
(Recirculation):Press this button
to recirculate air inside the vehicle. This
mode keeps outside air from entering
the vehicle. The recirculation feature will
operate only when the vent or bi-level
airflow setting is selected.
REAR (Rear Climate Control):Press
this button to turn the rear climate con-
trol system on or off.
(Defrost):Press this button to
direct most of the air to the windshield
and some air to the side window and
floor outlets.
(Rear Window Defogger):Press
this button to activate the rear window
defogger. The defogger will turn off
automatically or can be turned off by
pressing the button again.
See Section 3 of your Owner Manual.
Tri-Zone Automatic Climate
Controls
The rear seat climate control system
can be operated using the front climate
controls on the instrument panel or the
rear control panel, which is located in
the rear of the console or integrated
with the Rear Seat Audio (RSA) controls
(if equipped).
Rear Seat Climate Controls
Page 11 of 24

11
To turn the rear system on or off, press
the REAR button on the front control
panel. The settings in the rear will be
the same as in the front until they are
changed by rear occupants using the
rear controls.
Rear Control Panel
To operate the system, use the following
rear controls:
(Fan):Turn this knob to adjust fan
speed or to turn off the system.
Temperature Control:Turn this knob
to adjust the temperature setting.
(Airflow Mode):Turn this knob
to adjust the direction of the airflow
between the floor and headliner outlets.
Rear Controls with Rear Seat Audio
To operate the system, use the following
controls that are integrated with the RSA
controls:
(Fan): Press the up or down button
to adjust fan speed or to turn off the
system.
(Airflow Mode): Press this button
to adjust the direction of the airflow
between the floor and headliner outlets.
+ – (Temperature Control):Press the
+ or – button to adjust the temperature
setting from 0 (cooler) to 12 (warmer).
See Section 3 of your Owner Manual.
ENTERTAINMENT
Audio System Features
While most of the features on your radio
will look familiar, some of the following
may be new:
(Power/Volume):Press this knob to
turn the system on or off. Turn the knob
to adjust the volume.
(Tune):Turn this knob to select radio
stations or, when a CD is playing, to
select a track or MP3 file.
Tone and Speaker Control:Press the
(Tune) knob to adjust the tone con-
trol (bass/treble) or speaker control
(balance/fade) setting. Turn the knob or
press the SEEK, FWD or REV button to
adjust the selected setting.
(Information):Press this button to
display additional information related to
the current FM-RDS or XM station, or
MP3 song.
FAV (Favorite):Press this button to go
through up to six pages of any combina-
tion (AM, FM, or XM, if equipped) of
preset favorite radio stations. On each
page, up to six stations are available by
using the six pushbuttons below the
radio display.
BAND: Press this button to switch to
FM, AM, or XM (if equipped). When
playing a CD or portable audio player,
press this button to play the radio
instead.
Page 12 of 24

Getting to Know Your Enclave12
CD/AUX: Press this button to play a CD
instead of the radio. Press again and the
system will automatically search for a
portable audio player connected to the
auxiliary input jack.
EQ (Equalization):Press this button to
select preset equalization settings.
CAT (Category)(if equipped): Press
this button to find XM stations within a
desired category.
Auxiliary Input Jack:A portable audio
player (such as an iPod
®or other MP3
player) can be connected to the auxiliary
input jack located on the radio. Press
the CD/AUX button to begin playing
audio from the portable player over the
vehicle speakers. To optimize speaker
volume, fully increase the volume level
of the portable player.
Setting Favorite Stations
Before setting your favorite stations,
shift the vehicle into Park.
You can set up to six pages of any
combination (AM, FM, or XM, if
equipped) of favorite radio stations, with
up to six stations stored on each page.To set the number of favorite station
pages:
1. Press the MENU button to display the
radio setup menu.
2. Press the pushbutton located below
the FAV 1–6 label on the radio display.
3. Select the desired number of favorite
station pages.
4. Press the FAV button. You may now
begin storing your favorite stations for
the chosen number of pages.
To store favorite stations:
1. Tune in the desired radio station.
2. Press the FAV button to display the
page where the station is to be
stored.
3. Press and hold one of the six push-
buttons until a beep sounds to store
the station.
4. Repeat the steps for each pushbutton
on each page.
Setting the Time on the Audio System
To set the time:
1. Turn on the radio.
Note:Engaging in extended searching
for specific audio stations or songs by
using buttons and knobs — or giving
extended attention to entertainment tasks
— can lead you to look away from the
road frequently or for prolonged periods,
which may cause you to miss seeing
things on the road that you need to see.
Avoid engaging in extended searching for
specific items while driving.
Page 13 of 24
 button, or press
the MENU button until the clock
option is displayed; and then press
the pushbutton located under the
clock option label. The HR, MIN, MM,
DD, YYYY labels will")
13
2. Press the (Clock) button, or press
the MENU button until the clock
option is displayed; and then press
the pushbutton located under the
clock option label. The HR, MIN, MM,
DD, YYYY labels will appear on the
display.
3. Press the pushbutton under any of
the labels to be changed.
4. Press the pushbutton again, the right
SEEK arrow or the FWD button to
increase the numbers. Press the left
SEEK arrow or the REV button to
decrease the numbers. Rotating the
(Tune) knob also will increase or
decrease the selected label.
5. Press the Clock or MENU button
again to set the currently displayed
time and date.
Playing MP3 Files
Your audio system has MP3 file play-
back capability. A CD-R containing MP3
audio tracks will play automatically when
inserted into the CD player. An MP3
label will be displayed.
Radio Data System
When you tune to a Radio Data System
(RDS) station, the station name or call
letters will appear on the display instead
of the frequency. Depending on the RDS
station, additional text information may
be available by pressing the
(Information) button.
RDS features are available for use only
on FM stations that broadcast RDS
information. RDS relies on receiving
specific information from these stations
and will work only when the information
is available.
See Section 3 of your Owner Manual.
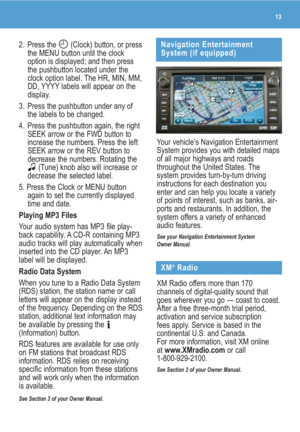
Your vehicle’s Navigation Entertainment
System provides you with detailed maps
of all major highways and roads
throughout the United States. The
system provides turn-by-turn driving
instructions for each destination you
enter and can help you locate a variety
of points of interest, such as banks, air-
ports and restaurants. In addition, the
system offers a variety of enhanced
audio features.
See your Navigation Entertainment System
Owner Manual.
Navigation Entertainment
System (if equipped)
XM®Radio
XM Radio offers more than 170
channels of digital-quality sound that
goes wherever you go — coast to coast.
After a free three-month trial period,
activation and service subscription
fees apply. Service is based in the
continental U.S. and Canada.
For more information, visit XM online
atwww.XMradio.comor call
1-800-929-2100.
See Section 3 of your Owner Manual.
Page 14 of 24
:
Pull up on the
+ or – button
to increase or
decrease the
volume.
(Next/Previous/End): Press the
up or down arrow to go")
The following
audio controls
are located on
the steering
wheel:
+ – (Volume):
Pull up on the
+ or – button
to increase or
decrease the
volume.
(Next/Previous/End): Press the
up or down arrow to go to the next
or previous radio station stored as a
favorite or, when a CD or DVD (if
equipped) is playing, to the next or
previous track or chapter. Press the
(End) button to end an OnStar or
Bluetooth call.
SRCE (Source):Press this button to
switch between AM, FM, XM (if
equipped), CD, DVD (if equipped) and
AUX.
(Seek):Press this button to go to
the next radio station on the same band
or, when a CD or DVD (if equipped) is
playing, to the next track or chapter.
(Mute/Voice Recognition): Press
this button to mute the vehicle
speakers. Press and hold the button for
one second to initiate navigation system
voice recognition or interact with the
OnStar or Bluetooth system.
See Section 3 of your Owner Manual.
Getting to Know Your Enclave14
Audio Steering Wheel Controls
Rear Seat Audio
The Rear Seat Audio (RSA) system
allows front seat and rear seat passen-
gers to listen to different entertainment
sources at the same time using the rear
seat controls and wired headphones
(not supplied) or wireless headphones
(if equipped).
To select an entertainment source
(radio, CD, or DVD, if equipped):
• Press the SRCE (Source) button.
Rear Seat Audio and DVD Rear
Seat Entertainment Systems
(if equipped)
Bluetooth®System
The in-vehicle Bluetooth system allows
users with a Bluetooth-enabled cell
phone to make and receive hands-free
phone calls using the vehicle’s audio
system, microphone and controls. The
Bluetooth-enabled cell phone must be
paired with the in-vehicle Bluetooth sys-
tem before it can be used in the vehicle.
Not all phones will support all functions.
Visit www.buick.com/bluetoothfor
more information.
See Section 3 of your Owner Manual.
Page 15 of 24

15
To adjust the volume:
• Turn the left volume knob to adjust
the left wired headphones and the
right volume knob to adjust the right
wired headphones. On wireless head-
phones, adjust volume using the
headphone volume control.
DVD Rear Seat Entertainment
The Rear Seat Entertainment (RSE)
system includes a DVD player as part of
the front radio, a video display screen,
audio/video jacks, two wireless head-
phones, and a remote control.
To play a DVD:
1. Turn the ignition to the Accessory or
On position.
2. Push the release button on the DVD
display console and fold down the
video screen.
3. Insert a DVD into the DVD slot in the
radio. It will turn on the video screen
and begin playing automatically. To
cycle through available inputs, press
the DVD/CD AUX button. It may be
necessary to press the Play push-
button on the radio or the remote
control to start playing the movie
if the DVD stops at a menu screen.
4. To listen to the DVD through the
vehicle speakers, press the DVD/CD
AUX button. Adjust volume using the
radio volume control.
Note:Aim the remote control at the
video screen, not the DVD player,
for proper operation.
To listen to the DVD through the
headphones, press the On/Off button
on the headphones. Adjust volume
using the headphone volume control.
5. To control DVD playback, use the
remote control or the front radio
pushbuttons.
Parental Control
The Parental Control feature turns off
the video screen and Rear Seat Audio to
help gain the attention of rear passen-
gers, such as when using headphones.
To enable the Parental Control feature,
press and hold the radio power button
for two seconds. To turn off Parental
Control, press and hold the radio power
button again for two seconds.
See Section 3 of your Owner Manual.
CONVENIENCE
Adaptive Forward Lighting
(if equipped)
The Adaptive Forward Lighting System
(AFS) features headlamps that swivel
horizontally to provide greater road
illumination while turning.
To enable AFS, turn the exterior lamps
control knob to the AUTO position. AFS
operates only at speeds greater than
2 mph and after starting the vehicle and
driving a short distance to calibrate the
system.
See Section 3 of your Owner Manual.
Page 16 of 24

Getting to Know Your Enclave16
Windshield Wipers and Washer
The windshield wipers and washer con-
trols, located on the multifunction lever
on the left side of the steering column,
include the following functions:
(Mist):Rotate the control band to
this position to turn the wipers on for
one wipe.
(Off):Rotate the control band to this
position to turn off the wipers.
Interior Lighting Features
Instrument Panel Brightness
The (instrument panel brightness)
control knob is located on the left side of
the instrument panel. To brighten or dim
the instrument panel lights, press the
knob; it will pop out. Turn the knob to
adjust the intensity of the lights.
Courtesy Lamps
The courtesy lamps will come on when
a door is open. The lamps also can be
turned on by fully rotating the instrument
panel brightness control knob clockwise.
To disable the courtesy lamps, press the
(Courtesy Lamp Override) button
located above the instrument panel
brightness control knob.
See Section 3 of your Owner Manual.
The Automatic Headlamp System
turns on the Daytime Running Lamps
in the daytime and the headlamps and
other exterior lamps at night or when
necessary.
The system uses a light sensor, located
on top of the instrument panel, to
determine light conditions. For proper
operation, avoid placing any objects on
or near the sensor.
Exterior Lamps Control
The exterior lamps can be operated
using the control knob located on the left
side of the instrument panel. The knob
can be rotated to the following positions:
AUTO (Automatic Lamp Control):
This position enables the Automatic
Headlamp System.
(On/Off):Momentarily turn the knob
to this position to turn the Automatic
Headlamp System off or on again.
(Parking Lamps):This position
turns on the parking lamps and
taillamps.
(Headlamps):This position turns
on the headlamps, parking lamps and
taillamps.
(Fog Lamps):Press this button on
the exterior lamps control knob to turn
the fog lamps on or off.
See Section 3 of your Owner Manual.
Automatic Headlamp System