2009 BMW Z4 SDRIVE35I navigation
[x] Cancel search: navigationPage 151 of 248
Navigation
Entertainment
Driving tips
149Reference
At a glance
Controls
Communications
Mobility
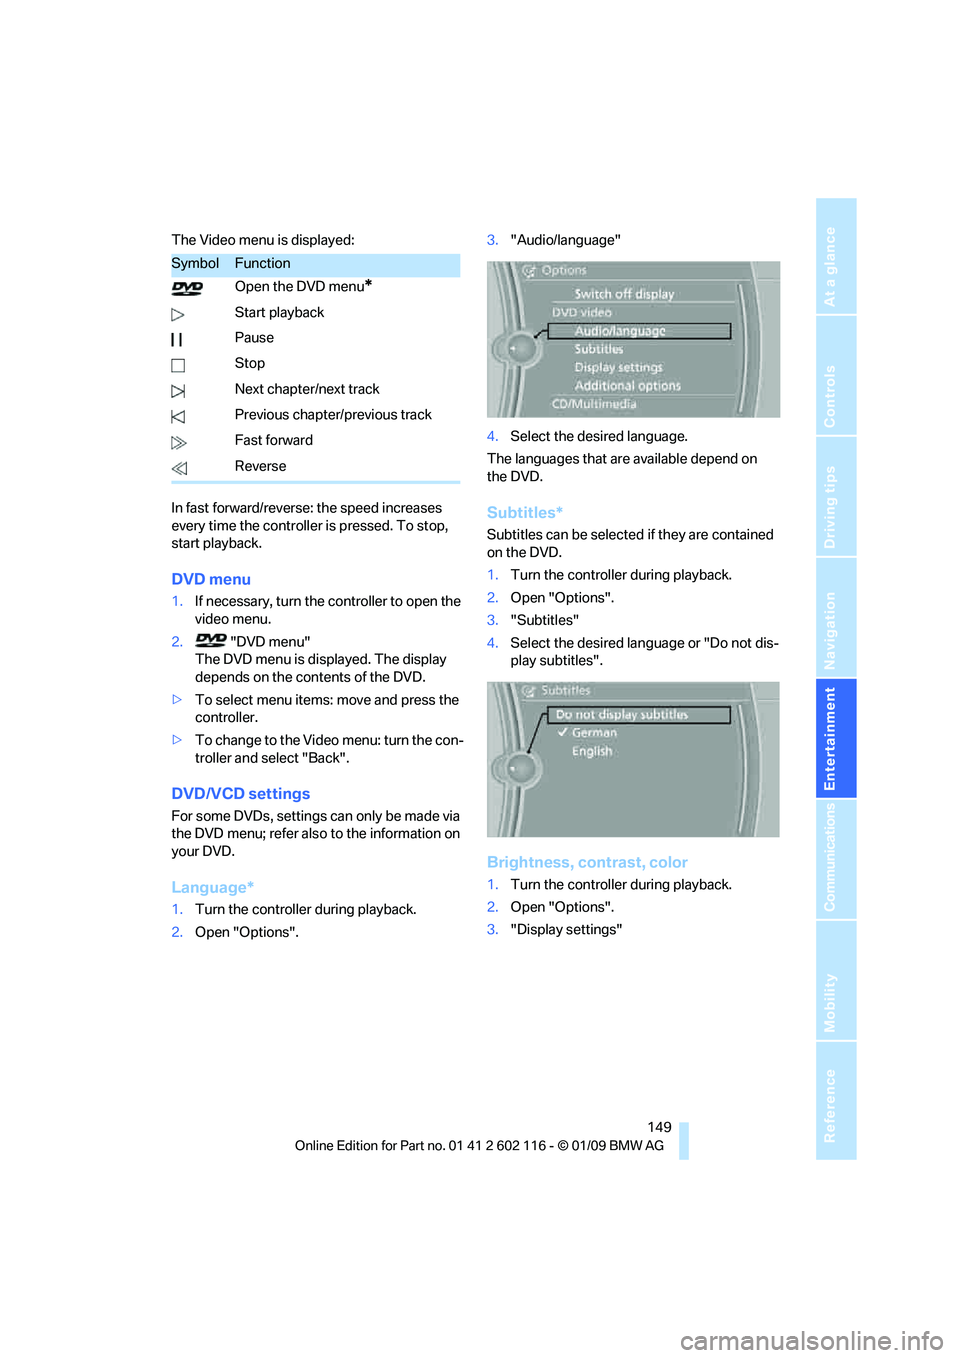
The Video menu is displayed:
In fast forward/reverse: the speed increases
every time the controller is pressed. To stop,
start playback.
DVD menu
1.If necessary, turn the controller to open the
video menu.
2. "DVD menu"
The DVD menu is displayed. The display
depends on the contents of the DVD.
> To select menu items: move and press the
controller.
> To change to the Vide o menu: turn the con-
troller and select "Back".
DVD/VCD settings
For some DVDs, settings can only be made via
the DVD menu; refer also to the information on
your DVD.
Language*
1. Turn the controller during playback.
2. Open "Options". 3.
"Audio/language"
4. Select the desired language.
The languages that are available depend on
the DVD.
Subtitles*
Subtitles can be selected if they are contained
on the DVD.
1. Turn the controller during playback.
2. Open "Options".
3. "Subtitles"
4. Select the desired language or "Do not dis-
play subtitles".
Brightness, contrast, color
1.Turn the controller during playback.
2. Open "Options".
3. "Display settings"
SymbolFunction
Open the DVD menu
*
Start playback
Pause
Stop
Next chapter/next track
Previous chapter/previous track
Fast forward
Reverse
Page 153 of 248
Navigation
Entertainment
Driving tips
151Reference
At a glance
Controls
Communications
Mobility
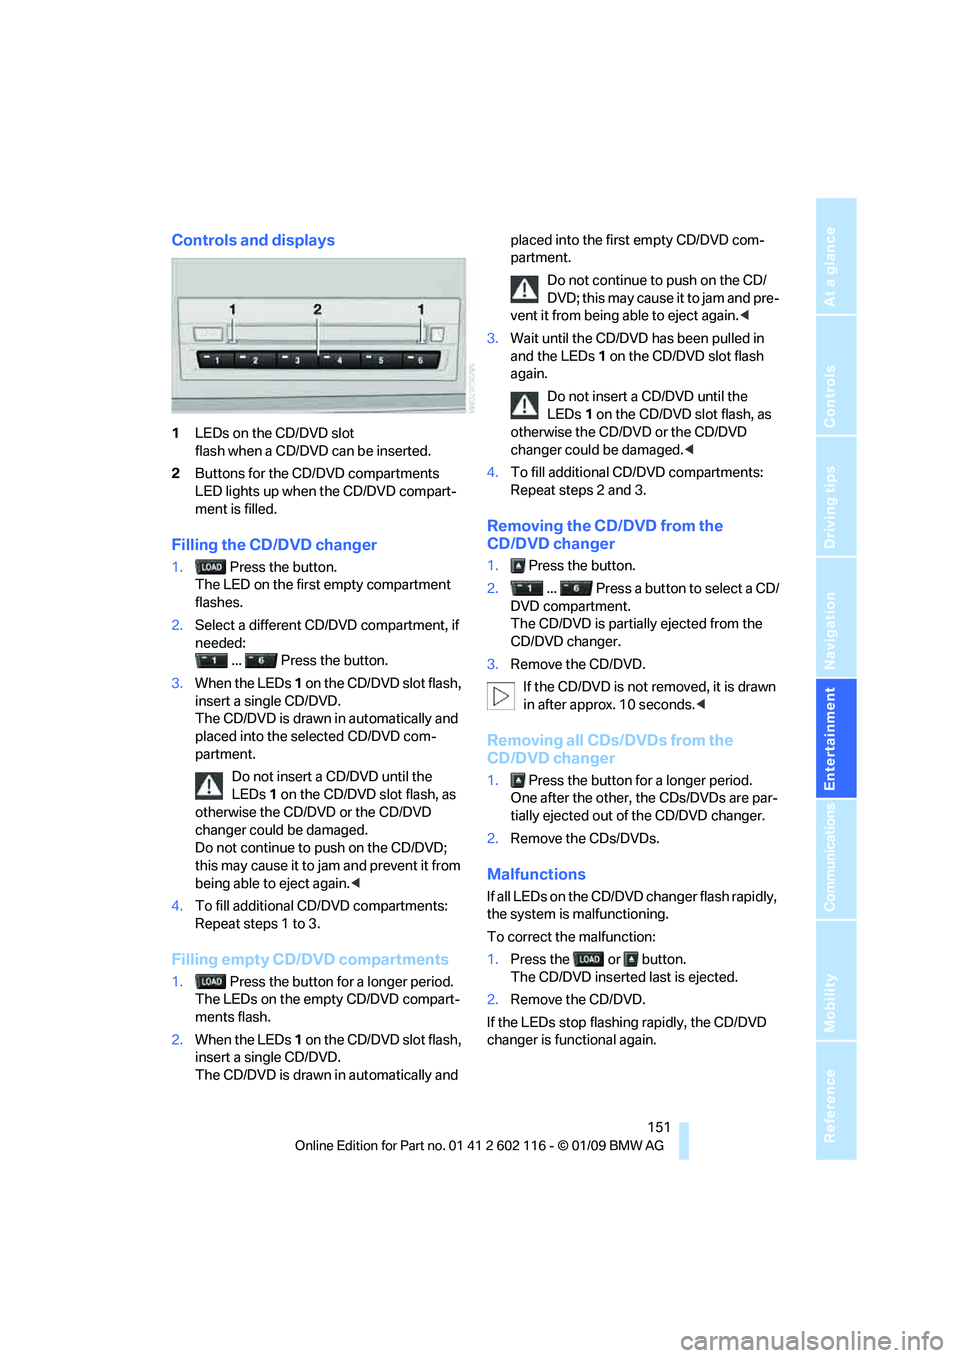
Controls and displays
1LEDs on the CD/DVD slot
flash when a CD/DVD can be inserted.
2 Buttons for the CD/DVD compartments
LED lights up when the CD/DVD compart-
ment is filled.
Filling the CD/DVD changer
1. Press the button.
The LED on the first empty compartment
flashes.
2. Select a different CD/DVD compartment, if
needed:
... Press the button.
3. When the LEDs 1 on the CD/DVD slot flash,
insert a single CD/DVD.
The CD/DVD is drawn in automatically and
placed into the selected CD/DVD com-
partment.
Do not insert a CD/DVD until the
LEDs 1 on the CD/DVD slot flash, as
otherwise the CD/DVD or the CD/DVD
changer could be damaged.
Do not continue to push on the CD/DVD;
this may cause it to jam and prevent it from
being able to eject again. <
4. To fill additional CD/DVD compartments:
Repeat steps 1 to 3.
Filling empty CD/DVD compartments
1. Press the button for a longer period.
The LEDs on the empty CD/DVD compart-
ments flash.
2. When the LEDs 1 on the CD/DVD slot flash,
insert a single CD/DVD.
The CD/DVD is drawn in automatically and placed into the first empty CD/DVD com-
partment.
Do not continue to push on the CD/
DVD; this may cause it to jam and pre-
vent it from being able to eject again. <
3. Wait until the CD/DVD has been pulled in
and the LEDs 1 on the CD/DVD slot flash
again.
Do not insert a CD/DVD until the
LEDs 1 on the CD/DVD slot flash, as
otherwise the CD/DVD or the CD/DVD
changer could be damaged.<
4. To fill additional CD/DVD compartments:
Repeat steps 2 and 3.
Removing the CD/DVD from the
CD/DVD changer
1. Press the button.
2. ... Press a button to select a CD/
DVD compartment.
The CD/DVD is partia lly ejected from the
CD/DVD changer.
3. Remove the CD/DVD.
If the CD/DVD is not removed, it is drawn
in after approx. 10 seconds. <
Removing all CDs/DVDs from the
CD/DVD changer
1. Press the button for a longer period.
One after the other, the CDs/DVDs are par-
tially ejected out of the CD/DVD changer.
2. Remove the CDs/DVDs.
Malfunctions
If all LEDs on the CD/DVD changer flash rapidly,
the system is malfunctioning.
To correct the malfunction:
1.Press the or button.
The CD/DVD inserted last is ejected.
2. Remove the CD/DVD.
If the LEDs stop flashing rapidly, the CD/DVD
changer is functional again.
Page 155 of 248
Navigation
Entertainment
Driving tips
153Reference
At a glance
Controls
Communications
Mobility
Music collection
Storing music
The music tracks from CDs/DVDs and USB
devices can be stored in the music collection in
the vehicle and played from there.
> Audio CD: tracks are converted into a com-
pressed audio format when they are stored.
If available, information on the album, such
as the artist, is stored as well.
> CD/DVD or USB device with compressed
audio files: The entire content of the CD/
DVD or the USB device is stored in the vehi-
cle as an album. After storing, the tracks and
directories can be dele ted individually. Files
are only stored in the WMA, MP3, and AAC
formats.
Tracks with DRM copy protection can be
stored in the vehicle but cannot be
played back.
Regularly back up the music data; other-
wise, it could be lost if there is a fault on
the hard disk. <
Music recognition technology and
related data ar e provided by
Gracenote®. Gracenote® is the industry stan-
dard in music recogn ition technology and
related content delivery. For more information,
please visit www.gracenote.com.
CD and music-related data from Gracenote,
Inc., copyright © 2000-2008 Gracenote.
Gracenote Software, copyright 2000-2008
Gracenote. This product and service may prac-
tice one or more of the following U.S. Patents:
#5,987,525; #6,061,680; #6,154,773,
#6,161,132, #6,230,192, #6,230,207,
#6,240,459, #6,330,593, and other patents
issued or pending. So me services supplied
under license from Open Globe, Inc. for U.S.
Patent: 6.304.523.
Storing from a CD/DVD
CDs/DVDs can only be stored from the CD/DVD
player.
1. Insert a CD/DVD into the CD/DVD player.
2. "CD/Multimedia"
3. "CD/DVD"
4. Select the symbol for the CD/DVD
player.
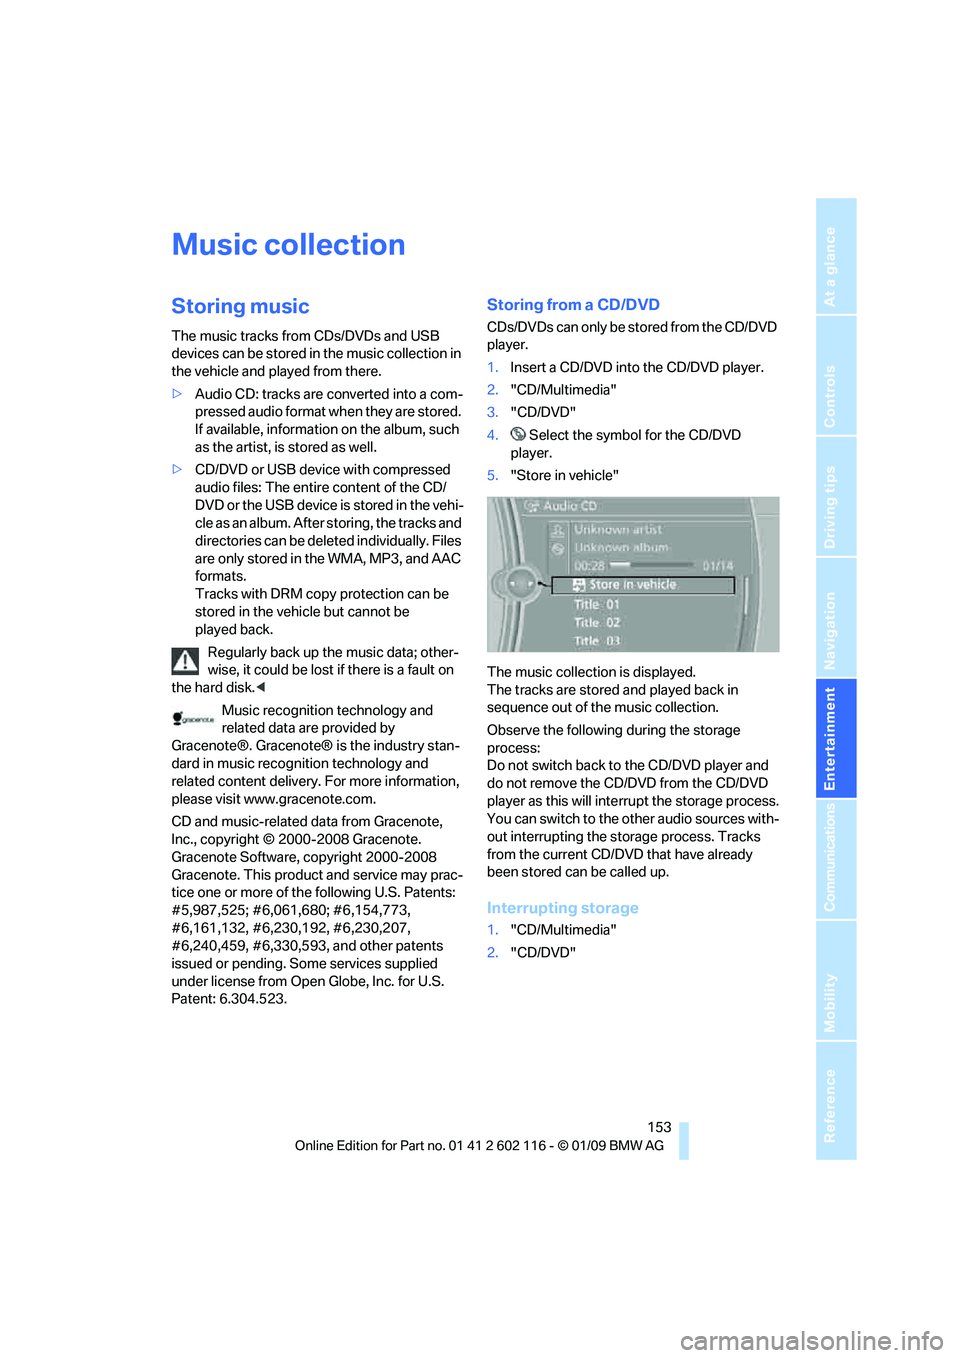
5. "Store in vehicle"
The music collection is displayed.
The tracks are stored and played back in
sequence out of the music collection.
Observe the following during the storage
process:
Do not switch back to the CD/DVD player and
do not remove the CD/DVD from the CD/DVD
player as this will inte rrupt the storage process.
You can switch to the other audio sources with-
out interrupting the storage process. Tracks
from the current CD/DVD that have already
been stored can be called up.
Interrupting storage
1. "CD/Multimedia"
2. "CD/DVD"
Page 157 of 248
Navigation
Entertainment
Driving tips
155Reference
At a glance
Controls
Communications
Mobility
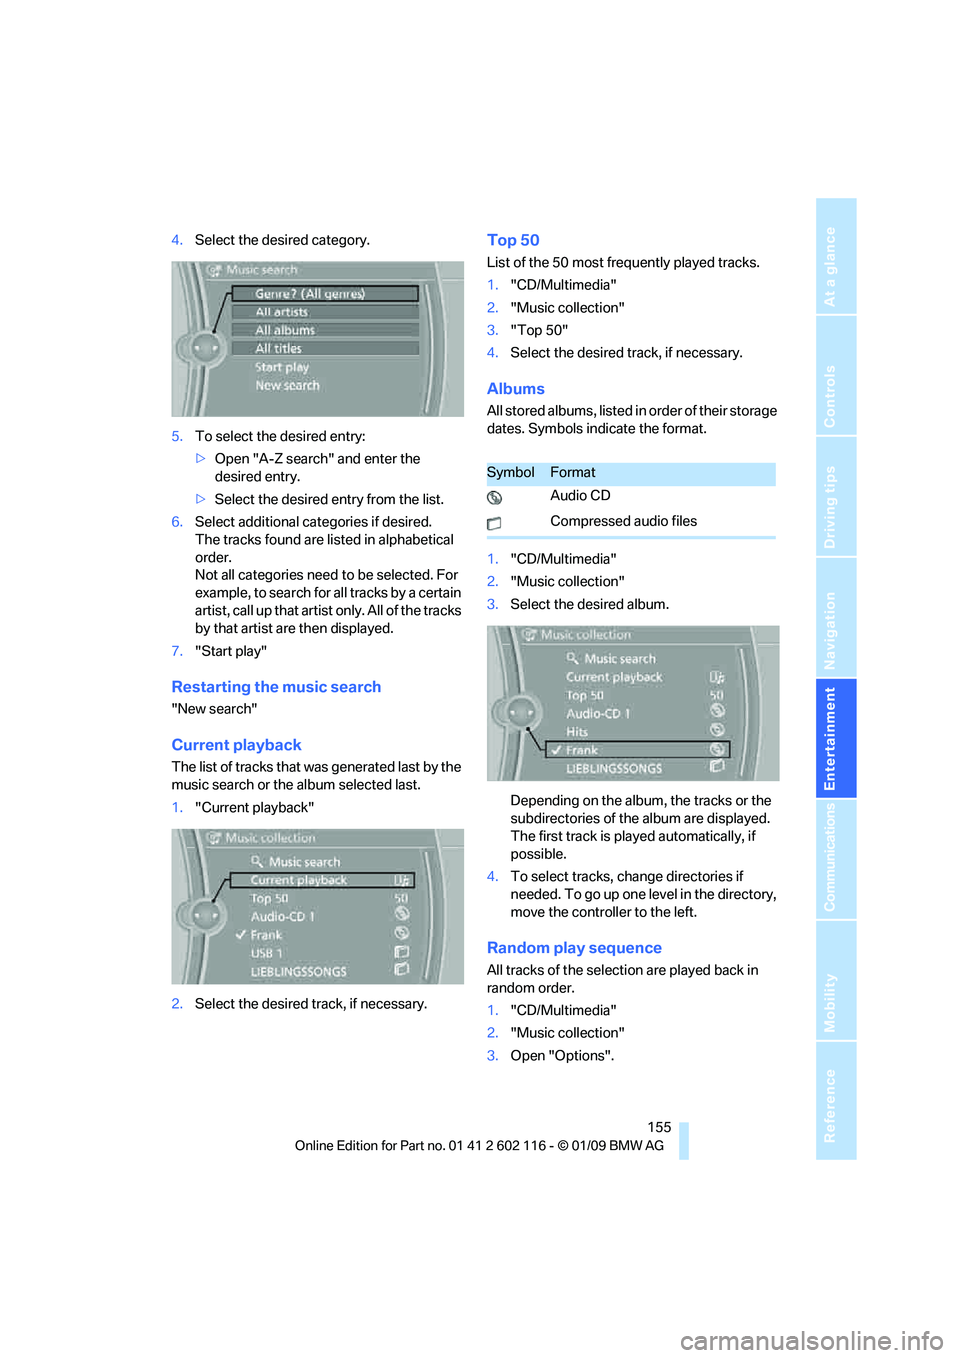
4.Select the desired category.
5. To select the desired entry:
>Open "A-Z search" and enter the
desired entry.
> Select the desired entry from the list.
6. Select additional categories if desired.
The tracks found are listed in alphabetical
order.
Not all categories need to be selected. For
example, to search for all tracks by a certain
artist, call up that artist only. All of the tracks
by that artist are then displayed.
7. "Start play"
Restarting the music search
"New search"
Current playback
The list of tracks that was generated last by the
music search or the album selected last.
1."Current playback"
2. Select the desired track, if necessary.
Top 50
List of the 50 most frequently played tracks.
1."CD/Multimedia"
2. "Music collection"
3. "Top 50"
4. Select the desired track, if necessary.
Albums
All stored albums, listed in order of their storage
dates. Symbols indicate the format.
1."CD/Multimedia"
2. "Music collection"
3. Select the desired album.
Depending on the album, the tracks or the
subdirectories of the album are displayed.
The first track is played automatically, if
possible.
4. To select tracks, change directories if
needed. To go up one level in the directory,
move the controller to the left.
Random play sequence
All tracks of the select ion are played back in
random order.
1. "CD/Multimedia"
2. "Music collection"
3. Open "Options".
SymbolFormat
Audio CD
Compressed audio files
Page 159 of 248
Navigation
Entertainment
Driving tips
157Reference
At a glance
Controls
Communications
Mobility
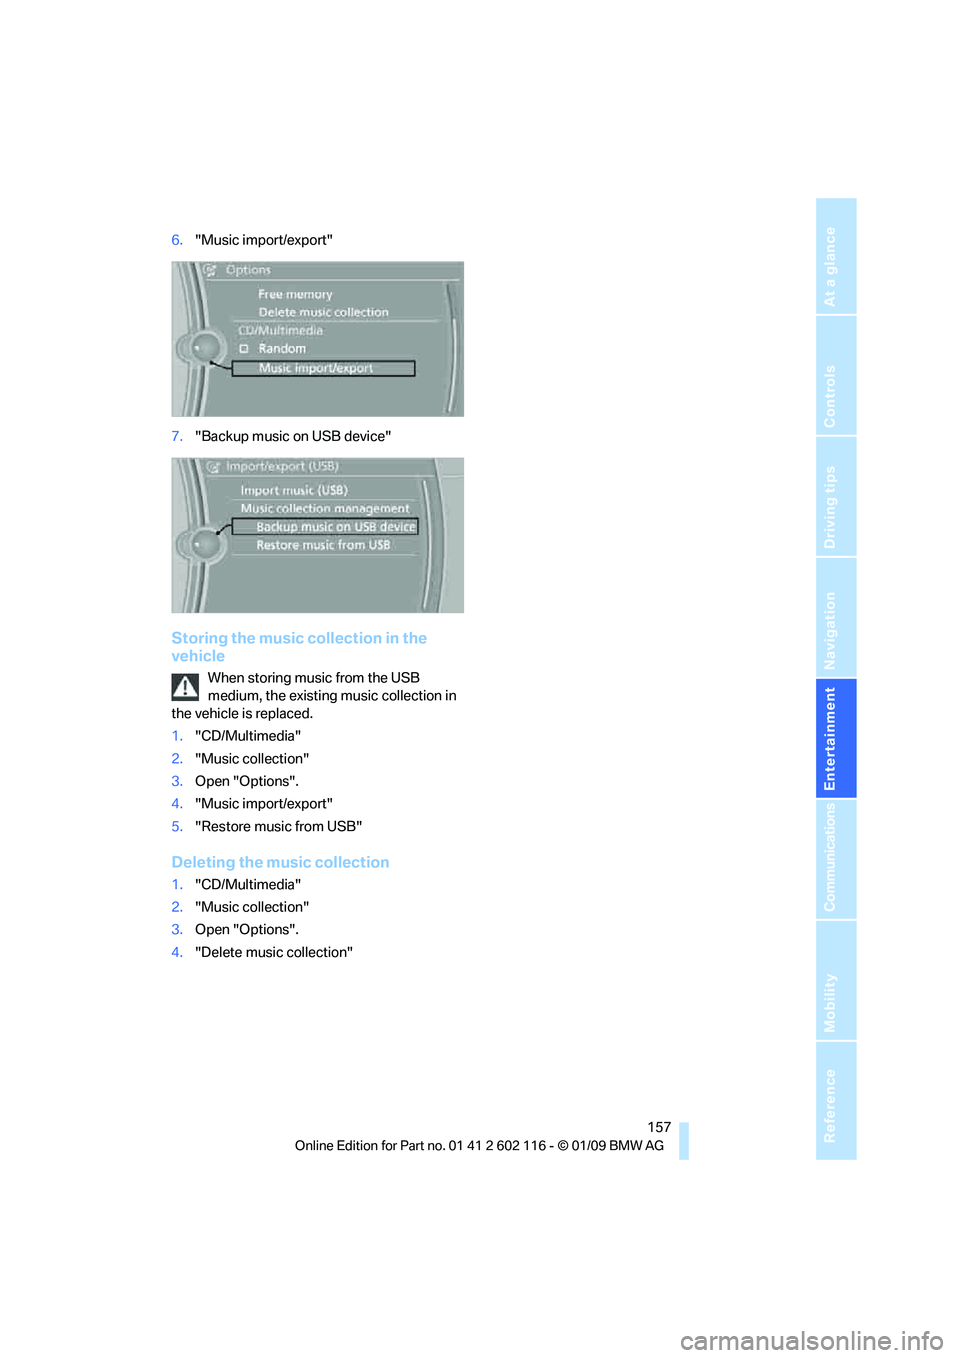
6."Music import/export"
7. "Backup music on USB device"
Storing the music collection in the
vehicle
When storing music from the USB
medium, the existing music collection in
the vehicle is replaced.
1. "CD/Multimedia"
2. "Music collection"
3. Open "Options".
4. "Music import/export"
5. "Restore music from USB"
Deleting the music collection
1."CD/Multimedia"
2. "Music collection"
3. Open "Options".
4. "Delete music collection"
Page 161 of 248
Navigation
Entertainment
Driving tips
159Reference
At a glance
Controls
Communications
Mobility
Audio files
Standard audio formats, e.g. MP3, WMA, WAV
(PCM) and AAC, and playlists in the M3U format
can be played.
Connecting via USB-audio interface
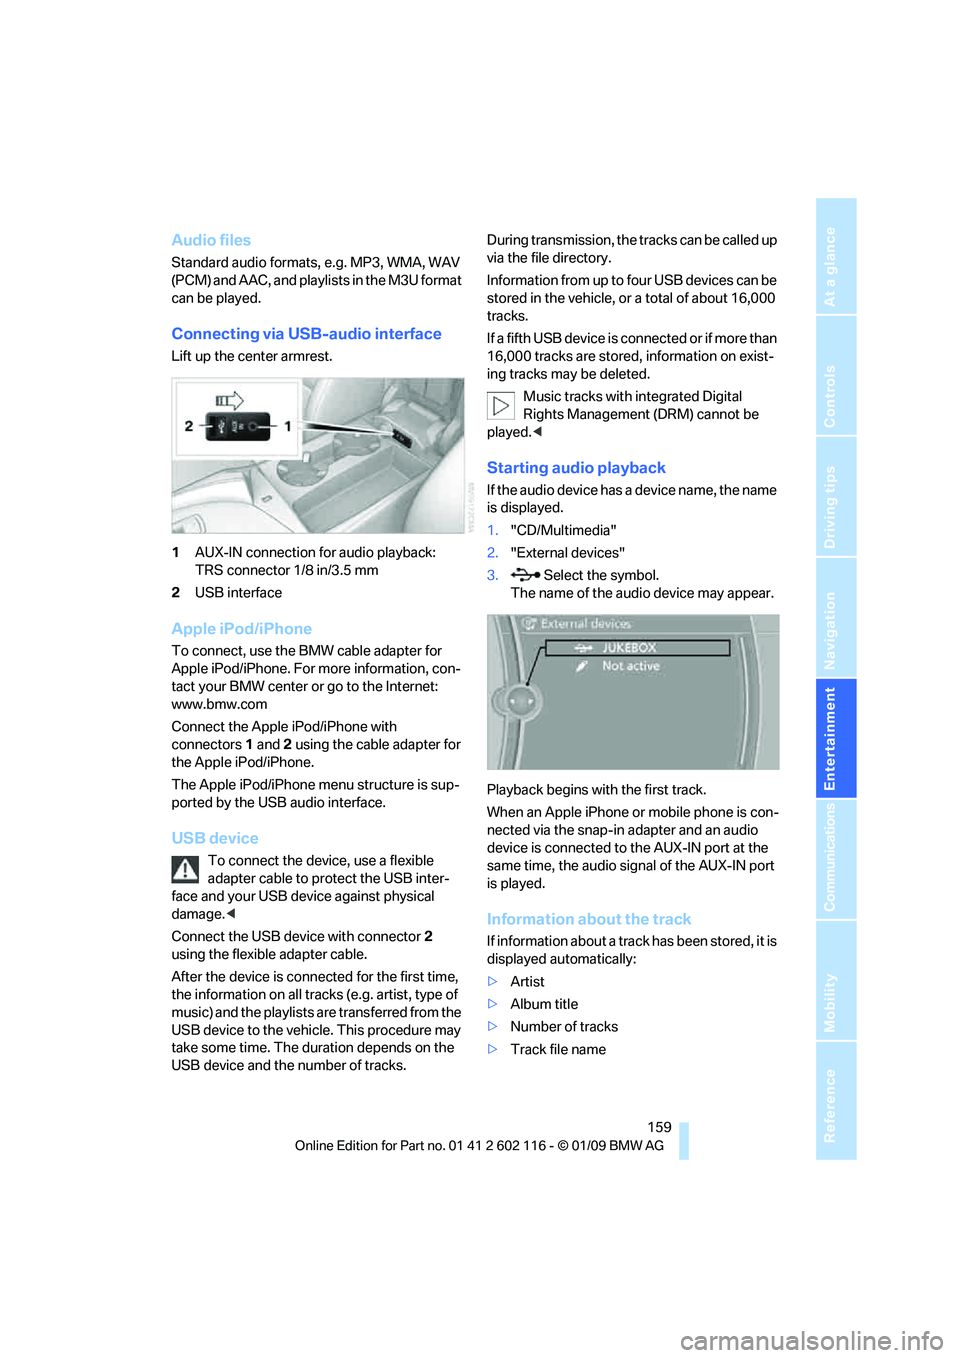
Lift up the center armrest.
1AUX-IN connection for audio playback:
TRS connector 1/8 in/3.5 mm
2 USB interface
Apple iPod/iPhone
To connect, use the BMW cable adapter for
Apple iPod/iPhone. For more information, con-
tact your BMW center or go to the Internet:
www.bmw.com
Connect the Apple iPod/iPhone with
connectors 1 and 2 using the cable adapter for
the Apple iPod/iPhone.
The Apple iPod/iPhone menu structure is sup-
ported by the USB audio interface.
USB device
To connect the device, use a flexible
adapter cable to protect the USB inter-
face and your USB device against physical
damage. <
Connect the USB device with connector 2
using the flexible adapter cable.
After the device is connected for the first time,
the information on all trac ks (e.g. artist, type of
music) and the playlists are transferred from the
USB device to the vehicle. This procedure may
take some time. The du ration depends on the
USB device and the number of tracks. During transmission, the tracks can be called up
via the file directory.
Information from up to four USB devices can be
stored in the vehicle, or a total of about 16,000
tracks.
I f a f i f t h U S B d e v i c e i s c o n n e c t e d o r i f m o r e t h a n
16,000 tracks are stored, information on exist-
ing tracks may be deleted.
Music tracks with integrated Digital
Rights Management (DRM) cannot be
played. <
Starting audio playback
If the audio device has a device name, the name
is displayed.
1."CD/Multimedia"
2. "External devices"
3. Select the symbol.
The name of the audio device may appear.
Playback begins with the first track.
When an Apple iPhone or mobile phone is con-
nected via the snap-in adapter and an audio
device is connected to the AUX-IN port at the
same time, the audio signal of the AUX-IN port
is played.
Information about the track
If information about a track has been stored, it is
displayed automatically:
> Artist
> Album title
> Number of tracks
> Track file name
Page 163 of 248
Navigation
Entertainment
Driving tips
161Reference
At a glance
Controls
Communications
Mobility
Notes on connecting
>The connected audio device is supplied
with max. 500 mA current if this is sup-
ported by the device. Therefore, do not
connect the device to the power socket in
the vehicle.
> Do not forcibly connect the plug to the USB
interface.
> Do not connect devices such as fans or
lamps to the USB-audio interface.
> Do not connect USB hard disks.
> Do not use the USB-audio interface to
charge external devices.
Page 167 of 248
165
Entertainment
Reference
At a glance
Controls
Driving tips
Communications
Navigation
Mobility
> Bluetooth is activated in the vehicle, refer to
page 166, and on the mobile phone.
> Certain presettings ma y be necessary on
some mobile phones: e.g. using the follow-
ing menu items:
> Bluetooth switched on
> Connection must be allowed without
requiring further confirmation
> Reconnection
> Depending on the mobile phone type, the
power-saving mode setting, for example,
may result in a paired mobile phone not
being detected by the vehicle.
> For pairing purposes, define any 4 to 16-
digit number as a Bluetooth passkey,
e.g. 123. A long and complex number offers
the best protection against unauthorized
access. This Bluetooth passkey is no longer
required after pairing has been successful.
> The ignition is switched on.
Pair the mobile phone with the vehicle
only when the car is stationary, to avoid
endangering the car's occupants and other
road users by be ing distracted.<
Switching on the ignition
1.Insert the remote contro l all the way into the
ignition lock.
2. Switch on the ignition without operating the
brake or clutch or pressing the start/stop
button.
Preparation via iDrive
iDrive, for operating principle refer to page 16.
3. "Telephone"
4. "Bluetooth" 5.
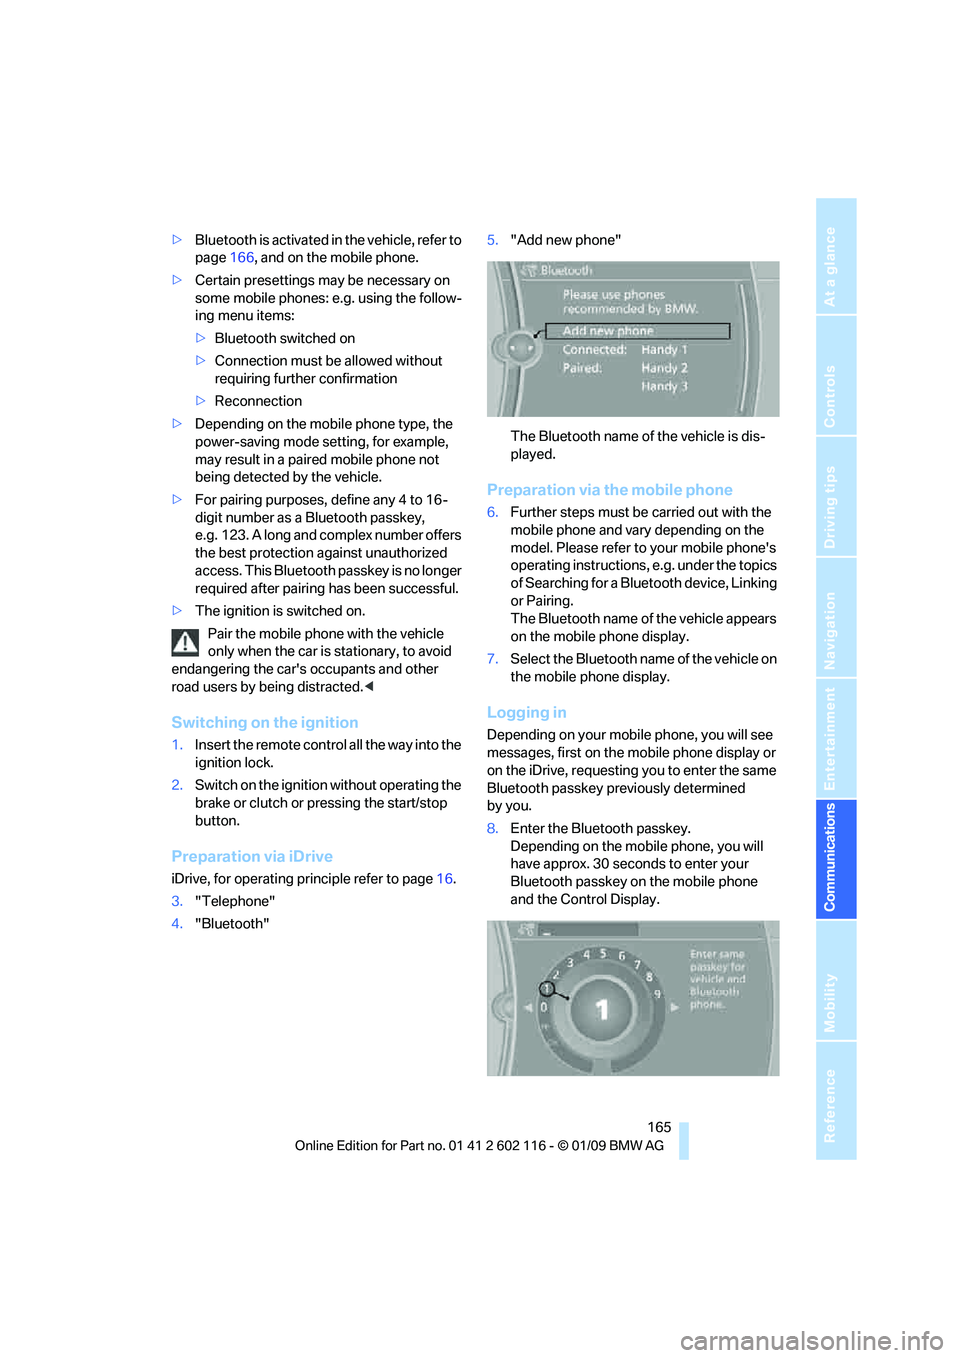
"Add new phone"
The Bluetooth name of the vehicle is dis-
played.
Preparation via the mobile phone
6.Further steps must be carried out with the
mobile phone and vary depending on the
model. Please refer to your mobile phone's
operating instructions, e.g. under the topics
of Searching for a Bluetooth device, Linking
or Pairing.
The Bluetooth name of the vehicle appears
on the mobile phone display.
7. Select the Bluetooth na me of the vehicle on
the mobile phone display.
Logging in
Depending on your mob ile phone, you will see
messages, first on the mobile phone display or
on the iDrive, requesting you to enter the same
Bluetooth passkey previously determined
by you.
8. Enter the Bluetooth passkey.
Depending on the mobile phone, you will
have approx. 30 seco nds to enter your
Bluetooth passkey on the mobile phone
and the Control Display.