2009 BMW Z4 SDRIVE35I length
[x] Cancel search: lengthPage 54 of 248
Driving
52
Switching off the engine
Always take the remote control with you
when you leave the vehicle.
Set the parking brake firmly when parking; oth-
erwise, the vehicle could roll. <
Manual transmission
1.With the car at a standstill, press the start/
stop button.
2. Shift into first gear or reverse.
3. Set the parking brake.
4. Removing the remote control from the igni-
tion lock, refer to page 50.
Automatic transmission
1. With the car at a stan dstill, move the selec-
tor lever to position P.
2. Press the start/stop button.
3. Set the parking brake.
4. Removing the remote control from the igni-
tion lock, refer to page 50.
7-gear sport automatic transmission
with dual clutch
1. With the car at a stan dstill, engage trans-
mission position P.
2. Press the start/stop button.
3. Set the parking brake.
4. Removing the remote control from the igni-
tion lock, refer to page 50.
Parking brake
The concept
Your BMW is equipped with an electromechan-
ical parking brake that can be set and released
by using a button.
The parking brake is primarily used to prevent
the vehicle from rolling when it is parked.
When the vehicle is stationary, the parking
brake acts on the rear wheels via an electrome-
chanical mechanism. When the vehicle is rolling
or being driven, the parking brake acts on the disc brakes of the front and rear wheels via the
hydraulic brake system.
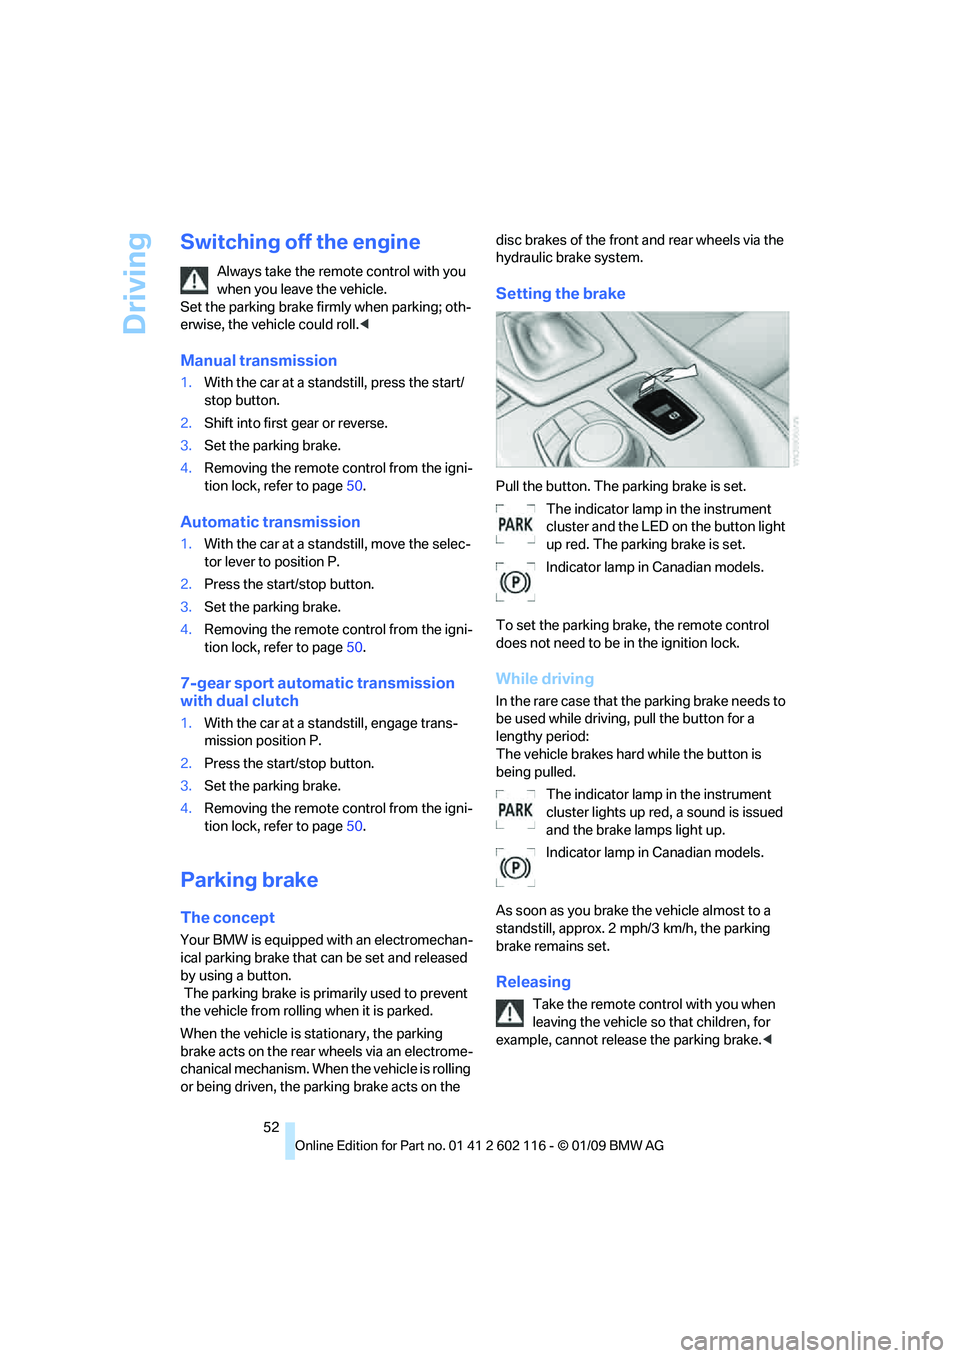
Setting the brake
Pull the button. The parking brake is set.
The indicator lamp in the instrument
cluster and the LED on the button light
up red. The parking brake is set.
Indicator lamp in Canadian models.
To set the parking brake, the remote control
does not need to be in the ignition lock.
While driving
In the rare case that the parking brake needs to
be used while driving, pull the button for a
lengthy period:
The vehicle brakes hard while the button is
being pulled. The indicator lamp in the instrument
cluster lights up red, a sound is issued
and the brake lamps light up.
Indicator lamp in Canadian models.
As soon as you brake the vehicle almost to a
standstill, approx. 2 mph/3 km/h, the parking
brake remains set.
Releasing
Take the remote cont rol with you when
leaving the vehicle so that children, for
example, cannot release the parking brake. <
Page 83 of 248
Controls
81Reference
At a glance
Driving tips
Communications
Navigation
Entertainment
Mobility
Flat Tire Monitor FTM*
The concept
The Flat Tire Monitor detects pressure loss in a
tire by comparing the rotating speeds of the
individual tires while moving.
In the event of pressure loss, the rolling circum-
ference changes and, thus, the rotating speed
of the affected wheel. This change is detected
and is reported as a flat tire.
Functional requirement
In order to assure the reliable reporting of a flat
tire, the system must be initialized for the cor-
rect tire inflation pressure.The system must be reinitialized each
time a tire inflation pressure has been cor-
rected or a wheel or tire has been changed. <
System limitations
The Flat Tire Monitor is unable to warn
the driver of sudden, severe tire damage
caused by external factors, nor can it identify
the gradual loss of pressure that will inevitably
occur in all four tires over a lengthy period
of time. <
In the following situations, the system could be
delayed or malfunction:
> System has not been initialized
> Driving on snowy or slippery road surface
> Performance-oriented style of driving: slip
in the drive wheels, hi gh lateral acceleration
> Snow chains are attached
Initializing the system
The initialization is completed during driv-
ing, which can be interrupted at any time.
When driving resumes, the initialization is con-
tinued automatically.
Do not initialize the syst em while snow chains
are attached. <
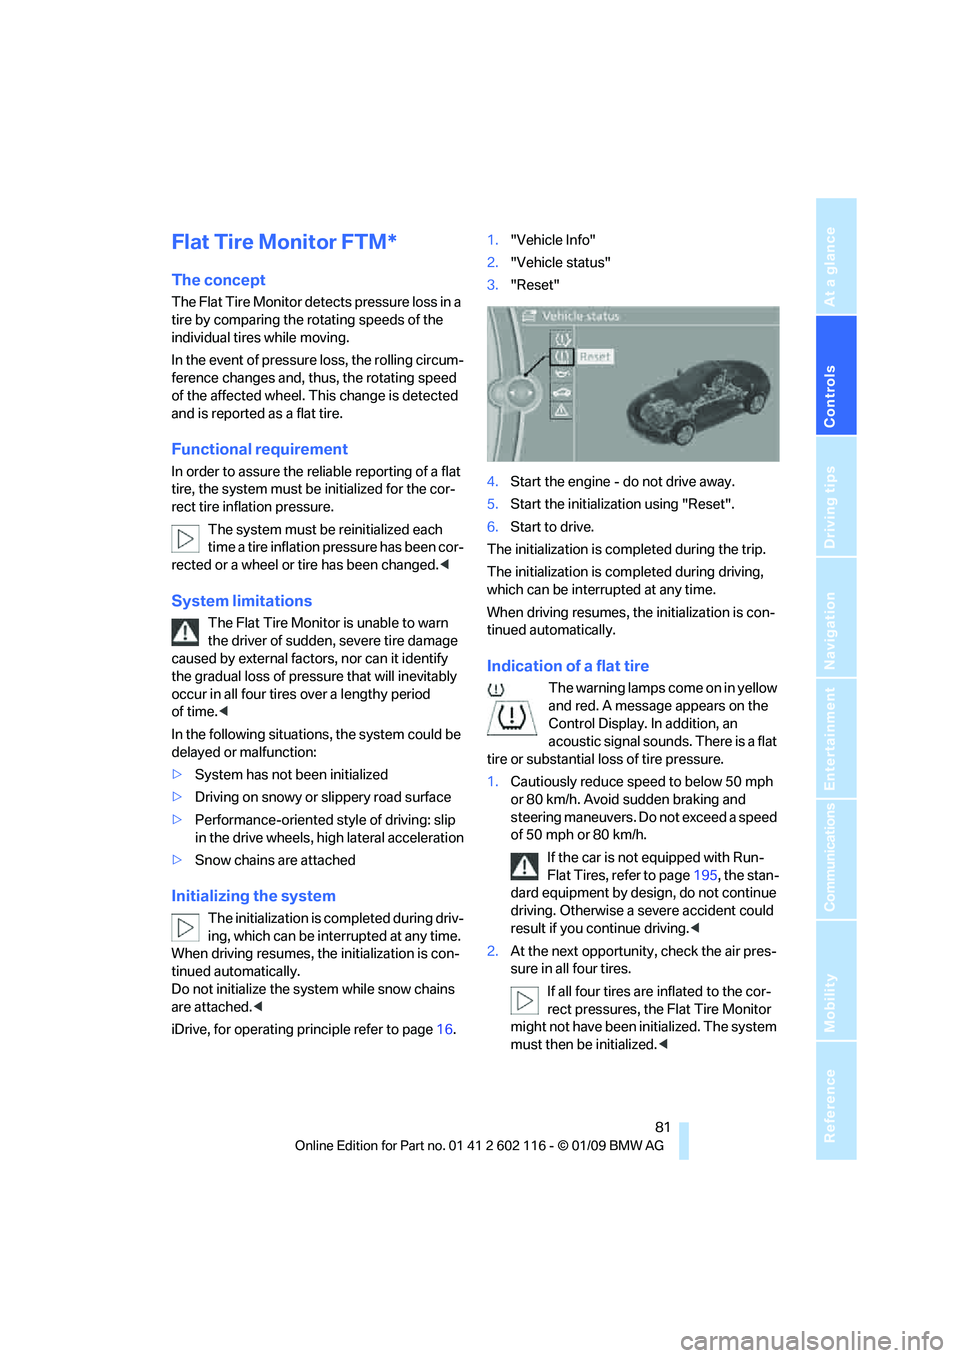
iDrive, for operating principle refer to page 16.1.
"Vehicle Info"
2. "Vehicle status"
3. "Reset"
4. Start the engine - do not drive away.
5. Start the initializat ion using "Reset".
6. Start to drive.
The initialization is completed during the trip.
The initialization is comp leted during driving,
which can be interrupted at any time.
When driving resumes, the initialization is con-
tinued automatically.
Indication of a flat tire
The warning lamps come on in yellow
and red. A message appears on the
Control Display. In addition, an
acoustic signal sounds. There is a flat
tire or substantial loss of tire pressure.
1. Cautiously reduce speed to below 50 mph
or 80 km/h. Avoid sudden braking and
steering maneuvers. Do not exceed a speed
of 50 mph or 80 km/h.
If the car is not equipped with Run-
Flat Tires, refer to page 195, the stan-
dard equipment by design, do not continue
driving. Otherwise a severe accident could
result if you continue driving. <
2. At the next opportunity, check the air pres-
sure in all four tires.
If all four tires are inflated to the cor-
rect pressures, the Flat Tire Monitor
might not have been initialized. The system
must then be initialized. <
Page 95 of 248
Controls
93Reference
At a glance
Driving tips
Communications
Navigation
Entertainment
Mobility
Air conditioning system
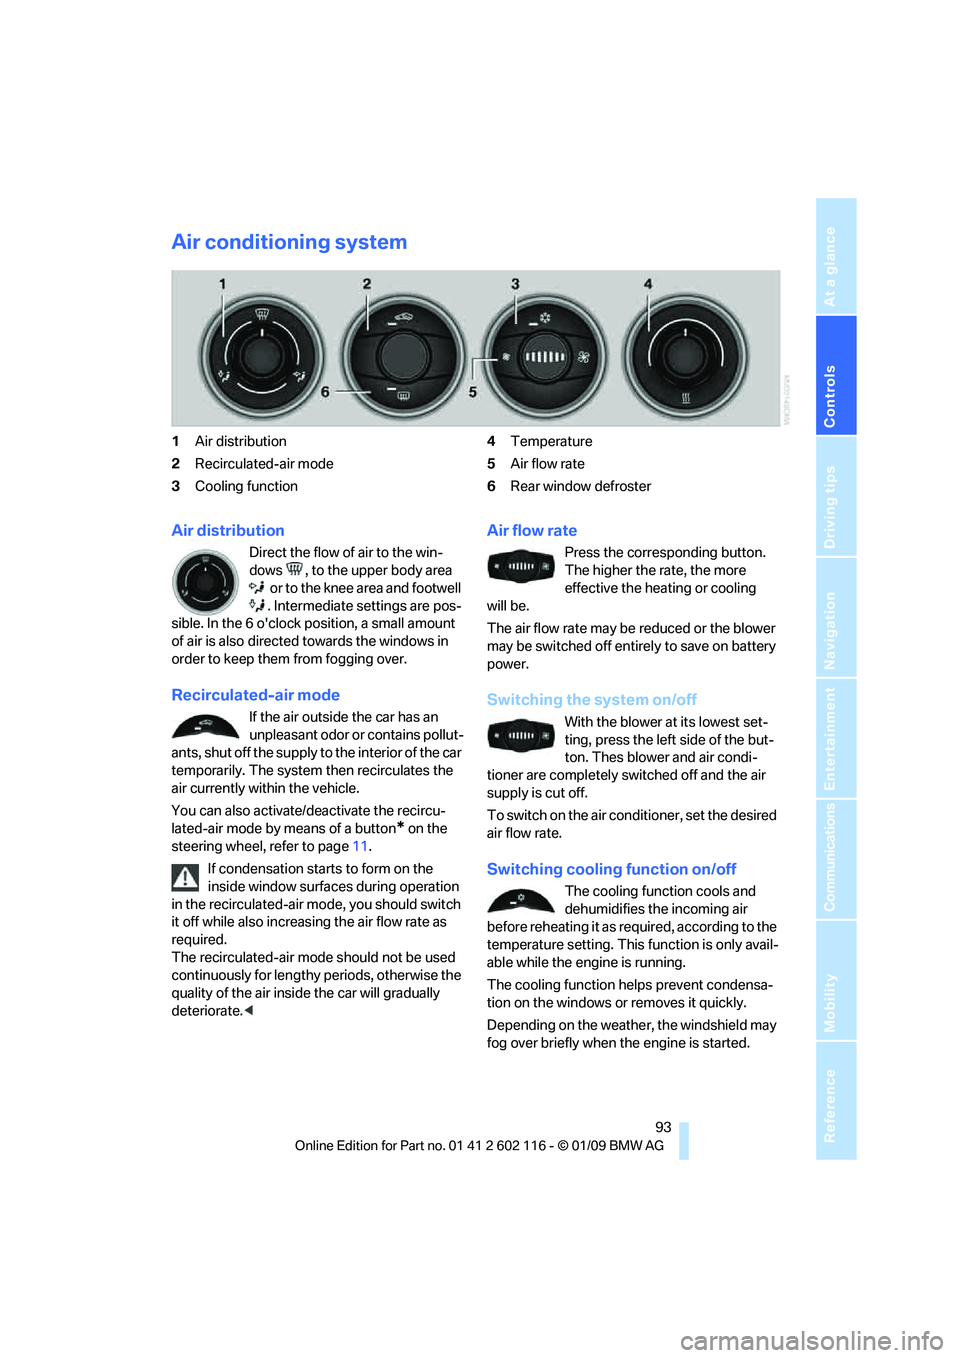
1Air distribution
2 Recirculated-air mode
3 Cooling function 4
Temperature
5 Air flow rate
6 Rear window defroster
Air distribution
Direct the flow of air to the win-
dows , to the upper body area
or to the knee area and footwell
. Intermediate settings are pos-
sible. In the 6 o'clock position, a small amount
of air is also directed towards the windows in
order to keep them from fogging over.
Recirculated-air mode
If the air outside the car has an
unpleasant odor or contains pollut-
ants, shut off the supply to the interior of the car
temporarily. The system then recirculates the
air currently within the vehicle.
You can also activate/d eactivate the recircu-
lated-air mode by means of a button
* on the
steering wheel, refer to page 11.
If condensation starts to form on the
inside window surfaces during operation
in the recirculated-air mode, you should switch
it off while also increasing the air flow rate as
required.
The recirculated-air mode should not be used
continuously for lengthy periods, otherwise the
quality of the air inside the car will gradually
deteriorate. <
Air flow rate
Press the corresponding button.
The higher the rate, the more
effective the heating or cooling
will be.
The air flow rate may be reduced or the blower
may be switched off entire ly to save on battery
power.
Switching the system on/off
With the blower at its lowest set-
ting, press the left side of the but-
ton. Thes blower and air condi-
tioner are completely switched off and the air
supply is cut off.
To switch on the air cond itioner, set the desired
air flow rate.
Switching cooling function on/off
The cooling function cools and
dehumidifies the incoming air
before reheating it as re quired, according to the
temperature setting. This function is only avail-
able while the engine is running.
The cooling function helps prevent condensa-
tion on the windows or removes it quickly.
Depending on the weathe r, the windshield may
fog over briefly when the engine is started.
Page 107 of 248
Controls
105Reference
At a glance
Driving tips
Communications
Navigation
Entertainment
Mobility
Enlarging the cargo bay
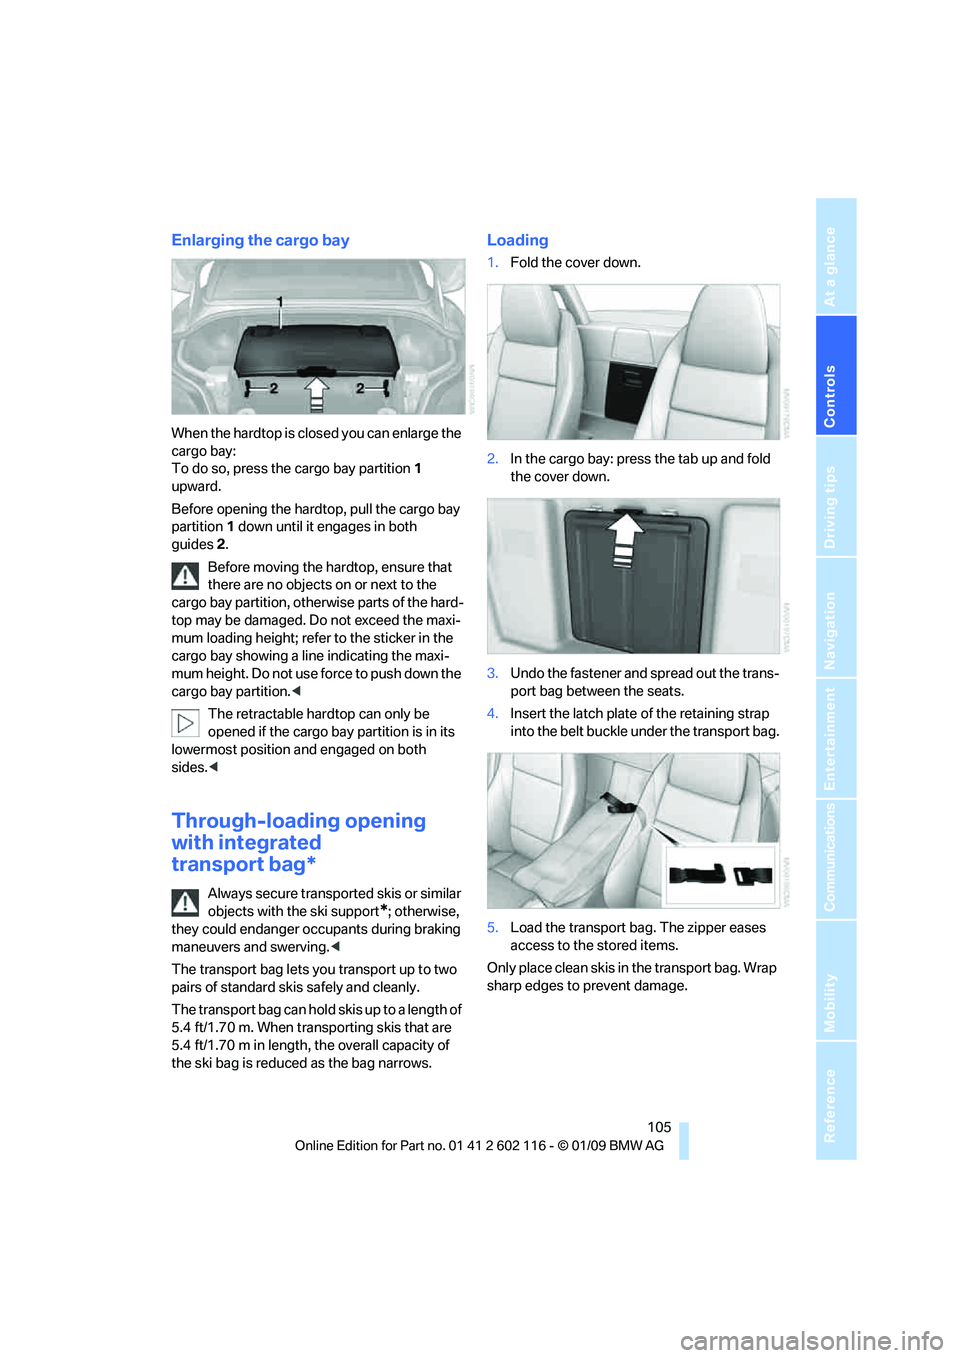
When the hardtop is closed you can enlarge the
cargo bay:
To do so, press the cargo bay partition 1
upward.
Before opening the hardtop, pull the cargo bay
partition 1 down until it engages in both
guides 2.
Before moving the hardtop, ensure that
there are no objects on or next to the
cargo bay partition, othe rwise parts of the hard-
top may be damaged. Do not exceed the maxi-
mum loading height; refer to the sticker in the
cargo bay showing a line indicating the maxi-
mum height. Do not use fo rce to push down the
cargo bay partition. <
The retractable hard top can only be
opened if the cargo bay partition is in its
lowermost position and engaged on both
sides. <
Through-loading opening
with integrated
transport bag*
Always secure transported skis or similar
objects with the ski support
*; otherwise,
they could endanger occupants during braking
maneuvers and swerving. <
The transport bag lets you transport up to two
pairs of standard skis safely and cleanly.
The transport bag can hold skis up to a length of
5.4 ft/1.70 m. When transporting skis that are
5.4 ft/1.70 m in length, th e overall capacity of
the ski bag is reduced as the bag narrows.
Loading
1. Fold the cover down.
2. In the cargo bay: press the tab up and fold
the cover down.
3. Undo the fastener and spread out the trans-
port bag between the seats.
4. Insert the latch plate of the retaining strap
into the belt buckle under the transport bag.
5. Load the transport bag. The zipper eases
access to the stored items.
Only place clean skis in the transport bag. Wrap
sharp edges to prevent damage.
Page 113 of 248
Driving tips
111Reference
At a glance
Controls
Communications
Navigation
Entertainment
Mobility
Drive defensively
Avoid unnecessary acceleration and braking
maneuvers. To do so, keep an adequate dis-
tance to the forward vehicle. A defensive
and smooth driving style keeps fuel con-
sumption down.
Avoid high engine speeds
Only use first gear when setting off. In second
and higher gears, accele rate without hesitation
or pauses. When accelerating, shift up before
reaching high engine speeds.
When you reach the desired speed, shift into
the highest applicable ge ar and drive with the
engine speed as low as possible and at a con-
stant speed.
As a rule: driving at low engine speeds lowers
fuel consumption and reduces wear.
Coasting
When approaching a red lig ht, take your foot off
the accelerator and coast to a stop in the high-
est applicable gear.
On a downhill slope, take your foot off the accel-
erator and coast in a suitable gear.
The fuel supply is interrupted when coasting.
Switch off the engi ne during lengthy
stops
Switch off the engine when stopping for lengthy
periods, e.g. at traffic lights, railroad crossings
or in traffic congestion. You achieve fuel sav-
ings even if standing time is as short as approx.
4 seconds.
Switch off functions you do not need at
the moment
Functions such as the air conditioner and the
seat or rear window heating draw large amounts
of power and consume a dditional fuel. Espe-
cially in city traffic and in stop and go driving
they have a considerable impact. Therefore,
switch these functions off when they are not
really needed.
Have the vehicle serviced
Have the vehicle serviced regularly to achieve
good economy and a long vehicle life. BMW
recommends having the vehicle serviced at a
BMW center. Also note the BMW service sys-
tem, refer to page 202.
General driving notes
Close the luggag e compartment lid
Operate the vehicle only when the lug-
gage compartment lid is closed. Other-
wise, exhaust fumes could enter the interior of
the vehicle. <
If the vehicle must be driven with the luggage
compartment lid open:
1. Close all windows.
2. Greatly increase the ai r volume of the auto-
matic climate control system, refer to
page 96.
Hot exhaust system
In all vehicles, extremely high tempera-
tures are generated in the exhaust sys-
tem. Do not remove the heat shields installed
adjacent to various sect ions of the exhaust sys-
tem, and never apply un dercoating to them.
When driving, standing at idle and while park-
ing, take care to avoid possible contact
between the hot exhaust system and any highly
flammable materials such as hay, leaves, grass,
etc. Such contact could lead to a fire, with the
risk of serious personal injuries and property
damage. Do not touch ho t exhaust tail pipes.
Otherwise there is a risk of burns. <
Hydroplaning
When driving on wet or slushy roads,
reduce road speed. If you do not, a wedge
of water can form between tires and road sur-
face. This situation, known as hydroplaning,
means that the tire can completely lose contact
with the road surface, so that neither the car can
be steered nor the brake be properly applied.<
Page 114 of 248
Things to remember when driving
112
The risk of hydroplaning
increases with declin-
ing tread depth on the tire s, refer also to Mini-
mum tread depth on page 194.
Driving through water
Drive though calm water only if it is not
deeper than 1 ft/25 cm and at this height
no faster than walking speed, up to 6 mph/
10 km/h. Otherwise, the vehicle's engine, the
electrical systems and the transmission may be
damaged. <
Use the parking brake on inclines
On inclines, do not hold the vehicle for a
lengthy period using the clutch; use the
parking brake instead. Ot herwise greater clutch
wear will result. <
For more information about the drive-off assis-
tant, refer to page 80.
Braking safely
Your BMW is equipped with ABS as a standard
feature. Applying the brakes fully is the most
effective way of braking in situations in which
this is necessary. Since the vehicle maintains
steering responsiveness, you can still avoid
possible obstacles with a minimum of steering
effort.
Pulsation of the brake pedal, combined with
sounds from the hydraulic circuits, indicate that
ABS is in its active mode.
Driving in wet conditions
When roads are wet or there is heavy rain,
briefly exert gentle pre ssure on the brake pedal
every few miles. Monitor traffic conditions to
ensure that this maneuver does not endanger
other road users. The heat generated in this
process helps dry the pads and rotors. Full
braking efficiency will th en be available when
you need it.
Hills
To prevent overheating and the resulting
reduced efficiency of the brake system,
drive long or steep downhill gradients in the
gear in which the least br aking is required. Even light but consistent brak
e pressure can lead to
high temperatures, brake wear and possibly
even brake failure. <
You can increase the engine's braking effect by
shifting down, all the way to first gear if neces-
sary. This strategy helps you avoid placing
excessive loads on the brake system. Down-
shifting in manual mode of the automatic trans-
mission, refer to page 54.
7-gear sport automatic transmission with
dual clutch: Never drive with the trans-
mission in neutral or with the engine switched
off; otherwise, engine braking action will not be
present or there will be no power assistance to
the brakes or steering.
Manual transmission: Never drive with the
clutch held down, with the transmission in neu-
tral or with the engine switched off; otherwise,
engine braking action will not be present or
there will be no power a ssistance to the brakes
or steering.
Never allow floor mats, carpets or any other
objects to protrude into the area around the
pedals, otherwise peda l function could be
impaired. <
Corrosion on brake rotors
When the vehicle is driv en only occasionally,
during extended periods when the vehicle is not
used at all, and in op erating conditions where
brake applications are less frequent, there is an
increased tendency for corrosion to form on
rotors, while contaminan ts accumulate on the
brake pads. This occurs because the minimum
pressure which must be exerted by the pads
during brake applications to clean the rotors is
not reached.
Should corrosion form on the brake rotors, the
brakes will tend to re spond with a pulsating
effect that even extended application will fail
to cure.
When the vehicle is parked
Condensation forms wh ile the automatic cli-
mate control is in operation, and then exits
under the vehicle. Traces of condensed water
under the vehicle are therefore normal.
Page 122 of 248
Destination entry
120
>
To delete all letters:
Select the symbol and press the
controller for a lengthy period.
> To enter spaces:
Select the symbol.
The list gradually grow s smaller each time
you enter a new letter.
2. Move the controller to the right.
3. Select the name of th e town/city from the
list. The three destinations stored last are
displayed.
If there are several towns/cities with the
same name:
1. Change to the list of town/city names.
2. Highlight the town/city: a preview map is
displayed.
3. Select the town/city.
Entering the postal code
1.Select "Town/City/Postal Code" or the dis-
played town/city.
2. Select the symbol.
3. Select the digits.
4. Change to the list of postal codes and
towns/cities.
5. Highlight the postal code. A preview map is
displayed in the assistance window.
6. Select the postal code.
Entering street and intersection
1.Select "Street" or the displayed street.
2. Enter a street and intersection as you would
the town/city.
After the street you can also enter the intersec-
tion or the house number.
If there are several streets with the same name:
1. Change to the list of street names.
2. Highlight the street: a preview map is dis-
played.
3. Select the street.
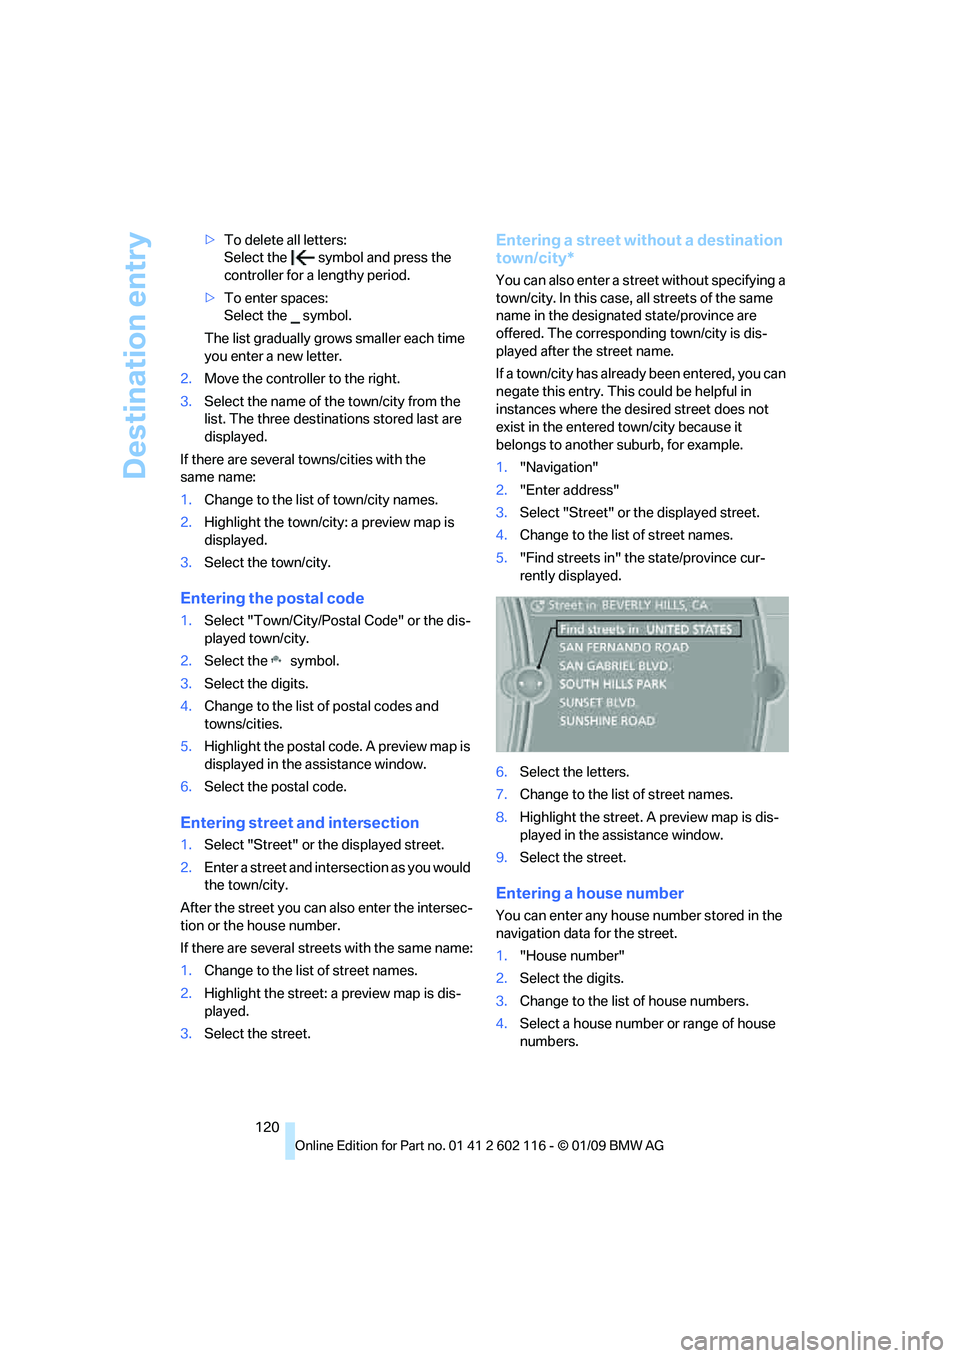
Entering a street without a destination
town/city*
You can also enter a street without specifying a
town/city. In this case, all streets of the same
name in the designated state/province are
offered. The correspond ing town/city is dis-
played after the street name.
If a town/city has already been entered, you can
negate this entry. This could be helpful in
instances where the desired street does not
exist in the entered town/city because it
belongs to another suburb, for example.
1. "Navigation"
2. "Enter address"
3. Select "Street" or the displayed street.
4. Change to the list of street names.
5. "Find streets in" the state/province cur-
rently displayed.
6. Select the letters.
7. Change to the list of street names.
8. Highlight the street. A preview map is dis-
played in the assistance window.
9. Select the street.
Entering a house number
You can enter any house number stored in the
navigation data for the street.
1."House number"
2. Select the digits.
3. Change to the list of house numbers.
4. Select a house number or range of house
numbers.
Page 131 of 248
Navigation
Driving tips
129Reference
At a glance
Controls
Communications
Entertainment
Mobility
point out traffic obstructions along the original
route.
Depending on the type of road and the nature
and length of the traffic obstruction, the route
can also be calculated so that you travel
through the traffic obstruction.
1. "Navigation"
2. Open "Options".
3. "Dynamic guidance"
If the "Avoid highways", "Avoid toll roads"
or "Avoid ferries" route criteria are
selected, route calculation may take consider-
ably longer. <
Route
General information
Depending on the equipment in your vehicle,
different views of the route are available during
destination guidance.
>Map display
> Arrow display
> Displaying towns/cities and streets along
the route
Displaying a list of the streets or
towns/cities on the route
When destination guidance is started, a list of
the streets and towns/cities on the route is dis-
played. The driving distances and traffic bulle-
tins are displayed for each route section.
>Display a list of the streets and towns/cities
on the route.
> Display the traffic bulletins and the driving
distance for each route section.
1. "Navigation"
2. "Route information"
3. Highlight a section.
The section is displaye d in the preview map.
Bypassing a section of the route
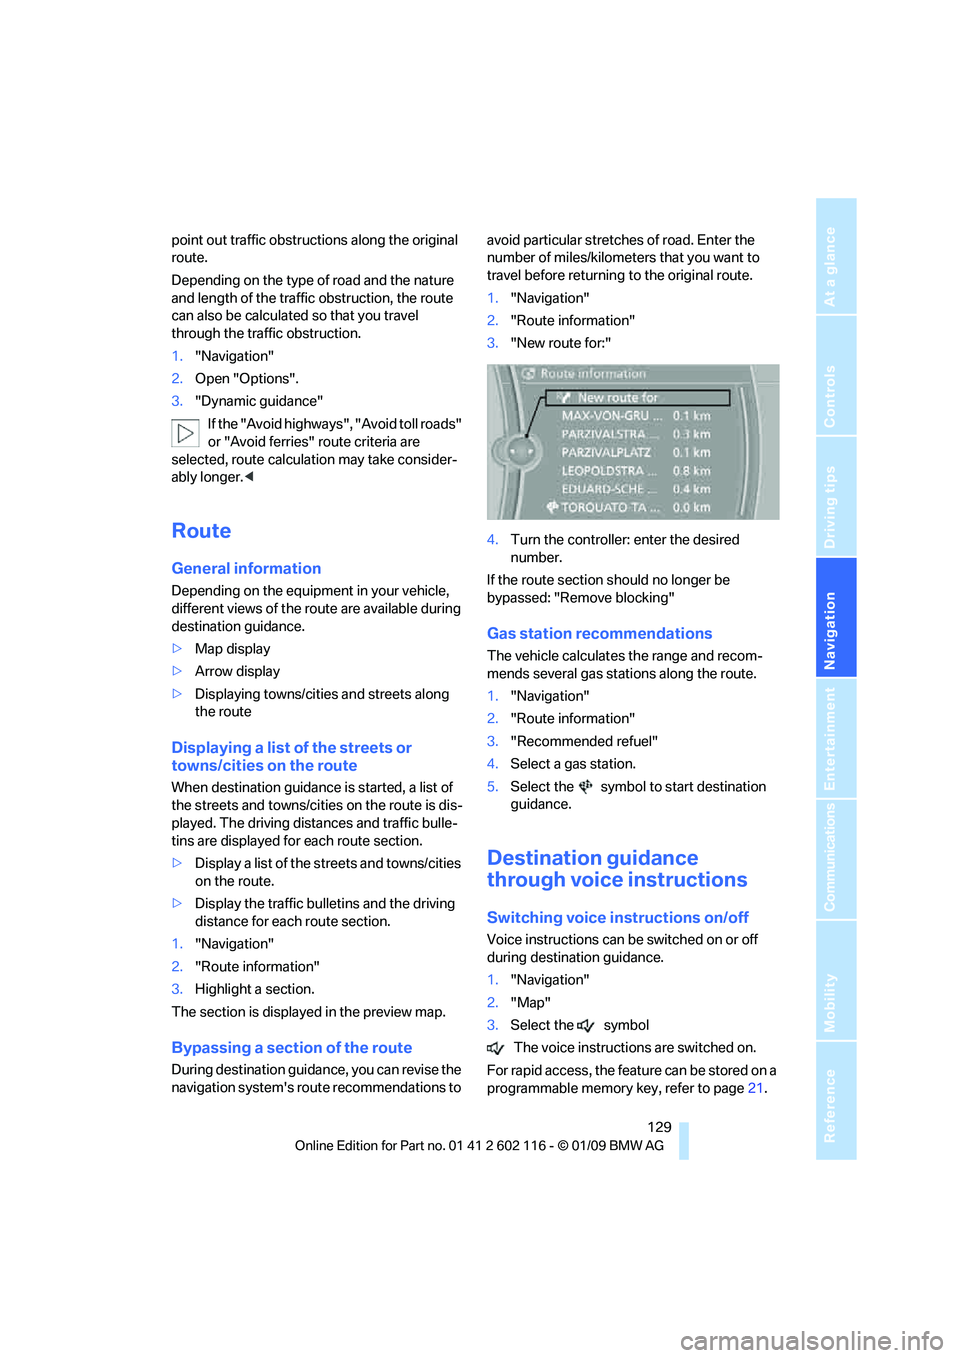
During destination guidan ce, you can revise the
navigation system's ro ute recommendations to avoid particular stretches of road. Enter the
number of miles/kilomete
rs that you want to
travel before returning to the original route.
1. "Navigation"
2. "Route information"
3. "New route for:"
4. Turn the controller: enter the desired
number.
If the route section sh ould no longer be
bypassed: "Remove blocking"
Gas station recommendations
The vehicle calculates the range and recom-
mends several gas stations along the route.
1. "Navigation"
2. "Route information"
3. "Recommended refuel"
4. Select a gas station.
5. Select the symbol to start destination
guidance.
Destination guidance
through voice instructions
Switching voice in structions on/off
Voice instructions can be switched on or off
during destination guidance.
1."Navigation"
2. "Map"
3. Select the symbol
The voice instructions are switched on.
For rapid access, the feat ure can be stored on a
programmable memory key, refer to page21.