2009 BMW Z4 SDRIVE35I lights
[x] Cancel search: lightsPage 38 of 248
Opening and closing
36
Starting the engine
You can start the engine or switch on the igni-
tion when a remote control is inside the vehicle.
It is not necessary to insert a remote control into
the ignition swit ch, refer to page 50.
Switching off the engine in cars with
automatic transmission
The engine can only be switched off when the
selector lever is in position P, refer to page 52.
To switch the engine off when the selector lever
is in position N, the re mote control must be in
the ignition switch.
Before driving a vehicle with automatic
transmission in to a car wash
1.Insert the remote control into the ignition
switch.
2. Depress the brake.
3. Move the selector lever to position N.
4. Switch off the engine.
The vehicle can roll.
Malfunction
Convenient access may malfunction due to
local radio waves. If this happens, open or close
the vehicle via the buttons on the remote con-
trol or using the integr ated key. To start the
engine afterward, insert the remote control into
the ignition switch.
Warning lamps
The warning lamp in the instrument
cluster lights up when you attempt to
start the engine: the engine cannot
be started. The remote co ntrol is not inside the
vehicle or is malfunctioning. Take the remote
control with you inside the vehicle or have it
checked. If necessary, insert another remote
control into the ignition switch.
The warning lamp in the instrument
cluster lights up while the engine is
running: the remote control is no
longer inside the vehicle. After the engine is
switched off, the engine can only be restarted
within approx. 10 seconds. The indicator lamp in the instrument
cluster comes on and a message
appears on the Control Display:
replace the battery in the remote control.
Replacing the battery
The remote control for convenient access con-
tains a battery that will ne ed to be replaced from
time to time.
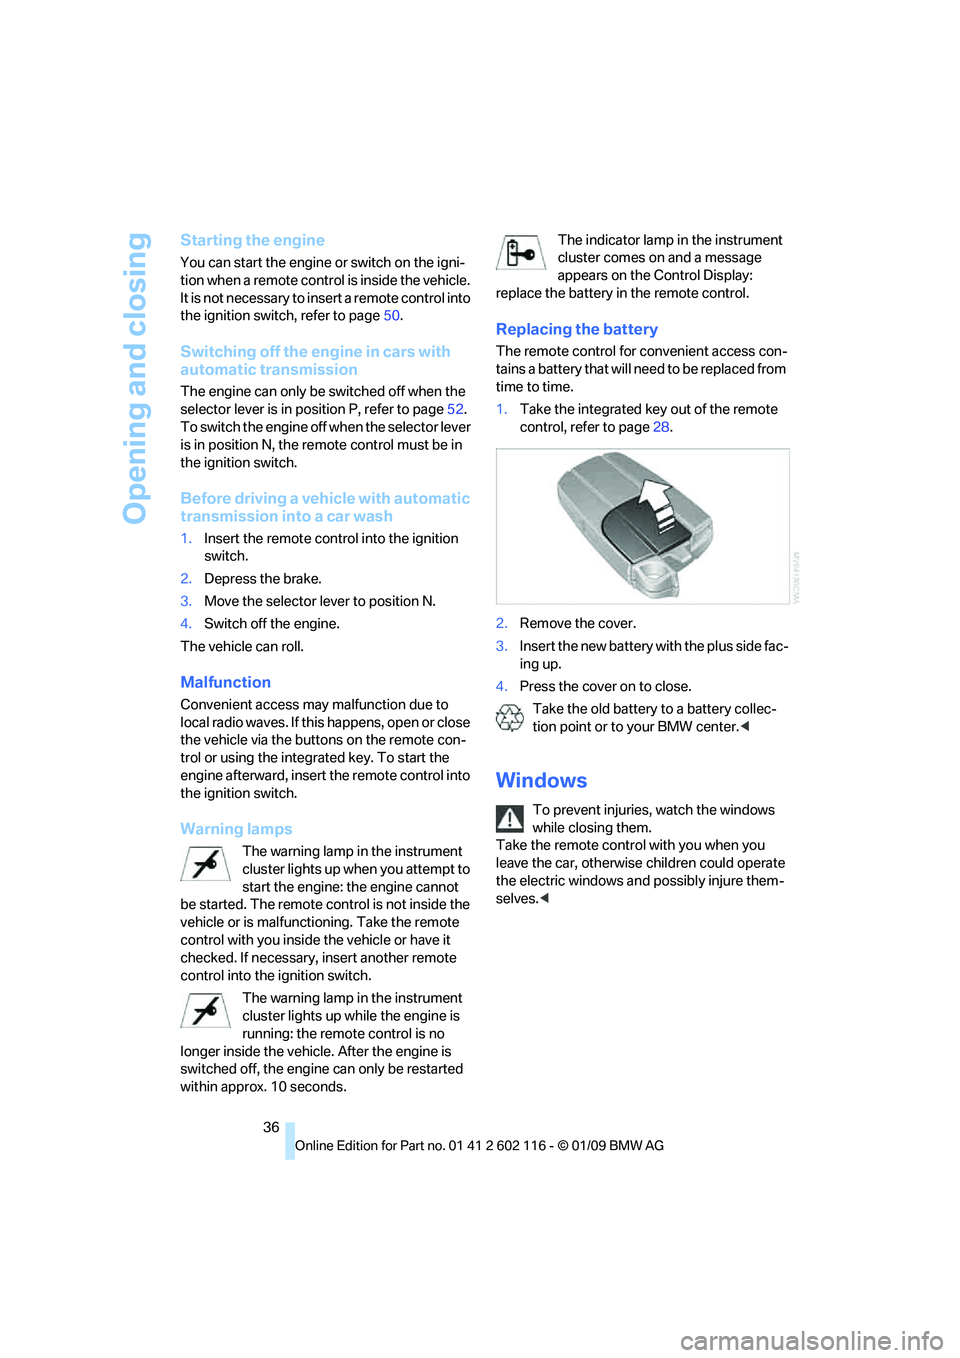
1. Take the integrated ke y out of the remote
control, refer to page 28.
2. Remove the cover.
3. Insert the new battery wi th the plus side fac-
ing up.
4. Press the cover on to close.
Take the old battery to a battery collec-
tion point or to your BMW center.<
Windows
To prevent injuries, watch the windows
while closing them.
Take the remote contro l with you when you
leave the car, otherwise children could operate
the electric windows and possibly injure them-
selves. <
Page 41 of 248
Controls
39Reference
At a glance
Driving tips
Communications
Navigation
Entertainment
Mobility
Opening and closing
When the vehicle is stationary and at radio
readiness or beyond, refer to page50:
If possible, conserve the battery by only
operating the retrac table hardtop when
the engine is running.
Before closing the retrac table hardtop, remove
all foreign objects from the windshield frame as
these could prevent the hardtop from closing
properly. <
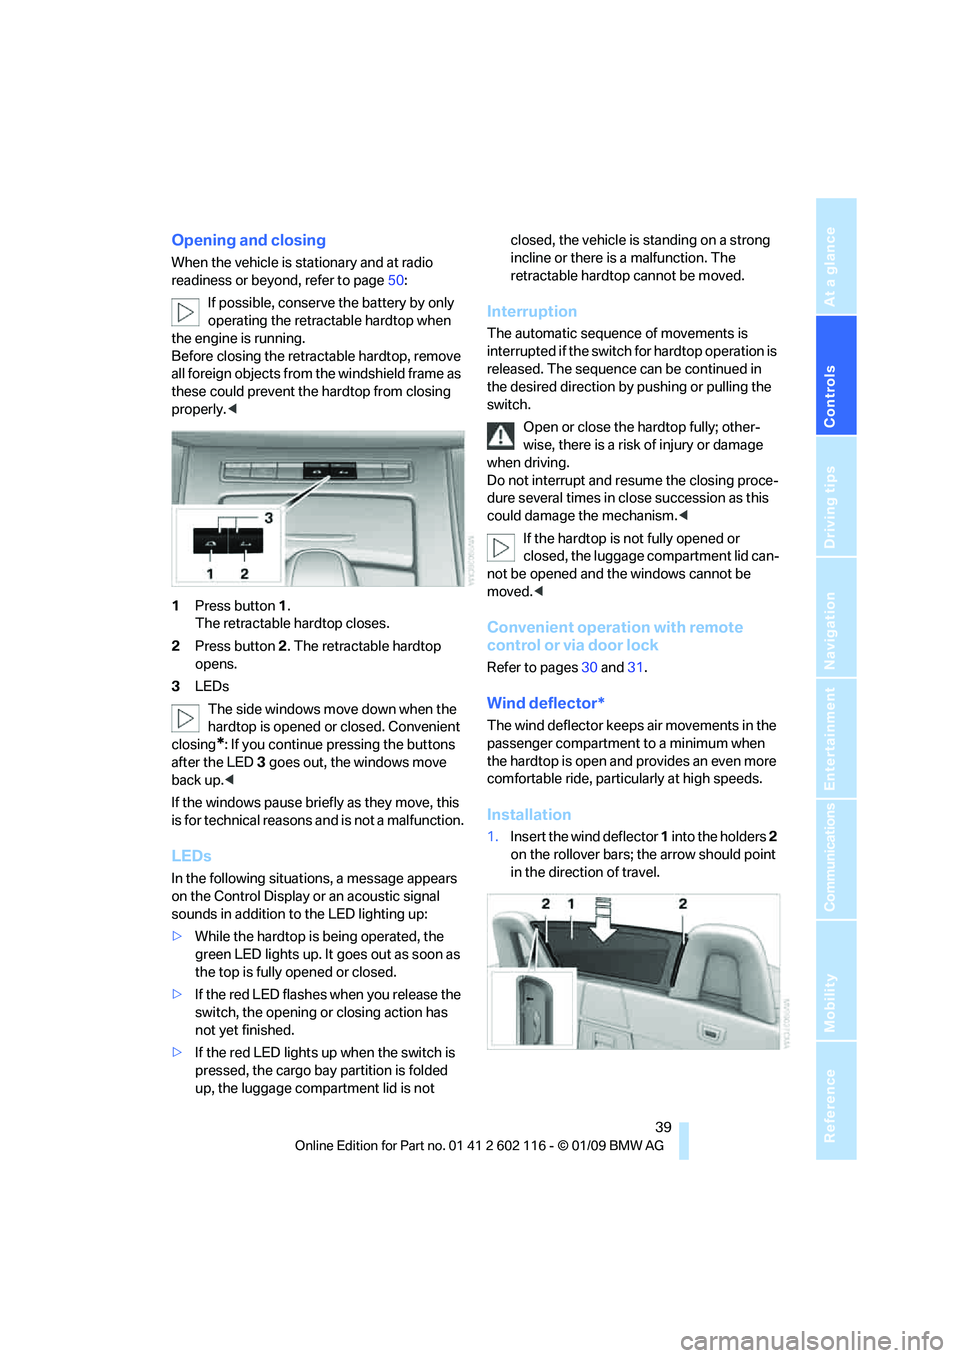
1 Press button 1.
The retractable hardtop closes.
2 Press button 2. The retractable hardtop
opens.
3 LEDs
The side windows move down when the
hardtop is opened or closed. Convenient
closing
*: If you continue pressing the buttons
after the LED 3 goes out, the windows move
back up. <
If the windows pause brie fly as they move, this
is for technical reasons and is not a malfunction.
LEDs
In the following situations, a message appears
on the Control Display or an acoustic signal
sounds in addition to the LED lighting up:
> While the hardtop is being operated, the
green LED lights up. It goes out as soon as
the top is fully opened or closed.
> If the red LED flashes when you release the
switch, the opening or closing action has
not yet finished.
> If the red LED lights up when the switch is
pressed, the cargo bay partition is folded
up, the luggage compartment lid is not closed, the vehicle is standing on a strong
incline or there is a malfunction. The
retractable hardto
p cannot be moved.
Interruption
The automatic sequence of movements is
interrupted if the switch for hardtop operation is
released. The sequence can be continued in
the desired direction by pushing or pulling the
switch.
Open or close the hardtop fully; other-
wise, there is a risk of injury or damage
when driving.
Do not interrupt and re sume the closing proce-
dure several times in cl ose succession as this
could damage the mechanism. <
If the hardtop is not fully opened or
closed, the luggage compartment lid can-
not be opened and the windows cannot be
moved. <
Convenient operation with remote
control or via door lock
Refer to pages 30 and 31.
Wind deflector*
The wind deflector keeps air movements in the
passenger compartment to a minimum when
the hardtop is open and provides an even more
comfortable ride, particul arly at high speeds.
Installation
1.Insert the wind deflector 1 into the holders 2
on the rollover bars; the arrow should point
in the direction of travel.
Page 46 of 248
Adjustments
44
Storing
1.Switch on radio readiness or the ignition,
refer to page 50.
2. Adjust the seat and exterior mirrors to the
desired positions.
3. Press the button.
The LED in the button lights up.
4. Press the desired memory button 1 or 2 : the
LED goes out.
The driver's seat and exterior mirror posi-
tions are stored for th e remote control cur-
rently in use.
Call-up
Do not call up memory while you are driv-
ing, otherwise unexpected seat move-
ment could result in an accident. <
Convenience mode
1.Unlock and open the driver's door or switch
on radio readiness, refer to page 50.
2. Briefly press the desired memory
button 1or 2.
The adjusting procedure is halted immediately
when you touch a seat adjustment switch or
one of the memory buttons.
Safety feature
1. Close the driver's door and switch the igni-
tion on or off, refer to page 50.
2. Press the desired memory button 1 or 2
and keep it pressed until the adjustment
process has been completed.
If the button was pressed accidentally:
Press the button again; the LED goes out.
Call-up with the remote control
The driver's seat position last stored is stored
for the remote control currently in use.
You can select whether the seat should be reset
to that position.
When this Personal Profile function is
used, first make sure that the footwell
behind the driver's seat is free of obstacles.
Failure to do so could re sult in damage to the
objects if the seat were to move rearward. <
The adjusting procedure is halted immediately
when you touch a seat adjustment switch or
one of the memory buttons.
iDrive, for operating pr inciple refer to page16.
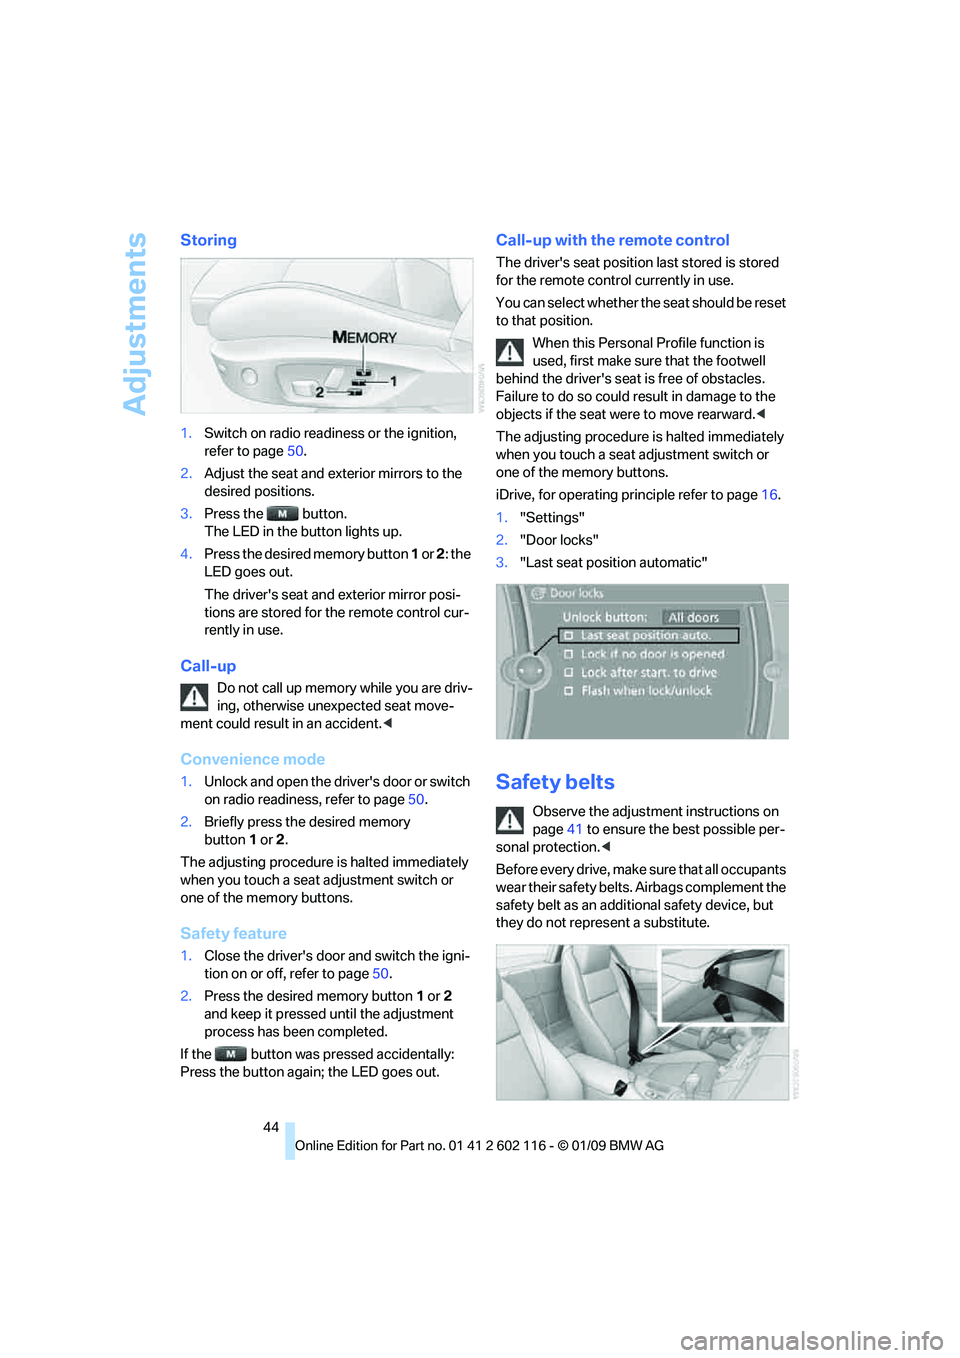
1. "Settings"
2. "Door locks"
3. "Last seat position automatic"
Safety belts
Observe the adjustment instructions on
page 41 to ensure the best possible per-
sonal protection. <
Before every drive, make sure that all occupants
wear their safety belts. Airbags complement the
safety belt as an additi onal safety device, but
they do not repres ent a substitute.
Page 54 of 248
Driving
52
Switching off the engine
Always take the remote control with you
when you leave the vehicle.
Set the parking brake firmly when parking; oth-
erwise, the vehicle could roll. <
Manual transmission
1.With the car at a standstill, press the start/
stop button.
2. Shift into first gear or reverse.
3. Set the parking brake.
4. Removing the remote control from the igni-
tion lock, refer to page 50.
Automatic transmission
1. With the car at a stan dstill, move the selec-
tor lever to position P.
2. Press the start/stop button.
3. Set the parking brake.
4. Removing the remote control from the igni-
tion lock, refer to page 50.
7-gear sport automatic transmission
with dual clutch
1. With the car at a stan dstill, engage trans-
mission position P.
2. Press the start/stop button.
3. Set the parking brake.
4. Removing the remote control from the igni-
tion lock, refer to page 50.
Parking brake
The concept
Your BMW is equipped with an electromechan-
ical parking brake that can be set and released
by using a button.
The parking brake is primarily used to prevent
the vehicle from rolling when it is parked.
When the vehicle is stationary, the parking
brake acts on the rear wheels via an electrome-
chanical mechanism. When the vehicle is rolling
or being driven, the parking brake acts on the disc brakes of the front and rear wheels via the
hydraulic brake system.
Setting the brake
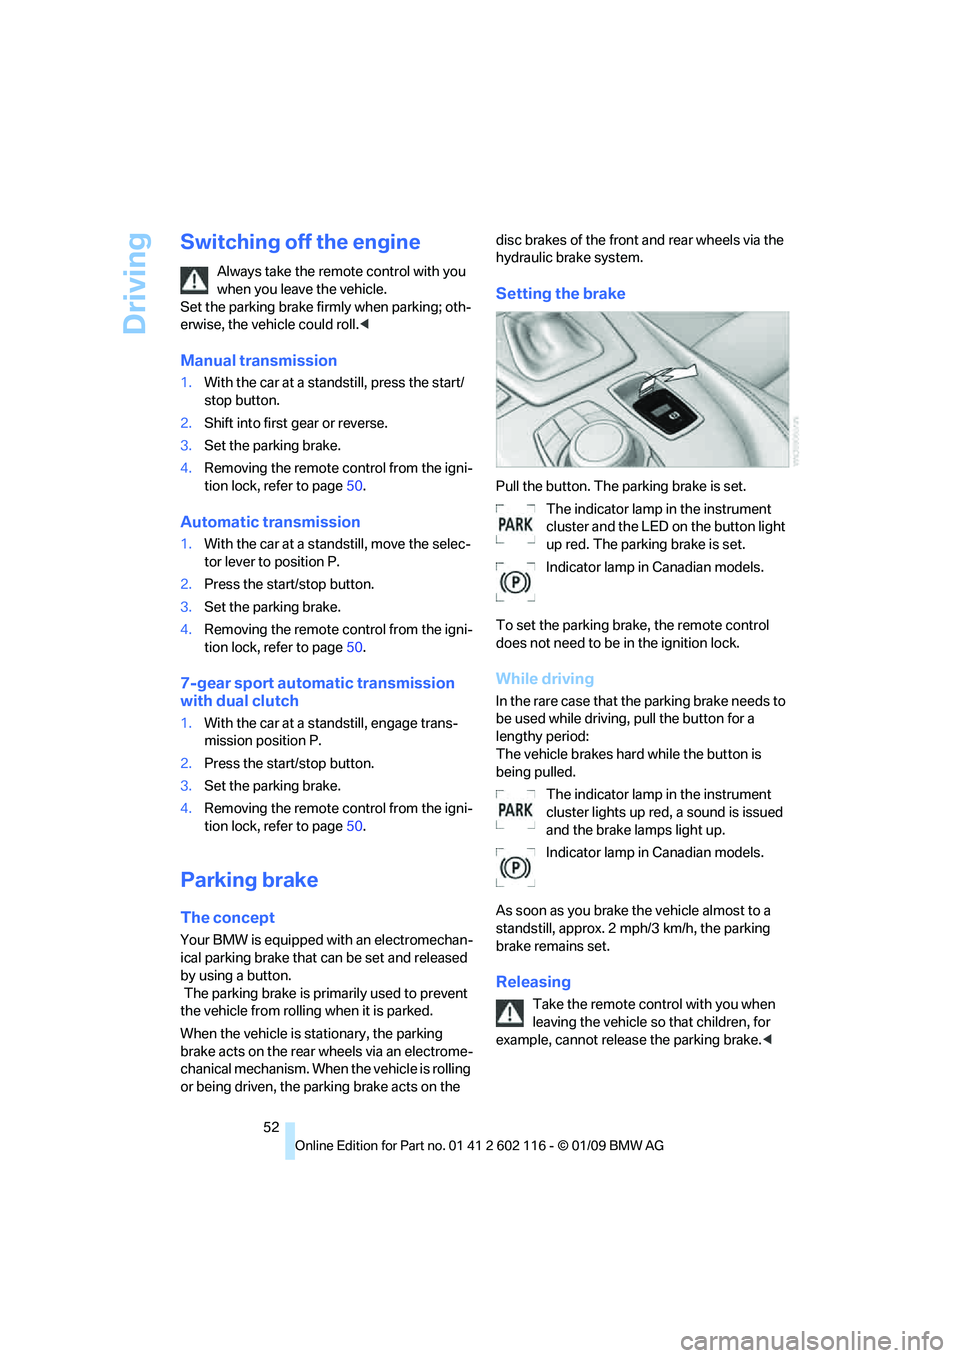
Pull the button. The parking brake is set.
The indicator lamp in the instrument
cluster and the LED on the button light
up red. The parking brake is set.
Indicator lamp in Canadian models.
To set the parking brake, the remote control
does not need to be in the ignition lock.
While driving
In the rare case that the parking brake needs to
be used while driving, pull the button for a
lengthy period:
The vehicle brakes hard while the button is
being pulled. The indicator lamp in the instrument
cluster lights up red, a sound is issued
and the brake lamps light up.
Indicator lamp in Canadian models.
As soon as you brake the vehicle almost to a
standstill, approx. 2 mph/3 km/h, the parking
brake remains set.
Releasing
Take the remote cont rol with you when
leaving the vehicle so that children, for
example, cannot release the parking brake. <
Page 58 of 248
Driving
56
The indicator lamp lights up yellow if
the transmission becomes too warm.
Avoid high engine loads and driving off
frequently. If the transmission overheats, the
indicator lamp lights up red and power flow to
the engine is interrupted. You can only continue
driving after the transmi ssion has cooled down.
Avoid driving off frequently with a high acceler-
ation and do not hold the vehicle on inclines by
depressing the accelerato r lightly and dragging
the clutch; otherwise, the transmission may
overheat.
Transmission positions
P R N D M/S + –
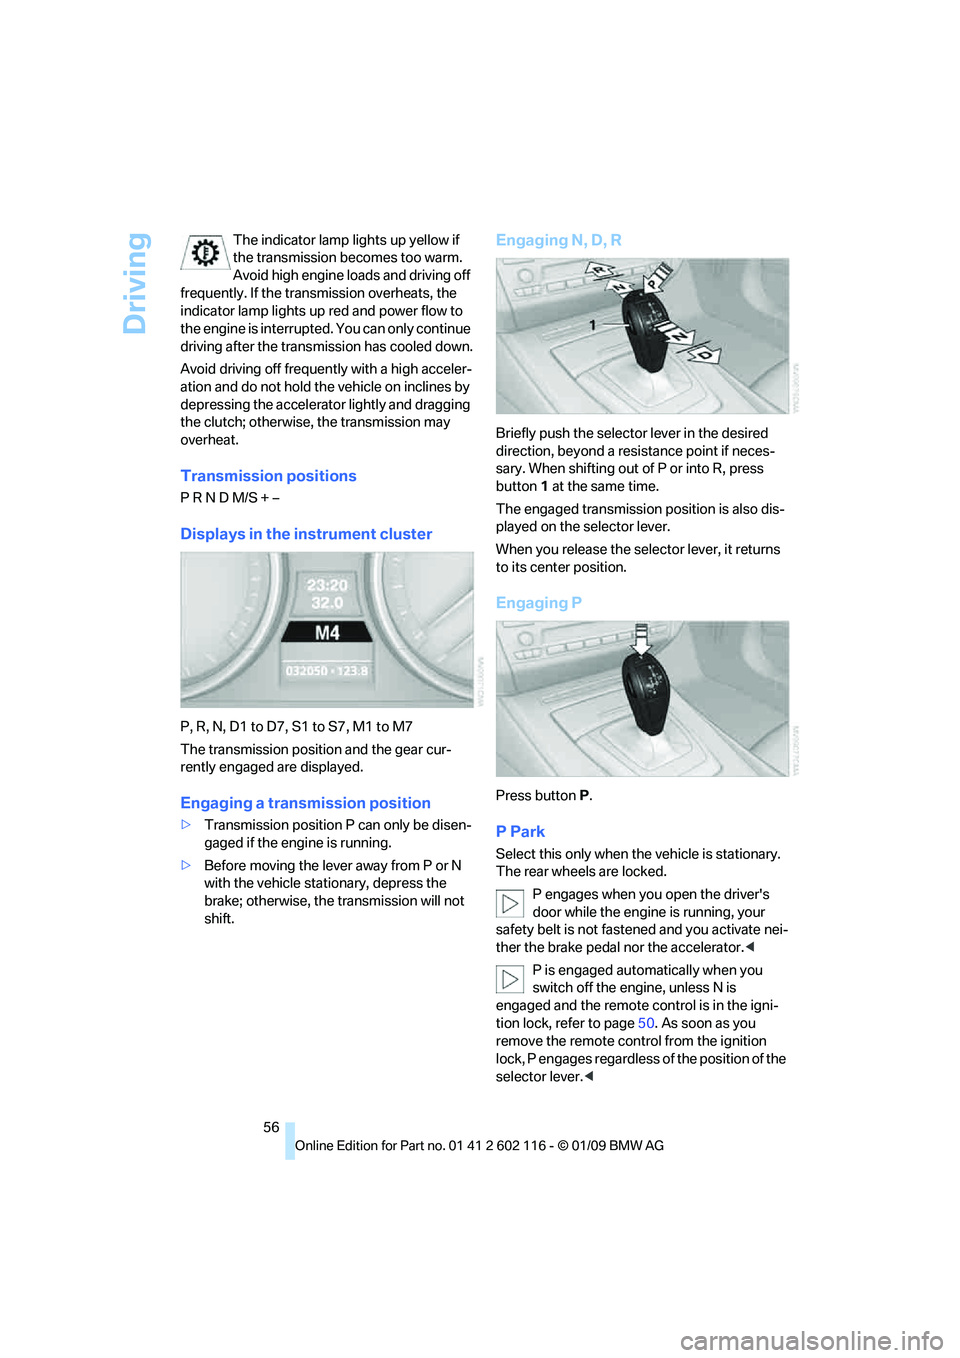
Displays in the instrument cluster
P, R, N, D1 to D7, S1 to S7, M1 to M7
The transmission position and the gear cur-
rently engaged are displayed.
Engaging a transmission position
> Transmission position P can only be disen-
gaged if the engine is running.
> Before moving the lever away from P or N
with the vehicle stat ionary, depress the
brake; otherwise, the transmission will not
shift.
Engaging N, D, R
Briefly push the selector lever in the desired
direction, beyond a resi stance point if neces-
sary. When shifting out of P or into R, press
button 1 at the same time.
The engaged transmission position is also dis-
played on the selector lever.
When you release the sele ctor lever, it returns
to its center position.
Engaging P
Press button P.
P Park
Select this only when th e vehicle is stationary.
The rear wheels are locked.
P engages when you open the driver's
door while the engine is running, your
safety belt is not fastened and you activate nei-
ther the brake pedal nor the accelerator.<
P is engaged automatically when you
switch off the engine, unless N is
engaged and the remote co ntrol is in the igni-
tion lock, refer to page 50. As soon as you
remove the remote cont rol from the ignition
lock, P engages regardless of the position of the
selector lever. <
Page 62 of 248

Driving
60
Wiper system
1Switching on wipers
2 Switching off wipers or brief wipe
3 Activating/deactivating intermittent wipe or
rain sensor
*
4Cleaning windshield and headlamps
5 Setting speed for intermittent wipe, or sen-
sitivity of the rain sensor
Switching on wipers
Press the lever upward, arrow 1.
The lever automatically retu rns to its initial posi-
tion when released.
Normal wiper speed
Press once.
The system switches to operation in the inter-
mittent mode when the vehicle is stationary.
Fast wiper speed
Press twice or press beyond the resistance
point.
The system switches to normal speed when the
vehicle is stationary.
Intermittent wipe or rain sensor*
If the car is not equipped with a rain sensor, the
intermittent-wipe time is a preset.
If the car is equipped with a rain sensor, the time
between wipes is contro lled automatically and
depends on the intensity of the rainfall. The rain
sensor is mounted on the windshield, directly in
front of the interior rearview mirror.
Activating intermitte nt wipe or rain
sensor
Press the button, arrow 3. The LED in the but-
ton lights up.
Setting speed for inte rmittent wipe or
sensitivity of the rain sensor
Turn knurled wheel 5 up or down.
Deactivating intermit tent wipe or rain
sensor
Press the button again, arrow 3.
The LED goes out.
Deactivate the rain sensor before enter-
ing an automatic car wash. Failure to do
so could result in damage caused by undesired
wiper activation. <
Cleaning windshield and headlamps*
Pull the lever, arrow 4.
Washer fluid is sprayed onto the windshield and
the wipers are operated for a short time.
When the vehicle lighting system is switched
on, the headlamps are cleaned at regular and
appropriate intervals. Do not use the washers if there is any
danger that the fluid will freeze on the
windshield. If you do, your vision could be
obscured. Antifreeze should therefore be
added to the fluid, refer to Washer fluid.
Do not use the washers when the washer fluid
reservoir is empty, ot herwise you will damage
the washer pump.<
Page 66 of 248
Everything under control
64
Everything under control
Odometer, outside
temperature display, clock
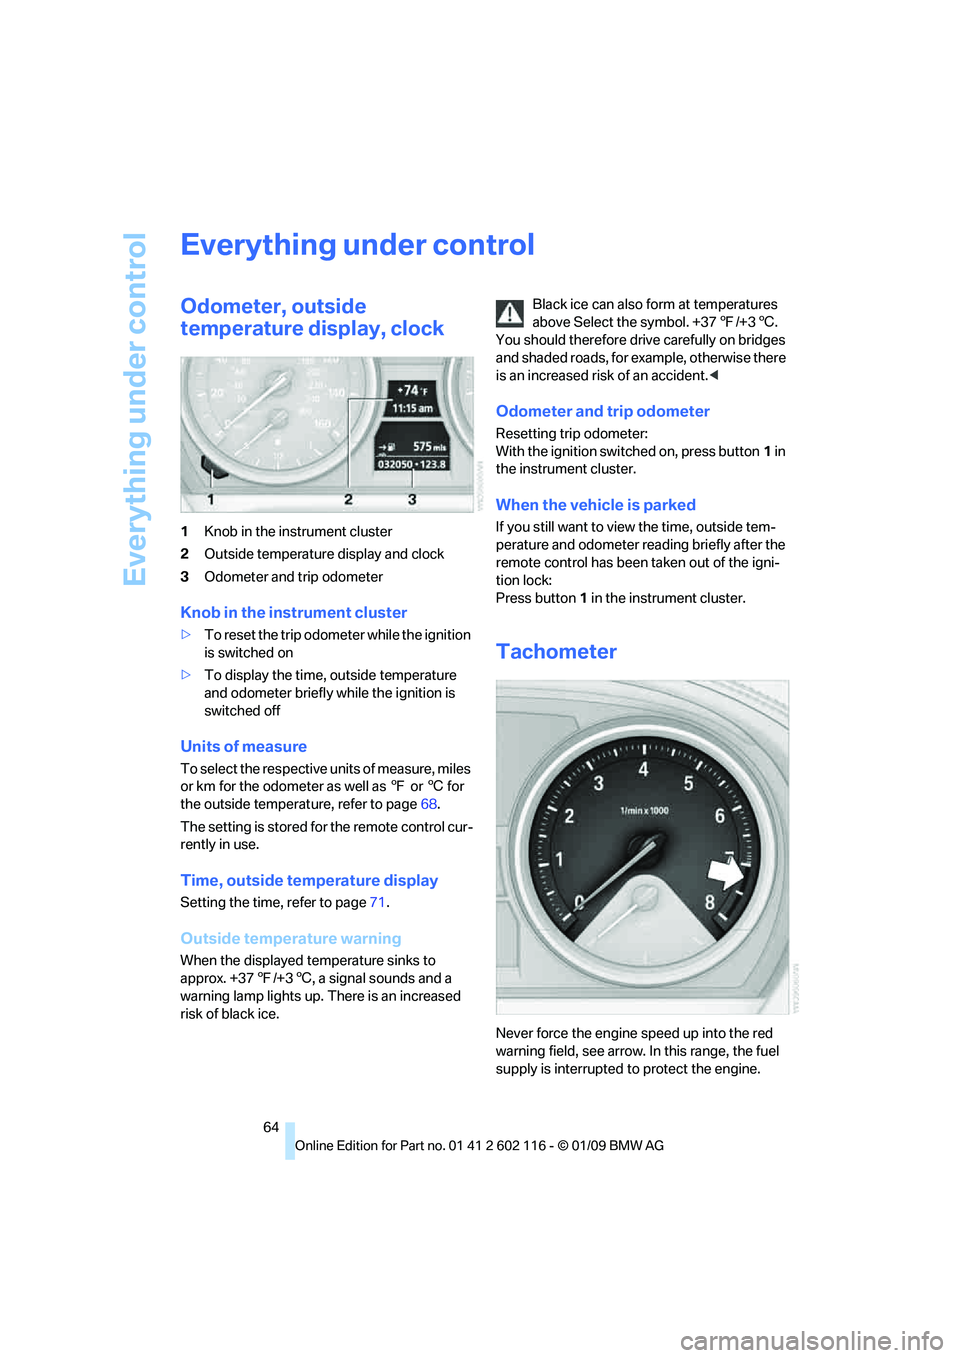
1Knob in the instrument cluster
2 Outside temperature display and clock
3 Odometer and trip odometer
Knob in the instrument cluster
>To reset the trip odometer while the ignition
is switched on
> To display the time, outside temperature
and odometer briefly while the ignition is
switched off
Units of measure
To select the respective units of measure, miles
or km for the odometer as well as 7 or 6 for
the outside temperat ure, refer to page68.
The setting is stored fo r the remote control cur-
rently in use.
Time, outside temperature display
Setting the time, refer to page 71.
Outside temperature warning
When the displayed temperature sinks to
approx. +37 7/+3 6, a signal sounds and a
warning lamp lights up. There is an increased
risk of black ice. Black ice can also form at temperatures
above Select the symbol. +37
7/+3 6.
You should therefore driv e carefully on bridges
and shaded roads, for example, otherwise there
is an increased risk of an accident. <
Odometer and trip odometer
Resetting trip odometer:
With the ignition switched on, press button 1 in
the instrument cluster.
When the vehicle is parked
If you still want to view the time, outside tem-
perature and odometer re ading briefly after the
remote control has been taken out of the igni-
tion lock:
Press button 1 in the instrument cluster.
Tachometer
Never force the engine speed up into the red
warning field, see arrow. In this range, the fuel
supply is interrupted to protect the engine.
Page 70 of 248
Everything under control
68
Settings and information
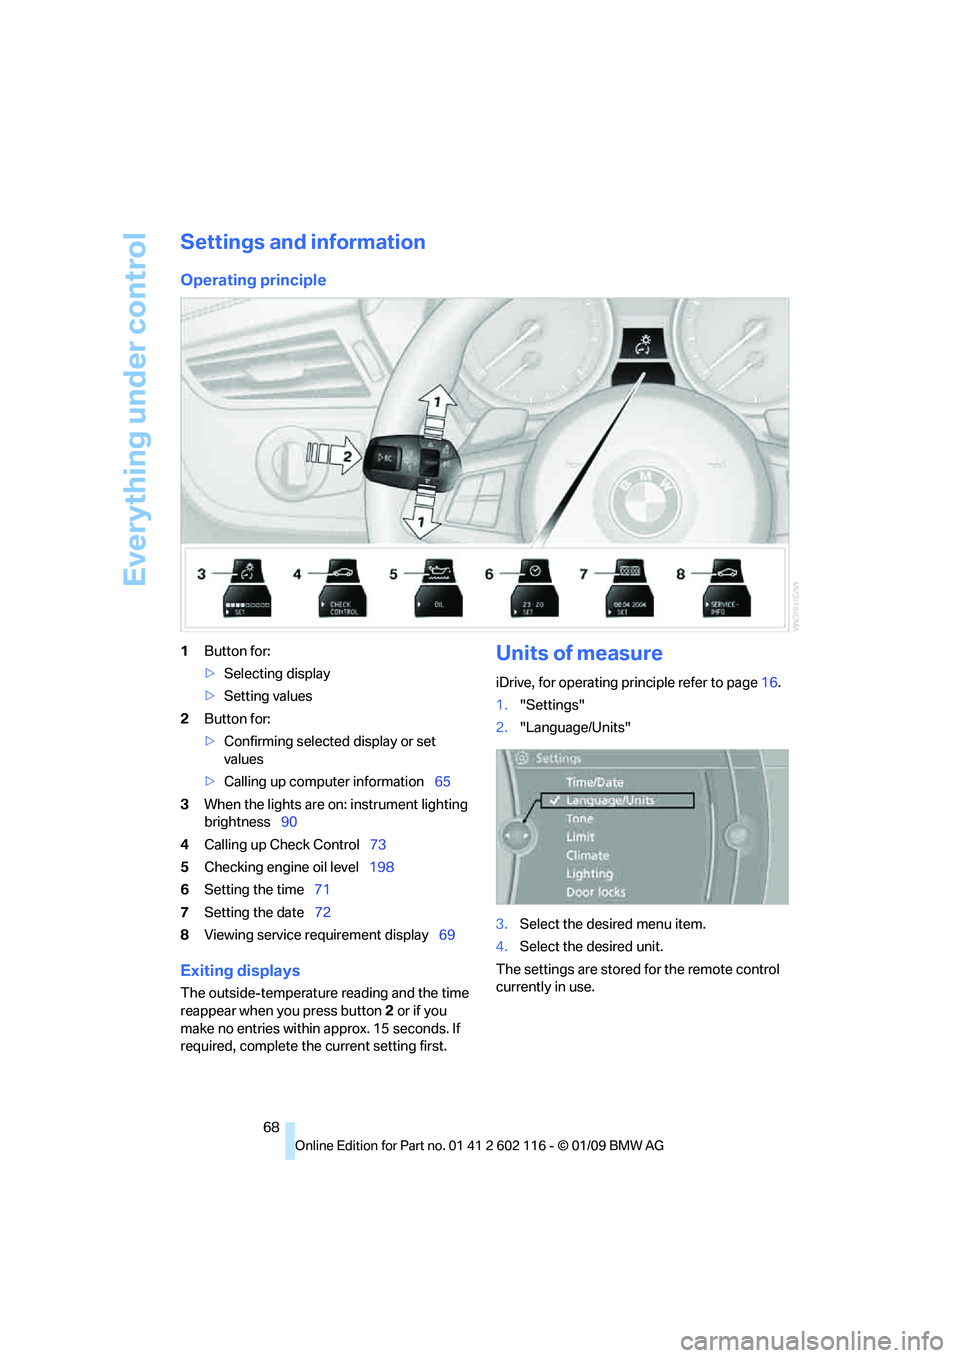
Operating principle
1Button for:
>Selecting display
> Setting values
2 Button for:
>Confirming selected display or set
values
> Calling up computer information 65
3 When the lights are on: instrument lighting
brightness 90
4 Calling up Check Control 73
5 Checking engine oil level 198
6 Setting the time 71
7 Setting the date 72
8 Viewing service re quirement display 69
Exiting displays
The outside-temperature reading and the time
reappear when you press button 2 or if you
make no entries within approx. 15 seconds. If
required, complete the current setting first.
Units of measure
iDrive, for operating principle refer to page16.
1. "Settings"
2. "Language/Units"
3. Select the desired menu item.
4. Select the desired unit.
The settings are stored for the remote control
currently in use.