2009 BMW Z4 SDRIVE35I lights
[x] Cancel search: lightsPage 80 of 248
Technology for driving comfort and safety
78
Loud sound sources outside or inside the car
can drown out the PDC signal. Therefore,
always drive cautiously, otherwise there is a risk
of personal injury or property damage.
<
Driving stability control
systems
Your BMW has a number of systems that help
to maintain the vehicle's stability even in
adverse driving conditions.
Antilock Brake System ABS
ABS prevents locking of the wheels during
braking. Safe steering response is maintained
even during full braking. Active safety is thus
increased.
The ABS is operational every time you start the
engine. Braking safely, refer to page 112.
Electronic brake-force distribution
The system controls the brake pressure in the
rear wheels to ensure st able braking behavior.
Dynamic Brake Control DBC
When you apply the brakes rapidly, this system
automatically produces the maximum braking
force boost and thus helps to achieve the short-
est possible braking distance during full brak-
ing. This system exploits all of the benefits pro-
vided by ABS.
Do not reduce the pressu re on the brake for the
duration of the full braking application.
Dynamic Stability Control DSC
DSC prevents the driving wheels from losing
traction when you pull away from rest or accel-
erate. The system also recognizes unstable
driving conditions, for example if the rear of the
car is about to swerve or if momentum is acting
at an angle past the front wheels. In these
cases, DSC helps the vehicle maintain a safe
course within physical lim its by reducing engine
output and through braking actions at the indi-
vidual wheels. The laws of physics
cannot be repealed,
even with DSC. An appropriate driving
style always remains th e responsibility of the
driver. Therefore, do no t reduce the additional
s a f e t y m a r g i n a g a i n b y t a k i n g r i s k s , a s t h i s c o u l d
result in an accident. <
Deactivating/activating the DSC OFF
program
The program can be de activated via Dynamic
Driving Control, refer to DSC OFF.
For better control
The indicator lamp flashes: DSC con-
trols the drive forces and brake forces.
The indicator lamp lights up: DSC has
failed.
DTC Dynamic Traction Control
The concept
The DTC system and the TRACTION program
is a variant of the DSC in which forward momen-
tum is optimized.
The system ensures maximum forward
momentum on special road conditions, e.g.,
unplowed snowy roads, bu t driving stability is
limited.
It is therefore necessary to drive with appropri-
ate caution.
You may find it useful to briefly activate DTC
under the following special circumstances:
> When driving in slus h or on uncleared,
snow-covered roads.
> When rocking the vehicle or driving off in
deep snow or on loose surfaces.
> When driving with snow chains.
Deactivating/activ ating DTC Dynamic
Traction Control
The system and program can be deactivated/
activated via Dynamic Driving Control.
Page 81 of 248
Controls
79Reference
At a glance
Driving tips
Communications
Navigation
Entertainment
Mobility
Dynamic Driving Control
The concept
Dynamic Driving Control can be used to adjust
the driving dynamics of the vehicle.
Several programs are available for this purpose;
they can be activated using the two Dynamic
Driving Control buttons.
The following characteristics are adapted,
depending on which program was selected:
> Engine response.
> Shift times of the automatic transmission
*.
> Power steering support
*.
> Changes in the suspension characteristics
through damping control
*.
> Vehicle stabilization through DSC Dynamic
Stability Control.
Operating the programs
1You can activate or de activate the following
programs using this button:
> DSC OFF
> TRACTION
2 You can activate or de activate the following
programs using this rocker switch:
> SPORT+
> SPORT
> NORMAL
DSC OFF
Driving stability is limited during acceleration
and when driving in bends.
To increase vehicle stability, activate DSC again
as soon as possible.
Activating DSC OFF
Press and hold the button, but not
longer than approx. 10 seconds, until
the indicator lamp for the DSC lights up in the
instrument cluster and DSC OFF is displayed in
the instrument cluster.
The DSC system is switched off.
Deactivating DSC OFF
Press the button.
DSC OFF and the DSC indicator lamp
go out.
For better control
DSC OFF is briefly displayed in the instrument
cluster.
The indicator lamp lights up: DSC is
deactivated.
TRACTION
Maximum traction on loose road surfaces. DTC
Dynamic Traction Control is switched on. Driv-
ing stability is limited during acceleration and
when driving in bends.
Activating TRACTION
Press the button.
TRACTION is displayed in the instru-
ment cluster.
Page 82 of 248
Technology for driving comfort and safety
80
The DSC indicator lamp in
the instrument clus-
ter lights up.
Deactivating TRACTION
Press the button again.
TRACTION and the DSC indicator
lamp go out.
For better control
TRACTION is displayed in the instrument
cluster.
The indicator lamp lights up: DTC
Dynamic Traction Control is activated.
SPORT+
Sporty driving with a tight suspension and lim-
ited driving stabilization.
Dynamic Traction Control is switched on.
The driver handles seve ral of the stabilization
tasks.
Activating SPORT+
Press the button repeatedly until
SPORT+ appears in the instrument
cluster and the DSC indicator lamp lights up.
For better control
SPORT+ is displayed in the instrument cluster.
The indicator lamp lights up: DTC
Dynamic Traction Control is activated.
SPORT
Consistently sporty tuning of the suspension
for greater driving agility with maximum driving
stabilization.
Activating SPORT
Press the button repeatedly until
SPORT+ appears in the instrument
cluster.
NORMAL
For a balanced tuning with maximum driving
stabilization.
Activating NORMAL
Press the button repeatedly until the
program display disappears in the
instrument cluster.
Displays in the instrument cluster
The selected program is displayed in the instru-
ment cluster.
Drive-off assistant
The drive-off assistant enables you to drive off
smoothly on uphill gradients. The parking brake
is not required.
1. Hold the car in place by depressing the
brake.
2. Release the brake and drive off without
delay.
The drive-off assistant holds the car in
place for approx. 2 seconds after the
brake is released. Drive off without delay after
releasing the brake. Because the drive-off
assistant will not hold the car in place after
approx. 2 seconds, the car would otherwise
start to roll backwards. <
Page 86 of 248
Technology for driving comfort and safety
84
2.
In the event of complete pressure loss,
0 psi/0 kPa, you can estimate the possible
distance for continued driving on the basis
of the following guidelines:
>With a light load:
1 person without luggage:
approx. 155 miles/250 km
> With a medium load:
1 person, cargo bay full, or 2 people
without luggage:
approx. 95 miles/150 km
> With a full load:
2 people, cargo bay full:
approx. 30 miles/50 km
Drive cautiously and do not exceed a
speed of 50 mph/80 km/h. In the event of
pressure loss, vehicle handling changes. This
includes reduced tracking stability in braking,
extended braking distance and altered natural
steering characteristics.
If unusual vibration or lo ud noises occur during
the journey, this may be an indication that the
damaged tire has finally failed. Reduce your
speed and pull over as soon as possible at a
suitable location. Otherw ise parts of the tire
could come loose, resulting in an accident. Do
not continue driving. Instead, contact your
BMW center. <
Message for unsuccessful system
reset
The warning lamp lights up yellow. A
message will appear on the Control
Display. The system is not reset after
a tire has been changed, for example.
Check the tire inflation pressure and reset the
system, refer to page 83.
Status display
iDrive, for operating pr inciple refer to page16.
1. Press the button
The start menu is opened.
2. "Vehicle Info"
3. "Vehicle status"
4. "TPM"
5. The status is displayed.
Malfunction
The small warning lamp flashes in
yellow and then lights up continu-
ously; the larger warning lamp comes
on in yellow. On the Control Display,
the tires are shown in gray and a message
appears. No punctures can be detected.
This type of message is shown in the following
situations:
> If there is a malfunction
Have the system checked.
> If a wheel without TPM electronics has
been mounted
> If TPM is temporarily malfunctioning due to
other systems or devices using the same
radio frequency.
Declaration according to
NHTSA/FMVSS 138
Tire Pressure Monitoring Systems
Each tire should be checked monthly when cold
and inflated to the inflation pressure recom-
mended by the vehicle manufacturer on the
vehicle placard or tire infl ation pressure label. If
your vehicle has tires of a different size than the
size indicated on the vehicle placard or tire infla-
tion pressure label, yo u should determine the
proper tire inflation pressure for those tires. As
an added safety feature, your vehicle has been
equipped with a tire pressure monitoring sys-
tem, TPMS, that illuminates a low tire pressure
telltale when one or more of your tires are signif-
icantly under-inflated. Accordingly, when the
low tire pressure telltale illuminates, you should
stop and check your tires as soon as possible,
and inflate them to the proper pressure. Driving
on a significantly underi nflated tire causes the
tire to overheat and ca n lead to tire failure.
Underinflation also reduces fuel efficiency and
tire tread life, and may affect the vehicle’s han-
dling and stopping ability. Please note that the
TPMS is not a substitute for proper tire mainte-
nance, and it is the dr iver’s responsibility to
maintain correct tire pressure, even if underin-
flation has not reached the level at which the
TPMS low tire pressure telltale illuminates.
Page 88 of 248
Technology for driving comfort and safety
86
Do not attempt to remove
the airbag retention
system from the vehicle. Do not modify the indi-
vidual components of the system or its wiring in
any way. This includes the upholstered covers
of the steering wheel, the dashboard and the
seats. Do not attempt to remove or dismantle
the steering wheel.
Do not touch the individual components imme-
diately after the system has been triggered,
because there is a danger of burns.
In the event of malfunctions, deactivation or
triggering of the airbag restraint system, have
the testing, repair, remo val and disposal of air-
bag generators executed only by a BMW center
or a workshop that works according to repair
procedures of BMW with correspondingly
trained personnel and th at has the required
explosives licenses. Unprofessional attempts to
work on the system could lead to failure in an
emergency or to undesi red airbag activation,
either of which could resu lt in personal injury.<
Warning notices and information about the air-
bags can also be found on the sun visors.
Automatic deactivation of the
passenger airbags
The system determines whether the passenger
seat is occupied by meas uring the resistance of
the human body. Front, knee and side airbags
on the passenger side ar e activated or deacti-
vated accordingly.
Make sure that the passenger keeps his
or her feet in the footwell; otherwise, the
passenger airbags may not function properly. <
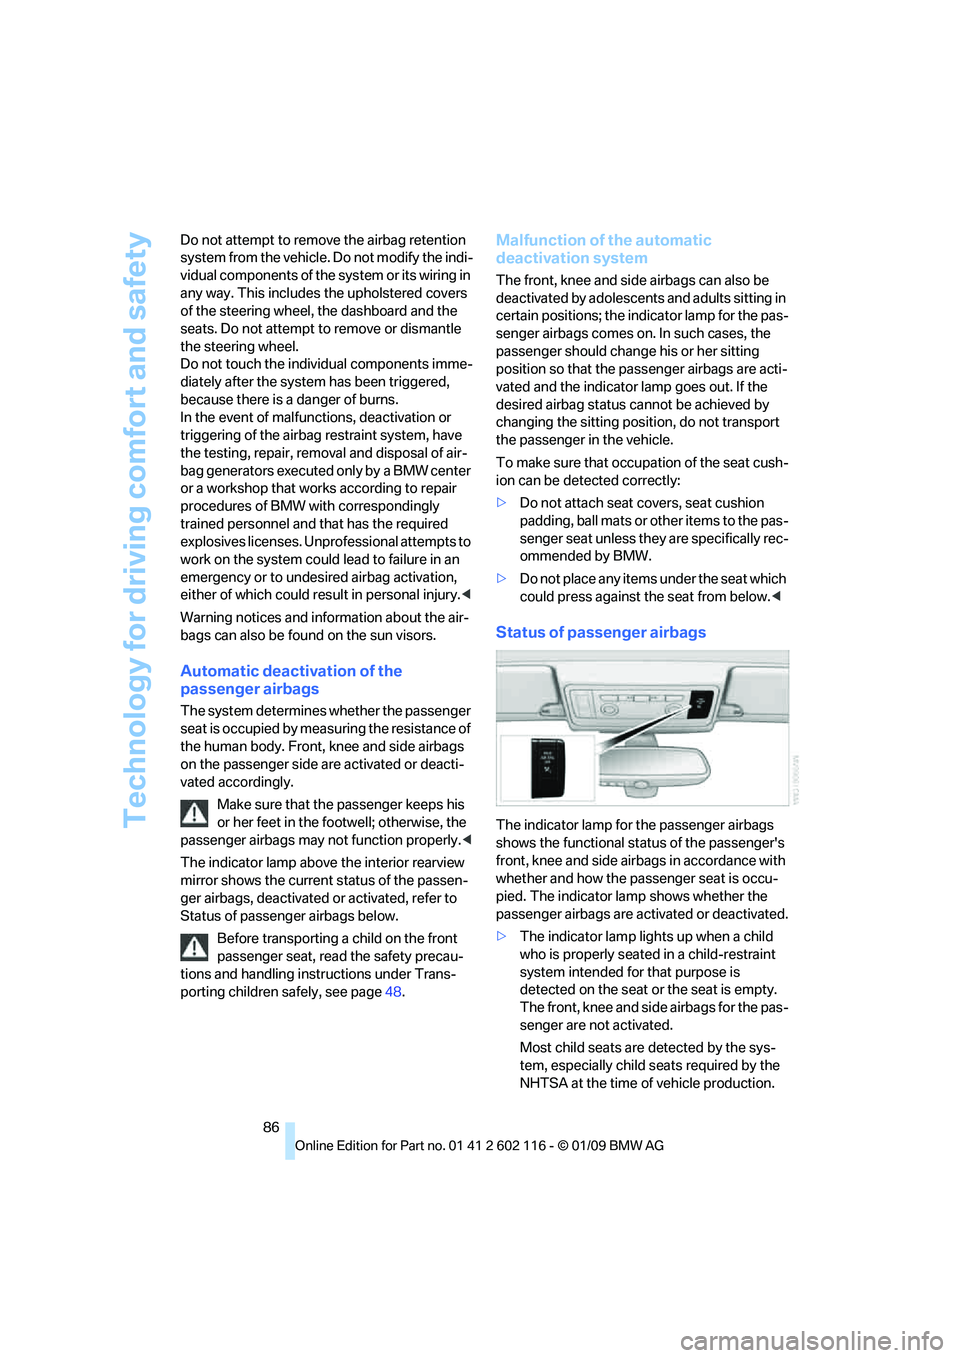
The indicator lamp above the interior rearview
mirror shows the current status of the passen-
ger airbags, deactivated or activated, refer to
Status of passenger airbags below.
Before transporting a child on the front
passenger seat, read the safety precau-
tions and handling instructions under Trans-
porting children safely, see page 48.
Malfunction of the automatic
deactivation system
The front, knee and side airbags can also be
deactivated by adolescents and adults sitting in
certain positions; the in dicator lamp for the pas-
senger airbags comes on. In such cases, the
passenger should change his or her sitting
position so that the pa ssenger airbags are acti-
vated and the indicator la mp goes out. If the
desired airbag status cannot be achieved by
changing the sitting posi tion, do not transport
the passenger in the vehicle.
To make sure that occupa tion of the seat cush-
ion can be detected correctly:
> Do not attach seat covers, seat cushion
padding, ball mats or other items to the pas-
senger seat unless they are specifically rec-
ommended by BMW.
> Do not place any items under the seat which
could press against the seat from below. <
Status of passenger airbags
The indicator lamp for the passenger airbags
shows the functional status of the passenger's
front, knee and side airbags in accordance with
whether and how the passenger seat is occu-
pied. The indicator lamp shows whether the
passenger airbags are activated or deactivated.
> The indicator lamp lights up when a child
who is properly seated in a child-restraint
system intended for that purpose is
detected on the seat or the seat is empty.
The front, knee and side airbags for the pas-
senger are not activated.
Most child seats are detected by the sys-
tem, especially child seats required by the
NHTSA at the time of vehicle production.
Page 97 of 248
Controls
95Reference
At a glance
Driving tips
Communications
Navigation
Entertainment
Mobility
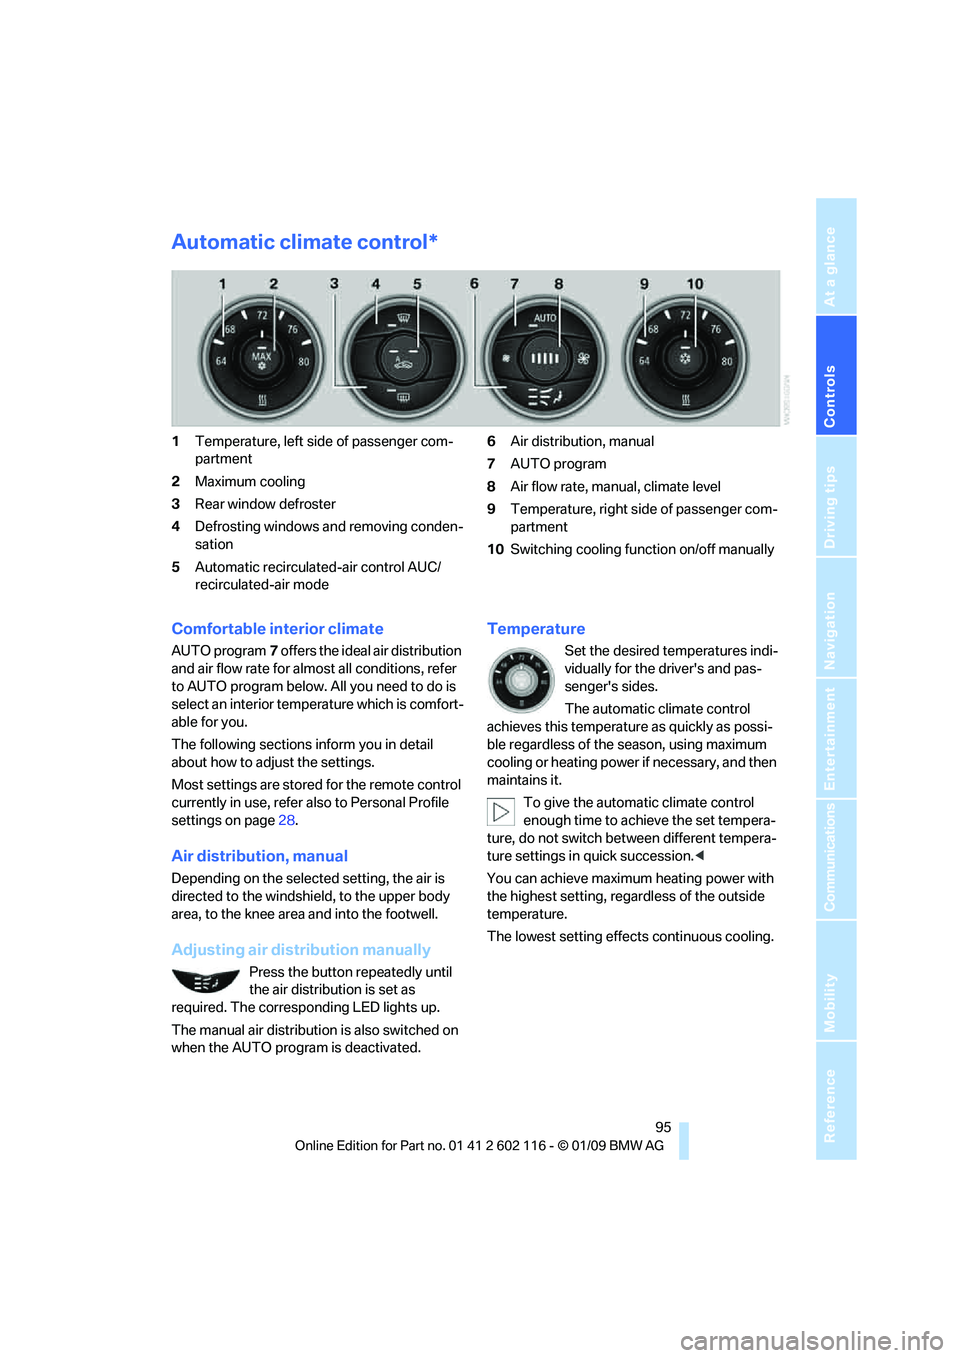
Automatic climate control*
1Temperature, left side of passenger com-
partment
2 Maximum cooling
3 Rear window defroster
4 Defrosting windows and removing conden-
sation
5 Automatic recirculated-air control AUC/
recirculated-air mode 6
Air distribution, manual
7 AUTO program
8 Air flow rate, manual, climate level
9 Temperature, right side of passenger com-
partment
10 Switching cooling function on/off manually
Comfortable interior climate
AUTO program 7 offers the ideal air distribution
and air flow rate for almost all conditions, refer
to AUTO program below. All you need to do is
select an interior temp erature which is comfort-
able for you.
The following sections inform you in detail
about how to adjust the settings.
Most settings are stored for the remote control
currently in use, refer al so to Personal Profile
settings on page 28.
Air distribution, manual
Depending on the selected setting, the air is
directed to the windshie ld, to the upper body
area, to the knee area and into the footwell.
Adjusting air distribution manually
Press the button repeatedly until
the air distribution is set as
required. The corresponding LED lights up.
The manual air distribution is also switched on
when the AUTO program is deactivated.
Temperature
Set the desired temperatures indi-
vidually for the driver's and pas-
senger's sides.
The automatic climate control
achieves this temperature as quickly as possi-
ble regardless of the season, using maximum
cooling or heating power if necessary, and then
maintains it.
To give the automatic climate control
enough time to achieve the set tempera-
ture, do not switch be tween different tempera-
ture settings in quick succession. <
You can achieve maximum heating power with
the highest setting, rega rdless of the outside
temperature.
The lowest setting effe cts continuous cooling.
Page 113 of 248
Driving tips
111Reference
At a glance
Controls
Communications
Navigation
Entertainment
Mobility
Drive defensively
Avoid unnecessary acceleration and braking
maneuvers. To do so, keep an adequate dis-
tance to the forward vehicle. A defensive
and smooth driving style keeps fuel con-
sumption down.
Avoid high engine speeds
Only use first gear when setting off. In second
and higher gears, accele rate without hesitation
or pauses. When accelerating, shift up before
reaching high engine speeds.
When you reach the desired speed, shift into
the highest applicable ge ar and drive with the
engine speed as low as possible and at a con-
stant speed.
As a rule: driving at low engine speeds lowers
fuel consumption and reduces wear.
Coasting
When approaching a red lig ht, take your foot off
the accelerator and coast to a stop in the high-
est applicable gear.
On a downhill slope, take your foot off the accel-
erator and coast in a suitable gear.
The fuel supply is interrupted when coasting.
Switch off the engi ne during lengthy
stops
Switch off the engine when stopping for lengthy
periods, e.g. at traffic lights, railroad crossings
or in traffic congestion. You achieve fuel sav-
ings even if standing time is as short as approx.
4 seconds.
Switch off functions you do not need at
the moment
Functions such as the air conditioner and the
seat or rear window heating draw large amounts
of power and consume a dditional fuel. Espe-
cially in city traffic and in stop and go driving
they have a considerable impact. Therefore,
switch these functions off when they are not
really needed.
Have the vehicle serviced
Have the vehicle serviced regularly to achieve
good economy and a long vehicle life. BMW
recommends having the vehicle serviced at a
BMW center. Also note the BMW service sys-
tem, refer to page 202.
General driving notes
Close the luggag e compartment lid
Operate the vehicle only when the lug-
gage compartment lid is closed. Other-
wise, exhaust fumes could enter the interior of
the vehicle. <
If the vehicle must be driven with the luggage
compartment lid open:
1. Close all windows.
2. Greatly increase the ai r volume of the auto-
matic climate control system, refer to
page 96.
Hot exhaust system
In all vehicles, extremely high tempera-
tures are generated in the exhaust sys-
tem. Do not remove the heat shields installed
adjacent to various sect ions of the exhaust sys-
tem, and never apply un dercoating to them.
When driving, standing at idle and while park-
ing, take care to avoid possible contact
between the hot exhaust system and any highly
flammable materials such as hay, leaves, grass,
etc. Such contact could lead to a fire, with the
risk of serious personal injuries and property
damage. Do not touch ho t exhaust tail pipes.
Otherwise there is a risk of burns. <
Hydroplaning
When driving on wet or slushy roads,
reduce road speed. If you do not, a wedge
of water can form between tires and road sur-
face. This situation, known as hydroplaning,
means that the tire can completely lose contact
with the road surface, so that neither the car can
be steered nor the brake be properly applied.<
Page 153 of 248
Navigation
Entertainment
Driving tips
151Reference
At a glance
Controls
Communications
Mobility
Controls and displays
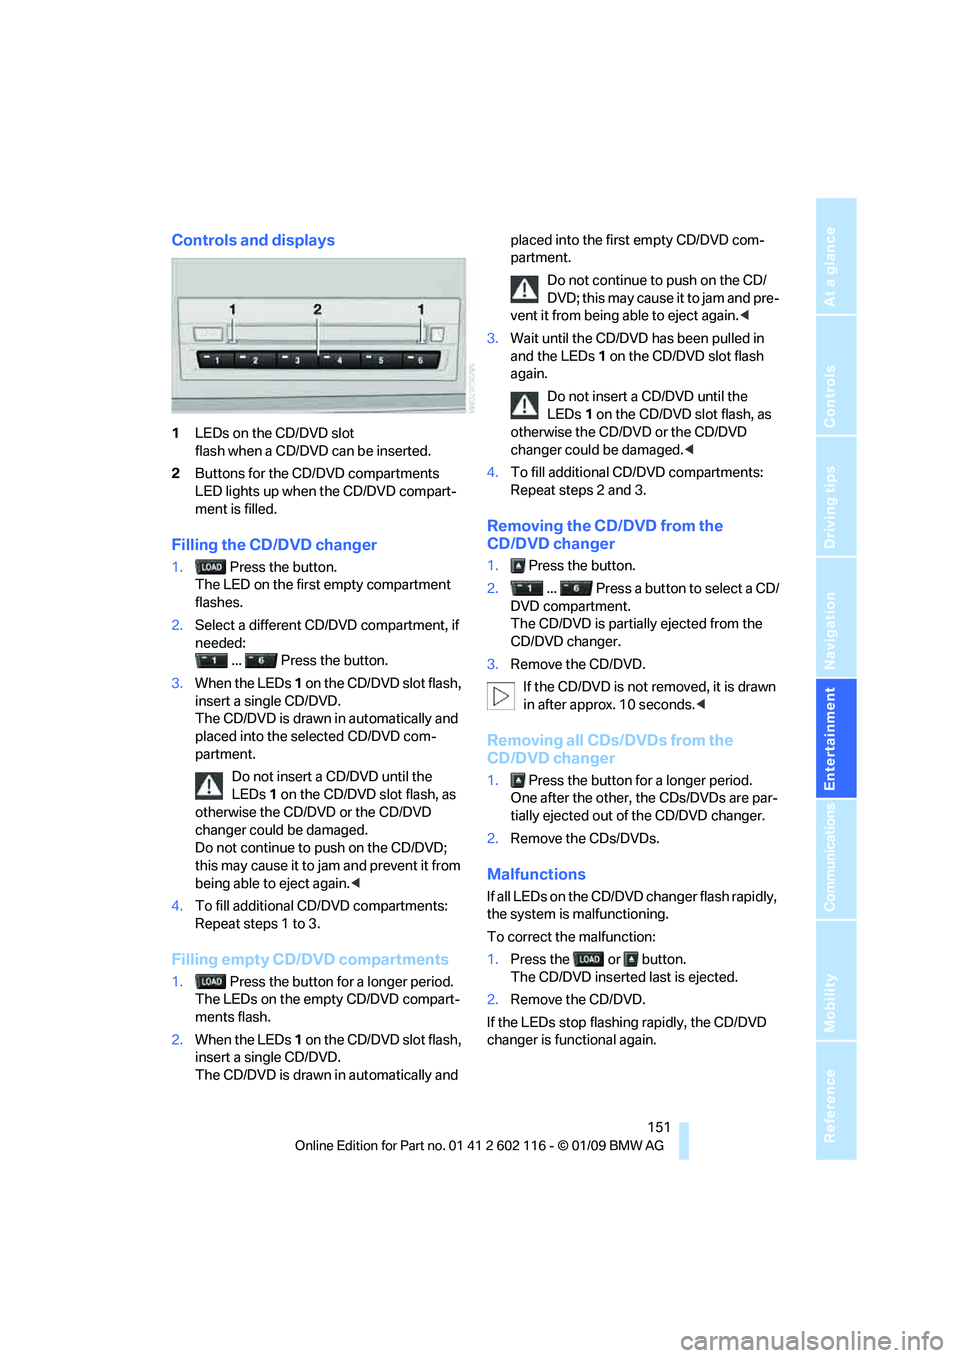
1LEDs on the CD/DVD slot
flash when a CD/DVD can be inserted.
2 Buttons for the CD/DVD compartments
LED lights up when the CD/DVD compart-
ment is filled.
Filling the CD/DVD changer
1. Press the button.
The LED on the first empty compartment
flashes.
2. Select a different CD/DVD compartment, if
needed:
... Press the button.
3. When the LEDs 1 on the CD/DVD slot flash,
insert a single CD/DVD.
The CD/DVD is drawn in automatically and
placed into the selected CD/DVD com-
partment.
Do not insert a CD/DVD until the
LEDs 1 on the CD/DVD slot flash, as
otherwise the CD/DVD or the CD/DVD
changer could be damaged.
Do not continue to push on the CD/DVD;
this may cause it to jam and prevent it from
being able to eject again. <
4. To fill additional CD/DVD compartments:
Repeat steps 1 to 3.
Filling empty CD/DVD compartments
1. Press the button for a longer period.
The LEDs on the empty CD/DVD compart-
ments flash.
2. When the LEDs 1 on the CD/DVD slot flash,
insert a single CD/DVD.
The CD/DVD is drawn in automatically and placed into the first empty CD/DVD com-
partment.
Do not continue to push on the CD/
DVD; this may cause it to jam and pre-
vent it from being able to eject again. <
3. Wait until the CD/DVD has been pulled in
and the LEDs 1 on the CD/DVD slot flash
again.
Do not insert a CD/DVD until the
LEDs 1 on the CD/DVD slot flash, as
otherwise the CD/DVD or the CD/DVD
changer could be damaged.<
4. To fill additional CD/DVD compartments:
Repeat steps 2 and 3.
Removing the CD/DVD from the
CD/DVD changer
1. Press the button.
2. ... Press a button to select a CD/
DVD compartment.
The CD/DVD is partia lly ejected from the
CD/DVD changer.
3. Remove the CD/DVD.
If the CD/DVD is not removed, it is drawn
in after approx. 10 seconds. <
Removing all CDs/DVDs from the
CD/DVD changer
1. Press the button for a longer period.
One after the other, the CDs/DVDs are par-
tially ejected out of the CD/DVD changer.
2. Remove the CDs/DVDs.
Malfunctions
If all LEDs on the CD/DVD changer flash rapidly,
the system is malfunctioning.
To correct the malfunction:
1.Press the or button.
The CD/DVD inserted last is ejected.
2. Remove the CD/DVD.
If the LEDs stop flashing rapidly, the CD/DVD
changer is functional again.