2009 BMW Z4 SDRIVE30I light
[x] Cancel search: lightPage 58 of 248
Driving
56
The indicator lamp lights up yellow if
the transmission becomes too warm.
Avoid high engine loads and driving off
frequently. If the transmission overheats, the
indicator lamp lights up red and power flow to
the engine is interrupted. You can only continue
driving after the transmi ssion has cooled down.
Avoid driving off frequently with a high acceler-
ation and do not hold the vehicle on inclines by
depressing the accelerato r lightly and dragging
the clutch; otherwise, the transmission may
overheat.
Transmission positions
P R N D M/S + –
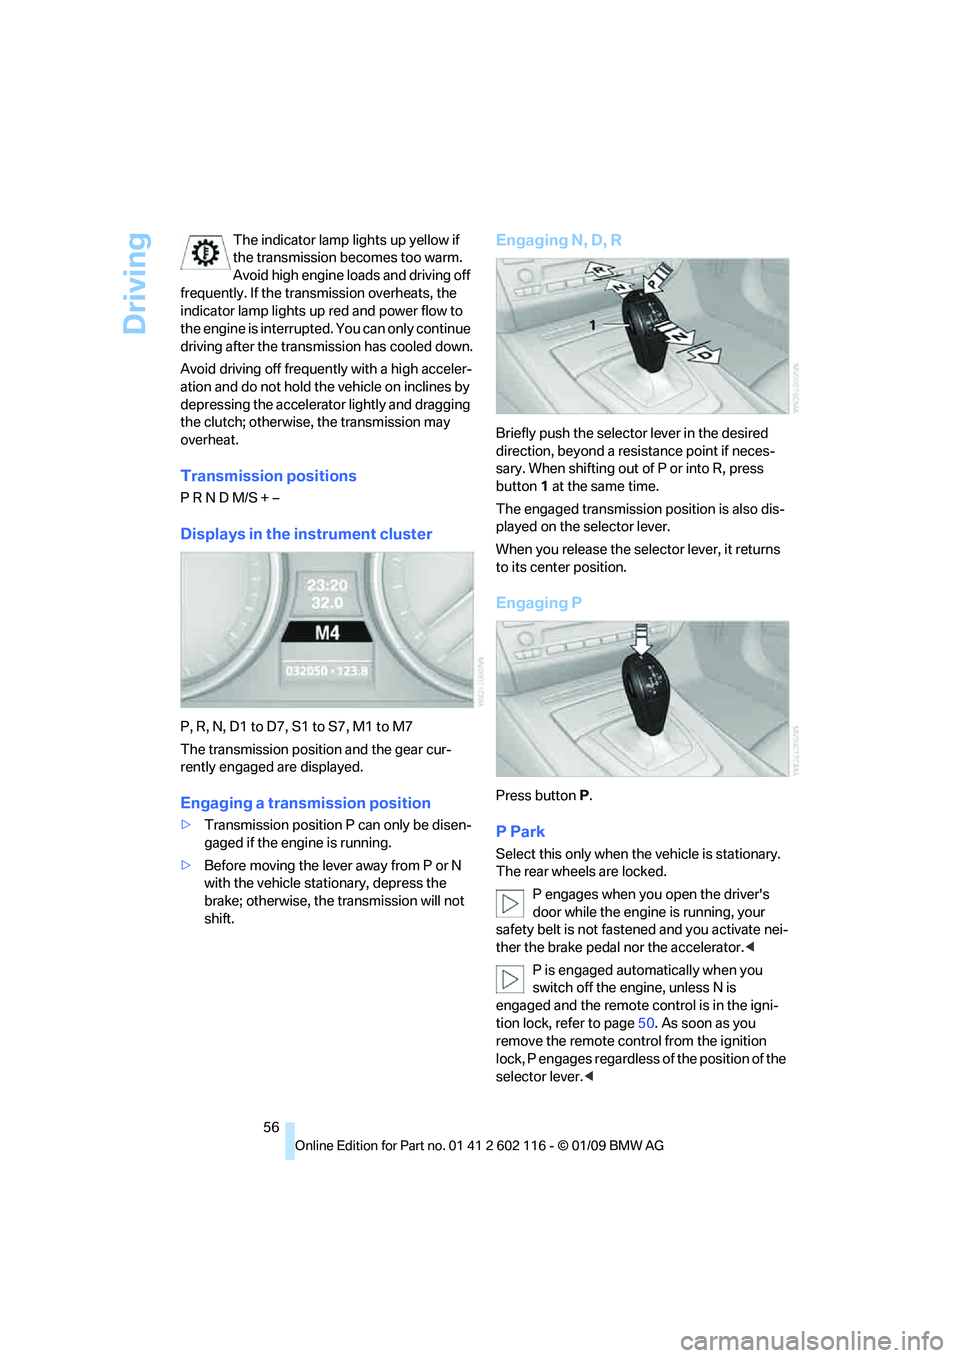
Displays in the instrument cluster
P, R, N, D1 to D7, S1 to S7, M1 to M7
The transmission position and the gear cur-
rently engaged are displayed.
Engaging a transmission position
> Transmission position P can only be disen-
gaged if the engine is running.
> Before moving the lever away from P or N
with the vehicle stat ionary, depress the
brake; otherwise, the transmission will not
shift.
Engaging N, D, R
Briefly push the selector lever in the desired
direction, beyond a resi stance point if neces-
sary. When shifting out of P or into R, press
button 1 at the same time.
The engaged transmission position is also dis-
played on the selector lever.
When you release the sele ctor lever, it returns
to its center position.
Engaging P
Press button P.
P Park
Select this only when th e vehicle is stationary.
The rear wheels are locked.
P engages when you open the driver's
door while the engine is running, your
safety belt is not fastened and you activate nei-
ther the brake pedal nor the accelerator.<
P is engaged automatically when you
switch off the engine, unless N is
engaged and the remote co ntrol is in the igni-
tion lock, refer to page 50. As soon as you
remove the remote cont rol from the ignition
lock, P engages regardless of the position of the
selector lever. <
Page 61 of 248
Controls
59Reference
At a glance
Driving tips
Communications
Navigation
Entertainment
Mobility
5.Turn the Allen wrench as far as it will go,
arrow 2. The transmission lock is released.
Do not turn the Allen wrench in the
opposite direction as this may dam-
age the mechanism.<
6. Draw the Allen wrench out of the opening.
After parking the vehicle, lock the trans-
mission lock again. Otherwise, there is a
danger of the vehicle rolling. <
Locking
1.Press the button, see arrow.
The transmission lock is locked again.
2. Clip the sleeve of the selector lever back in
place.
3. Set the parking brake.
Jump-starting and towing, refer to page 214.
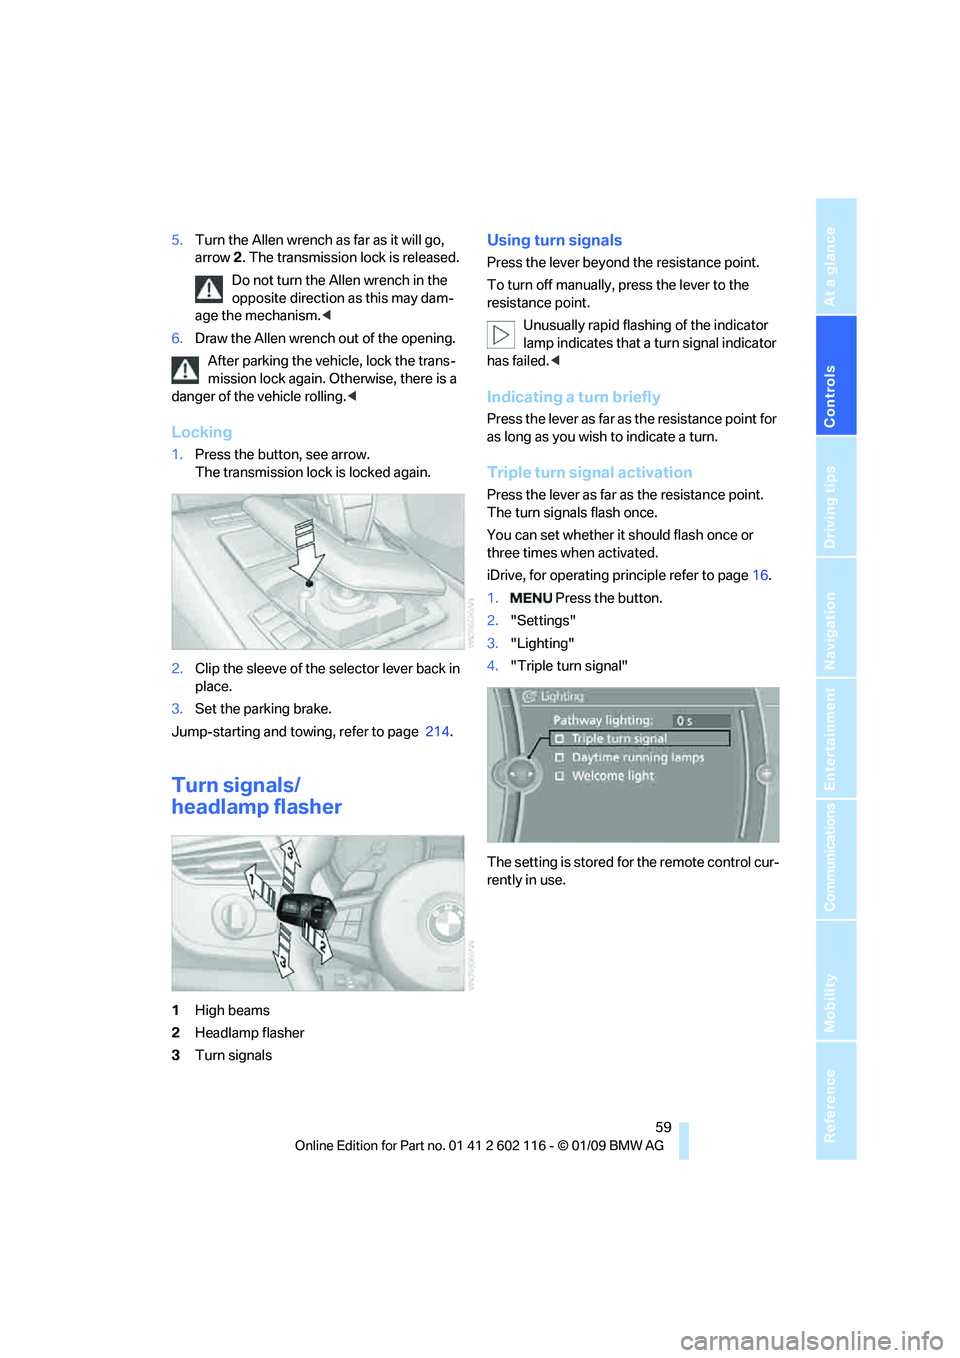
Turn signals/
headlamp flasher
1High beams
2 Headlamp flasher
3 Turn signals
Using turn signals
Press the lever beyond the resistance point.
To turn off manually, press the lever to the
resistance point.
Unusually rapid flashi ng of the indicator
lamp indicates that a turn signal indicator
has failed. <
Indicating a turn briefly
Press the lever as far as the resistance point for
as long as you wish to indicate a turn.
Triple turn signal activation
Press the lever as far as the resistance point.
The turn signals flash once.
You can set whether it should flash once or
three times when activated.
iDrive, for operating pr inciple refer to page16.
1. Press the button.
2. "Settings"
3. "Lighting"
4. "Triple turn signal"
The setting is stored for the remote control cur-
rently in use.
Page 62 of 248
Driving
60
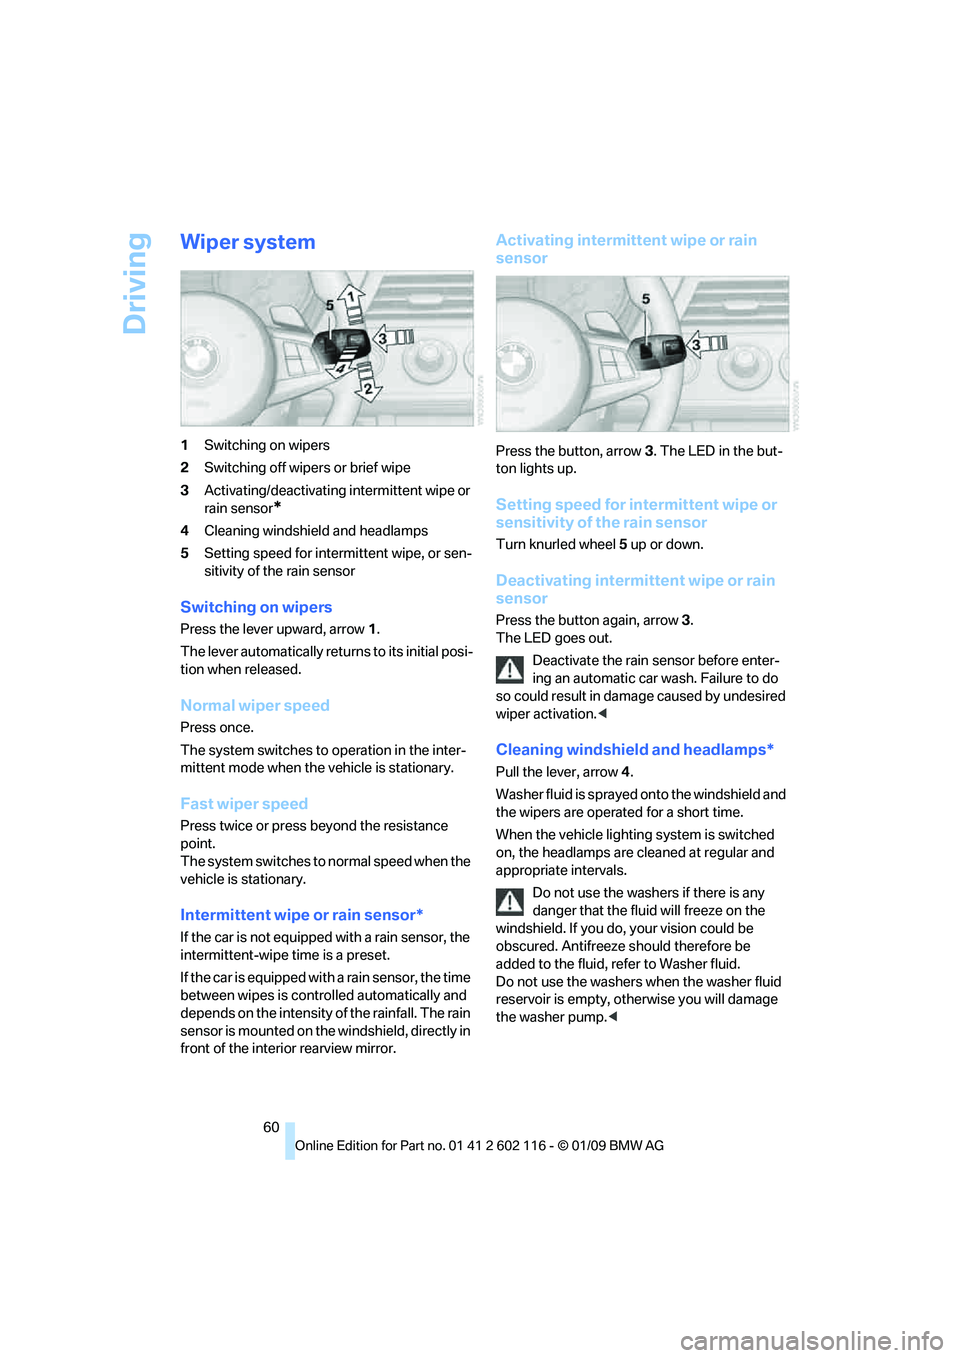
Wiper system
1Switching on wipers
2 Switching off wipers or brief wipe
3 Activating/deactivating intermittent wipe or
rain sensor
*
4Cleaning windshield and headlamps
5 Setting speed for intermittent wipe, or sen-
sitivity of the rain sensor
Switching on wipers
Press the lever upward, arrow 1.
The lever automatically retu rns to its initial posi-
tion when released.
Normal wiper speed
Press once.
The system switches to operation in the inter-
mittent mode when the vehicle is stationary.
Fast wiper speed
Press twice or press beyond the resistance
point.
The system switches to normal speed when the
vehicle is stationary.
Intermittent wipe or rain sensor*
If the car is not equipped with a rain sensor, the
intermittent-wipe time is a preset.
If the car is equipped with a rain sensor, the time
between wipes is contro lled automatically and
depends on the intensity of the rainfall. The rain
sensor is mounted on the windshield, directly in
front of the interior rearview mirror.
Activating intermitte nt wipe or rain
sensor
Press the button, arrow 3. The LED in the but-
ton lights up.
Setting speed for inte rmittent wipe or
sensitivity of the rain sensor
Turn knurled wheel 5 up or down.
Deactivating intermit tent wipe or rain
sensor
Press the button again, arrow 3.
The LED goes out.
Deactivate the rain sensor before enter-
ing an automatic car wash. Failure to do
so could result in damage caused by undesired
wiper activation. <
Cleaning windshield and headlamps*
Pull the lever, arrow 4.
Washer fluid is sprayed onto the windshield and
the wipers are operated for a short time.
When the vehicle lighting system is switched
on, the headlamps are cleaned at regular and
appropriate intervals. Do not use the washers if there is any
danger that the fluid will freeze on the
windshield. If you do, your vision could be
obscured. Antifreeze should therefore be
added to the fluid, refer to Washer fluid.
Do not use the washers when the washer fluid
reservoir is empty, ot herwise you will damage
the washer pump.<
Page 64 of 248
Driving
62
Maintaining current speed
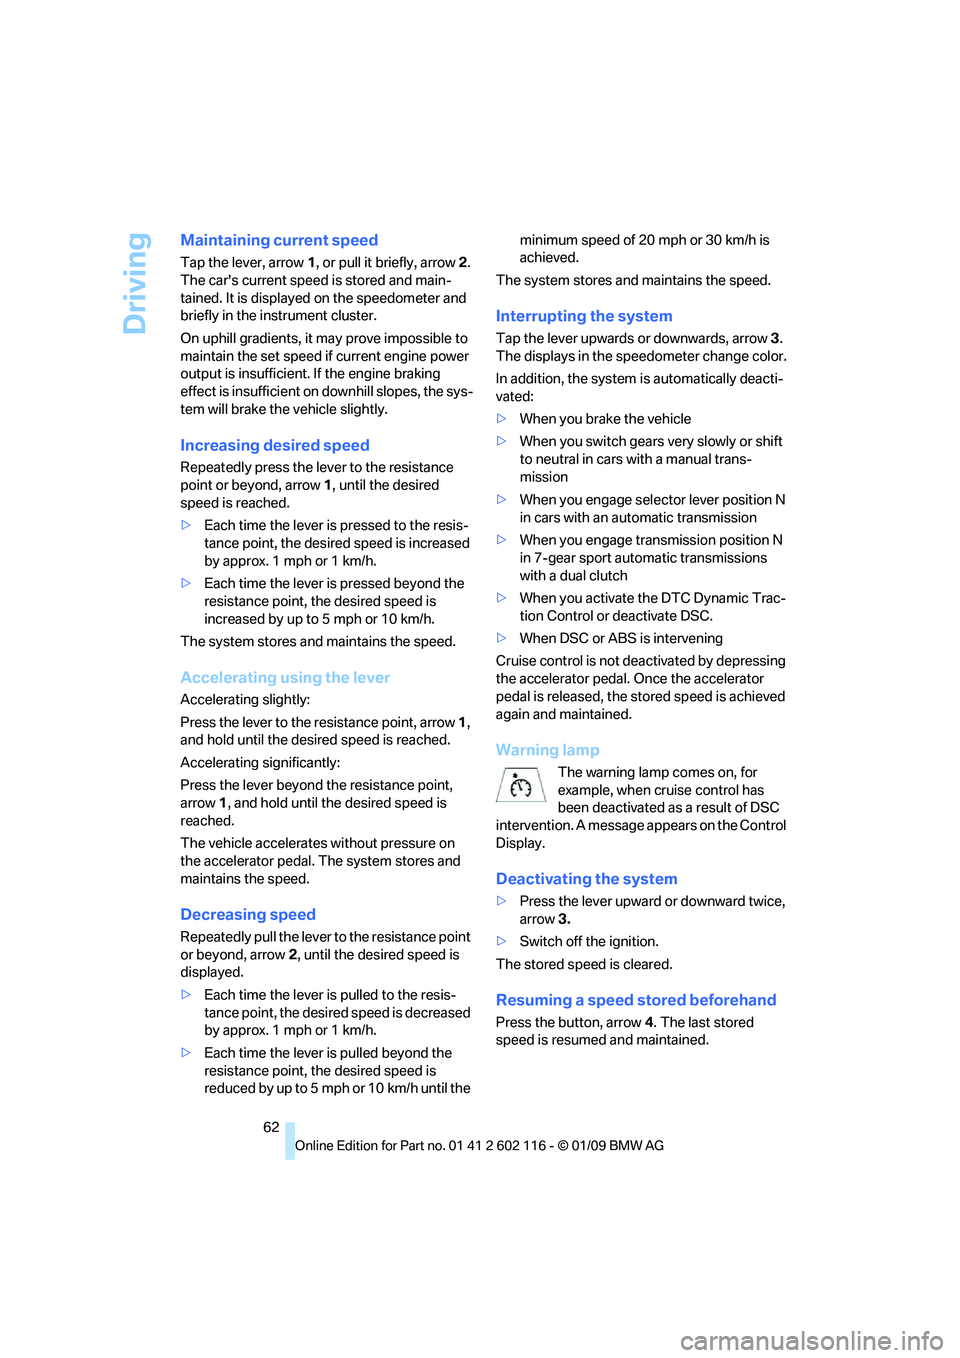
Tap the lever, arrow 1, or pull it briefly, arrow 2.
The car's current speed is stored and main-
tained. It is displayed on the speedometer and
briefly in the instrument cluster.
On uphill gradients, it may prove impossible to
maintain the set speed if current engine power
output is insufficient. If the engine braking
effect is insufficient on downhill slopes, the sys-
tem will brake the vehicle slightly.
Increasing desired speed
Repeatedly press the lever to the resistance
point or beyond, arrow 1, until the desired
speed is reached.
> Each time the lever is pressed to the resis-
tance point, the desired speed is increased
by approx. 1 mph or 1 km/h.
> Each time the lever is pressed beyond the
resistance point, the desired speed is
increased by up to 5 mph or 10 km/h.
The system stores and maintains the speed.
Accelerating using the lever
Accelerating slightly:
Press the lever to the resistance point, arrow 1,
and hold until the desired speed is reached.
Accelerating significantly:
Press the lever beyond the resistance point,
arrow 1, and hold until the desired speed is
reached.
The vehicle accelerates without pressure on
the accelerator pedal. The system stores and
maintains the speed.
Decreasing speed
Repeatedly pull the lever to the resistance point
or beyond, arrow 2, until the desired speed is
displayed.
> Each time the lever is pulled to the resis-
tance point, the desired speed is decreased
by approx. 1 mph or 1 km/h.
> Each time the lever is pulled beyond the
resistance point, the desired speed is
reduced by up to 5 mph o r 10 km/h until the minimum speed of 20 mph or 30 km/h is
achieved.
The system stores and maintains the speed.
Interrupting the system
Tap the lever upwards or downwards, arrow 3.
The displays in the speedometer change color.
In addition, the system is automatically deacti-
vated:
> When you brake the vehicle
> When you switch gears very slowly or shift
to neutral in cars with a manual trans-
mission
> When you engage selector lever position N
in cars with an automatic transmission
> When you engage transmission position N
in 7-gear sport automatic transmissions
with a dual clutch
> When you activate the DTC Dynamic Trac-
tion Control or deactivate DSC.
> When DSC or ABS is intervening
Cruise control is not de activated by depressing
the accelerator pedal. Once the accelerator
pedal is released, the st ored speed is achieved
again and maintained.
Warning lamp
The warning lamp comes on, for
example, when cruise control has
been deactivated as a result of DSC
intervention. A message appears on the Control
Display.
Deactivating the system
> Press the lever upward or downward twice,
arrow 3.
> Switch off the ignition.
The stored speed is cleared.
Resuming a speed stored beforehand
Press the button, arrow 4. The last stored
speed is resumed and maintained.
Page 66 of 248

Everything under control
64
Everything under control
Odometer, outside
temperature display, clock
1Knob in the instrument cluster
2 Outside temperature display and clock
3 Odometer and trip odometer
Knob in the instrument cluster
>To reset the trip odometer while the ignition
is switched on
> To display the time, outside temperature
and odometer briefly while the ignition is
switched off
Units of measure
To select the respective units of measure, miles
or km for the odometer as well as 7 or 6 for
the outside temperat ure, refer to page68.
The setting is stored fo r the remote control cur-
rently in use.
Time, outside temperature display
Setting the time, refer to page 71.
Outside temperature warning
When the displayed temperature sinks to
approx. +37 7/+3 6, a signal sounds and a
warning lamp lights up. There is an increased
risk of black ice. Black ice can also form at temperatures
above Select the symbol. +37
7/+3 6.
You should therefore driv e carefully on bridges
and shaded roads, for example, otherwise there
is an increased risk of an accident. <
Odometer and trip odometer
Resetting trip odometer:
With the ignition switched on, press button 1 in
the instrument cluster.
When the vehicle is parked
If you still want to view the time, outside tem-
perature and odometer re ading briefly after the
remote control has been taken out of the igni-
tion lock:
Press button 1 in the instrument cluster.
Tachometer
Never force the engine speed up into the red
warning field, see arrow. In this range, the fuel
supply is interrupted to protect the engine.
Page 67 of 248
Controls
65Reference
At a glance
Driving tips
Communications
Navigation
Entertainment
Mobility
Coolant temperature
A warning lamp will come on if the coolant, and
therefore the engine, becomes too hot. In addi-
tion, a message will appear on the Control
Display.
Check coolant level, refer to page201.
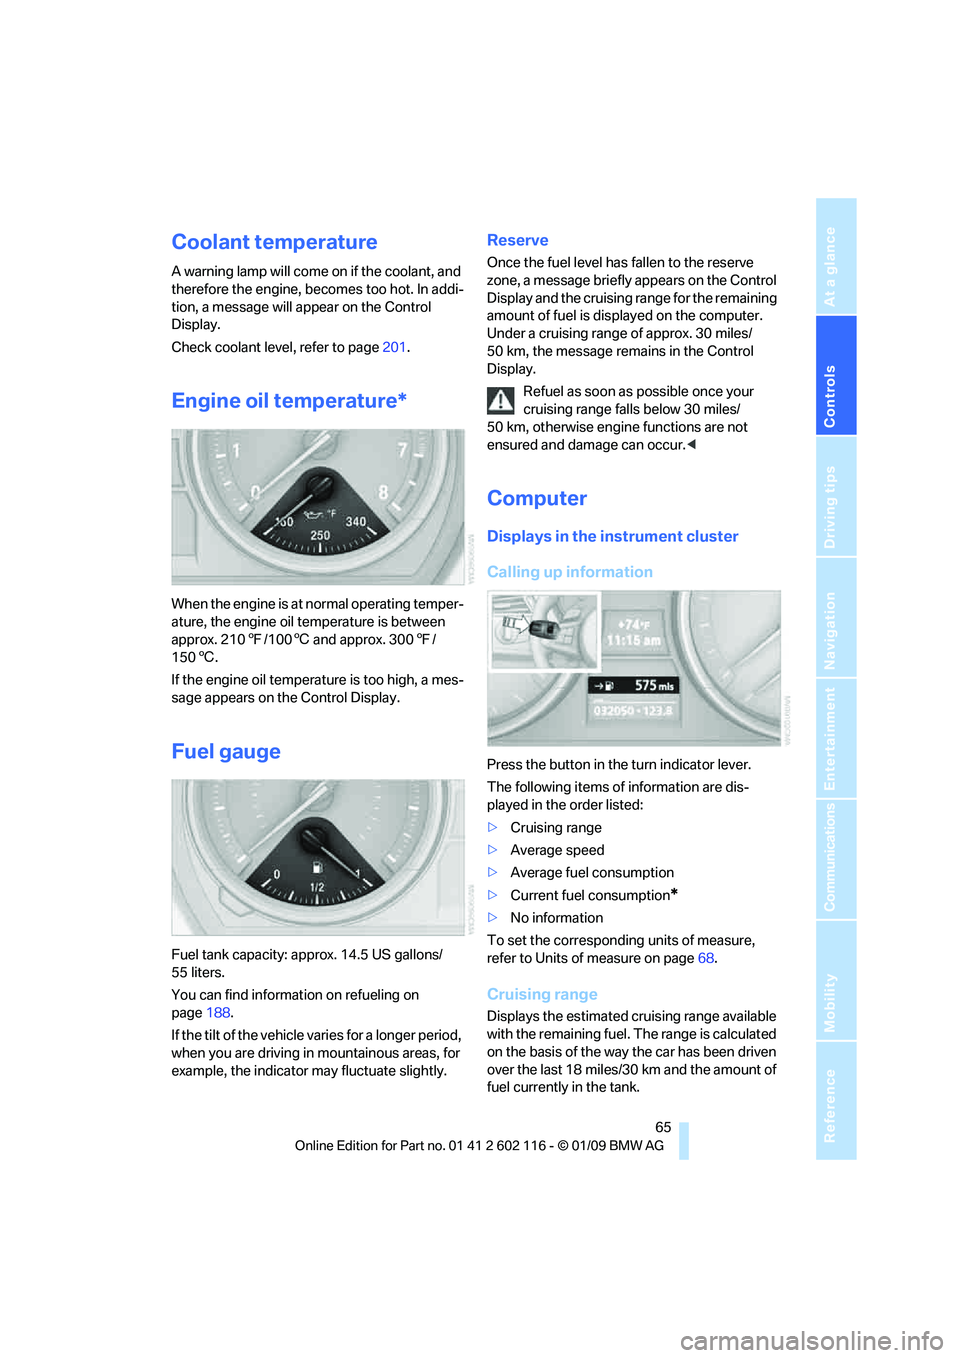
Engine oil temperature*
When the engine is at normal operating temper-
ature, the engine oil temperature is between
approx. 210 7/100 6 and approx. 300 7/
150 6.
If the engine oil temperature is too high, a mes-
sage appears on the Control Display.
Fuel gauge
Fuel tank capacity: approx. 14.5 US gallons/
55 liters.
You can find information on refueling on
page 188.
If the tilt of the vehicle varies for a longer period,
when you are driving in mountainous areas, for
example, the indicator may fluctuate slightly.
Reserve
Once the fuel level has fallen to the reserve
zone, a message briefly appears on the Control
Display and the cruising range for the remaining
amount of fuel is displayed on the computer.
Under a cruising range of approx. 30 miles/
50 km, the message remains in the Control
Display.
Refuel as soon as possible once your
cruising range falls below 30 miles/
50 km, otherwise engine functions are not
ensured and damage can occur. <
Computer
Displays in the instrument cluster
Calling up information
Press the button in the turn indicator lever.
The following items of information are dis-
played in the order listed:
>Cruising range
> Average speed
> Average fuel consumption
> Current fuel consumption
*
>No information
To set the corresponding units of measure,
refer to Units of measure on page 68.
Cruising range
Displays the estimated cr uising range available
with the remaining fuel. The range is calculated
on the basis of the way the car has been driven
over the last 18 miles/30 km and the amount of
fuel currently in the tank.
Page 70 of 248

Everything under control
68
Settings and information
Operating principle
1Button for:
>Selecting display
> Setting values
2 Button for:
>Confirming selected display or set
values
> Calling up computer information 65
3 When the lights are on: instrument lighting
brightness 90
4 Calling up Check Control 73
5 Checking engine oil level 198
6 Setting the time 71
7 Setting the date 72
8 Viewing service re quirement display 69
Exiting displays
The outside-temperature reading and the time
reappear when you press button 2 or if you
make no entries within approx. 15 seconds. If
required, complete the current setting first.
Units of measure
iDrive, for operating principle refer to page16.
1. "Settings"
2. "Language/Units"
3. Select the desired menu item.
4. Select the desired unit.
The settings are stored for the remote control
currently in use.
Page 73 of 248

Controls
71Reference
At a glance
Driving tips
Communications
Navigation
Entertainment
Mobility
Entering deadlines for legally required
inspections*
Make sure the date on the Control Display is set
correctly, refer to page 72, otherwise the effec-
tiveness of CBS Conditio n Based Service is not
ensured.
iDrive, for operating principle refer to page 16.
1. "Vehicle Info"
2. "Vehicle status"
3. "Service required"
4. "§ Vehicle inspection"
5. Open the menu for entering the deadline.
6. "Date:/"
7. Create the settings.
8. Press the controller to apply the setting.
The year is highlighted.
9. Turn the controller to make the adjustment.
10. Press the controller to apply the setting.
The date entry is stored.
To exit from the menu:
Move the controller to the left.
More information on the BMW Maintenance
System can be found on page 202.
Clock
The settings are stored for the remote control
currently in use, refer also to Personal Profile on
page 28.
Setting the time
In the instrument cluster
To set the 12h/24h mode, refer to Setting the
time format below.
1. Press button 1 in the turn indicator lever up
or down repeatedly until the appropriate
symbol appears in the display, accompa-
nied by the time and the word "SET".
2. Press button 2.
3. Use button 1 to set the hours.
4. Press button 2 to confirm the entry.
5. Use button 1 to set the minutes.
6. Press button 2 to confirm the entry.
7. Press button 2.
The system accepts the new time.
Via iDrive
iDrive, for operating pr inciple refer to page16.
1. Press the button.
The main menu is displayed.