2009 AUDI S6 lock
[x] Cancel search: lockPage 90 of 398

Seats and storage
& WARNING
• Driving without head restraints or with head restraints that are
not properly adjusted increases the risk of serious or fatal neck
injury dramatically.
• Read and heed all WARNINGS =>
page 199
[ i ] Tips
Correctly adjusted head restraints and safety belts are an extremely
effective combination of safety features. •
Applies to vehi cles: wit h fro nt arm res t
Arm rest
The arm rest can be adjusted to several positions and
contains a storage compartment.
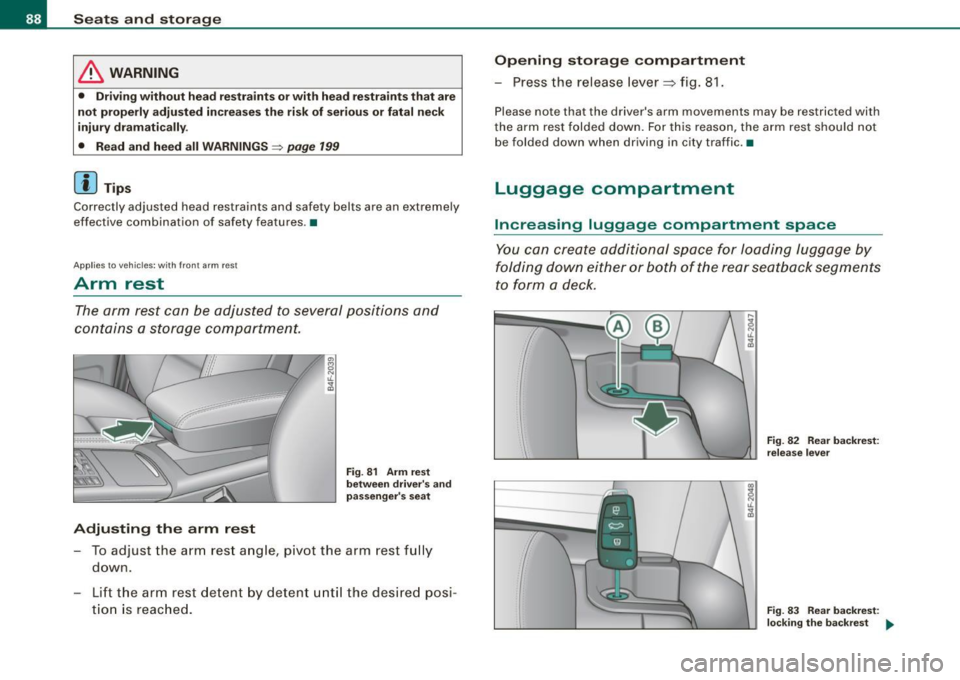
Adjusting the arm rest
Fig . 81 Arm rest
between driver's and
passenger's seat
- To adjust the arm rest angle, pivot the arm rest fully
down.
- Lift the arm rest detent by detent until the desired posi
tion is reached.
Opening storage compartment
- Press the release lever~ fig. 81.
Please note that the driver's arm movements may be restricted with
the arm rest folded down. For this reason, the arm rest should not
be folded down when driving in city traffic.•
Luggage compartment
Increasing luggage compartment space
You can create additional space for loading luggage by
folding down either or both of the rear seatback segments
to form a deck.
---
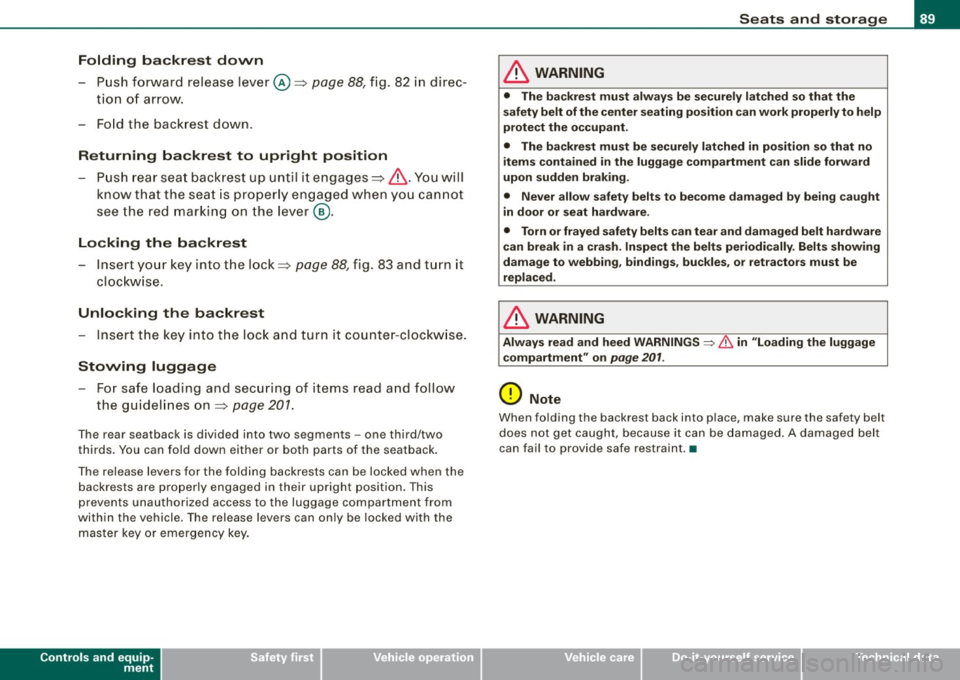
Fig. 82 Rear backrest :
release lever
Fig. 83 Rear backrest:
locking the backrest ...
Page 91 of 398

Folding backrest down
-Push forward release lever@~ page 88, fig. 82 in direc -
tion of arrow.
- Fold the backrest down .
Returning backrest to upright position
-Push rear seat backrest up until it engages~ &-You will
know that the seat is properly engaged when you cannot
see the red marking on the lever @.
Locking the backrest
- Insert your key into the lock~ page 88, fig. 83 and turn it
clockwise .
Unlocking the backrest
-Insert the key into the lock and turn it counter-clockwise.
Stowing luggage
-For safe loading and securing of items read and follow
the guidelines on~
page 201.
The rear seatback is divided into two segments -one third/two
thirds. You can fold down either or both parts of the seatback.
The release levers for the folding backrests can be locked when the
backrests are properly engaged in their upright position . This
prevents unauthorized access to the luggage compartment from
within the vehicle. The release levers can only be locked with the
master key or emergency key.
Controls and equip
ment
Seats and storage
& WARNING
• The backrest must always be securely latched so that the
safety belt of the center seating position can work properly to help
protect the occupant.
• The backrest must be securely latched in position so that no
items contained in the luggage compartment can slide forward
upon sudden braking.
• Never allow safety belts to become damaged by being caught
in door or seat hardware.
• Torn or frayed safety belts can tear and damaged belt hardware
can break in a crash. Inspect the belts periodically. Belts showing
damage to webbing, bindings, buckles, or retractors must be
replaced.
& WARNING
Always read and heed WARNINGS ~ & in "Loading the luggage
compartment" on
page 201.
0 Note
When folding the backrest back into place, make sure the safety belt
does not get caught, because it can be damaged. A damaged belt
can fail to provide safe restraint. •
I • •
Page 101 of 398
![AUDI S6 2009 Owners Manual 0 Note
To avoid damaging the socket, only use plugs that fit properly.
[ i] Tips
When the engine is off and accessories are still plugged in and are
on, the vehicle battery AUDI S6 2009 Owners Manual 0 Note
To avoid damaging the socket, only use plugs that fit properly.
[ i] Tips
When the engine is off and accessories are still plugged in and are
on, the vehicle battery](/manual-img/6/57595/w960_57595-100.png)
0 Note
To avoid damaging the socket, only use plugs that fit properly.
[ i] Tips
When the engine is off and accessories are still plugged in and are
on, the vehicle battery can still be drained. •
Storage
General overview
There are numerous places to store items in your vehicle.
Glove compartment
Storage compartment in roof
Coat hooks
Storage compartment in the trunk
& WARNING
~ page 99
~ page 100
~ page 101
~ page 91
• Always remove objects from the instrument panel. Any items
not stored could slide around inside the vehicle while driving or
when accelerating or when applying the brakes or when driving
around a corner.
• When you are driving make sure that anything you may have
placed in the center console or other storage locations cannot fall
out into the footwells. In case of sudden braking you would not be
able to brake or accelerate.
• Any articles of clothing that you have hung up must not inter
fere with the driver's view. The coat hooks are designed only for
lightweight clothing. Never hang any clothing with hard, pointed
or heavy objects in the pockets on the coat hooks. During sudden
Con tro ls and eq uip
ment
Seats and storage
& WARNING !continued)
braking or in an accident -especially if the airbag is deployed -
these objects could injure any passengers inside the vehicle. •
Glove compartment
The media player is in the glove compartment.
To open glove compartment
Fig. 99 Unlocking
button for glove
compartment
Press the button ::V => fig. 99 (arrow) - the lid opens auto
matically.
To close glove compartment
Push the glove compartment lid up unt il the lock
engages.
In the glove compartmen t lid you will find a place to store a pen and
a pad of paper.
CD changer*
The CD changer for the radio system and the Navigation drive* is located in the glove compartment . How to change CDs is described
in the pertinent Owner's Manual.
tJ,,,
Vehicle care I I irechnical data
Page 102 of 398

• ..__S_ e_a _ t_ s_ a_ n_ d_ s_t _o _r_ a-' g==- e ________________________________________________ _
& WARNING
To reduce the risk of personal injury in an accident or sudden stop,
always keep the glove compartment closed while driving.
[ i J Tips
Should you not be able to open the glove compartment as
described, make sure the valet key function is not activated
=> page 44. •
Emergency unlocking of glove compartment
The glove compartment can be unlocked in an emer
gency.
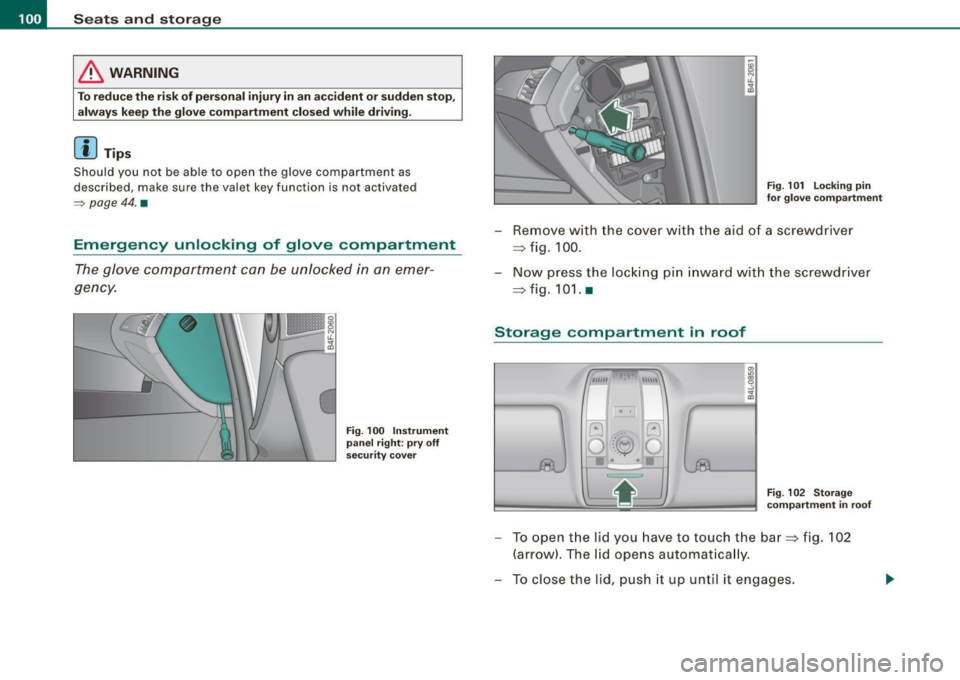
Fig. 100 Instrument
panel right : pry off
security cover
Fig. 101 Locking pin
for glove compartment
- Remove with the cover with the aid of a screwdriver
=> fig. 100.
- Now press the locking pin inward with the screwdriver
::::>fig.101. a
Storage compartment in roof
,IIIIJI \}\\\\,
. '
"'--~
Fig. 102 Storage
compartment in roof
- To open the lid you have to touch the bar=> fig. 102
(arrow). The lid opens automatically.
- To close the lid, push it up until it engages.
Page 106 of 398

_L--_W:....:....: a=- r:..: m..:..:....: a.:.;n..:. d=- c.::..:: o..:.ld =-------------------------------------------------
Controls
This overview will help y ou to familiarize yourself with the
air conditioning controls.
I I
Fig. 104 Air condit ionin g c ontrol el em ent s
The left dis play indicates the temperature selected for the d river's
side , the right display indicates the temperature selected for the
passenger 's side.
The settings you make are shown in the MMI disp lay for a few
seconds when MMI is turned on.
Each function is turned on or off by briefly pressing the corre
spond ing button . The indicator l ight in the button illumina tes when
the function is active .
Button(s ) Function Page
!ECON ON/OFF J Switch climate contro l on ~ page 105
and off,
switch coo ling system on
a nd off
IAUTOJ Automatic mode ~ page 105
Contro l kn ob G Temperatu re selec tion ~ page 106
Heated seats* ~ page 170
Air distribut ion ~ page 107
@ Fan ~ page 706
~ Defrost ~ page 107
Manual recirculation ~ page 107
Heated rear wi ndow ~ p age 108
Basic settings ~ page 171
[ i ] Tips
• Residual heat: With the ignition turned off, you can activate the
r esidual heat function by p ressing the
!ECON ON/O FFJ button. The
residual heat from the coo lant can be used to heat the vehicle inte
r ior. The residua l heat function is turned off automa tically after 30
minutes.
• Synchronizing climate control: By pressing and ho lding the
control knob on the driver's side, the temperature setting on the
driver's side can be switched to the passenger's side, and vice versa.
The new temperature is shown in the display .
• Do not block or tape over the grille on the contro ls . M easuring
se nsors a re located behind it. •
Page 107 of 398
![AUDI S6 2009 Owners Manual _________________________________________________ w_ a_ r_ m __ a_n_ d_ c_ o_ld __ llll
Turning on and off [ECON ON/OFF]
Turning th e air conditioning on
- Press [ECON ON /OF F], or
- Pre AUDI S6 2009 Owners Manual _________________________________________________ w_ a_ r_ m __ a_n_ d_ c_ o_ld __ llll
Turning on and off [ECON ON/OFF]
Turning th e air conditioning on
- Press [ECON ON /OF F], or
- Pre](/manual-img/6/57595/w960_57595-106.png)
_________________________________________________ w_ a_ r_ m __ a_n_ d_ c_ o_ld __ llll
Turning on and off [ECON ON/OFF]
Turning th e air conditioning on
- Press [ECON ON /OF F], or
- Press
[AUTO].
Turning the air conditioning off
-Press the [ECON ON /OFF] button to switc h the air condi
tion ing off and to block the air supply from the
outside. "OF F" appea rs in the display.
Sw itching air c onditionin g on /off
- Switching the air conditioning system on/off is done with
climate contro l switched on.
- Press the
[ECON ON /OFF] button just briefly.
The air conditioner turns back on if you press one of the control
buttons or the contro l knob .
ECON operation is indicated by the glowing LED on the right next to
the word ECON.
The air conditioning (compressor) is turned off in ECON mode .
"ECON" means "Economy" . You save fuel by switching off the air
conditioning=>
page 109 .
Please note that vehicle interior temperature cannot be lower than
the outside temperature in the ECON mode . The air is no t coo led or
dehumid ified. This can cause the windows to fog up.
[ i ) Tip s
Residu al he at: With the ignition turned off, you can activate the
residual heat function by pressing the !ECON ON /OFF] button . The
residual heat from the coo lant can be used to heat the vehic le inte-
Controls and equip
ment
rior . The residual heat function is turned off automatical ly after 30
minutes .•
Automatic mode [AUTO]
The automatic mode is the standard setting for all
seasons .
- Select temperature between 60 °F ( +16 °C) and 84 °F
(+28 °C).
- Press
[AUTO ].
Automatic operation ensures constant tempera tures in the interior
and dehumidifies the air inside the vehicle. Air temperature , volume
and d is tribution are controlled automatically to reach or maintain
the desired interior temperature as quickly as possible . F luctua tions
in exterior temperature and the effects of temperature from the
position of the sun are compensated for automatically .
This operating mode works only in the adjustable temperature
range, from 60 °F (+ 16 °C) to 84 °F ( +28 °C). If a temperature below
60 ° F
(+ 16 °C) is selected, LO appears in the display . At temperatures
above 84 °F (+28 °C),
HI is displayed . At both ex treme settings,
climate control runs continuous ly at maximum cooling or heating
power . There is no temperatu re regulation. •
I • •
Page 114 of 398

-Warm
and cold --------------------
ECON
The ECON mode helps to save fuel.
The air conditioning is turned off in ECON mode. "ECON" means
"Economy". By switching off the air conditioning (compressor), you
save fuel.
Please note that vehicle interior temperature cannot be lower than
the outside temperature in the ECON mode. The air is not cooled or dehumidified.
If the vehicle interior becomes too hot or if the windows fog up,
ECON mode should be turned off. As soon as the
jAUTO I button in
the air conditioning controls is pressed, the system automatically leaves the ECON mode, and the air conditioning compressor is
turned on again. •
Automatic recirculation mode
An air quality sensor detects increased concentrations of
pollutants in the outside air and automatically switches
to recirculation mode.
We recommend that you always keep automatic air recirculation ON
to prevent polluted outside air from entering the vehicle interior.
If the
air quality sensor located in the air conditioning system
detects polluted outside air, the sensor decides whether the air
pollution can be reduced by the factory -installed pollutant filter or
whether it is necessary to switch to air recirculation. With heavy concentrations of pollutants, the air conditioning system is
switched automatically to recirculation mode and the supply of
outside air is blocked. As soon as the concentration of pollutants in
the outside air drops, fresh air is supplied to the vehicle interior
again.
In the event that the windows fog up during automatic air recircula
tion, you must press the® button immediately. Under certain operating conditions, automatic air recirculation is
switched off automatically. With outside temperatures below about
+ 10
°C, automatic air recirculation is limited to 30 seconds. With
outside temperatures below about -1 °C and in the ECON mode,
automatic air recirculation is limited to 15 seconds. •
Synchronization
One climate control setting for the passenger's and
driver's seats.
After Synchronization is set to on, all of the subsequent climate
control settings (except for seat heating*) for the driver are trans
ferred to the front passenger.
Synchronization is canceled when settings are adjusted on the front passenger's side. •
Center air vent
The temperature of the air leaving the center vents can be
changed to differ from the temperature setting.
Fig. 113 Display:
Center air vent
The air flow coming from the center vents can be adjusted to be
colder or warmer than the selected set temperature.
Page 116 of 398

• ..__O_ n_ t_ h _e _ ro_ a_d __________________________________________________ _
On the road
Steering
Applies to vehicl es : with m anua lly a dju stab le steer in g wh eel
Manually adjusted steering wheel
The height and reach of the steering wheel can be
adjusted.
First, adjust the driver 's seat correctly.
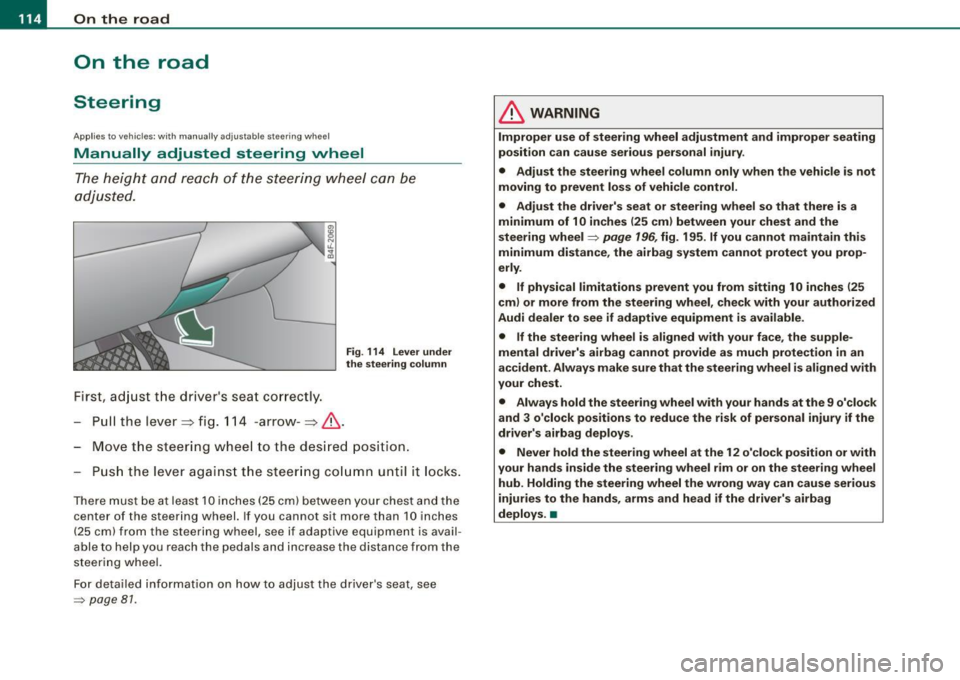
Pull the lever~ fig. 114 -arrow -~&,.
Fig. 114 Lever under
the steering column
Move the steering wheel to the desired position.
Push the lever against the steering column unt il it locks.
There must be at least 10 inches (25 cm) between your chest and the
c en ter of th e steering wh eel. If you cannot sit more than 10 inches
( 25 cm) from the steering wheel, se e if adaptive equipment is avail
able to help you reach the pedals and inc rease the dis tance fro m the
steering whe el.
For detailed information on how to adjust the driver 's seat, see
=> pag e 81 .
& WARNING
Improper use of steering wheel adjustment and improper seating
position can cause serious personal injury.
• Adjust the steering wheel column only when the vehicle is not
moving to prevent loss of vehicle control.
• Adjust the driver's seat or steering wheel so that there is a
minimum of 10 inches
(25 cm) between your chest and the
steering wheel=>
page 196, fig. 195. If you cannot maintain this
minimum distance, the airbag system cannot protect you prop
erly.
• If physical limitations prevent you from sitting 10 inches
125
cm) or more from the steering wheel, check with your authorized
Audi dealer to see if adaptive equipment is available .
• If the steering wheel is aligned with your face, the supple
mental driver's airbag cannot provide as much protection in an
accident. Always make sure that the steering wheel is aligned with
your chest.
• Always hold the steering wheel with your hands at the 9 o'clock
and 3 o'clock positions to reduce the risk of personal injury if the
driver's airbag deploys.
• Never hold the steering wheel at the 12 o'clock position or with
your hands inside the steering wheel rim or on the steering wheel
hub. Holding the steering wheel the wrong way can cause serious
injuries to the hands, arms and head if the driver's airbag
deploys. •