2009 AUDI S6 spare tire
[x] Cancel search: spare tirePage 345 of 398

What do I do now? 111111 _______________________________ ....:..:..:..:..:.:..:--=.:..::....:.....:.:...::..___;__ _ __,J
& WARNING !continued)
• Never start or run the engine while the vehicle is supported by
the jack.
• If you must work under the vehicle, always use safety stands
specifically designed for this purpose.
• Never use the hexagonal socket in the handle of the screw
driver to loosen or tighten the wheel bolts.
• Always make sure the spare tire and even a flat tire are secured
in place and not loose, otherwise they could fly forward, causing
personal injury to passengers in the vehicle in an accident or
sudden maneuver. •
Tools
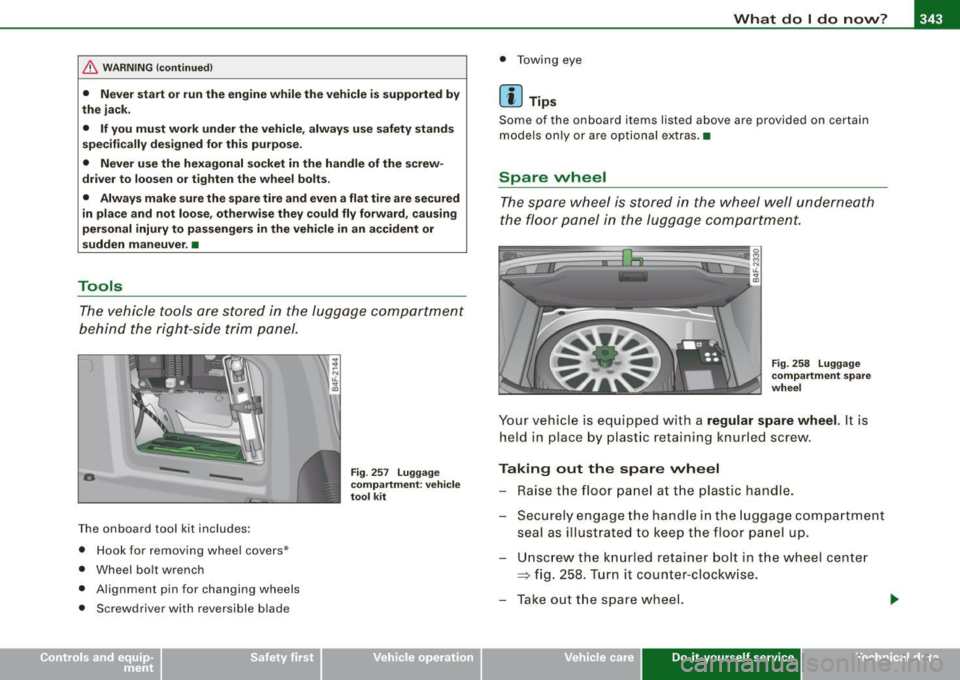
The vehicle tools are stored in the luggage compartment
behind the right-side trim panel.
-
-
The onboard tool kit includes:
• Hook for removing wheel covers *
• Wheel bolt wrench
• Alignment pin for changing wheels
• Screwdriver with reversible blade
Fig. 257 Luggage
compartment: vehicle
tool kit
• Towing eye
[ i] Tips
Some of the on board items listed above are provided on certain
models only or are optional extras.•
Spare wheel
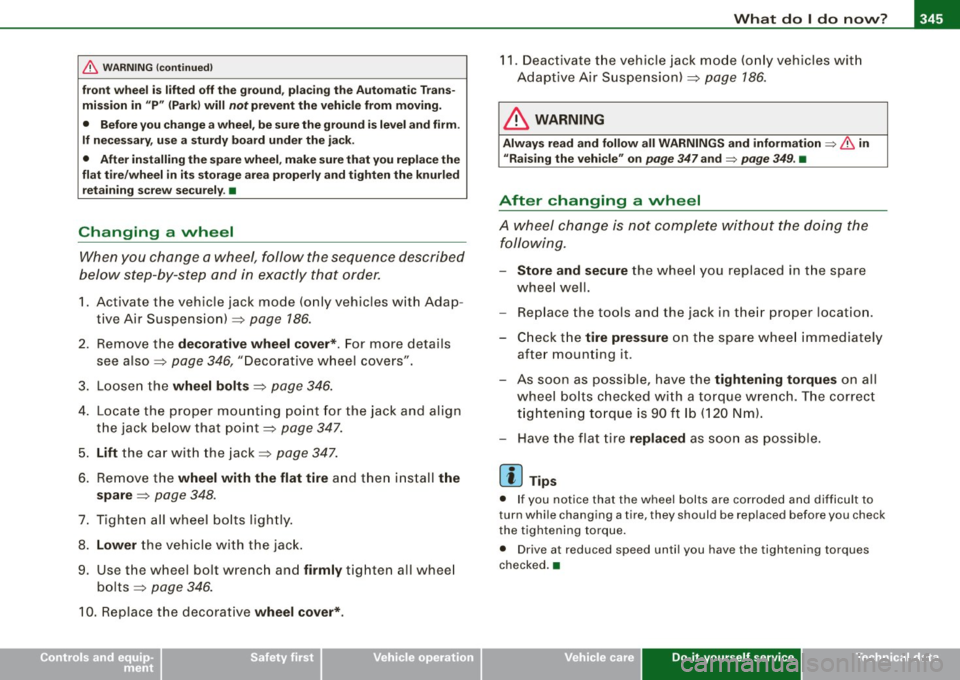
The spare wheel is stored in the wheel well underneath
the floor panel in the luggage compartment.
Fig. 258 Luggage
compartment spare
wheel
Your vehicle is equipped with a regular spare wheel. It is
held in place by plastic retaining knurled screw.
Taking out the spare wheel
- Raise the floor panel at the plastic handle.
- Securely engage the handle in the luggage compartment
seal as illustrated to keep the floor panel up.
Unscrew the knurled retainer bolt in the wheel center
=> fig. 258. Turn it counter-clockwise.
- Take out the spare wheel.
Vehicle care Do-it-yourself service irechnical data
Page 346 of 398

1111!1.___W_ h_ a_ t_ d_o_ l_ d_ o _ n_ o_w _ ? ____________________________________________ _
- Disengage and lower the floor panel before you close the
luggage compartment lid again.
Storing the replaced wheel
- Place the replaced wheel inside the spare wheel well in
the luggage compartment .
Tighten the knurled retaining screw clockwise to secure the wheel in place.
- Disengage and lower the floor panel before you close the
luggage compartment lid again.
& WARNING
Loose items in the passenger compartment can cause serious
personal injury during hard braking or in an accident .
• Never store the spare wheel or jack and tools in the passenger
compartment.
• Always store all jacking equipment, tools, and the spare wheel
in the luggage compartment.
• Tighten the knurled retaining screw for the spare wheel
securely.
[ i] Tips
Check the inflation pressure of the spare tire periodically to keep the
tire ready for use. •
Changing a wheel
Before changing a wheel
Observe the following precautions for your own and your
passenger's safety when changing a wheel.
- After you experience a tire failure, pull the car well away
from moving traffic and try to reach level ground before
you stop :::;. & .
- All passengers should leave the car and move to a safe
location (for instance, behind the guardrail) :::;,& .
- Engage the parking brake to prevent your vehicle from
rol ling unintentionally :::;.& .
- Move selector lever to position P :::;. & .
-If you are towing a trailer: unhitch the trailer from your
vehicle.
- Take the jack and the spare tire out of the luggage
compartment:::;.
page 342.
& WARNING
You or your passengers could be injured while changing a wheel if
you do not follow these safety precautions:
• If you have a flat tire, move a safe distance off the road. Turn off
the engine, turn the emergency flashers on and use other warning
devices to alert other motorists.
• Make sure that passengers wait
in a safe place away from the
vehicle and well away from the road and traffic.
• To help prevent the vehicle from moving suddenly and possibly
slipping off the jack, always fully set the parking brake and block
the wheel diagonally opposite the wheel being changed. When one ...
Page 347 of 398

_______________________________________________ W_ h_ a_t _ d_ o_ l _d _o_ n_ o _ w_ ? __ IIII
•
& WARNING (continued)
front wheel is lifted off the ground, placing the Automatic Trans
mission in "P" {Park) will
not prevent the vehicle from moving.
• Before you change a wheel , be sure the ground is level and firm.
If necessary, use a sturdy board under the jack.
• After installing the spare wheel, make sure that you replace the
flat tire/wheel in its storage area properly and tighten the knurled
retaining screw securely. •
Changing a vvheel
When you change a wheel, follow the sequence described
below step-by-step and in exactly that order.
1. Act ivate the vehicle jack mode (only vehicles with Adap
tive Air Suspension) ~
page 186.
2. Remove the decorative wheel cover*. For more details
see also ~
page 346, "Decorative wheel covers".
3. Loosen the
wheel bolts ~ page 346.
4. Locate the proper mounting point for the jack and align
the jack below that point~
page 347.
5. Lift the car with the jack~ page 347.
6. Remove the wheel with the flat tire and then install the
spare
~ page 348.
7. Tighten all wheel bolts lightly.
8.
Lower the vehicle with the jack.
9. Use the wheel bolt wrench and
firmly tighten all wheel
bolts
~ page 346.
10. Replace the decorative wheel cover*.
11. Deactivate the veh icle jack mode (only vehicles with
Adaptive Air Suspension)~
page 186.
& WARNING
Always read and follow all WARNINGS and information => & in
"Raising the vehicle" on
page 347 and => page 349. •
After changing a vvheel
A wheel change is not complete without the doing the
following.
- Store and secure the wheel you replaced in the spare
wheel well.
- Replace the tools and the jack in their proper location.
-Check the tire pressure on the spare wheel immediately
after mounting it.
- As soon as possible, have the
tightening torques on all
wheel bolts checked with a torque wrench. The correct
tightening torque is 90 ft lb (120 Nm).
- Have the flat tire
replaced as soon as possible.
[ i] Tips
• If you notice that the wheel bolts are corroded and difficult to
turn while changing a tire, they should be replaced before you check
the tightening torque.
• Drive at reduced speed until you have the tightening torques
checked. a
Do-it-yourself service
Page 351 of 398

_______________________________________________ W_ h_ a_t _ d_ o_ l _d _o_ n_ o _ w_ ? __ ffllll
•
- Screw the th readed end of the a lignment pin from the
tool k it hand-tight into the em pty bolt hole~ page 348,
fig. 264 .
- Then remove the other w heel bolts as described above.
- Take off the wheel leaving the al ignment pin in the bolt
hole.
Putting on the spar e wheel
- Lift the spare whee l and carefully slide it over t he align
ment pin to g uide it in place .
- Use the hexagonal socket in the screw drive r ha ndle t o
screw in a nd tighten a ll w heel bol ts slightly .
- Remove the alignment p in and insert and tighten the
remaini ng wheel bol t slightly like the rest.
- Turn the jack hand le counter -clockwise to lower the
ve hicle until the jack is fully released .
- Use the wheel bolt wrench to tighten all wheel bolts
firmly ~ page 346 . Tighten them crosswise, from one
bolt to the (approximately) opposite one, to keep the
wheel centered .
[ i J Tip s
Never use the hexagonal socke t in the hand le of the screwdriver to
loosen or tighten the wheel bolts .
• Pull the reversible blade from the screwdriver before you use the
hexagonal socket in the hand le to turn the wheel bo lts .
• When mounting tires with
unidire ctional tre ad de sign make sure
t he tread pattern is po inted the right way~
page 349.
• T he wh ee l bolts should b e clean and easy to turn . Check for dirt
and corrosion on the mating surfaces of both the wheel and the hub
. Remove all dirt from these surfaces before remounting the
wheel. •
Tires with unidirectional tread design
Tires with unidirectional tread design must be mounted
with their tread pa ttern pointed in the right dire ction .
Using a spare tire with a tread patte rn intended f or use
in a s pec ific direc tio n
When using a spare tire with a t read pattern intended for use in a
specific direction, please note the following :
• The direction of rotation is marked by an arrow on the side of the
tire .
• I f the spare tire has to be insta lled in the incorrect direction, use
the spare t ire only temporarily since the tire will not be ab le to
achieve its optimum performance characteristics wi th regard to
aquaplaning , noise and wear.
• We recommend that you pay particular attention to this fact
dur ing wet weather and that you ad just your speed to match road
conditions .
• Replace the flat tire with a new one and have it installed on your
vehicle as soon as p ossible to res tore the handling advantages of a
unidirectional tire. •
Notes on wheel changing
Please read the information~ page 329, "New tires and replacing
tires and whee ls" if you are going to use a spare tire which is
different from the tires on your vehic le.
Aft er you change a tire :
• Check the tire pre ssure on the spare im mediat ely a fter in stalla -
tion . _,,,
Do-it -yourself service
Page 354 of 398

-Fuses and bulbs Pffl..._ _____________________ _
[ i J Tip s
You are wel l advised to keep a supply of spare fuses in your vehicle .
Fuses with the proper ampere ratings are availab le at your Audi
dea ler. •
Fuse Location , Instrument Panel left
Fig . 267 Fuse pa nel
l ayo ut
Some of the equipment items listed are optional or only ava ilable on
certain model configurations .
Note th at t he fo llo wi ng t able i s acc urat e at th e time of goin g to
pr ess and is subject t o ch ang e. In th e eve nt of d iscrep ancie s, th e
labe l on th e in side of th e cover always ta kes prece de nce .
The power seats are protected by cir cuit br eaker s, which automati
cally reset after a few seconds after the overload has been reme
died.
N o. Equipm ent
1 Not used
2
3
4
Not used
Engine management
Oil level sensor Amps
5
5
No
.
5
6
..
7
8
9
10
1 1
12
13
14
15
16
17
18
19
20
21
22
23
24
25
26
27
28
Equipm ent
Climate cont rol , tire pressure monitoring sys
tem
Electronic Stabilization Program (ESP), clutch
sensor
Diagnostic connector
Homelink control unit
Automa tic dimming interior mirror
Adaptive Cruise Control
Not used
Diagnostic connector
Switch modu le steering column
Not used
I nstrument c luster, control module Ga teway
Telephone, cell phone E lectronic Stabilization Program (ESP)
Headlight electronics, left -side
Rain sensor
Heated washer nozzles
Seat adjustment (driver)
MMI display
E lectromechanica l parking brake
Not used
Not used
Not used
N ot used
Not used Amps
5
5
5
5
5
5
10
10
10
5
10
5
5
5
10
5
5
-
Page 376 of 398

___ C_ o_n_ s_ u_m _ e_ r_ ln_ f_o _r_m _ a_ t_ i_o _n ______________________________________________ _
& WARN ING (continued )
• The engine compartment of any motor vehicle is a potentially
hazardous area . Never rea ch into the area around or to uch the
radiator fan . It is temperature controlled and can sw itch on
suddenly -even when the engine is off and the ignition key has
been removed . The radiator fan switches on automatically when
the coolant reaches a certain temperature and will continue to run until the coolant tempe rature drops .
• Always remove the ignition key before anyone gets under the
vehi cle .
• Always support your vehicle with safety stands if it is neces
sary to work underneath the vehicle . The jack suppl ied with the
vehicle is not adequate for this purpose and could collap se
causing serious personal injury .
• If you must work underneath the vehicle with the wheels on
the ground, always make sure the veh icle is on level ground , that
the wheels are always securely blocked and that the engine
cannot be sta rted .
• Always make sure the tr ansmission selector lever (automatic
transmission) is in "P" (Park position ) and the p ark brake is firmly
applied.
W For the sake of the environment
• Cha ng ing the e ngin e sett ings will a dverse ly aff ect em iss ion
levels. This is detrimenta l to the environment and increases fuel
co nsump tion .
• Always observe environmenta l regu lations when disposing of
o ld eng ine oil, u sed bra ke flu id, d irty eng ine coo la nt, spent batter ies
or worn out tires.
• Undeployed airbag modul es and pretensioners might be classi
fied as Perchlorate Material -specia l handling may apply, see
www .d tsc.ca .gov/ hazardouswaste/pe rc h lora te . W hen t he vehicle or
parts of the restraint s ystem including airbag modules safety be lts
with pre tensio ners are sc ra p pe d, a ll ap pl ica ble laws and reg ula- tions must be observed. Your authorized Audi dea
ler is familiar with
t hese requi reme nts and we reco mmend th at you h ave your dealer
perform th is serv ice for you. •
Additional accessories,
modifications and parts replacement
Additional accessories and parts
replacement
A lways consult an author ized Audi dea ler before
pur chasin g access orie s.
Y our vehicle incorporates the latest safety design featu res ensuring
a hi gh standa rd of active a nd passive sa fety .
T his saf ety could be com promised by non -approved changes to th e
vehic le . Fo r thi s reason, i f parts have to be replaced, p lease obse rve
th e fo llow ing po ints wh en insta lling add it io na l acc essories:
Approved Audi accessories and genuine Audi parts are avai lable
from autho rized Audi dea lers .
T hese dealers also have the necessary faci lities, tools and trained
spec ia lists to ins tal l the part s and accessorie s prope rly.
& WARNING
Using the wrong spare parts or using non -approved accessories
can cause serious personal injury.
• Use only accessorie s expressly approved by Audi and genuine
Audi spare parts
• These parts and accessories have been specially designed to
be used on your vehicle .
• Never install accessories such as telephone cradles or
beverage holders on airbag covers or within the airbag deploy-