2009 Acura MDX buttons
[x] Cancel search: buttonsPage 243 of 489

To Select Rear Entertainment
from the Front Control Panel
To operate the rear entertainment
system from the front panel, press
the REAR SOURCE button. You will
hear two beeps and the indicator in
the button comes on to show that the
control panel is enabled.
If you do not operate the rear
entertainment system from the front
panel within 10 seconds, the
indicator goes off and the FRONT
SOURCE indicator comes on
automatically.
To play the radio, the buttons for the
front entertainment system have the
same functions.
If discs are loaded in the disc
changer of the upper part, select the
6 DISC button. If a disc is loaded in
the lower player, select the DVD
button.Operating the DVD Player from
the Front Control Panel
The DVD player in your rear
entertainment system can play DVD
video discs, audio CDs MP3/WMA
discs and DTS CDs.
Open the overhead screen by
pushing the OPEN button. The
screen will swing down part-way.
Pivot the screen the rest of the way.
If you pivot the screen too far
forward, past the second detent, the
display will turn off. Pivot the screen
back to the second or first detent to
turn the display back on. To close the
screen, pivot it up until it latches.
REAR CONTROL PANEL
OPEN BUTTON
OVERHEAD SCREEN
CONTINUED
Rear Entertainment System
239
Feat ures
08/06/06 16:58:07 09 ACURA MDX MMC North America Owner's M 50 31STX620 enu
2009 MDX
Page 244 of 489

Insert a DVD into the lower DVD/
CD slot in the audio unit.
Push the DVD in halfway, the drive
will pull it in the rest of the way.
PLAY-Press the DVD (
)
button if the DVD does not start
playing automatically.
PAUSE -Press the DVD ()
button to pause the DVD. Press the
button again or press PLAY to
resume. Pause works only with the
DVD player.
U.S. Entertainment Package and Canadian Elite Package models
SEEK/SKIP BUTTONS
PLAY/PAUSE BUTTON EJECT BUTTON
Rear Entertainment System24008/06/06 16:58:07 09 ACURA MDX MMC North America Owner's M 50 31STX620 enu
2009 MDX
Page 246 of 489

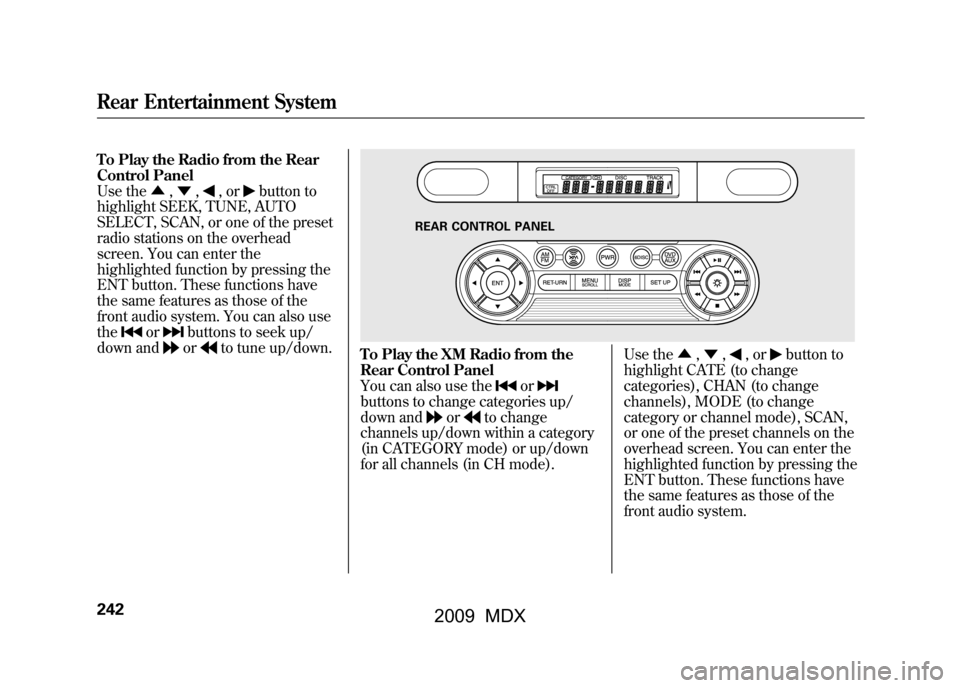
To Play the Radio from the Rear
Control Panel
Use the▲,▼ ,
,or
button to
highlight SEEK, TUNE, AUTO
SELECT, SCAN, or one of the preset
radio stations on the overhead
screen. You can enter the
highlighted function by pressing the
ENT button. These functions have
the same features as those of the
front audio system. You can also use
the
or
buttons to seek up/
down andor
to tune up/down.
To Play the XM Radio from the
Rear Control Panel
You can also use the
or
buttons to change categories up/
down and
or
to change
channels up/down within a category
(in CATEGORY mode) or up/down
for all channels (in CH mode). Use the
▲,▼ ,
,or
button to
highlight CATE (to change
categories), CHAN (to change
channels), MODE (to change
category or channel mode), SCAN,
or one of the preset channels on the
overhead screen. You can enter the
highlighted function by pressing the
ENT button. These functions have
the same features as those of the
front audio system.
REAR CONTROL PANEL
Rear Entertainment System24208/06/06 16:58:07 09 ACURA MDX MMC North America Owner's M 50 31STX620 enu
2009 MDX
Page 248 of 489

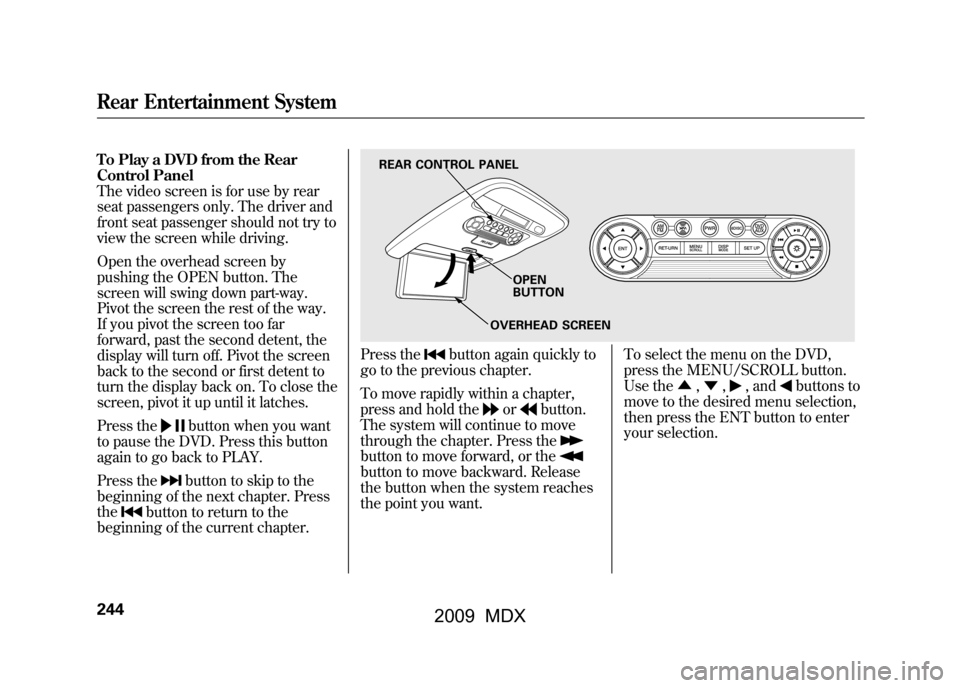
To Play a DVD from the Rear
Control Panel
The video screen is for use by rear
seat passengers only. The driver and
front seat passenger should not try to
view the screen while driving.
Open the overhead screen by
pushing the OPEN button. The
screen will swing down part-way.
Pivot the screen the rest of the way.
If you pivot the screen too far
forward, past the second detent, the
display will turn off. Pivot the screen
back to the second or first detent to
turn the display back on. To close the
screen, pivot it up until it latches.
Press the
button when you want
to pause the DVD. Press this button
again to go back to PLAY.
Press thebutton to skip to the
beginning of the next chapter. Press
the
button to return to the
beginning of the current chapter.
Press the
button again quickly to
go to the previous chapter.
To move rapidly within a chapter,
press and hold the
or
button.
The system will continue to move
through the chapter. Press the
button to move forward, or thebutton to move backward. Release
the button when the system reaches
the point you want. To select the menu on the DVD,
press the MENU/SCROLL button.
Use the
▲,▼ ,
, and
buttons to
move to the desired menu selection,
then press the ENT button to enter
your selection.
REAR CONTROL PANEL
OVERHEAD SCREENOPEN
BUTTON
Rear Entertainment System24408/06/06 16:58:07 09 ACURA MDX MMC North America Owner's M 50 31STX620 enu
2009 MDX
Page 280 of 489

The HomeLink
®Universal
Transceiver built into your vehicle
can be programmed to operate up to
three remote controlled devices
around your home, such as garage
doors, lighting, or home security
systems.
General Safety Information
Before programming your HomeLink
to operate a garage door opener,
confirm that the opener has an
external entrapment protection
system, such as an ‘‘electronic eye, ’’
or other safety and reverse stop
features.
If your garage door was
manufactured before April 1, 1982,
you may not be able to program
HomeLink to operate it. These units
do not have safety features that cause
the motor to stop and reverse it if an
obstacle is detected during closing,
increasing the risk of injury. Do not
use HomeLink with any garage door
opener that lacks safety stop and
reverse features. Units manufactured between April 1,
1982 and January 1, 1993 may be
equipped with safety stop and
reverse features. If your unit does not
have an external entrapment
protection system, an easy test to
confirm the function and
performance of the safety stop and
reverse feature is to lay a 2
╳4
under the closing door. The door
should stop and reverse upon
contacting the piece of wood.
As an additional safety feature,
garage door openers manufactured
after January 1, 1993 are required to
have external entrapment protection
systems, such as an electronic eye,
which detect an object obstructing
the door.
Important Safety Precautions
Refer to the safety information that came
with your garage door opener to test that
the safety features are functioning
properly. If you do not have this
information, contact the manufacturer of
the equipment.
Before programming HomeLink to a
garage door or gate opener, make sure
that people and objects are out of the way
of the device to prevent potential injury
or damage.
When programming a garage door
opener, park just outside the garage.Training HomeLinkBefore you begin
- If you just
received your vehicle and have not
trained any of the buttons in
HomeLink before, you should erase
any previously learned codes before
training the first button.
To do this, press and hold the two
outside buttons on the HomeLink
transceiver for about 20 seconds,
until the red indicator flashes.
Release the buttons, then proceed to
step 1.
HomeLink
®Universal Transceiver
27608/06/06 16:58:07 09 ACURA MDX MMC North America Owner's M 50 31STX620 enu
2009 MDX
Page 281 of 489

If you are training the second or third buttons, go directly to step 1.
2
a
ab
1
1
23
5
4
Training a Button
NO NO
NO YES
YES
Retraining a Button
Erasing Codes
Press and hold the desired
HomeLink button until the HomeLink
indicator begins to flash slowly.
When the indicator begins to flash
slowly, continue to hold the HomeLink
button and follow steps 1-3 under
Training a Button.
To erase codes stored in all buttons, press
and hold the two outer buttons until the
HomeLink indicator begins to flash (about
10 to 20 seconds), then release the buttons.
You should erase all three codes before
selling the vehicle.
Press and hold the programmed
Homelink button for about a
second.
Press and hold the
HomeLink button
again.
The remote has a
rolling code.
Press the "learn" button on the
remotely controlled device
(e.g., garage door opener).
Within 30 seconds, press and hold
the programmed HomeLink button
for 2 seconds.
Press the programmed HomeLink
button again; the remotely
controlled device should operate. Training
complete
Position the remote transmitter you
wish to link 1-3 inches from the
HomeLink button you want to program.
Press and hold the desired HomeLink
button and the button on the remote
transmitter you wish to link.
Press and hold the button on the
remote and the HomeLink button at
the same time. Then, while
continuing to hold the HomeLink
button, press and release the button
on the remote every 2 seconds.
Does the HomeLink indicator (LED) blink at a
faster rate after about 10 seconds?
HomeLink
LED is on.
Does the device (garage door opener) work?
HomeLink indicator
flashes for 2 seconds,
then remains on. Indicator remains
on for about 25
seconds (standard
transmitter)
If you have any problems programming
HomeLink, see the owner's manual included with
the device you are trying to program, or call
HomeLink at 1-800-355-3515 or go online to
www.homelink.com.Indicator flashes rapidly
for 2 seconds, then
remains on for about 23
seconds (rolling code
transmitter)
Does the LED blink at a faster rate within 20
seconds? YES
CONTINUED
HomeLink
®Universal Transceiver
277
Feat ures
08/06/06 16:58:07 09 ACURA MDX MMC North America Owner's M 50 31STX620 enu
2009 MDX
Page 284 of 489

Microphone
The HFL microphone is on the
ceiling, between the front map lights
and the console buttons. On models
with navigation system, the
microphone is shared with the
navigation system.
Audio System
When the HFL is in use, the sound
comes through the vehicle's front
audio system speakers. If the audio
system is in use while operating
either of the HFL buttons or making
a call, the HFL over-rides the audio
system. To change the volume level,
use the audio system volume knob,
or the steering wheel volume
controls.HFL Buttons
To operate the HFL, use the HFL
Talk and Back buttons on the left
side of the steering wheel.
The HFL buttons are used as follows:
HFL Talk: This button is used before
you give a command, to answer
incoming calls, and to confirm
system information.
Press and release the button, then
wait for a beep before giving a
command.HFL Back: This button is used to end
a call, go back to the previous voice
control command, and to cancel an
operation.
HFL TALK BUTTON
HFL BACK
BUTTON
Bluetooth
®HandsFreeLink
®
28008/06/06 16:58:07 09 ACURA MDX MMC North America Owner's M 50 31STX620 enu
2009 MDX
Page 285 of 489

Multi-Information DisplayWhen you are operating the HFL, or
when you manually select HFL on
the multi-information display, you
will see this information on the
screen:
●Signal Strength
ꭧ-Indicates the
network signal strength of the
current phone. Five bars equals
full strength.
●ROAM Status
ꭧ- Indicates your
phone is roaming.
●Battery Level Status
ꭧ- Indicates
the power currently remaining in
your phone's battery. Five bars
equals full battery strength.
●HFL Mode -Indicates when you
are dialing and receiving calls.●Phone Dialing -Indicates the
number you entered or the
number of the incoming call.
ꭧ : Some phones do not send this
information to the HFL. How to Use the HFL
The HFL is operated by the HFL
Talk and Back buttons on the left
side of the steering wheel. The next
few pages provide instructions for all
basic features of the HFL.
NOTE:
All phones may not operate
identically, and some may cause
inconsistent operation of the HFL.
SIGNAL
STRENGTH HFL
MODEBATTERY
LEVEL STATUS
ROAM STATUS PHONE DIALING
CONTINUED
Bluetooth
®HandsFreeLink
®
281
Feat ures
08/06/06 16:58:07 09 ACURA MDX MMC North America Owner's M 50 31STX620 enu
2009 MDX