2009.5 Peugeot 308 SW BL Dag headlamp
[x] Cancel search: headlampPage 88 of 313
!
i
97
VISIBILITY
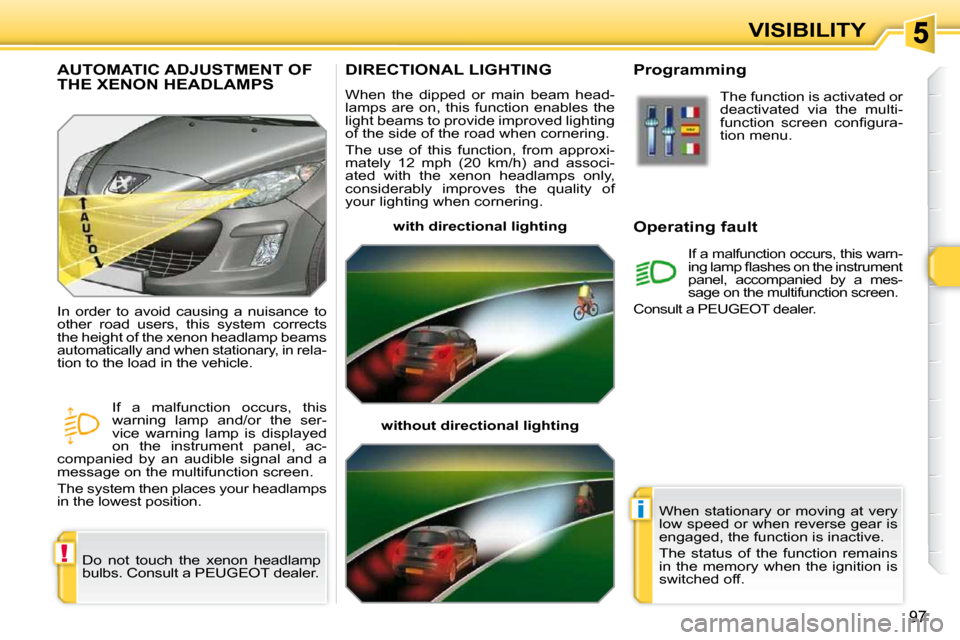
DIRECTIONAL LIGHTING
When the dipped or main beam head-
lamps are on, this function enables the
light beams to provide improved lighting
of the side of the road when cornering.
The use of this function, from approxi-
�m�a�t�e�l�y� �1�2� �m�p�h� �(�2�0� �k�m�/�h�)� �a�n�d� �a�s�s�o�c�i�-
ated with the xenon headlamps only,
considerably improves the quality of
your lighting when cornering.
with directional lighting
without directional lighting Programming
Operating fault
The function is activated or
deactivated via the multi-
�f�u�n�c�t�i�o�n� �s�c�r�e�e�n� �c�o�n�fi� �g�u�r�a�-
tion menu.
If a malfunction occurs, this warn-
�i�n�g� �l�a�m�p� �fl� �a�s�h�e�s� �o�n� �t�h�e� �i�n�s�t�r�u�m�e�n�t�
panel, accompanied by a mes-
sage on the multifunction screen.
Consult a PEUGEOT dealer.
AUTOMATIC ADJUSTMENT OF THE XENON HEADLAMPS
Do not touch the xenon headlamp
bulbs. Consult a PEUGEOT dealer.
In order to avoid causing a nuisance to
other road users, this system corrects
the height of the xenon headlamp beams
automatically and when stationary, in rela-
tion to the load in the vehicle.
If a malfunction occurs, this
warning lamp and/or the ser-
vice warning lamp is displayed
on the instrument panel, ac-
companied by an audible signal and a
message on the multifunction screen.
The system then places your headlamps
in the lowest position. When stationary or moving at very
low speed or when reverse gear is
engaged, the function is inactive.
The status of the function remains
in the memory when the ignition is
switched off.
Page 89 of 313
!
i
97
VISIBILITY
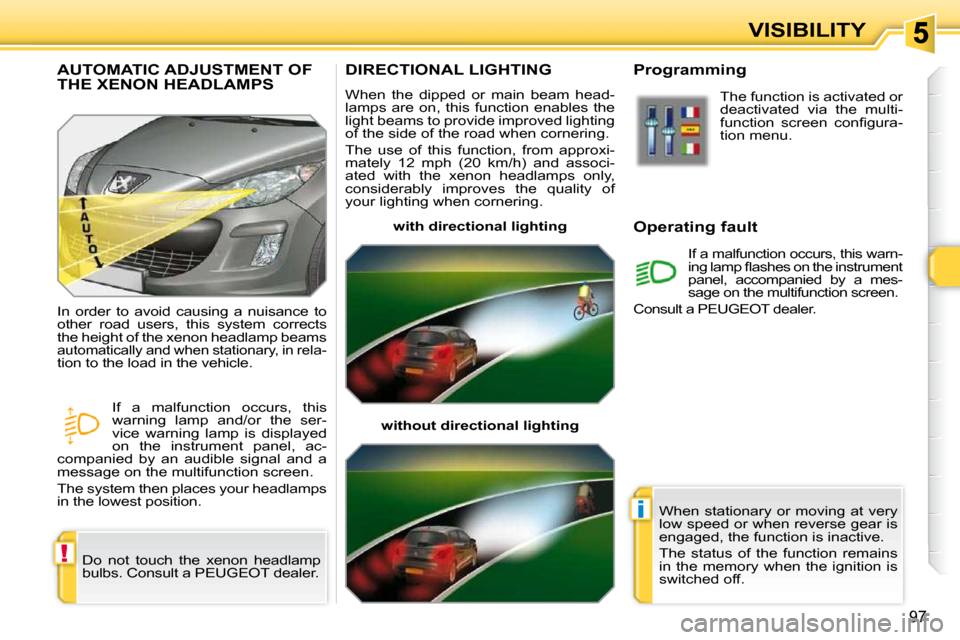
DIRECTIONAL LIGHTING
When the dipped or main beam head-
lamps are on, this function enables the
light beams to provide improved lighting
of the side of the road when cornering.
The use of this function, from approxi-
�m�a�t�e�l�y� �1�2� �m�p�h� �(�2�0� �k�m�/�h�)� �a�n�d� �a�s�s�o�c�i�-
ated with the xenon headlamps only,
considerably improves the quality of
your lighting when cornering.
with directional lighting
without directional lighting Programming
Operating fault
The function is activated or
deactivated via the multi-
�f�u�n�c�t�i�o�n� �s�c�r�e�e�n� �c�o�n�fi� �g�u�r�a�-
tion menu.
If a malfunction occurs, this warn-
�i�n�g� �l�a�m�p� �fl� �a�s�h�e�s� �o�n� �t�h�e� �i�n�s�t�r�u�m�e�n�t�
panel, accompanied by a mes-
sage on the multifunction screen.
Consult a PEUGEOT dealer.
AUTOMATIC ADJUSTMENT OF THE XENON HEADLAMPS
Do not touch the xenon headlamp
bulbs. Consult a PEUGEOT dealer.
In order to avoid causing a nuisance to
other road users, this system corrects
the height of the xenon headlamp beams
automatically and when stationary, in rela-
tion to the load in the vehicle.
If a malfunction occurs, this
warning lamp and/or the ser-
vice warning lamp is displayed
on the instrument panel, ac-
companied by an audible signal and a
message on the multifunction screen.
The system then places your headlamps
in the lowest position. When stationary or moving at very
low speed or when reverse gear is
engaged, the function is inactive.
The status of the function remains
in the memory when the ignition is
switched off.
Page 91 of 313
!
99
VISIBILITY
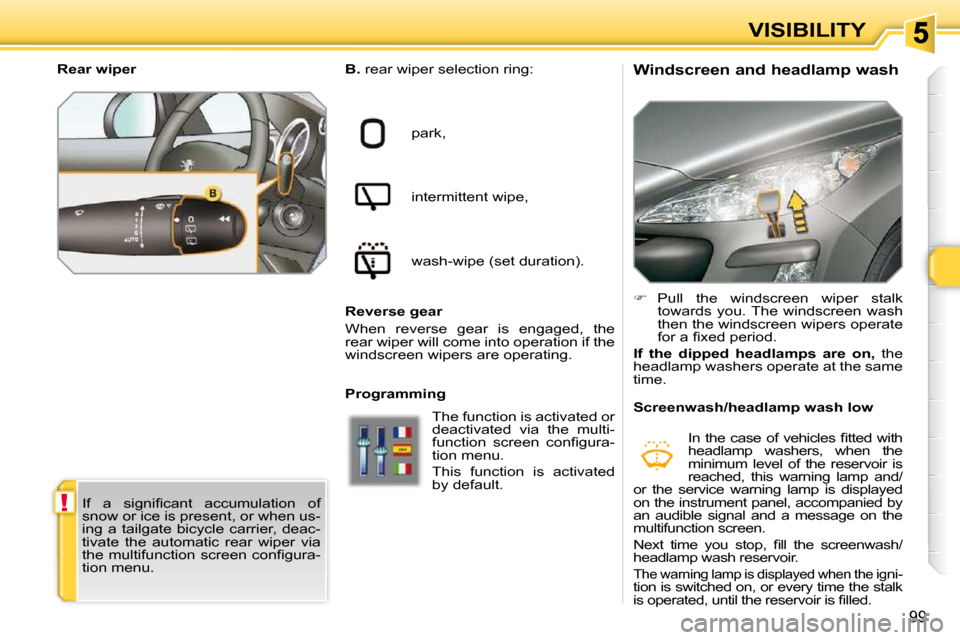
Windscreen and headlamp wash
B. rear wiper selection ring:
park,
intermittent wipe,
� �w�a�s�h�-�w�i�p�e� �(�s�e�t� �d�u�r�a�t�i�o�n�)�.� �
Reverse gear
When reverse gear is engaged, the
rear wiper will come into operation if the
windscreen wipers are operating.
� Pull the windscreen wiper stalk
towards you. The windscreen wash
then the windscreen wipers operate
�f�o�r� �a� �fi� �x�e�d� �p�e�r�i�o�d�.� �
If the dipped headlamps are on, the
headlamp washers operate at the same
time.
Rear wiper
� �I�f� �a� �s�i�g�n�i�fi� �c�a�n�t� �a�c�c�u�m�u�l�a�t�i�o�n� �o�f�
snow or ice is present, or when us-
ing a tailgate bicycle carrier, deac-
tivate the automatic rear wiper via
�t�h�e� �m�u�l�t�i�f�u�n�c�t�i�o�n� �s�c�r�e�e�n� �c�o�n�fi� �g�u�r�a�-
tion menu. Programming
The function is activated or
deactivated via the multi-
�f�u�n�c�t�i�o�n� �s�c�r�e�e�n� �c�o�n�fi� �g�u�r�a�-
tion menu.
This function is activated
by default. Screenwash/headlamp wash low
� �I�n� �t�h�e� �c�a�s�e� �o�f� �v�e�h�i�c�l�e�s� �fi� �t�t�e�d� �w�i�t�h�
headlamp washers, when the
minimum level of the reservoir is
reached, this warning lamp and/
or the service warning lamp is displayed
on the instrument panel, accompanied by
an audible signal and a message on the
multifunction screen.
� �N�e�x�t� �t�i�m�e� �y�o�u� �s�t�o�p�,� �fi� �l�l� �t�h�e� �s�c�r�e�e�n�w�a�s�h�/
headlamp wash reservoir.
The warning lamp is displayed when the igni-
tion is switched on, or every time the stalk
�i�s� �o�p�e�r�a�t�e�d�,� �u�n�t�i�l� �t�h�e� �r�e�s�e�r�v�o�i�r� �i�s� �fi� �l�l�e�d�.� � �
Page 155 of 313

10
160
CHECKS
PETROL ENGINES
� �T�h�e� �v�a�r�i�o�u�s� �c�a�p�s� �a�n�d� �c�o�v�e�r�s� �a�l�l�o�w� �a�c�c�e�s�s� �f�o�r� �c�h�e�c�k�i�n�g� �t�h�e� �l�e�v�e�l�s� �o�f� �t�h�e� �v�a�r�i�o�u�s� �fl� �u�i�d�s� �a�n�d� �f�o�r� �r�e�p�l�a�c�i�n�g� �c�e�r�t�a�i�n� �c�o�m�p�o�n�e�n�t�s�.�
1. Power steering reservoir.
2. Screenwash and headlamp wash
reservoir.
3. Coolant reservoir.
4. � � �B�r�a�k�e� �fl� �u�i�d� �r�e�s�e�r�v�o�i�r�.�
5. Battery/Fuses.
6. Fusebox.
7. � � �A�i�r� �fi� �l�t�e�r� �*� �.�
8. Engine oil dipstick.
9. � � �E�n�g�i�n�e� �o�i�l� �fi� �l�l�e�r� �c�a�p�.� �
� � �*� � � �A�c�c�o�r�d�i�n�g� �t�o� �e�n�g�i�n�e�.� �
Page 156 of 313

10
161
CHECKS
DIESEL ENGINES
� �T�h�e� �v�a�r�i�o�u�s� �c�a�p�s� �a�n�d� �c�o�v�e�r�s� �a�l�l�o�w� �a�c�c�e�s�s� �f�o�r� �c�h�e�c�k�i�n�g� �t�h�e� �l�e�v�e�l�s� �o�f� �t�h�e� �v�a�r�i�o�u�s� �fl� �u�i�d�s�,� �f�o�r� �r�e�p�l�a�c�i�n�g� �c�e�r�t�a�i�n� �c�o�m�p�o�n�e�n�t�s� �a�n�d�
for priming the fuel system.
1. Power steering reservoir.
2. Screenwash and headlamp wash
reservoir.
3. Coolant reservoir.
4. � � �B�r�a�k�e� �fl� �u�i�d� �r�e�s�e�r�v�o�i�r�.�
5. Battery/Fuses.
6. Fusebox.
7. � � �A�i�r� �fi� �l�t�e�r� �*� �.�
8. Engine oil dipstick.
9. � � �E�n�g�i�n�e� �o�i�l� �fi� �l�l�e�r� �c�a�p�.�
10. � � �P�r�i�m�i�n�g� �p�u�m�p� �*� �.�
11. � � �B�l�e�e�d� �s�c�r�e�w� �*� �.� �
� � �*� � � �A�c�c�o�r�d�i�n�g� �t�o� �e�n�g�i�n�e�.� �
Page 157 of 313

10
!
162
CHECKS
CHECKING LEVELS
Check all of these levels regularly and
top them up if necessary, unless other-
wise indicated.
� �I�f� �a� �l�e�v�e�l� �d�r�o�p�s� �s�i�g�n�i�fi� �c�a�n�t�l�y�,� �h�a�v�e� �t�h�e�
corresponding system checked by a
PEUGEOT dealer. Brake fluid level
In addition, as the cooling system is
pressurised, wait at least one hour after
switching off the engine before carrying
out any work.
To avoid any risk of scalding, unscrew
the cap by two turns to allow the pres-
sure to drop. When the pressure has
dropped, remove the cap and top up
the level.
Oil level The reading will only be correct
if the vehicle is on level ground
and the engine has been off for
more than 15 minutes.
The check is carried out either
when the ignition is switched on using
the oil level indicator on the instrument
panel, or using the dipstick. � �T�h�e� �b�r�a�k�e� �fl� �u�i�d� �l�e�v�e�l� �s�h�o�u�l�d� �b�e�
close to the "MAX" mark. If it is
not, check the brake pad wear.
� � �C�h�a�n�g�i�n�g� �t�h�e� �fl� �u�i�d�
Refer to the Warranty and Maintenance
Record for details of the interval for this
operation.
Power steering fluid level � �T�h�e� �p�o�w�e�r� �s�t�e�e�r�i�n�g� �fl� �u�i�d� �l�e�v�e�l�
should be close to the "MAX"
mark. Unscrew the cap, with the
engine cold, to check the level. Screenwash and headlamp
wash fluid
� �I�n� �t�h�e� �c�a�s�e� �o�f� �v�e�h�i�c�l�e�s� �fi� �t�t�e�d� �w�i�t�h�
headlamp washers, the mini-
�m�u�m� �l�e�v�e�l� �o�f� �t�h�i�s� �fl� �u�i�d� �i�s� �i�n�d�i�-
cated by an audible signal and a
message on the multifunction screen.
Top up the level when you stop the ve-
hicle.
Engine oil change
Refer to the Warranty and Maintenance
Record for details of the interval for this
operation.
In order to maintain the reliability of the
engine and emission control system,
the use of additives in the engine oil is
prohibited.
� � �O�i�l� �s�p�e�c�i�fi� �c�a�t�i�o�n�
The oil must correspond to your engine
and conform to the manufacturer's re-
commendations. � � �F�l�u�i�d� �s�p�e�c�i�fi� �c�a�t�i�o�n�
� �T�h�e� �b�r�a�k�e� �fl� �u�i�d� �m�u�s�t� �c�o�n�f�o�r�m� �t�o� �t�h�e�
manufacturer's recommendations and
�f�u�l�fi� �l� �t�h�e� �D�O�T�4� �s�t�a�n�d�a�r�d�s�.� � �
Changing the coolant
The coolant does not have to be
changed.
� � �F�l�u�i�d� �s�p�e�c�i�fi� �c�a�t�i�o�n�
For optimum cleaning and to avoid
�f�r�e�e�z�i�n�g�,� �t�h�i�s� �fl� �u�i�d� �m�u�s�t� �n�o�t� �b�e� �t�o�p�p�e�d�
up with or replaced with water.
Coolant level
The coolant level should be
close to the "MAX" mark but
should never exceed it.
When the engine is warm, the tempera-
ture of the coolant is regulated by the fan.
This can operate with the ignition off.
�O�n� �v�e�h�i�c�l�e�s� �w�h�i�c�h� �a�r�e� �fi� �t�t�e�d� �w�i�t�h� �a�
�p�a�r�t�i�c�l�e� �e�m�i�s�s�i�o�n� �fi� �l�t�e�r�,� �t�h�e� �f�a�n� �m�a�y�
operate after the vehicle has been
�s�w�i�t�c�h�e�d� �o�f�f�,� �e�v�e�n� �i�f� �t�h�e� �e�n�g�i�n�e� �i�s�
cold. � � �F�l�u�i�d� �s�p�e�c�i�fi� �c�a�t�i�o�n�
The coolant must conform to the manu-
facturer's recommendations.
When working under the bonnet,
take care, as certain areas of the
engine may be extremely hot (risk
of burns).
Page 174 of 313
11
!
!
!
178
PRACTICAL INFORMATION Risk of electrocution
� �X�e�n�o�n� �b�u�l�b�s� �(�D�1�S�-�3�5�W�)� �m�u�s�t� �b�e�
replaced by a PEUGEOT dealer.
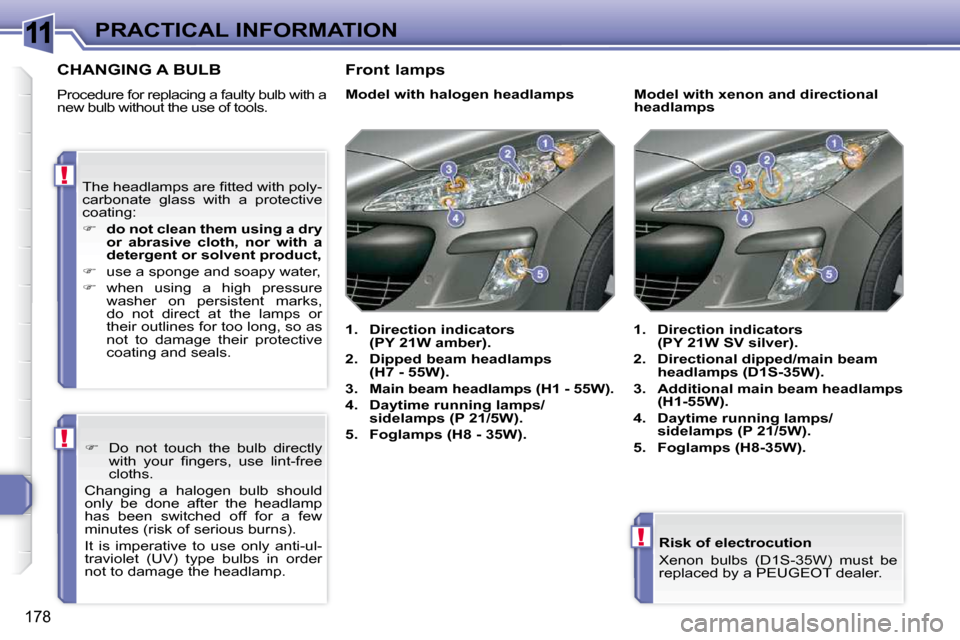
CHANGING A BULB
Procedure for replacing a faulty bulb with a
new bulb without the use of tools. Model with halogen headlamps
1. Direction indicators
(PY
21W
amber).
2. Dipped
beam
headlamps
(H7
-
55W).
3. Main beam headlamps (H1
-
55W).
4. Daytime
running lamps/
sidelamps
(P 21/
5W
).
5. Foglamps
(H8
-
35W).
1. Direction indicators
(PY 21W SV silver).
2. Directional dipped/main beam
headlamps (D1S-35W).
3. Additional main beam headlamps
(H1-55W).
4. Daytime running lamps/
sidelamps (P 21/5W).
5. Foglamps (H8-35W).
Model with xenon and dir
ectional
headlamps
� �T�h�e� �h�e�a�d�l�a�m�p�s� �a�r�e� �fi� �t�t�e�d� �w�i�t�h� �p�o�l�y�-
carbonate glass with a protective
�c�o�a�t�i�n�g�:�
� do not clean them using a dry
or abrasive cloth, nor with a
detergent or solvent product,
� use a sponge and soapy water,
� when using a high pressure
washer on persistent marks,
do not direct at the lamps or
their outlines for too long, so as
not to damage their protective
coating and seals.
� Do not touch the bulb directly
�w�i�t�h� �y�o�u�r� �fi� �n�g�e�r�s�,� �u�s�e� �l�i�n�t�-�f�r�e�e�
cloths.
Changing a halogen bulb should
only be done after the headlamp
has been switched off for a few
�m�i�n�u�t�e�s� �(�r�i�s�k� �o�f� �s�e�r�i�o�u�s� �b�u�r�n�s�)�.�
It is imperative to use only anti-ul-
�t�r�a�v�i�o�l�e�t� �(�U�V�)� �t�y�p�e� �b�u�l�b�s� �i�n� �o�r�d�e�r�
not to damage the headlamp. Front lamps
Page 175 of 313
11
i
!
179
PRACTICAL INFORMATION
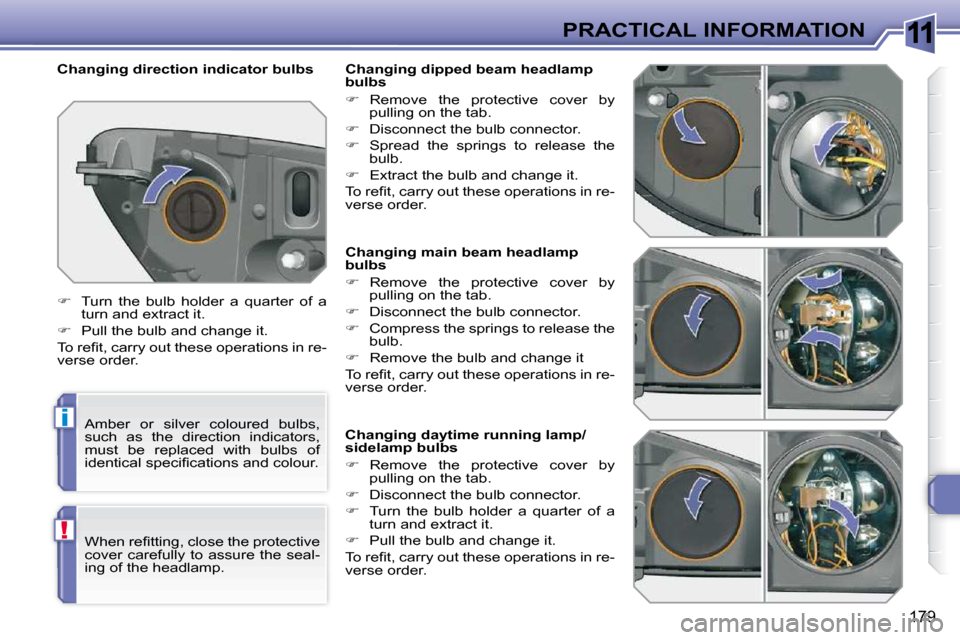
Changing main beam headlamp
bulbs
� Remove the protective cover by
pulling on the tab.
� Disconnect the bulb connector.
� Compress the springs to release the
bulb.
� Remove the bulb and change it
� �T�o� �r�e�fi� �t�,� �c�a�r�r�y� �o�u�t� �t�h�e�s�e� �o�p�e�r�a�t�i�o�n�s� �i�n� �r�e�-
verse order.
Changing daytime running lamp/
sidelamp bulbs
� Remove the protective cover by
pulling on the tab.
� Disconnect the bulb connector.
� Turn the bulb holder a quarter of a
�t�u�r�n� �a�n�d� �e�x�t�r�a�c�t� �i�t�.�
� Pull the bulb and change it.
� �T�o� �r�e�fi� �t�,� �c�a�r�r�y� �o�u�t� �t�h�e�s�e� �o�p�e�r�a�t�i�o�n�s� �i�n� �r�e�-
verse order.
Changing dipped beam headlamp
bulbs
� Remove the protective cover by
pulling on the tab.
� Disconnect the bulb connector.
� Spread the springs to release the
bulb.
� � � �E�x�t�r�a�c�t� �t�h�e� �b�u�l�b� �a�n�d� �c�h�a�n�g�e� �i�t�.� �
� �T�o� �r�e�fi� �t�,� �c�a�r�r�y� �o�u�t� �t�h�e�s�e� �o�p�e�r�a�t�i�o�n�s� �i�n� �r�e�-
verse order.
Changing direction indicator bulbs
� Turn the bulb holder a quarter of a
�t�u�r�n� �a�n�d� �e�x�t�r�a�c�t� �i�t�.�
� Pull the bulb and change it.
� �T�o� �r�e�fi� �t�,� �c�a�r�r�y� �o�u�t� �t�h�e�s�e� �o�p�e�r�a�t�i�o�n�s� �i�n� �r�e�-
verse order.
Amber or silver coloured bulbs,
such as the direction indicators,
must be replaced with bulbs of
�i�d�e�n�t�i�c�a�l� �s�p�e�c�i�fi� �c�a�t�i�o�n�s� �a�n�d� �c�o�l�o�u�r�.�
� �W�h�e�n� �r�e�fi� �t�t�i�n�g�,� �c�l�o�s�e� �t�h�e� �p�r�o�t�e�c�t�i�v�e�
cover carefully to assure the seal-
ing of the headlamp.