Page 145 of 230

Check tire inflation pressure regularly.
Tables listing the recommended inflation pressure for your vehicle can be found on pages 160 and 161
. A tire inflation
pressure placard is also located on the driver's side Bpillar (the structural member at the side of the vehicle, at the rear
of the driver's door opening). This placard indicates the designation of the factory-mounted tires on your vehicle, as
well as load limits and inflation pressure.
NOTE
The placards shown indicate inflation pressure for the tires installed on the vehicle at the factory only.
Use a tire gauge to check the tire inflation pressure, including the spare, at least once a month and before long trips.
You are strongly urged to buy a reliable tire pressure gauge, as automatic service station gauges may be inaccurate.
Use the recommended cold inflation pressure for optimum tire performance and wear.
Under-inflation or over-inflation may cause uneven treadwear patterns.
WARNING
Under-inflation is the most common cause of tire failure and may result in severe tire cracking, tread separation, or
"blowout," with unexpected loss of vehicle control and increased risk of injury.
Under-inflated tires reduce the load carrying capacity of your vehicle.
When weather temperature changes occur, tire inflation pressures also change. A 10-degree temperature drop causes a
corresponding drop of 1 psi (7 kPa) in inflation pressure. Check your tire pressures frequently and adjust them to the
proper pressure, which can be found on the vehicle's tire information placard or certification label.
ProCarManuals.com
Page 146 of 230

Checking tire pressure
A certain amount of air seepage from the tires occurs naturally and tire pressure fluctuates with seasonal changes in
temperature. Always check tire pressure regularly.
Cold tires
Inflation pressure should be checked when the tires are cold.
159 07 Wheels and tires
Tire inflation
The tires are considered to be cold when they have the same temperature as the surrounding (ambient) air.
This temperature is normally reached after the vehicle has been parked for at least 3 hours.
After driving a distance of approximately 1 mile (1.6 km), the tires are considered to be hot. If you have to drive
farther than this distance to pump your tire(s), check and record the tire pressure first and add the appropriate air
pressure when you get to the pump.
If checking tire pressure when the tire is hot, never "bleed" or reduce air pressure. The tires are hot from driving and it
is normal for pressures to increase above recommended cold pressures. A hot tire at or below recommended cold
inflation pressure could be significantly under-inflated.
To check inflation pressure:
1. Remove the cap from the valve on one tire, then firmly press the tire gauge onto the valve.
2. Add air to reach the recommended air pressure.
3. Replace the valve cap.
4. Repeat this procedure for each tire, including the spare.
5. Visually inspect the tires to make sure there are no nails or other objects embedded that could puncture the tire and
cause an air leak.
6. Check the sidewalls to make sure there are no gouges, cuts, bulges or other irregularities.
NOTE
If you overfill the tire, release air by pushing on the metal stem in the center of the valve. Then recheck the pressure
with your tire gauge.
Some spare tires require higher inflation pressure than the other tires. Consult the tire inflation tables on pages 160
and 161, or see the inflation pressure placard.
160 07 Wheels and tires
Tire inflation pressure table - U.S. models
The following tire pressures are recommended by Volvo for your vehicle. Refer to the tire inflation placard for
information specific to the tires installed on your vehicle at the factory.
ProCarManuals.com
Page 147 of 230
Load ratings
The load ratings in the tables above translate as follows:
91 = 1365 lbs (615 kg)
93 = 1433 lbs (650 kg)
99 = 1709 lbs (755 kg)
Speed ratings
The speed ratings in the tables translate as follows:
M = 81 mph (130 km/h)
V= 149 mph (240 km/h)
W= 168 mph (270 km/h)
See also page 164
for an explanation of the designations on the sidewall of the tire.
161 07 Wheels and tires
Tire inflation pressure table - Canadian models
The following tire pressures are recommended by Volvo for your vehicle. Refer to the tire inflation placard for
information specific to the tires installed on your vehicle at the factory.
ProCarManuals.com
Page 148 of 230
 - U.S. models
The tire pressure monitoring system uses sensors mounted in the tire valves to check inflation pressure levels. When
the")
162 07 Wheels and tires
Tire Pressure Monitoring System (TPMS) - U.S. models
The tire pressure monitoring system uses sensors mounted in the tire valves to check inflation pressure levels. When
the vehicle is moving at a speed of approximately 20 mph (30 km/h) or faster, these sensors transmit inflation pressure
data to a receiver located in the vehicle.USA - FCC ID: MRXTG315AM04
1
This device complies with part 15 of the FCC rules. Operation is subject to the following conditions: (1) This device
may not cause harmful interference, and (2) this device must accept any interference received, including interference
that may cause undesired operation.
1On certain models, the FCC code is MRXTG315AM04
When low inflation pressure is detected, TPMS will light up the tire pressure warning light () (also referred to as a
telltale) in the instrument panel, and will display a message in the text window. The wording of this message is
determined by the degree of inflation pressure loss.
NOTE
If a fault occurs in TPMS, the tire pressure warning light will flash for approximately 1 minute and TIRE PRESS
SYST SERVICE REQUIRED will be displayed.
Each tire, including the spare (if provided), should be checked monthly when cold and inflated to the inflation pressure
recommended by the vehicle manufacturer on the vehicle placard or tire inflation pressure label. (If your vehicle has
tires of a different size than the size indicated on the vehicle placard or tire inflation pressure label, you should
determine the proper tire inflation pressure for those tires.)
As an added safety feature, your vehicle has been equipped with a tire pressure monitoring system (TPMS) that
illuminates a low tire pressure telltale when one or more of your tires is significantly under-inflated. Accordingly,
when the low tire pressure telltale illuminates, you should stop and check your tires as soon as possible, and inflate
them to the proper pressure. Driving on a significantly under-inflated tire causes the tire to overheat and can lead to
tire failure. Under-inflation also reduces fuel efficiency and tire tread life, and may affect the vehicle's handling and
stopping ability.
Please note that the TPMS is not a substitute for proper tire maintenance, and it is the driver's responsibility to
maintain correct tire pressure, even if under-inflation has not reached the level to trigger illumination of the TPMS low
tire pressure telltale.
Your vehicle has also been equipped with a TPMS malfunction indicator to indicate when the system is not operating
properly. The TPMS malfunction indicator is combined with the low tire pressure telltale. When the system detects a
malfunction, the telltale will flash for approximately one minute and then remain continuously illuminated. This
sequence will continue upon subsequent vehicle start-ups as long as the malfunction exists. When the malfunction
indicator is illuminated, the system may not be able to detect or signal low tire pressure as intended. TPMS
malfunctions may occur for a variety of reasons, including the installation of replacement or alternate tires or wheels
on the vehicle that prevent the TPMS from functioning properly. Always check the TPMS malfunction telltale after
replacing one or more tires or wheels on your vehicle to ensure that the replacement or alternate tires and wheels allow
the TPMS to continue to function properly.
ProCarManuals.com
Page 149 of 230
 - U.S. models
NOTE
TPMS indicates low tire pressure but does not replace normal tire maintenance. For information on correct tire
pre")
163 07 Wheels and tires
Tire Pressure Monitoring System (TPMS) - U.S. models
NOTE
TPMS indicates low tire pressure but does not replace normal tire maintenance. For information on correct tire
pressure, please refer to the tables on pages 160 and 161
, or consult your Volvo retailer.
Erasing warning messages
When a low tire pressure warning message has been displayed, and the tire pressure warning light has come on:
Use a tire pressure gauge to check the inflation pressure of all four tires.
Re-inflate the tire(s) to the correct pressure (consult the tire pressure placard or the tables on pages 160 and 161).
Drive the vehicle for several minutes at a speed of 20 mph (30 km/h) or faster.
This will erase the warning text and the warning light will go out.
WARNING
Incorrect inflation pressure could lead to tire failure, resulting in a loss of control of the vehicle.
Changing wheels with TPMS
Please note the following when changing or replacing the factory installed TPMS wheels/tires on the vehicle:
Only the factory-mounted wheels are equipped with TPMS sensors in the valves.
If the vehicle is equipped with a temporary spare tire, this tire does not have a TPMS sensor.
If wheels without TPMS sensors are mounted on the vehicle, TIRE PRESS SYST SERVICE REQUIRED will be
displayed each time the vehicle is driven above 25 mph (40 km/h) for 10 minutes or more.
Once TPMS sensors are properly installed, the warning message should not reappear.
Volvo recommends that TPMS sensors be fitted on all wheels used on the vehicle. Volvo does not recommend
moving sensors back and forth between sets of wheels.
CAUTION
When inflating tires with TPMS valves, press the pump's mouthpiece straight onto the valve to help avoid bending or
otherwise damaging the valve.
164 07 Wheels and tires
Tire designations
ProCarManuals.com
Page 150 of 230
.
The following information is listed on the tire sidewall:
The tire des")
Federal law mandates that tire manufacturers place standardized information on the sidewall of all tires (see the
illustration).
The following information is listed on the tire sidewall:
The tire designation (the following figures are examples of a tire designation):
1. 215: the width of the tire (in millimeters) from sidewall edge to sidewall edge. The larger the number, the wider the
tire.
2. Å: The ratio of the tire's height to its width.
3. R: Radial tire.
4. 15: The diameter of the wheel rim (in inches).
5. 95: The tire's load index. In this example, a load index of 95 equals a maximum load of 1521 lbs (690 kg).
6. H : The tire's speed rating, or the maximum speed at which the tire is designed to be driven for extended periods of
time, carrying a permissible load for the vehicle, and with correct inflation pressure. For example, H indicates a speed
rating of 130 mph (210 km/h).
NOTE
This information may not appear on the tire because it is not required by law.
7. M+S or M/S = Mud and Snow
AT = All Terrain
AS = All Season
8. U.S. DOT Tire Identification Number (TIN): This begins with the letters "DOT" and indicates that the tire meets all
federal standards. The next two numbers or letters are the plant code where it was manufactured, the next two are the
tire size code and the last four numbers represent the week and year the tire was built. For example, the numbers 317
mean the 31st week of 1997. After 2000 the numbers go to four digits. For example, 2501 means the 25th week of
2001. The numbers in between are marketing codes used at the manufacturer's discretion. This information helps a tire
manufacturer identify a tire for safety recall purposes.
9. Tire Ply Composition and Material Used: Indicates the number of plies indicates or the number of layers of rubber-
coated fabric in the tire tread and sidewall. Tire manufacturers also must indicate the ply materials in the tire and the
sidewall, which include steel, nylon, polyester, and others.
10. Maximum Load: Indicates the maximum load in pounds and kilograms that can be carried by the tire. Refer to the
ProCarManuals.com
Page 151 of 230

vehicle's tire information placard or the safety certification label, located on the B-Pillar or the driver's door or on the
inside of the fuel filler door on Canadian models, for the correct tire pressure for your vehicle.
11. Treadwear, Traction, and Temperature grades: See page 168
for more information.
12. Maximum permissible inflation pressure: the greatest amount of air pressure that should ever be put in the tire. This
limit is set by the tire manufacturer.
165 07 Wheels and tires
Glossary of tire terminology
Tire suppliers may have additional markings, notes or warnings such as standard load, radial tubeless, etc.
Tire information placard: A placard showing the OE (Original Equipment) tire sizes, recommended inflation
pressure, and the maximum weight the vehicle can carry.
Tire Identification Number (TIN): A number on the sidewall of each tire providing information about the tire
brand and manufacturing plant, tire size and date of manufacturer.
Inflation pressure: A measure of the amount of air in a tire.
Standard load: A class of P-metric or Metric tires designed to carry a maximum load at 35 psi [37 psi (2.5 bar) for
Metric tires]. Increasing the inflation pressure beyond this pressure will not increase the tires load carrying capability.
Extra load: A class of P-metric or Metric tires designed to carry a heavier maximum load at 41 psi [43 psi (2.9 bar)
for Metric tires]. Increasing the inflation pressure beyond this pressure will not increase the tires load carrying
capability.
kPa: Kilopascal, a metric unit of air pressure.
PSI: Pounds per square inch, a standard unit of air pressure.
B-pillar: The structural member at the side of the vehicle behind the front door.
Bead area of the tire: Area of the tire next to the rim.
Sidewall of the tire: Area between the bead area and the tread.
Tread area of the tire: Area of the perimeter of the tire that contacts the road when mounted on the vehicle.
Rim: The metal support (wheel) for a tire or a tire and tube assembly upon which the tire beads are seated.
Maximum load rating: a figure indicating the maximum load in pounds and kilograms that can be carried by the
tire. This rating is established by the tire manufacturer.
Maximum permissible inflation pressure: the greatest amount of air pressure that should ever be put in the tire.
This limit is set by the tire manufacturer.
Recommended tire inflation pressure: inflation pressure, established by Volvo, which is based on the type of tires
that are mounted on a vehicle at the factory. This inflation pressure is affected by the number of occupants in the
vehicle, the amount of cargo, and the speed at which the vehicle will be driven for a prolonged period. This
information can be found on the tire inflation placard(s) located on the driver's side B-pillar or on the inside of the fuel
filler door on Canadian models, and in the tire inflation table in this chapter.
Cold tires: The tires are considered to be cold when they have the same temperature as the surrounding (ambient)
air. This temperature is normally reached after the vehicle has been parked for at least 3 hours.
166 07 Wheels and tires
Vehicle loading
Properly loading your vehicle will provide maximum return of vehicle design performance.
Before loading your vehicle, familiarize yourself with the following terms for deter-mining your vehicle's weight
ratings, with or without a trailer, from the vehicle's Federal/ Canadian Motor Vehicle Safety Standards
(FMVSS/CMVSS) label, and the vehicle's tire information placard:
ProCarManuals.com
Page 152 of 230

Curb weight
The weight of the vehicle including a full tank of fuel and all standard equipment. It does not include passengers,
cargo, or optional equipment.
Capacity weight
All weight added to the curb weight, including cargo and optional equipment. When towing, trailer hitch tongue load
is also part of cargo weight.
NOTE
NOTE: For trailer towing information, please refer to the section "Towing a trailer" on page 144
.
Permissible axle weight
The maximum allowable weight that can be carried by a single axle (front or rear). These numbers are shown on the
Federal/Canadian Motor Vehicle Safety Standards (FMVSS/CMVSS) label. The total load on each axle must never
exceed its maximum permissible weight.
Gross vehicle weight (GVW)
The vehicle's curb weight + cargo + passengers.
NOTE
The location of the various labels in your vehicle can be found on page 243.
A table listing important weight limits for your vehicle can be found on page 245.
Steps for Determining Correct Load Limit
1. Locate the statement "the combined weight of occupants and cargo should never exceed XXX pounds'' on your
vehicle's placard.
2. Determine the combined weight of the driver and passengers that will be riding in your vehicle.
3. Subtract the combined weight of the driver and passengers from XXX kilograms or XXX pounds.
4. The resulting figure equals the available amount of cargo and luggage load capacity. For example, if the "XXX"
amount equals 1400 lbs. and there will be five 150 lb. passengers in your vehicle, the amount of available cargo and
luggage load capacity is 650 lbs. (1400-750 (5 x 150) = 650 lbs.)
5. Determine the combined weight of luggage and cargo being loaded on the vehicle. That weight may not safely
exceed the available cargo and luggage load capacity calculated in Step 4.
6. If your vehicle will be towing a trailer, load from your trailer will be transferred to your vehicle. Consult this
manual
1 to determine how this reduces the available cargo and luggage load capacity of your vehicle.
1See "Towing a trailer" on page 144.
167 07 Wheels and tires
ProCarManuals.com
 1
1 2
2 3
3 4
4 5
5 6
6 7
7 8
8 9
9 10
10 11
11 12
12 13
13 14
14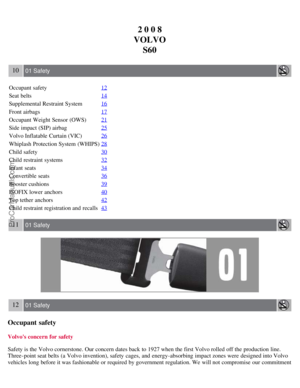 15
15 16
16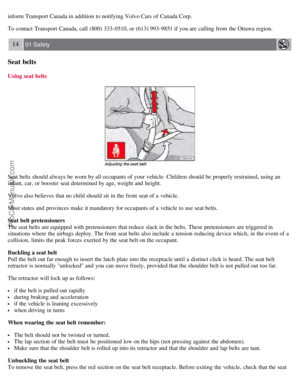 17
17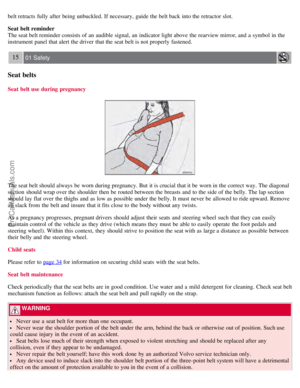 18
18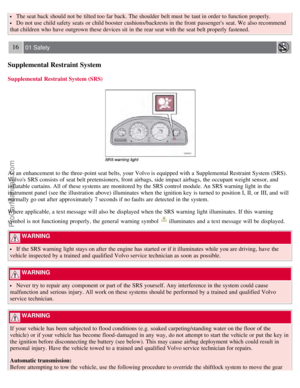 19
19 20
20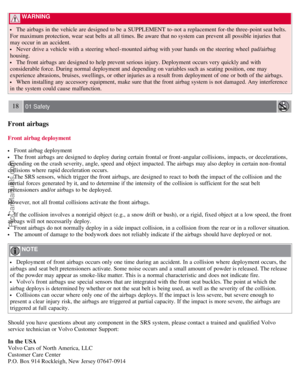 21
21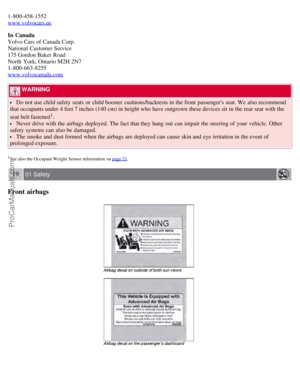 22
22 23
23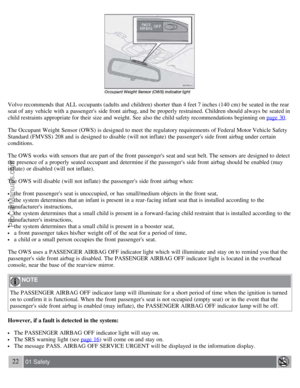 24
24 25
25 26
26 27
27 28
28 29
29 30
30 31
31 32
32 33
33 34
34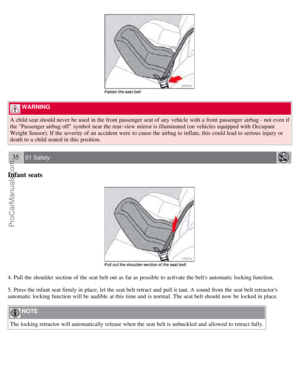 35
35 36
36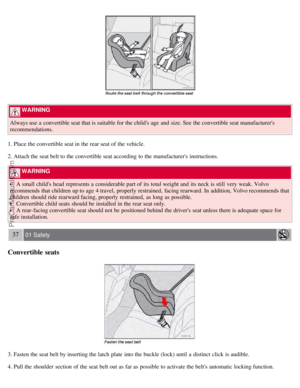 37
37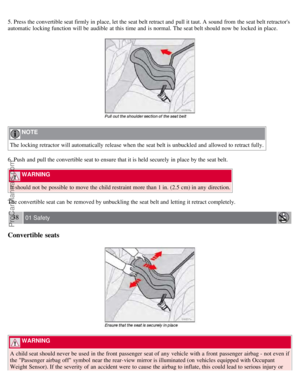 38
38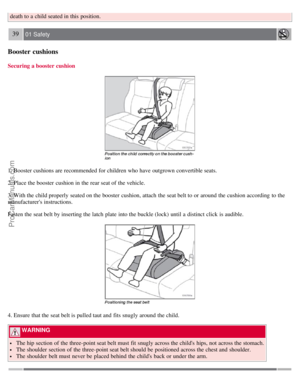 39
39 40
40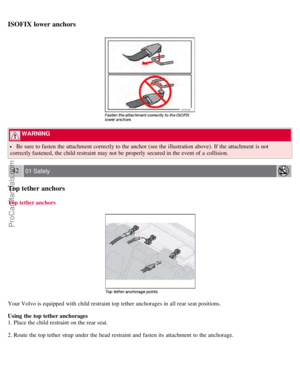 41
41 42
42 43
43 44
44 45
45 46
46 47
47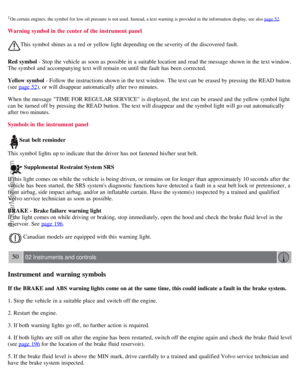 48
48 49
49 50
50 51
51 52
52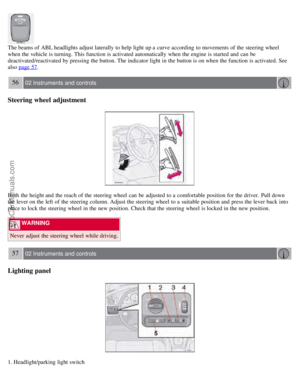 53
53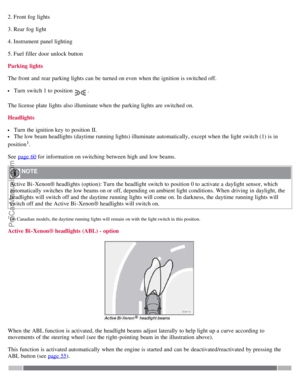 54
54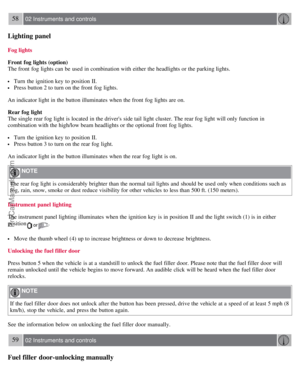 55
55 56
56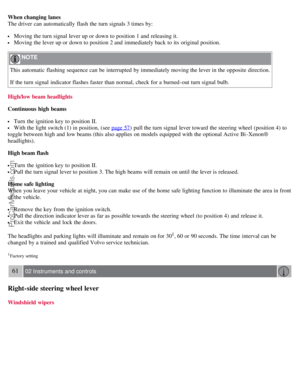 57
57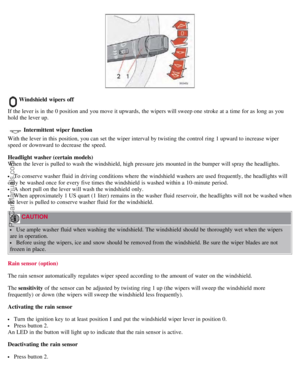 58
58 59
59 60
60 61
61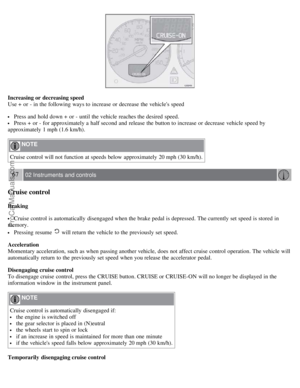 62
62 63
63 64
64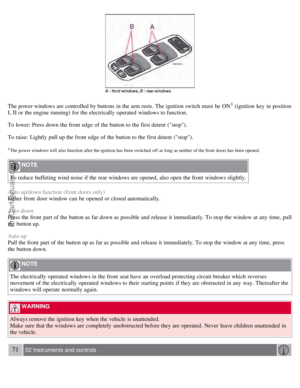 65
65 66
66 67
67 68
68 69
69 70
70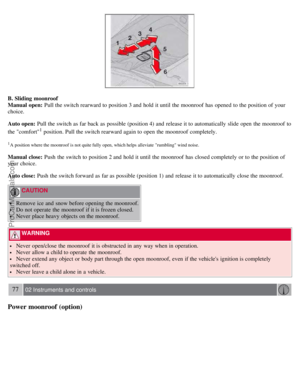 71
71 72
72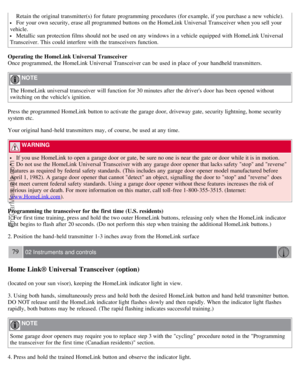 73
73 74
74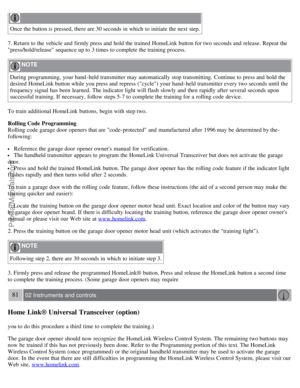 75
75 76
76 77
77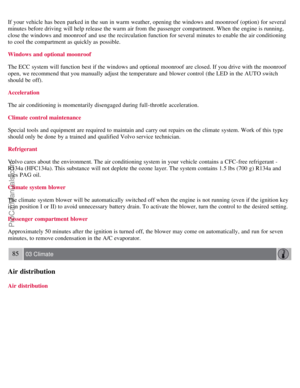 78
78 79
79 80
80 81
81 82
82 83
83 84
84 85
85 86
86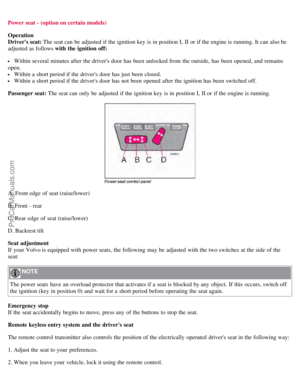 87
87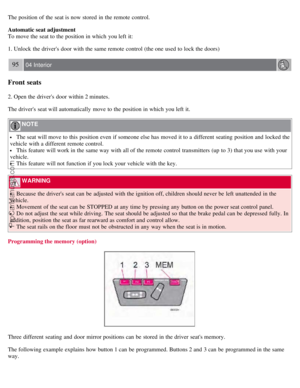 88
88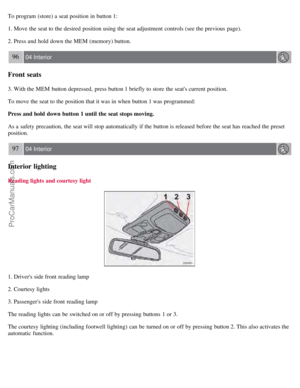 89
89 90
90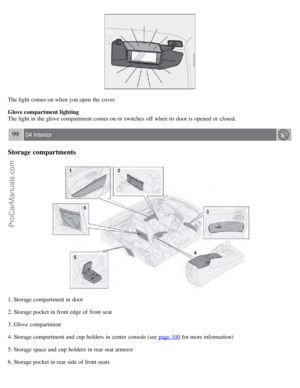 91
91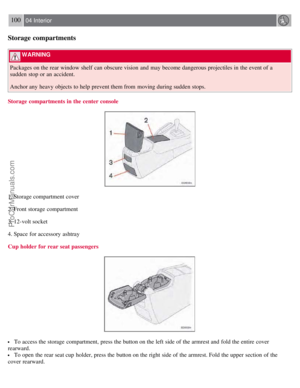 92
92 93
93 94
94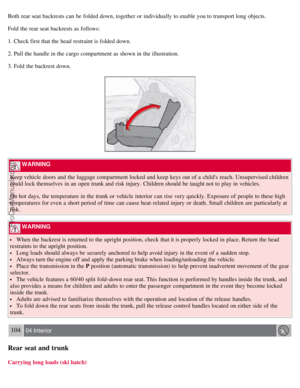 95
95 96
96 97
97 98
98 99
99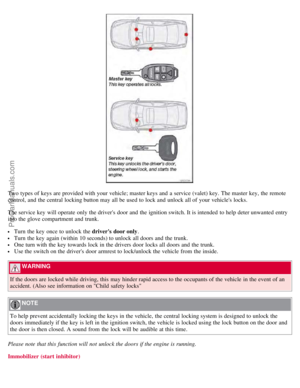 100
100 101
101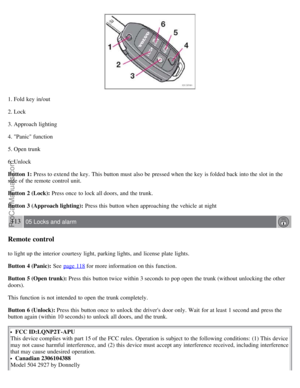 102
102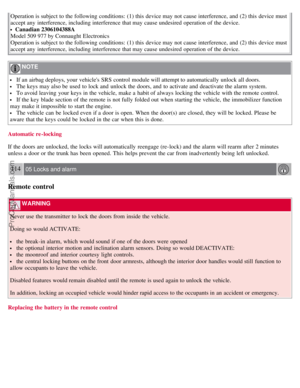 103
103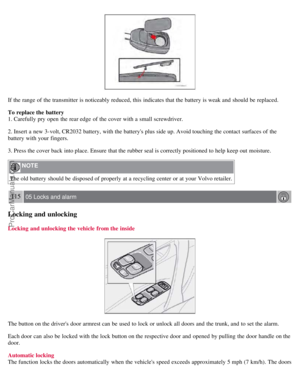 104
104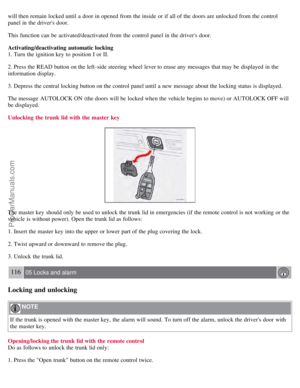 105
105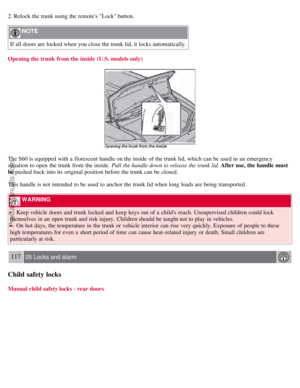 106
106 107
107 108
108 109
109 110
110 111
111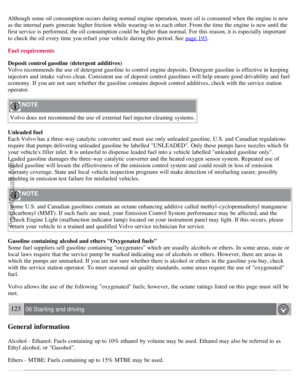 112
112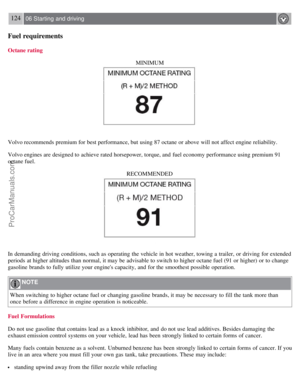 113
113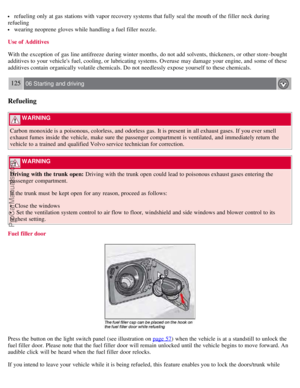 114
114 115
115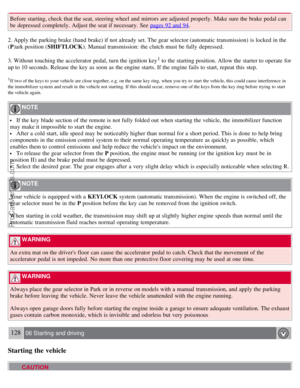 116
116 117
117 118
118 119
119 120
120 121
121 122
122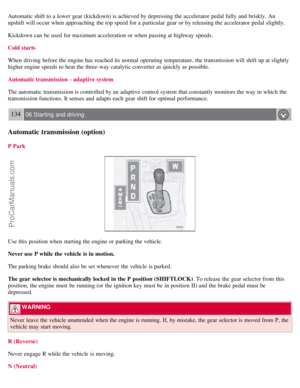 123
123 124
124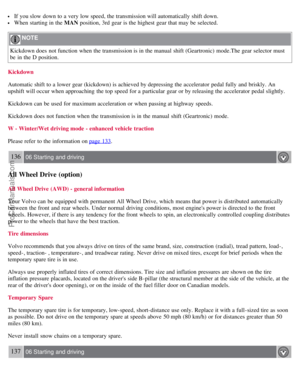 125
125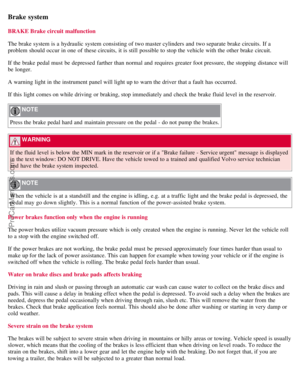 126
126 127
127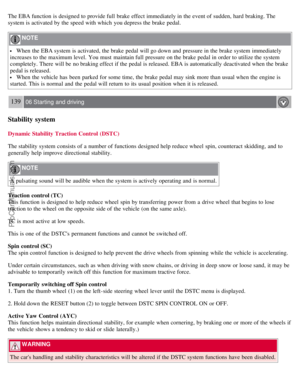 128
128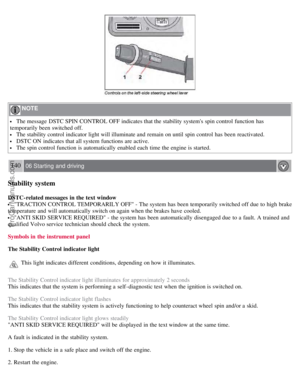 129
129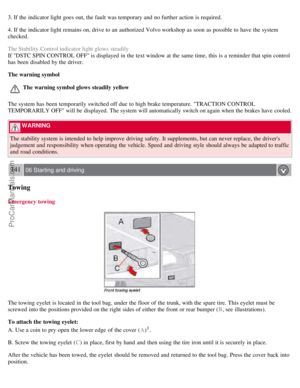 130
130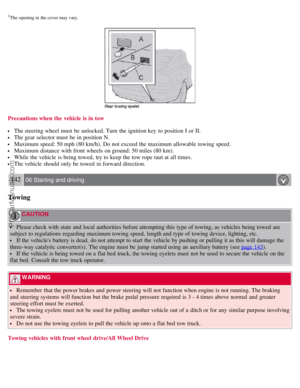 131
131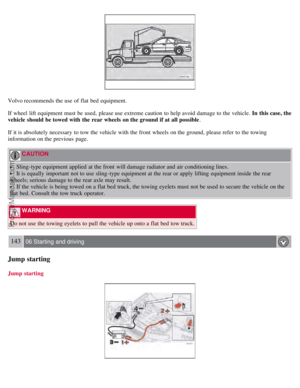 132
132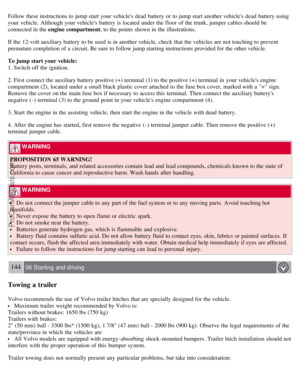 133
133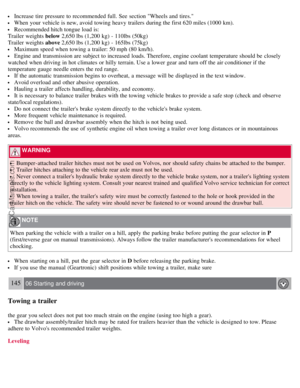 134
134 135
135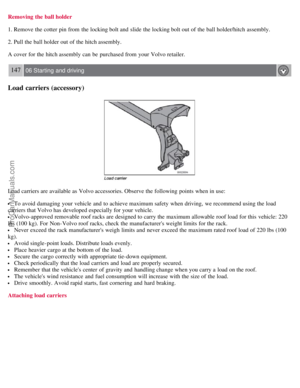 136
136 137
137 138
138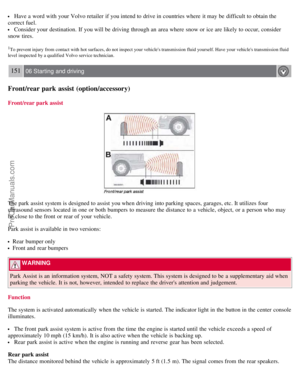 139
139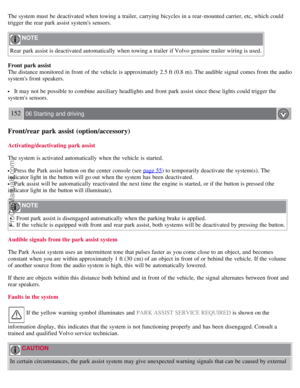 140
140 141
141 142
142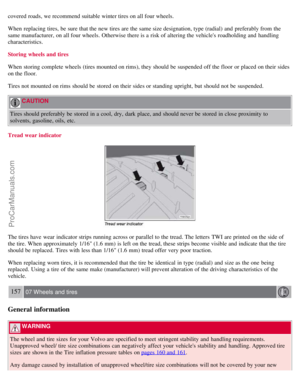 143
143 144
144 145
145 146
146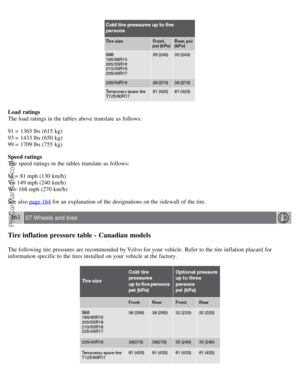 147
147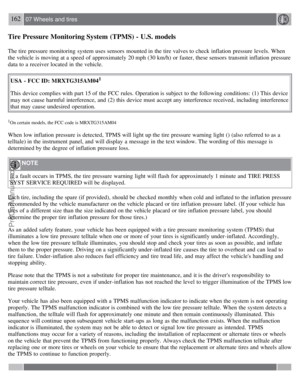 148
148 149
149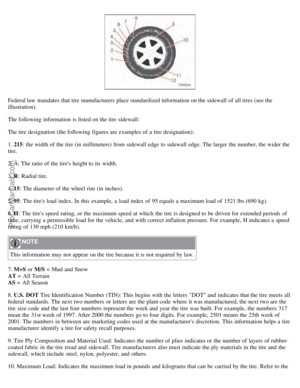 150
150 151
151 152
152 153
153 154
154 155
155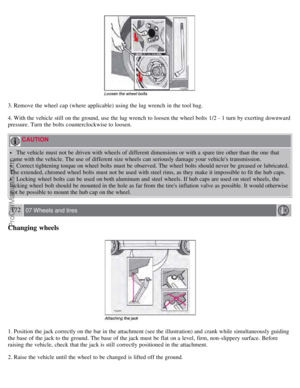 156
156 157
157 158
158 159
159 160
160 161
161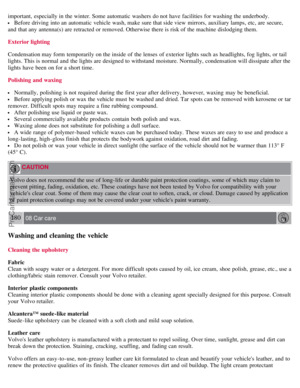 162
162 163
163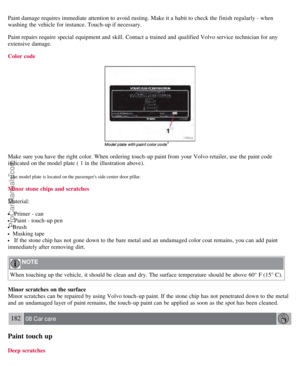 164
164 165
165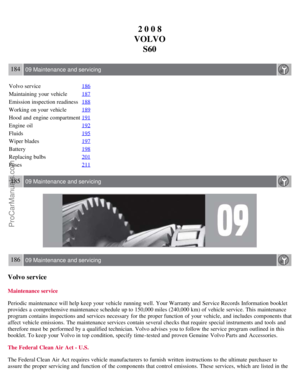 166
166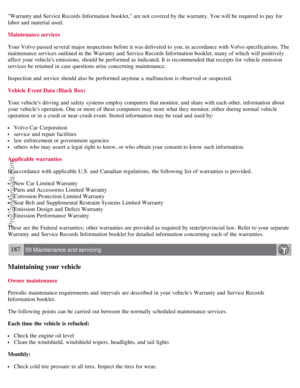 167
167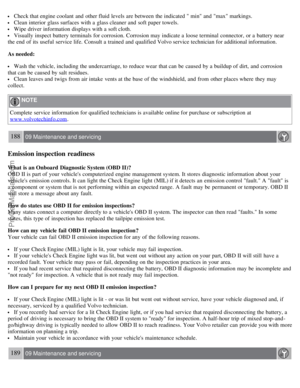 168
168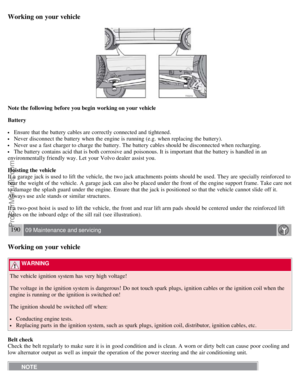 169
169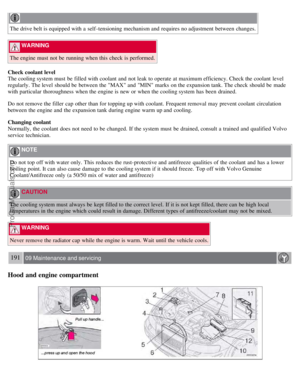 170
170 171
171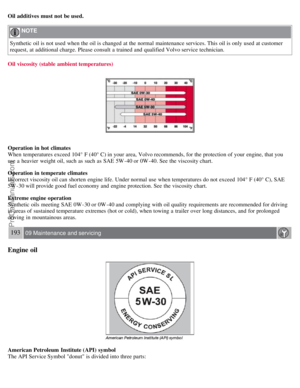 172
172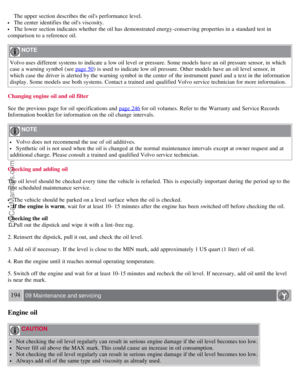 173
173 174
174 175
175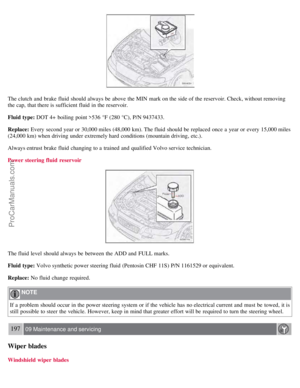 176
176 177
177 178
178 179
179 180
180 181
181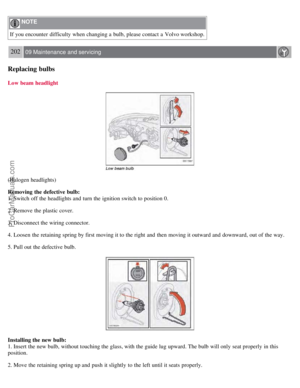 182
182 183
183 184
184 185
185 186
186 187
187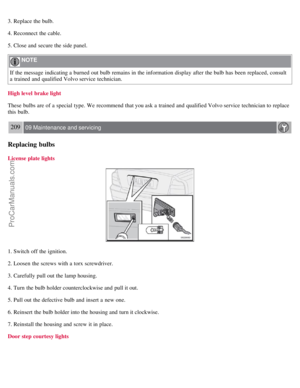 188
188 189
189 190
190 191
191 192
192 193
193 194
194 195
195 196
196 197
197 198
198 199
199 200
200 201
201 202
202 203
203 204
204 205
205 206
206 207
207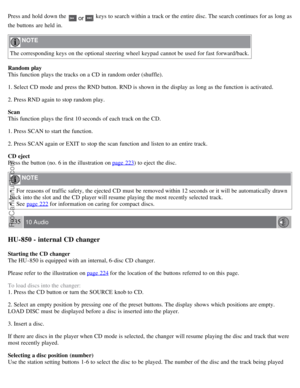 208
208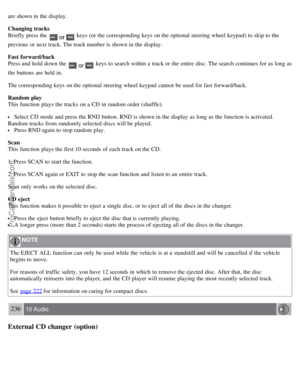 209
209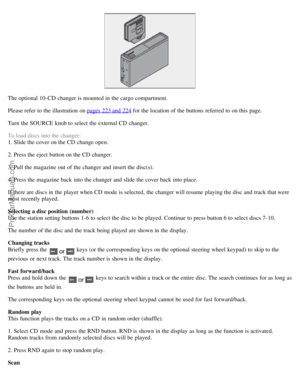 210
210 211
211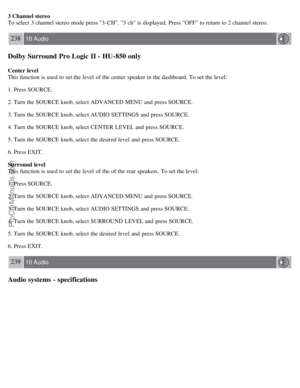 212
212 213
213 214
214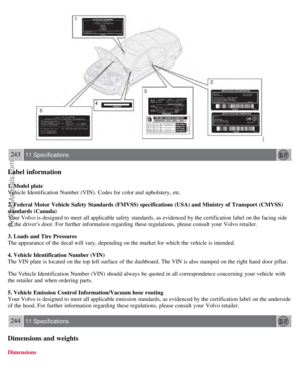 215
215 216
216 217
217 218
218 219
219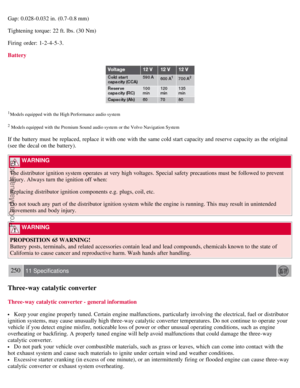 220
220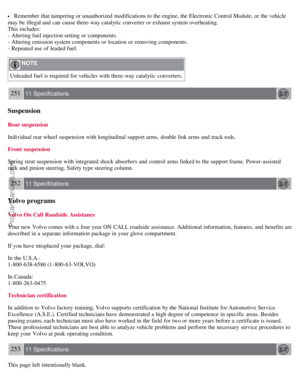 221
221 222
222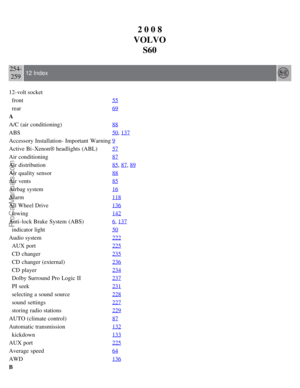 223
223 224
224 225
225 226
226 227
227 228
228 229
229
93 = 1433 lbs (650 kg)
99 = 1709 lbs (755 kg)
Speed ratings
The speed ratings in the tables translate")