Page 447 of 621
437
2008 TUNDRA from Apr. ’08 Prod. (OM 34477U)
XS10087
To remove the storage box:
1. Remove the storage box lids.
2. Remove the knobs by turning them counterclockwise.
3. Remove the storage box.
XS13006
You should use the front passenger ’s
seatback as a temporary table only when
the vehicle is stopped.
To use the seatback table, fold the seat-
back down. (For detailed information, see
“—Folding front passenger ’s seat” on page
54 in Section 1 −3.)
CAUTION
To avoid serious injury:
�Do not set up the seatback table
while the vehicle is moving.
�Do not sit on the seatback table.
NOTICE
To prevent damage to the seat, avoid
putting heavy loads on the temporary
table.
— R emo vin g th e st o rag e bo x Seatback table (Regular cab
models)
Page 519 of 621
509
2008 TUNDRA from Apr. ’08 Prod. (OM 34477U)
XS40054
Ty p e A
XS40008
Ty p e B 2. Insert the end of the jack handle
end (Type A) or jack handle exten-
sion No.2 (Type B) into the lower-
ing screw and turn it counterclock-
wise.
3. After the tire is lowered completely to the ground, remove the holding
bracket.
When storing the temporary spare
tire, put it in place with the outer side
of the wheel facing up. Then secure
the tire, taking care that the tire goes
straight up without catching on any
other part, to prevent it from flying for-
ward during a collision or sudden
braking.
Keep winding until three clicks are
heard.
XS40011
2. Block the wheel diagonally op- posite the flat tire to keep the
vehicle from rolling when it is
jacked up.
When blocking the wheel, place a
wheel block in front of one of the front
wheels or behind one of the rear
wheels.
—Blocking the wheel
Page 520 of 621
510
2008 TUNDRA from Apr. ’08 Prod. (OM 34477U)
XS40015b
3. Loosen all the wheel nuts.
Always loosen the wheel nuts before
raising the vehicle.
Turn the wheel nuts counterclockwise
to loosen. To get maximum leverage,
fit the wrench to the nut so that the
handle is on the right side, as shown
above. Grab the wrench near the end
of the handle and pull up on the han-
dle. Be careful that the wrench does
not slip off the nut.
Do not remove the nuts yet—just un-
screw them about one −half turn.
CAUTION
Never use oil or grease on the
bolts or nuts. The nuts may loose
and the wheels may fall off,
which could cause a serious ac-
cident.
XS40016b
Rear
Front
4. Position the jack at the correct
jack point as shown.
Make sure the jack is positioned on
a level and solid place.
JACK POINTS:
Front—Under the frame side rail
Rear—Under the rear axle housing
—Loosening wheel nuts —Positioning the jack
Page 522 of 621

512
2008 TUNDRA from Apr. ’08 Prod. (OM 34477U)
To raise the vehicle, insert the jack
handle end with the extension into the
jack (it is a loose fit) and turn it clock-
wise with the handle. As the jack
touches the vehicle and begins to lift,
double −check that it is properly posi-
tioned.
CAUTION
Never get under the vehicle when
the vehicle is supported by the
jack alone.
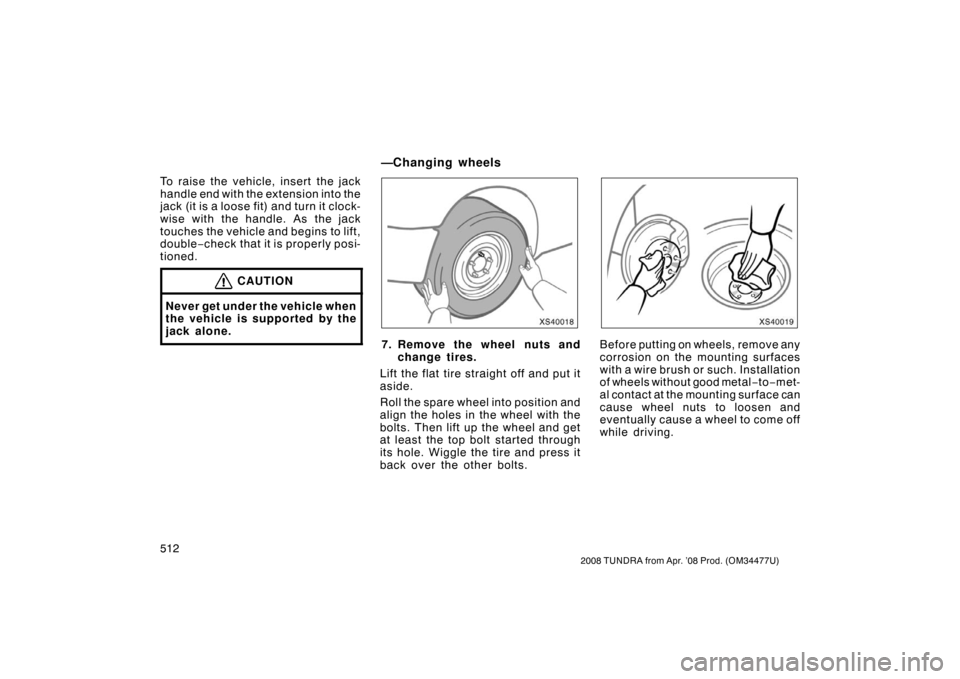
XS40018
7. Remove the wheel nuts and change tires.
Lift the flat tire straight off and put it
aside.
Roll the spare wheel into position and
align the holes in the wheel with the
bolts. Then lift up the wheel and get
at least the top bolt started through
its hole. Wiggle the tire and press it
back over the other bolts.
XS40019
Before putting on wheels, remove any
corrosion on the mounting surfaces
with a wire brush or such. Installation
of wheels without good metal− to−met-
al contact at the mounting surface can
cause wheel nuts to loosen and
eventually cause a wheel to come off
while driving.
—Changing wheels
Page 523 of 621

513
2008 TUNDRA from Apr. ’08 Prod. (OM 34477U)
XS40020
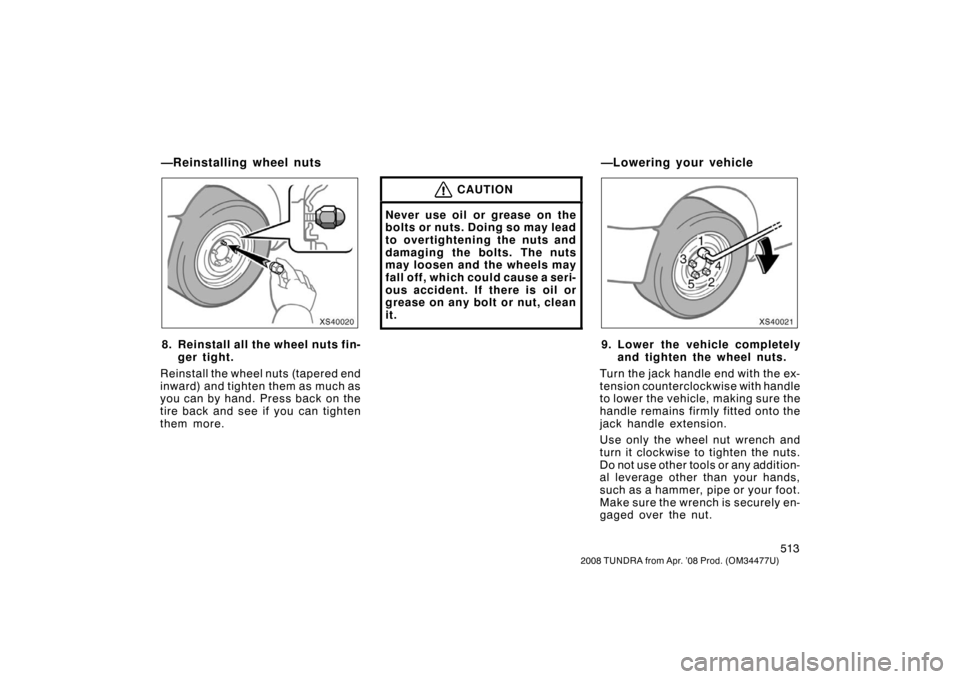
8. Reinstall all the wheel nuts fin-
ger tight.
Reinstall the wheel nuts (tapered end
inward) and tighten them as much as
you can by hand. Press back on the
tire back and see if you can tighten
them more.
CAUTION
Never use oil or grease on the
bolts or nuts. Doing so may lead
to overtightening the nuts and
damaging the bolts. The nuts
may loosen and the wheels may
fall off, which could cause a seri-
ous accident. If there is oil or
grease on any bolt or nut, clean
it.
XS40021
9. Lower the vehicle completely and tighten the wheel nuts.
Turn the jack handle end with the ex-
tension counterclockwise with handle
to lower the vehicle, making sure the
handle remains firmly fitted onto the
jack handle extension.
Use only the wheel nut wrench and
turn it clockwise to tighten the nuts.
Do not use other tools or any addition-
al leverage other than your hands,
such as a hammer, pipe or your foot.
Make sure the wrench is securely en-
gaged over the nut.
—Reinstalling wheel nuts —Lowering your vehicle
Page 563 of 621

553
2008 TUNDRA from Apr. ’08 Prod. (OM 34477U)
XS72005
If hot
O.K.
OpenIf cold
O.K.
If hot
add If cold
add
Close
Check the fluid level through the reser-
voir. If necessary, add automatic trans-
mission fluid DEXRON�II or III.
If the vehicle has been driven around 80
km/h (50 mph) for 20 minutes (a little
more in frigid temperatures), the fluid is
hot (60 �C—80 �C or 140 �F—175 �F). You
may also check the level when the fluid
is cold (about room temperature,
10 �C—30 �C or 50 �F—85 �F) if the engine
has not been run for about five hours. Clean all dirt from the outside of the res-
ervoir tank and look at the fluid level. If
the fluid is cold, the level should be in the
“COLD” range. Similarly, if it is hot, the
fluid level should be in the “HOT” range.
If the level is at the low side of either
range, add automatic transmission fluid
DEXRON
�II or III to bring the level within
the range.
To remove the reservoir cap, turn it coun-
terclockwise and lift up. To reinstall it,
turn it clockwise. After replacing the reser-
voir cap, visually check the steering box
case, vane pump and hose connections
for leaks or damage.
CAUTION
The reservoir tank may be hot so be
careful not to burn yourself.
NOTICE
Avoid overfilling, or the power steer-
ing could be damaged.
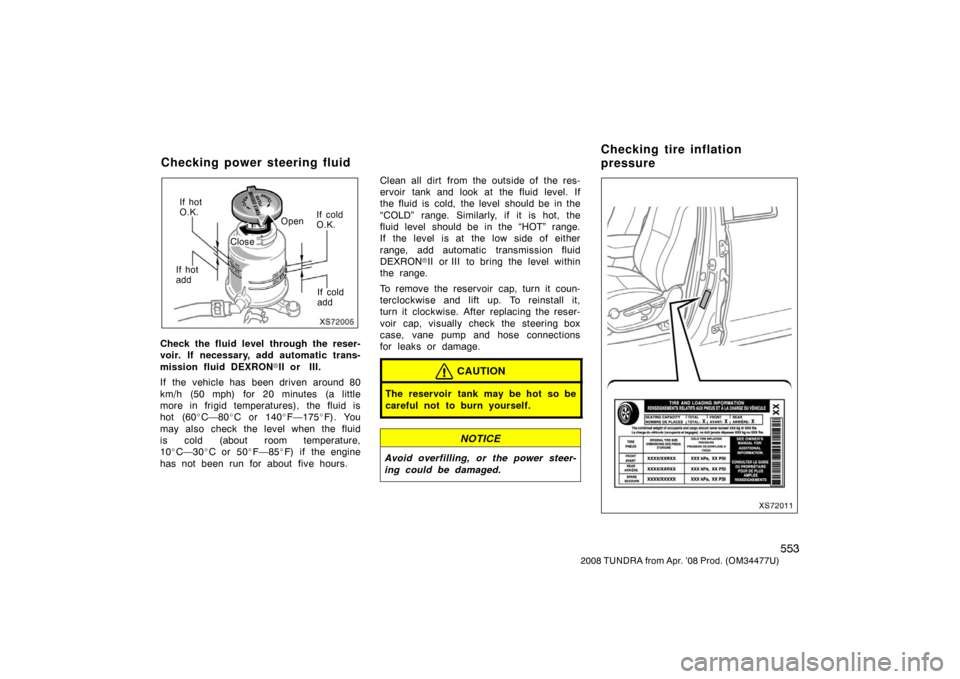
XS72011
Checking power steering fluid Checking tire inflation
pressure
Page 579 of 621
569
2008 TUNDRA from Apr. ’08 Prod. (OM 34477U)
Light bulbsBulb
No.WTy p e
Front personal
lights—5D
Rear personal
lights—5D
Glove box light741.2D
Foot light—1.4D
Door courtesy
light1685D
A: HB3 halogen bulbs
B: H11 halogen bulbs
C: H10 halogen bulbs
D: Wedge base bulbs (clear)
E: Wedge base bulbs (amber)
XS73007
1. Open the hood. Unplug the connector
while depressing the lock release.
If the connector is tight, wiggle it.
If additional space is required to access
the connector, move the battery rearward
by loosening the battery hold −down clamp.
XS73008
2. Turn the bulb base counterclockwise
and remove it.
—H ead lig h t s (h ig h beam)
Page 581 of 621
571
2008 TUNDRA from Apr. ’08 Prod. (OM 34477U)
XS73004
2. Turn the bulb base counterclockwise
and remove it.
XS73005
3. Plug in a new bulb install it into themounting hole.
Aiming is not necessary after replacing
the bulb. When aiming adjustment is nec-
essary, contact your Toyota dealer.
XS73006
4. Install the connector to the bulb.