Page 178 of 259
SECTION 6
AUDIO/VIDEO SYSTEM
179
AUDIO/VIDEO SYSTEM
Audio/video system
�Quick reference 166
�Using your audio/video system 167
Some basics181 . . . . . . . . . . . . . . . . . . . . . . . . . . . . . . . . . . . . . . . .
Radio operation187 . . . . . . . . . . . . . . . . . . . . . . . . . . . . . . . . . . . . .
CD changer operation197 . . . . . . . . . . . . . . . . . . . . . . . . . . . . . . .
DVD player operation209 . . . . . . . . . . . . . . . . . . . . . . . . . . . . . . . .
�Audio remote controls 218
�Audio/video system operating hints 219
Page 180 of 259

AUDIO/VIDEO SYSTEM
181
This section describes some of the basic
features of your audio system. Some in-
formation may not pertain to your system.
Your audio system works when the engine
switch is turned to the ACC or ON position.
NOTICE
To prevent the battery from being dis-
charged, do not leave the audio sys-
tem on longer than necessary when
the engine is not running.
CAUTION
For vehicles sold in U.S.A. and
Canada:
�Part 15 of the FCC Rules
FCC Warning:
Changes or modifications in
construction not expressly approved
by the party responsible for com-
pliance could void the user’s author-
ity to operate the equipment. Radio
frequency exposure. This device is
approved for Mobile Application only
and, to comply with applicable FCC
radio frequency exposure regula-
tions, must be used with a distance of
at least 7.9 in. (20 cm) between the an-
tenna and the body of any person at
all time during use.
�Laser products
�Do not take this unit apart or at-
tempt to make any changes
yourself. This is an intricate unit
that uses a laser pickup to re-
trieve information from the sur-
face of compact discs. The laser
is carefully shielded so that its
rays remain inside the cabinet.
Therefore, never try to disas-
semble the player or alter any of
its parts since you may be ex-
posed to laser rays and danger-
ous voltages.
�This product utilizes a laser.
Use of controls or adjustments
or performance of procedures
other than those specified here-
in may result in hazardous radi-
ation exposure.
Using your audio/video
system —
— Some basics
Page 231 of 259

AUDIO/VIDEO SYSTEM
232
XS00323
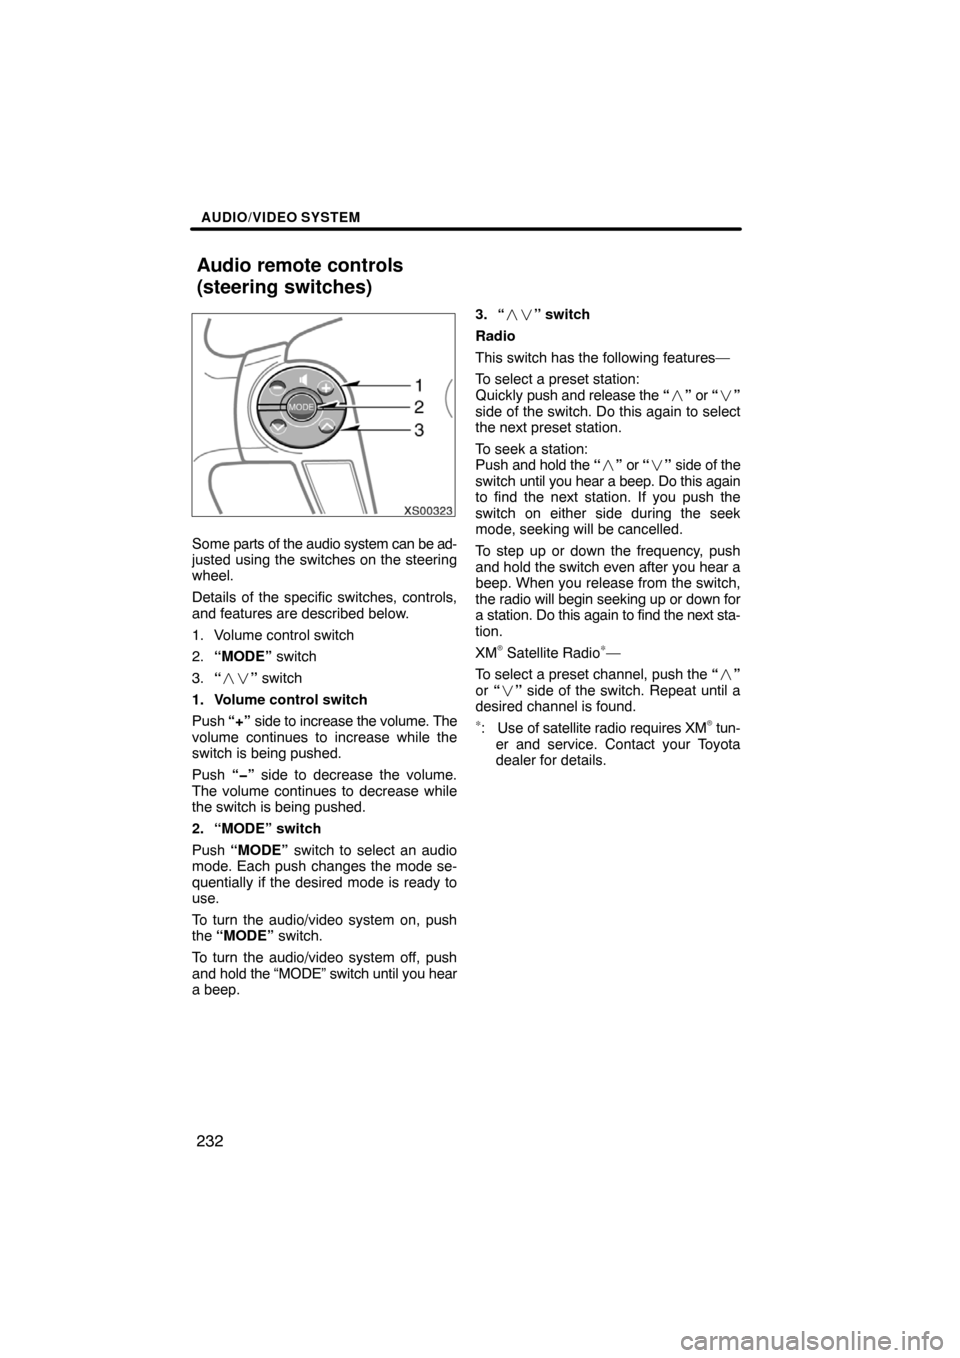
Some parts of the audio system can be ad-
justed using the switches on the steering
wheel.
Details of the specific switches, controls,
and features are described below.
1. Volume control switch
2.“MODE” switch
3.“��” switch
1. Volume control switch
Push “+” side to increase the volume. The
volume continues to increase while the
switch is being pushed.
Push “�” side to decrease the volume.
The volume continues to decrease while
the switch is being pushed.
2. “MODE” switch
Push “MODE” switch to select an audio
mode. Each push changes the mode se-
quentially if the desired mode is ready to
use.
To turn the audio/video system on, push
the “MODE” switch.
To turn the audio/video system off, push
and hold the “MODE” switch until you hear
a beep.3. “��” switch
Radio
This switch has the following features—
To select a preset station:
Quickly push and release the “�” or “�”
side of the switch. Do this again to select
the next preset station.
To seek a station:
Push and hold the “�” or “�” side of the
switch until you hear a beep. Do this again
to find the next station. If you push the
switch on either side during the seek
mode, seeking will be cancelled.
To step up or down the frequency, push
and hold the switch even after you hear a
beep. When you release from the switch,
the radio will begin seeking up or down for
a station. Do this again to find the next sta-
tion.
XM
� Satellite Radio∗—
To select a preset channel, push the “�”
or “�” side of the switch. Repeat until a
desired channel is found.
∗: Use of satellite radio requires XM� tun-
er and service. Contact your Toyota
dealer for details.
Audio remote controls
(steering switches)