Page 432 of 531
437
4−3. Do−it−yourself maintenance
4
Maintenance and care
CAUTION
nReplacing light bulbs
lTurn off the headlights. Do not attempt to replace the bulb immediately
after turning off the headlights.
The bulbs become very hot and may cause burns.
lDo not touch the glass portion of the light bulb with bare hands. Hold the
bulb by the plastic or metal portion.
If the bulb is scratched or dropped it may blow out or crack.
lFully install light bulbs and any parts used to secure them. Failing to do so
may result in heat damage, fire, or water entering the headlight unit. This
may damage the headlights or cause condensation to build up on the lens.
lDo not attempt to repair or disassemble light bulbs, connectors, electric
circuits or component parts.
Doing so may result in death or serious injury due to electric shock.
n
To prevent damage or fire
Make sure bulbs are fully seated and locked.
Page 434 of 531

440
5−1. Essential information
If your vehicle needs to be towed
Before towing
The following may indicate a problem with your transmission. Contact
your Toyota dealer before towing.
lThe engine is running, but the vehicle will not move.
l
The vehicle makes an abnormal sound.
Emergency towing
If a tow truck is not available in an emergency, your vehicle may be
temporarily towed using a cable or chain secured to the following
part. This should only be attempt
ed on hard, surfaced roads for short
distances at low speeds.
A driver must be in the vehicle to steer and operate the brakes. The
vehicle’s wheels, drive train, axles, steering and brakes must be in
good condition.
Towing hook
If towing is necessary, we recommen d having your vehicle towed by
your Toyota dealer or a commerci
al towing service, using a lift�type
truck or a flat bed truck.
Use a safety chain system for all to
wing, and abide by all state/pro�
vincial and local laws.
Use a towing dolly or flat bed truck.
Page 448 of 531

454 5−2. Steps to take in an emergency
nIf the malfunction indicator lamp comes on while driving
The malfunction indicator lamp will come on if the fuel tank becomes com−
pletely empty. If the fuel tank is empty, refuel the vehicle immediately. The
malfunction indicator lamp will go off after several trips.
If the malfunction indicator lamp does not go off, contact your Toyota dealer
as soon as possible.
nFront passenger detection sensor and passenger seat belt reminder
lIf luggage is placed on the front passenger seat, the front passenger
detection sensor may cause the warning light to flash, even if a passen−
ger is not sitting in the seat.
lIf a cushion is placed on the seat, the sensor may not detect a passen−
ger, and the warning light may not operate properly.
nSRS warning light
This warning light system monitors the following:
lThe airbag sensor assembly
lFront airbag sensors
lThe curtain shield airbag sensors
lThe side and curtain shield airbag sensors
lThe seat belt buckle switches
lThe driver ’s seat position sensor
lThe inflators
lThe interconnecting wiring and power sources
lThe front passenger occupant classification ECU
l“AIR BAG ON” and “AIR BAG OFF” indicator lights
lThe seatbelt pretensioners
lThe roll sensing of curtain shield airbags off indicator light
nChanging the engine oil
l
Make sure to reset oil change system
Page 459 of 531
5
When trouble arises
465 5−2. Steps to take in an emergency
Taking out the tool box
Remove the cover.
Take out the tool box.
Assemble the jack handle (in the tool box)
Assemble the jack handle exten−
sion as shown. Be sure to tighten
each bolt securely.
STEP1
STEP 2
Page 464 of 531
470 5−2. Steps to take in an emergency
Assemble the jack handle exten−
sion as shown. Be sure to tighten
each bolt securely.
Raise the vehicle until the tire is
slightly raised off the ground.
Remove all the wheel nuts and
the tire.
When resting the tire on the
ground, place the tire so that the
wheel design faces up to avoid
scratching the wheel surface.
STEP5
STEP6
STEP 7
Page 466 of 531
472 5−2. Steps to take in an emergency
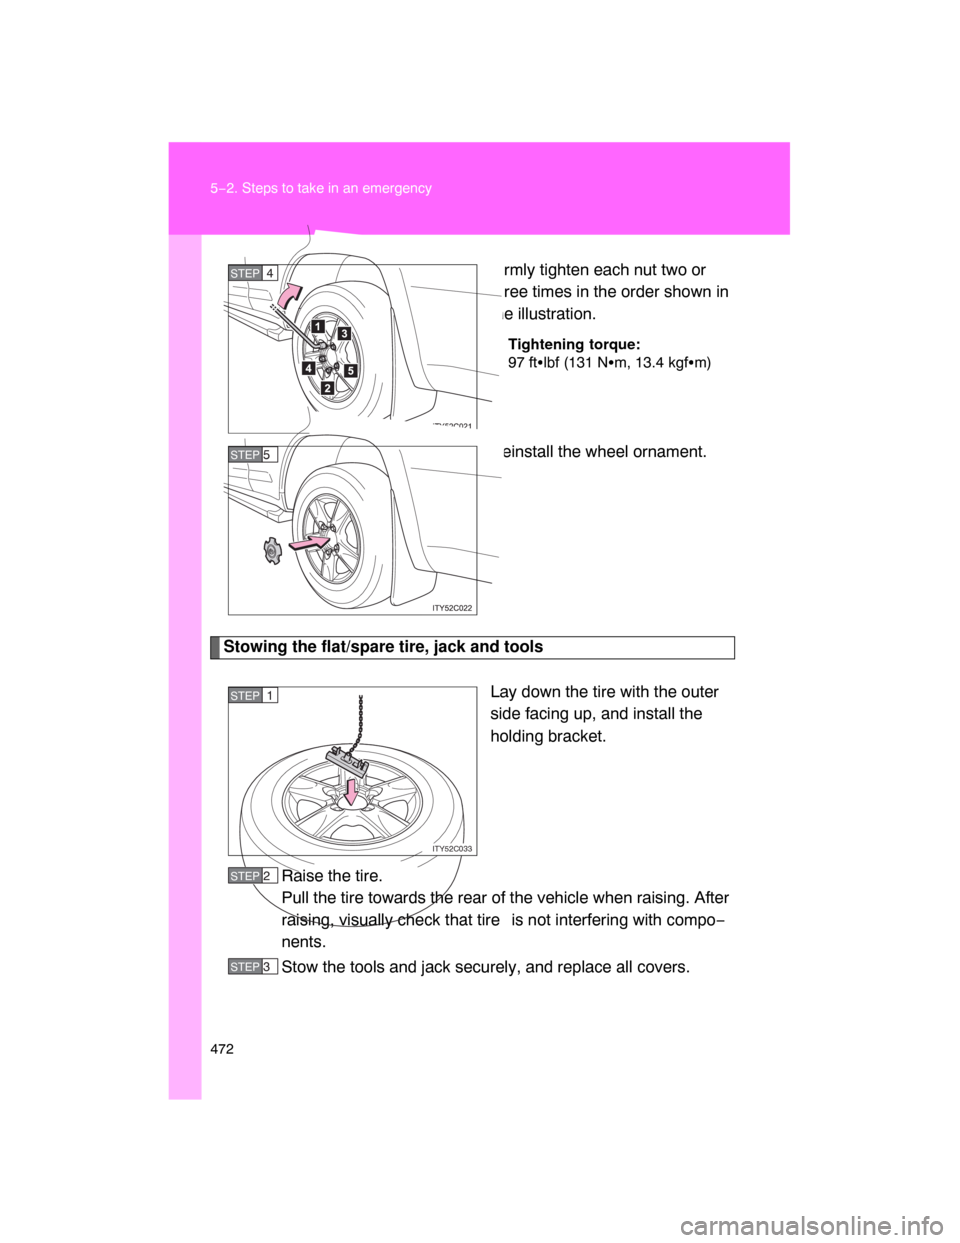
Firmly tighten each nut two or
three times in the order shown in
the illustration.
Tightening torque:
97 ft�lbf (131 N�m, 13.4 kgf�m)
Reinstall the wheel ornament.
Stowing the flat/spare tire, jack and tools
Lay down the tire with the outer
side facing up, and install the
holding bracket.
Raise the tire.
Pull the tire towards the rear of the vehicle when raising. After
raising, visually check that tire
is not interfering with compo−
nents.
Stow the tools and jack securely, and replace all covers.
STEP4
STEP 5
ITY52C033
STEP1
STEP 2
STEP 3
Page 467 of 531

CAUTION
n Using the tire jack
Improper use o")
5
When trouble arises
473 5−2. Steps to take in an emergency
n After completing the tire change
The tire pressure warning system must be reset. (
P. 393)
CAUTION
n Using the tire jack
Improper use of the tire jack may lead to death or injuries due to the
vehicle suddenly falling off the jack.
l Do not use the tire jack for any pu
rpose other than replacing tires or
installing and removing tire chains.
l Only use the tire jack that comes wi
th this vehicle for replacing a flat
tire.
Do not use it on other vehicles, and do not use other tire jacks for
replacing tires on this vehicle.
l Always check that the tire jack is securely set to the jack point.
l Do not raise the vehicle while someone is in it.
l When raising the vehicle, do not put an object on or under the jack.
l Do not raise the vehicle to a hei
ght greater than that required to
replace the tire.
l Use a jack stand if it is necessary to get under the vehicle.
l Do not put any part of your body under the vehicle supported by a jack.
l Do not start or run the engine while your vehicle is supported by the
jack.
Take particular care when lowering the vehicle to ensure that no one
working on or near the vehicle may be injured.
n Using the jack handle
Tighten all the jack handle bolts securely using a Phillips−head screw−
driver, to prevent the extension parts from coming apart unexpectedly.
Page 510 of 531

517
6−1. Specifications
6
Vehicle specifications
*:Table 1 Occupant loading and distri bution for vehicle normal load
for various designated seating capacities
Tire related term Meaning
Snow tireA tire that attains a traction index equal to or
greater than 110, compared to the ASTM E−
1136 Standard Reference Test Tire, when
using the snow traction test as described in
ASTM F−1805−00, Standard Test Method for
Single Wheel Driving Traction in a Straight Line
on Snow−and Ice−Covered Surfaces, and which
is marked with an Alpine Symbol ( ) on at
least one sidewall
Te s t r i mThe rim on which a tire is fitted for testing, and
may be any rim listed as appropriate for use
with that tire
Tr ea dThat portion of a tire that comes into contact
with the road
Tread ribA tread section running circumferentially
around a tire
Tread separation Pulling away of the tread from the tire carcass
Treadwear indicators
(TWI)The projections within the principal grooves
designed to give a visual indication of the
degrees of wear of the tread
Wheel−holding fixtureThe fixture used to hold the wheel and tire
assembly securely
during testing


Assemble the jack handle exte")